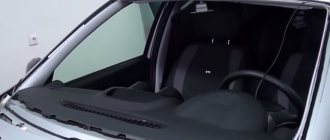
The procedure for removing and installing the headlight unit on Kalina:
- If on previous domestically produced models it was possible to perform this procedure quite quickly, then on Kalina you will first need to remove the front bumper. I wrote about this in a previous article, so read this first: Removing and installing the front bumper.
- After this, you will need a 13mm socket and a wrench to unscrew the bumper power beam from the side where it is needed.
- The next step is to unscrew the lower headlight mounting bolts. To get to them, you need to bend the beam a little to the side and unscrew two bolts using a ratchet with a 8-mm head.
- Now you can proceed to the upper bolts, there are also two of them: one for an 8-point wrench, and the second for a Phillips-head screwdriver:
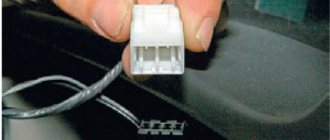
- And after that, you can disconnect the power plugs from Kalina’s front headlight: one of which is responsible for lighting, and the second for adjusting the height of the light beam. The electrical adjustment plug is secured with a latch, which must first be bent.
- We take the body with both hands and remove it from the seat.
- If it needs gluing, then it is necessary to apply silicone sealant around the entire perimeter of the junction of the glass and the body, wait at least an hour until it dries and install it back.
- If you replace the headlight with a new one, we immediately assemble everything in the reverse order, installing all the power wires in their places.
Removing, installing and replacing the headlight Link to main publication
This is interesting: Where to fill the engine oil
Lada Kalina: lamps and their replacement
Let's start with the fact that in addition to the low beam, other bulbs Kalina 1, Kalina 2, etc. may need replacement. To complete the picture, below we will consider replacing the low and high beams, as well as turn signals, headlight glass, the entire headlight itself, etc. So, the first thing you should do is disconnect the negative terminal from the battery. Only after this can you begin to carry out certain work.
- First, let's move on to replacing the turn signal bulbs. First of all, you should turn the turn signal socket 45 degrees counterclockwise. After this, it can be removed from the headlight housing.
Next, you need to press the lamp, turn it until it stops, turning it counterclockwise. Now the lamp can be removed from the socket. To replace the lamps in the direction indicators, orange PY21W lamps with a power of 21 W are used. Installation of a new lamp and assembly is carried out in the reverse order.
- If the low beam lamp on a Lada Kalina needs to be replaced, then replacing the low beam lamps begins with removing the protective rubber cover from the headlight housing. To remove the cover, just pull the characteristic petals that are made on it.
Now you should disconnect the wire tips from the lamp contacts, remove the spring clamp from engagement with the hooks (2 hooks), and then remove the clamp from the lamp.
Next, you can remove the lamp from the headlight housing. As for the Kalina model, the low beam lamp on this model is H7 (the standard low beam Kalina halogen lamp, power 55 W).
This must be taken into account, since other light bulbs simply will not fit Kalina. For this reason, lamps (for example, low beam lamp Kalina 2) must be selected taking into account this feature. Reassembly involves installing all parts in the reverse order of disassembly.
- To change the high beam lamps on Kalina, such light requires H1 bulbs with a power of 55 W. Replacing high beam lamps begins by disconnecting the wire block from the lamp, then compress the ends of the spring clip.
Now you can disengage them from the hooks, after which the latch is removed from the lamp. Next, you can remove the lamp from the headlight, install a new H1 lamp and begin reassembly.
Let us also add that to replace the side light bulbs, you should remove the following rubber cover, then remove the socket with the lamp, remove the lamp from the socket and install a new side light bulb. The dimensions on Kalina are W5W lamps, power 5 W.
Please note that when replacing lamps on any car (for example, Lada Kalina, low beam, H7 lamp), you should not touch the lamp bulb itself with your finger! The reason is that when heated, the lamp will darken. If you accidentally touch it, you need to carefully remove grease and dirt from the flask using a napkin or rag that is slightly moistened with alcohol.
The procedure for dismantling the lights
You should know that the Lada Kalina 1118 flashlight system consists of:
- housings;
- glass (polycarbonate);
- lamps;
- reflector;
- wiring;
- lamp plugs;
- decorative inserts (masks).
As for the ease of removal and subsequent replacement of the lamp on the 1118 model, the process usually involves removing the front bumper. After this, the screws on the top and bottom of the lighting fasteners become accessible. After dismantling them, you can immediately remove the headlight unit, not forgetting to first remove the blocks with wires.
Removing the front optics
However, not all car enthusiasts have a lot of time to replace the lighting system or experience in removing the bumper. For this reason, a more popular method is to change the Kalina headlight without removing the bumper.
To do this you will need to use:
- key for 8 and 10;
- a set of screwdrivers (flat and Phillips);
- new lighting system component.
Set of tools
In order to adjust the block lighting on the Lada. You will need to complete the following steps:
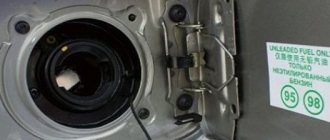
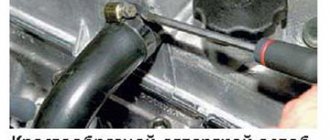
- Remove the air filter housing, as well as the coolant unit.
- Remove the PTF plug using a screwdriver.
- Unscrew the bolt on the lower fastener of the lighting component using a 10mm wrench. Insert your hand into the PTF hole.
- Remove the bolts located on the upper fastener of the light block component. They are located closer to the radiator. Use the key at 8.
- Unscrew the screw securing the product to the car fender using a large Phillips screwdriver.
- Expand the Lada Kalina headlamp so as to move the part closest to the radiator closer to the car engine. This measure will allow you to remove the lower fasteners from the seat.
- Remove the lower iron fasteners of the headlight. To do this, you will need to remove a couple of bolts with a short head.
Removing the headlight on Kalina
- Remove the car light by moving towards you. At the same time, try not to damage the paint layer, since during dismantling the lamp will be located as close as possible to the bumper and fender.
After this, you can install a similar device in reverse order.
Removing the headlight without removing the bumper
A more attractive way for car enthusiasts is to remove the headlights without removing the bumper. Not everyone wants to unscrew a large number of screws to get to the lighting fixture. But this cannot be said that this option is simpler; you will have to work in a limited space. The following instructions will help you quickly change the headlight:
- In order not to dismantle the Lada Kalina bumper, you will have to get to the headlights from the engine compartment. Just in case, disconnect the negative terminal from the battery. Then remove the expansion tank with coolant from its place and dismantle the air filter housing.
- To remove the fog lamp plug, you will need a screwdriver.
- Find the lighting element fastener and unscrew it. Place your hand into the hole that opened after removing the plug.
- Using a size 8 wrench, remove the bolts on the top of the headlight assembly. They are located near the radiator.
- There is a screw on the car fender that can be unscrewed with a Phillips screwdriver. Remove it to remove the headlight.
- Unfold the headlamp, trying to move the part adjacent to the radiator towards the engine. Remove the lower fasteners from the seats.
- Using a short socket, unscrew the lower bolts and remove them. Now all you have to do is pull out the flashlight with a slight movement towards yourself. Try to act carefully so as not to damage the paintwork of the wing and bumper.
Disassembling lanterns
To disassemble headlights of any brand on a Lada, you will need:
- hair dryer (household or industrial);
- flat screwdriver;
- stationery knife.
To separate glass or polycarbonate, you will need to remove the material's fastening brackets. After this, heat the sealant that holds the glass or polycarbonate in place with a hairdryer. Next, the softened sealant can be cut off. This makes it possible to remove the glass with a flat screwdriver.
Education: secondary specialized. Specialty: car mechanic. Professional diagnostics, repair, maintenance of passenger cars of foreign production 2000-2015. Extensive experience working with Japanese and German cars.
Traditional headlight removal
Access to all upper and lower screws will only be possible if the front bumper is missing. After removing the screws, you can begin to remove the headlight unit, but first you should get rid of the pads and wires. First of all, let's look at the technology for removing the bumper.
You can learn how to adjust headlights yourself by reading the detailed material from our specialist.
We also recommend reading our expert’s article, which details how to replace the side light bulb.
Another common question is how to replace a low beam light bulb. Our expert will help you understand this problem.
Replacing headlights LADA Kalina
Required tool : Phillips screwdriver, wrench or 8-mm socket.
To remove Kalina's headlight, press the latches and disconnect the wire blocks from:
|
Remove the front bumper (see “Removing the front bumper”).
- We unscrew the screw of the upper fastening of the headlight unit with a Phillips screwdriver. Unscrew the 3 bolts securing the headlight unit (shown by arrows) and remove it.
- The headlamp housing is marked “RE” on the right, and “LE” on the left.
- If you need to replace the headlight glass, use a screwdriver to pry up and remove the six spring brackets that press the lens to the headlight seal.
- Remove the headlight glass and seal.
Installing the headlight is done in reverse order.
Dismantling and repair of optics
One of the most common malfunctions in the operation of optics, if you do not take into account the failure of lighting sources, is damage to the headlight glass. If the lamp itself is damaged, it will have to be removed and disassembled to change the glass.
How to disassemble the headlight and how to replace the brake light bulb:
- First you need to open the trunk and move the brake light source to the left.
- The Kalina brake light lamp must be pressed and turned to the left, so that the device can be removed from the installation location. The installation procedure is performed in reverse order.
- If you need to replace the glass, you will have to remove the bumper to do this. To do this, you need to unscrew the corresponding fasteners.
- After dismantling the bumper, it is necessary to disconnect all the wiring connectors that are connected to the optics.
- After completing these steps, you can unscrew the lower fasteners of the flashlight; to do this, use a wrench. After this, similar actions are performed with the upper bolts securing the optics. When all the screws are removed, the optics themselves can be removed.
- The next stage will be the glass repair itself. You need to pull the headlight towards you and carefully remove the rubberized seal. It is usually attached to the lantern quite tightly, so most likely you will have to use a utility knife to cut the elastic.
- After the headlight housing and glass are separated from each other, all remaining adhesive and sealant should be removed from the perimeter of the housing. To do this, you will also need to use a utility knife, and if the residues are small, then use sandpaper. Make sure that the surface on the housing is clean and free of sealants and dirt.
- Before installing new glass, the housing around the perimeter of the installation will need to be treated with a solvent. This will allow the surface to be degreased, so that the fit of the new glass will be maximum.
- Next, apply glue to the new seal and connect the glass itself to the body. The tightness of the structure must be optimal, otherwise the problem of fogging of the optical glasses from the inside may arise. Press the headlight on both sides so that the lens is connected to the housing as firmly as possible.
- At this stage, the repair can be considered complete; assembly is carried out in the reverse order. When installing the lights, they will need to be readjusted.
Photo gallery “Replacing glass with your own hands”
How do you remove headlights?
The lighting system in Kalina includes:
- glass or polycarbonate;
- frame;
- lamp plugs;
- the lamps themselves;
- reflectors;
- wiring;
- decorative inserts.
To replace and adjust the headlights, most often you have to remove the front bumper. Only after this all the screws from below, as well as from above, will become more accessible. Once they are dismantled, you can remove the headlight itself, having first removed all the wires and pads.
But not every car owner has enough experience to dismantle the entire bumper. In addition, a common problem is the lack of time to change the entire lighting system. That is why replacing lighting without complete dismantling is considered more popular.
To disassemble the headlight with your own hands, you need to prepare the following tools:
- one key for 8 and one for 10;
- Phillips and flathead screwdrivers;
- new lighting system component.
To modernize the lighting on Kalina, you need to take the following actions:
- Remove the air filter housing and the special coolant unit.
- Remove the PTF plug using a screwdriver.
- Using a 10mm wrench, unscrew the bolt located underneath the headlight.
- Remove the bolts located on top of the light blocks. They are located near the radiator. In this case, you need to use the key 8.
- Remove the screw that secures the light to the car's fender using a large Phillips screwdriver.
- Rotate the light block so as to move the part near the radiator a little closer to the car engine. This will allow you to remove the fasteners located below from their seats.
- Remove the lower iron fasteners. To do this, you need to unscrew several bolts with a short head.
- Remove the headlight by pulling it towards you. Try not to damage the varnish layer, because the lamp is located next to the wing and bumper.
Knowing how to disassemble a headlight, installing another device with your own hands will not be difficult. Install a new headlight by performing the steps in reverse order. Now all that remains is to figure out how to adjust the headlights so that the light from them is directed correctly and illuminates not only the road, but also shines on the sides of the car.
This is interesting: What kind of oil to pour into Renault Logan 1 6 16v
How to disassemble a headlight: preparing tools
It is worth noting that the process of disassembling a car lamp requires certain skills. To perform all the required manipulations, you must first prepare the following equipment:
- a set of matching screwdrivers;
- a fairly powerful household hair dryer (with its help the sealing compound is heated);
- socket and open-end wrenches;
- mounting knife (this tool is used to remove sealant from the headlight housing);
- sealing compound.
It is also important to properly prepare the conditions in which the headlight will be disassembled. The workplace must be thoroughly cleaned of possible dirt and other undesirable elements. Along with this, it is necessary to provide high-quality lighting for the work site.
The process of disassembling the front and rear lights has some differences.
Video on how to disassemble a headlight
Lighting system design
Optics for Kalina are manufactured at two factories:
- Bosch;
- JSC "Avtosvet"
Both types of optics have excellent characteristics and provide high-quality illumination of the road. You can recognize Bosch products by the missing cap on the lamp in the near module, as well as by the AL code on the glass.
The headlight design of the Lada Kalina is no different from most cars. The flashlight has low and high beam modules, blocks with turn signals and side lights. In the new Kalina body, the dimensions also play the role of running lights.
The following lamps are used in Kalina optics:
- low – H7, 55W;
- long range – H1, 55W;
- direction indicators – PY21W, 21W;
- Dimensions – W5W, 5W.
Light elements from the dimensions fit into the license plate lighting module on the trunk lid. Since 2013, modernized optics have been installed in Kalina, where part W21/5W is responsible for the clearance and daytime light. The fog lamps are equipped with H11 lamps with a power of 55W.
Parsing headlight Kalina 1
How it all started: I decided one month ago, namely on June 26, to reseal the housings and, at the same time, paint the headlight masks - the reason for which was the constantly fogging up left glass.
Well, actually, I quickly took everything off, I thought I’d take it apart right away, paint it and assemble it the next day. (Yeah, yeah)
Turning the headlight in my hands, I saw the screws on the body, unscrewing which, I thought that the glass would come off (naive little guy), the screws turned out to be difficult, but torx, so I bought a screwdriver with a set of bits to disassemble the headlight.
After 3 screws on each headlight were removed, to my regret, the glass did not want to give up, after reading the Kalino forums, I made sure that, in my case, the headlight was not removable (Kirzhach with polycarbonate glass). After listening to a lot of advice about how the headlight should be “ bake" in the oven - it was sent there for 10 minutes at 180 degrees.
From that moment on, the most interesting thing began... I regretted 10 times that I took on this idea.
After the headlight had warmed up, I pulled it out and, I thought, well, that’s it, now I’ll work with a screwdriver for 5 minutes and the glass will separate... Here I was very wrong. Having started this work at 10 pm, I disassembled the headlight only at 4 am... I heated it in the oven once 10, as a result, the entire rim is deformed, because the sealant did not soften, only the plastic (I pricked the glass with great effort until the plastic hardened and went back into the oven), but even worse, the headlight mount melted... well, what can you do.
On this note, I went to bed at dawn and the next weekend I was disassembling the second headlight, I decided to just pry it off with a screwdriver first, without resorting to the oven. To my great surprise, the sealant was not pressed against the headlight body at all, naturally the glass snapped off instantly - it was the left headlight, which I disassembled in 5 minutes, unlike the first one (I spent 6 hours fiddling with it).
What conclusions did I draw at this stage?
: 1.
Never, ever undertake to disassemble a Kirzhach headlight on a viburnum (it’s easier to throw it away and buy new ones) , but since you are as desperate as I am, then God help you. 2. The reason for the fogging of the left headlight is a defect from the factory (the sealant was not pressed in)
, and the car was like that for four years with a whiny little eye... 3.
Heating the headlight in the oven is a very bad idea - the sealant on this headlight, like rubber, does not respond to temperature at all
(it is necessary solder or saw the outer edge to separate the glass, and then build it up again)
The next stage was painting the headlight masks, well, there’s nothing to tell here, just appreciate the abundance for creativity (by the way, there is material here not only for the headlights - keep an eye on the bulletin board) I painted it with heat-resistant KUDO in two layers, without primer, having previously removed the chrome using Pemolux and brushes and degreasing the surface.
Then I bought a hot air gun, I thought I would assemble the headlights (I first straightened the edges on the deformed headlight with it), because it was no longer possible to ride such a tramp for more than a week
BUT, remembering how hard it took me to disassemble the headlights
,HERE I WENT PSYCHANIC!
This idea actually delayed the assembly time for another 3 weeks.
I just didn’t expect that the viburnum headlight was so tight... This lens is universal (it is screwed with a nut through the adapter into the reflector) and fits even into the 2113 headlight without any modifications.
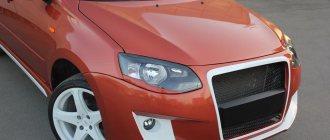
The headlight is a source of directional lighting on the Lada 1118. It is installed in front of the car, illuminating the road surface and the surrounding area. Due to the huge range of lighting systems to choose from, the elements of which can be installed on the Kalina, lights are often the subject of replacement or modification. To replace the Kalina headlight unit, it is worth first considering its structure. On this model, the car manufacturer installs 2 headlights equipped with 3 sections:
- low beam;
- side and main beam;
- turn signals.
Block headlight of Lada Kalina
When you turn on the low beam, only the low beam lights come on, and when you turn on the high beam on the 1118 model, the low and high beam complex with a power of 55 W each starts to burn. The sections of the front indicators have transparent light diffusers. The 21 W turning lights have an orange glow.
To be able to adjust the headlights on the Lada 1118, the package includes a headlight leveler with an electromechanical drive. The adjustment system has a device that is installed on the dashboard, as well as a connection wire and electric drives pre-installed in the lights.
The plant where Kalina is produced provides for installed lights from two manufacturers:
Kalina front optics
To determine which company is the manufacturer of the lamps on the 1118 model, you just need to carefully inspect the glass. If there are AL symbols on the glass, then the lighting complex was manufactured by Bosch. If the material for the flashlights is polycarbonate, which does not have a low beam lamp cap, then this model is also made by Bosch. However, if a polycarbonate flashlight has a low beam lamp cover, then it is made.
Among the main reasons why it is necessary to remove or replace the lighting system are:
- replacing old components with new ones;
- the need for tuning or adjustment of the device.
Which optics is better to choose
While using the machine, the lights are subject to sudden temperature changes, impacts from stones and small grains of sand. These factors negatively affect glass, reducing its transparency, worsening light characteristics.
High-quality headlights that meet safety requirements are installed from the factory. Unofficial replacements are equipped with xenon lenses, “angel eyes” and modified reflector geometry. These lights look beautiful, but wear out faster due to poor quality materials and can fog up in humid weather.
When choosing new optics, it is better to trust the official ones. When purchasing, it is important to clarify the modification of the body and the year of manufacture of Kalina. Depending on the configuration, there are darkened masks or improved lighting characteristics.
Low and high beam optics
Depending on the body type, Kalina has different parts installed:
- sedan, hatchback – standard optics;
- sport, station wagon - are equipped with a more elongated reflector with an increased area to increase the lighting area by 20%.
To connect improved optics to Kalina, you do not need to lay additional wires or change contact connectors. The optics are no different in mounting points and shape.
When purchasing flashlights, you should pay attention to original parts with improved performance. This will improve the characteristics of the beam without interfering with the wiring or altering the standard fasteners.
Fog lights
When buying new PTFs, it is better to choose from original parts. Standard lights are equipped with durable glass and a high-quality reflector that directs the beam in accordance with GOST.
Fog lights for Kalina are produced by:
- Bosch;
- "Kirzhach".
The models differ in the shape of the glass, but there is no difference in quality. The headlights are connected to the standard wiring and installed in the mounts on the bumper. There are no fog lights in the basic trim levels. To connect them, you will have to additionally purchase a button for the interior, a PTF relay, and remove the bumper plugs.
In stores you can find modernized flashlights with lenses for gas-discharge lamps or LED modules. Such products are not certified for use in Kalina because they do not meet transport safety requirements. For such parts you can receive a fine and an order to eliminate the malfunction within 10 working days.
How to remove a headlight on a Lada Kalina in the traditional way
The traditional method is to remove the headlight along with the bumper. If you remove this part of the body, you will have access to all the screws, lower and upper. The dismantling instructions are as follows:
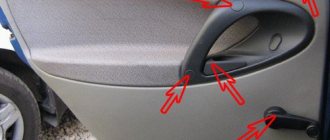
- Work begins with removing the bumper. Using a Phillips screwdriver, unscrew the screws securing the fender liners. There are 4 of them in total.
- Remove one more screw on the left and right.
- Remove the screws securing the bumper. They are located below.
- Remove the radiator grille. A few more screws will open in front of you, securing the bumper.
- Remove the license plate and dismantle the plastic grille to which it was attached. To do this, you will have to unscrew two bolts and pull it out with force. This sheathing is secured with clamps.
- In the area under the license plate, remove two more screws.
- Grasp the edges of the bumper and rip it off the latches with a sharp and strong movement. The weight of the bumper is small, so there is no need to involve an assistant - you can handle it yourself, it is only important to pull it smoothly, without distortions.
- Once the bumper is removed, you will be able to access the screws that secure the headlights. To do this, remove the lower bumper beam.
- Remove the screws from the bottom that secure the light block. If you do not find them right away, you need to bend the beam. To remove the feints you will need a ratchet with a size 8 head.
- The headlight block is also secured with two bolts on top. One is removed with a screwdriver, and the second is unscrewed with a ratchet.
- Now you need to disconnect the power plugs by first bending the latch.
- You can remove the headlight without damaging it with only two hands.
If you did disassembly to adjust the headlight, then you do not need to disconnect the power plugs. They help change the intensity of the light beams and their height.
After disassembling up to this stage, you can immediately begin adjusting. Once the setup is complete, you need to secure the headlight with screws and reassemble it.
Features of headlights
As standard, Lada Kalina headlights are combined into blocks, which are divided into three sections, providing:
- low beam;
- side and main beam;
- turn indicator.
When turning on the low beam, only low beam bulbs are used. If you turn on the high beam lighting, a complex consisting of high beam and low beam lighting at the same time lights up, each with a power of 55 W. At the front of each section of indicators there are specialized transparent lenses.
The turn signals glow orange and have a power of about 20 watts.
The headlights are adjusted using a specialized corrector. The electric headlight corrector has an electromechanical drive. The standard adjustment system contains a device mounted directly on the dashboard itself and a specialized wire that connects the electrical wires in the headlights. To adjust the electric headlight corrector, you will have to disassemble them.
Replacement or removal of the lighting system occurs for various reasons. Among the most common are:
- headlight tuning;
- installation of a new kit instead of the old one;
- need to adjust the electric headlight leveler.
Before removing a headlight when it needs to be replaced, it is advisable to identify the company that manufactured the part. To do this, you need to carefully examine the glass. If the AL symbols are present on it, this lighting complex was manufactured by Bosch.
Some headlight models from this manufacturer are made of polycarbonate and do not have a low beam lamp cap. If the lamp used for low beam in a polycarbonate headlight is equipped with a cap, it is most likely made.
Replacing, adjusting and tuning headlights on Kalina: modernizing our Lastochka
Regardless of the vehicle, the vehicle should only be operated with the optics working. If for some reason the headlights do not shine or do not work correctly, the car owner must have them repaired before driving on the road. From this material you can learn how to remove the headlight on Kalina and replace its glass, as well as lighting sources.
How do Kalina lighting devices work?
Regardless of the type, the headlights on Kalina have the same design. Each lamp has three sections for lamps with different light levels:
- further;
- near;
- dimensional (also rotating).
To activate the low beam, you need your own lamps, and when switching to high beam, both units work at once with a power of 55 W. To make the light wave stronger, manufacturers use special diffusers, transparent in the center in each section. The block of side lights and direction indicators differs in color (orange) and power - the bulbs produce only 20 W.
In order to adjust the light, it is necessary to use a corrector on an electromechanical drive. To use it, you will have to completely disassemble the headlight. The corrector is a device on the instrument panel associated with an electromechanical drive. Due to this, the wires of the light source are connected.
Low beam bulbs Kalina: how to replace it yourself
Let's start with the fact that if the car is actively used, especially in the dark, the main load falls on the side lights and low beam lamps. In other words, Kalina’s low beam is precisely the light that is used almost constantly, especially if the car does not have PTF or DRL.
Of course, Kalina low beam lamps quickly burn out in such conditions, exhausting their service life. It turns out that they may have to be changed too often. It also happens that you need to go, and the light bulb suddenly burns out.
In this case, in order to avoid fines and deterioration in the quality of road lighting, the only way out of the situation is to change the Kalina low beam lamp independently. In this case, replacement is often carried out in the field.
One way or another, there is nothing complicated about it. The main thing is that you need a correctly selected lamp. The Kalina low beam is installed in a separate section of the headlamp. The Lada Kalina headlight itself has 3 sections: low beam, high beam and turn signal. In this case, you can replace Kalina lamps without removing the headlight itself, which simplifies the task. Let's look at replacing lamps in more detail.
Lada Kalina Sedan “Gourmand” › Logbook › Replacing headlight glass
Another, seemingly small, nuisance, which gently hinted at labor-intensive and absolutely unnecessary work... Somewhere outside the city I caught a stone that pierced the glass in the headlight, with a corresponding halo around the small hole...
Well, I didn’t really want to drive with such glass, it’s not aesthetically pleasing. I calmed myself down with the only moment that I would finally take out the LED bulb that had fallen into the headlight from the previous owner. Some difficulties arose with finding the glass itself (I’ll note right away that I have BOSCH headlights, or in our language, “Automotive Lightning” with glass), somewhere the price for it was 850 rubles, and in most cases it was not available. As a result, I found it in one store for 470 rubles, although it was made by Kirzhach, but it was also glass and, in the end, it fit perfectly. Okay, I bought it, waited for the weekend and went to change it.
So, in order to remove the headlight from this wonderful car, we need to: 1. Unscrew a couple of bolts from the crankcase protection and lower it 2. Remove the license plate (to make it easier to remove the lower radiator trim (grille)) 3. Remove upper and lower radiator trims (grilles) 4. Remove the front bumper, while unscrewing a number of bolts, screws, etc. 5. Remove the bumper amplifier (it interferes with the ability to properly remove and replace the headlight)
Here, just 5 “simple and absolutely fast” steps, and the headlight is in your hands... There are few photos, because... it was a little bit before that