Print this article Font size 16
Repairing a gearbox on a VAZ 2110 with your own hands is not as difficult as it might seem at first glance. You will have to arm yourself with a set of tools, the necessary new parts to replace old ones, several photos and videos for clarity, as well as an operation and repair manual. Plus, we recommend that you familiarize yourself with our material, which will make complex manipulations much easier.
To begin with, it would be a good idea to study a video about repairing a gearbox on a VAZ 2110 with your own hands. This is for clarity, let's say so.
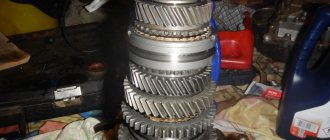
Box device
To understand the repair, you first need to understand the principle of the gearbox, which is installed on the domestic VAZ 2110 car.
Gearbox device
The principle of the device is as follows:
- To change gears, the input shaft works in the box. It consists of a block of gears that are constantly meshed with the drive gears from 1 to 5 gears (driving the car forward).
- The second shaft is equipped with a drive gear for the main transmission, on which synchronizers are also located. They are responsible for moving the driven gears forward. The oil sump and bearing are located in the same place.
- The driven gear of the main gear is attached to the two-satellite differential “tens” through the box flange.
- The drive includes a shift knob, ball joints, a selector rod, rods, a gear selection mechanism and a direct gear shift mechanism.
- The task of jet thrust is to prevent speed loss. Its ends are fixed to the support and the engine.
Features of power plants
The VAZ 2112 (Lada) car can be equipped with 16 valve power units, which have a volume of 1.5 liters, and the power reaches 93 horsepower. The power supply system of this car is injection. It is recommended to use AI-95 gasoline. In the urban cycle, it consumes about 10 liters per 100 km. The VAZ gearbox in this case is mechanical.
Cars with a 1.6-liter engine, which is equipped with a manual transmission (5 speed) and produces 89 horsepower, have become widespread. VAZ is less demanding on fuel quality, so AI-92 can be filled here.
Manual transmission diagram Gear shift diagram
Gearbox adjustment
It is not always necessary to remove it to get the box working properly. Although, if replacement of gearbox bearings or other repair measures is planned, simple adjustment is not enough.
The “ten” is characterized by situations in which the gears are poorly switched, they are simply knocked out. To correct such situations, the design includes a mechanism for adjusting the gear selection drive.
Adjustment is required in several situations:
- Recently, the input shaft bearings were replaced on a VAZ 2110 or another type of repair with the mandatory removal of the gearbox;
- There is a constant overshoot of one of the speeds;
- The gears are switched slowly, poorly, or are knocked out directly while driving.
If you are faced with one of these situations, then adjustment will not be avoided. Although this is better than dismantling and completely repairing the gearbox. The operation is performed as follows:
- At the bottom of the car, find the nut and bolt that tighten the gearbox linkage clamp. You don't need to remove it completely, just loosen it a little.
- The grooves of the rod are moved apart a little using a regular screwdriver, and also widen the gap in the clamp. This will make it easier for the rod to move to the speed selection rod. The rod must be set to neutral.
- Remove the cover from the gearshift knob.
- According to the template, position the lever - a template is installed in the window of the bracket lining to lock the reverse gear. Next, the lever axis stop is inserted into the existing template groove. It must be pressed in the transverse direction, but do not apply much force.
- Now the axial play of the rod is adjusted in the rear direction, plus the axial play is adjusted by turning to the left.
- The clamp is put in place, leaving a space of a few millimeters to the end of the rod. Now the clamp is properly tightened with the bolt.
Dismantling the VAZ 2110 gearbox housing
Having started repairing the VAZ 2110 gearbox, after all the steps described above, it is necessary to disassemble the crankcase and the operating mechanism. Let's get started:
- We unscrew the spring plugs that hold the gear rods. Once the plugs are unscrewed, the end balls will fall out of the holes. We do the same with the plug that holds the reverse gear. If the balls have not fallen out of the holes, you can get them out using a magnetic screwdriver.
- Next, we unscrew the bolts that secure the gearbox housing to the clutch housing. After the bolts are unscrewed, you can use a screwdriver to disconnect the crankcases.
- Next step. Unscrew the rod from the first and second gear fork.
- We do the same with gears third, fourth and fifth, respectively. To remove the rod, it must be removed together with the gear shift parts.
- You need to remove the axle from the reverse gear and, of course, the gear.
- Next, take out the differential and two shafts with gears. Unscrew the three bolts that secure the gear mechanism and remove it from the crankcase.
- Unscrew the rear lever bolt and remove the rod.
- If necessary, remove the bearings of the primary and secondary shafts with a separator.
Repair work
If the adjustment does not give the desired result, you will have to work more carefully with the box. A common problem is knocking out the gears responsible for speeds 1 and 2.
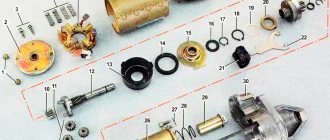
When dismantling, make sure that each individual fastener is in good working order. The latches are springs, of which there are a total of three. The first one is the longest, it is responsible for speeds 1 and 2. The second is medium in size, and its prerogative is 3 and 4 speeds. The third detent is the smallest, and its “guardian” is fifth gear.
Malfunctions
Gearbox oil for VAZ 2110: change it yourself
Every car owner with experience begins to feel a malfunction in the car’s gearbox based on characteristic signs. Most gearbox breakdowns are associated with wear of rubbing parts, because they experience constant significant load while driving. However, such wear rarely reaches a critical state immediately. This is usually a gradual process, which is why a novice driver is always advised to learn to “listen” to the car. The sooner you notice a problem, diagnose it accurately and fix it, the less repair work will need to be done and the less it will cost.
It is recommended to regularly check where the vehicle is parked for stains to monitor leakage of technical fluids.
You can classify signs that indicate breakdowns as follows:
- Noise in manual transmission. This may be a crackling, knocking, rustling, grinding, as well as beating of the gear shift lever. Knocking can occur during different phases of the box's operation. An experienced motorist can even determine from such a rustle which parts are at risk. For example, noise when a car turns into a turn indicates wear on the differential gears.
- Gears are hard to engage. In addition to the wear of parts of the gearbox itself, the malfunction may also lie in the clutch. In addition, there is a risk of deformation of the gearshift control rods. Remember that plastic parts break much more easily than metal parts.
- Spontaneous “dropping out” of the gear while driving. Over time, gear teeth become chipped and worn down, becoming shorter. The slightest vibration disengages them and the transmission “flies out”. In this case, it is also necessary to check the engine mounting.
- A sharp click and loss of smoothness when changing gears. If the clutch is working properly, then the cause of such a problem is most often the failure of the synchronizer blocking ring of the desired gear.
- The box “eats” a lot of oil. Increased oil consumption is primarily a leak. It can occur through a depressurized crankcase, as well as worn oil seals, which are located on almost any hole in the box body.
Most of these faults cannot be solved in any other way than by replacing worn parts. The gearbox is close to the center of mass of the car and breaks down much less often than the engine or suspension.
Such gear failures cannot be eliminated in any way except by replacing the unit
Therefore, if something happens to it, repairs will definitely be required. In order to find out which wear parts cause noise or interfere with the smooth movement of the lever, you need to remove and disassemble the gearbox.
Difficulty engaging second gear, video
The owner of the ten may encounter the same problems as when turning on the first speed. In any case, malfunctions are due to the following reasons:
- abrasion of gear teeth. At the first stages, the speed turns on poorly, but over time it will start to crash. Therefore, surgical intervention is required;
- there is insufficient adhesion of the gear to the gear shift clutch;
- the speed is switched off when hitting uneven road surfaces. In this case, the problem is the clutch.
Sometimes, to eliminate the knockout of the second gear, it is enough to replace the clamp. If replacement does not achieve the desired result, then a major overhaul is required.
Adjustment in this case will not solve the problem. Carrying out repair work yourself is quite difficult. Unlike adjusting and replacing oil seals, major repairs require professional skills.
Nuances, video
It should be noted that the gearbox is a fairly stable component of the vehicle. Compared to other units, breakdowns occur much less frequently here. At the same time, you need to remember that for the normal functioning of the box, you should change the oil in a timely manner, and use products from trusted brands. In terms of their performance, the gearboxes are almost identical. If we are talking about front-wheel drive cars, which include the VAZ-2110, then you can use oil poured into the power unit. If we are talking about rear-wheel drive VAZs, then special oil is provided for them. Sometimes car owners notice an oil leak. This is caused by weak fastening of the box and crankcase. The problem is solved with the help of seals, as well as careful tightening of the bolts.
If problems arise with the box, first of all it is necessary to adjust the drive and replace parts that have failed as a result of physical wear.
If the car owner has the skills and experience, then repairing the gearbox of a VAZ-2110 car can be done with his own hands. In other cases, it is better to visit a trusted auto repair shop and eliminate the deficiencies after professional diagnostics.
Where can I buy
You can buy a new replacement part at special retail outlets or HERE.
The cost of the checkpoint varies, starting from 50,000 tenge
Help
If you haven’t coped with this task yourself or simply don’t want to bother with the work, you should contact a service station, which you can choose HERE.
Something bad happened and a VAZ 2110 gearbox needed to be repaired. Unit repair is required when:
- It is difficult to switch gears off and on.
- automatic switching off of gears.
- noise occurs when shifting gears.
- transmission oil leak.
The reasons for the breakdown may be different, perhaps the oil was not changed in a timely manner or the mechanism has simply exhausted its resource.
How is a VAZ 2110 gearbox repaired? Do-it-yourself VAZ 2110 gearbox repair, video.
Step-by-step instructions for disassembling the gearbox:
1. Remove the gearbox from the machine, clean it of various contaminants and wash it from the outside.
2. The indicator that shows the oil level must be removed from the gearbox.
3. Place the gearbox in a vertical position on the clutch housing and unscrew bolt number 1 with a flat washer, and two nuts number 3 with a spring washer, which secure the clutch cable bracket. Remove this bracket from the gearbox after unscrewing all the bolts.
4. On the cover located at the back, unscrew all the remaining fastening bolts (there are four of them).
5. Remove this cover. To do this, use a screwdriver to lift the boss located on the lid.
6. The bolt with spring washer that holds the fifth gear fork should be unscrewed.
7. Then you need to prevent the transmission shafts from spinning. To do this, they need to be fixed: move the synchronizer clutch and fork down in fifth gear so that the gear and splines of the clutch are connected, then engage third or fourth gear by moving the gear selection rod.
8. It is necessary to unlock and unscrew the nut securing the input shaft. This requires some effort because the nut is very tightly screwed on.
9. Then do the same with the secondary shaft, as with the primary.
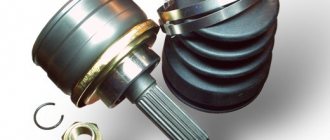
10. In fifth gear, use screwdrivers to lift the driven gear (by doing this, the synchronizer hub is pressed off the shaft). Together with the gear, you need to remove the synchronizer and the secondary shaft fork. But you must make sure that the synchronizer coupling does not move out and remains on the hub, since the balls that secure the synchronizer may fall apart.
11. Remove the thrust plate from the top of the synchronizer, and then remove the fork from the synchronizer itself in the coupling groove.
12. The fifth gear gear and the blocking ring (1) must also be removed from the synchronizer. It is necessary to number the blocking ring (1) and the coupling (2), and remove the ring. This must be done in order to put the ring in the same position as it was, because during operation the teeth of the coupling and the ring have already worked into each other. If there is no reason to disassemble the synchronizer, then it needs to be tied with something so that it does not fall apart.
13. Remove the bushing on the secondary shaft.
14. The fifth gear drive gear is located on the input shaft. You first need to take it off and remember how it stood.
15. Remove the bearing plate (1). To do this, take an impact screwdriver and unscrew the four bolts with spring washers on the bearing plate mounting. Remove the thrust washer (2) from the secondary shaft.
16. Lift the two shafts by hand and remove the bearing retaining rings from them.
17. Unscrew the clamps and remove the balls along with the springs.
18. Then unscrew the reverse lock, remove the seal ring, and remove the lock spring.
19. Remove the locking ball by tilting the box to do this.
20. On the fastening of the gearbox housings, unscrew the twelve nuts and bolt with spring washers. Remember the place for the holder (1) and the eye (2). The service plug (3) must also be removed.
21. There are three special grooves along the crankcases. Insert a screwdriver there and disconnect the clutch housing from the gearbox housing.
22. Lifting the gearbox housing, turn it to the left until the housing comes out from under the gear. Then remove the gearbox housing from the clutch housing.
23. Unscrew the bolts on the forks of the first, second, third and fourth gears.
24. Raising the shift rod for first and second gears, watch when it comes out of the support (3), and then turn it to the left until the head (1) stops clinging to the locking bracket (2). Remove the rod with the fork; to do this, remove the rod fork (4) from the groove of the synchronizer clutch. If there is no need to remove the fork from the rods, then there is no need, since you can then confuse them.
25. The head of the third and fourth gear shift rod must be disconnected from the gear selector lever by turning the rod. Next, lift the rod so that it does not have support, and remove the rod and fork, removing them from the groove of the synchronizer clutch.
26. Remove the fifth gear shift rod from the support by turning it and removing the head, which is connected to the locking bracket.
27. Remove the axis of the reverse intermediate gears.
28. Remove the intermediate gear. To do this, you need to move the reverse intermediate gear to the gear selection mechanism, turn it 30-40 degrees and remove it from under the shaft gears.
29. Remove the primary and secondary shafts at the same time, rocking them slightly.
30. Remove the differential in the clutch housing.
31. On the fastening in the gear selection mechanism, unscrew the three bolts with spring washers and remove the mechanism.
32. Remove the magnet from the clutch housing.
33. On the speedometer drive housing with the driven gear, unscrew the nut and remove the housing itself. If the housing o-ring has no elasticity or is torn, it must be replaced.
34. There is a metal O-ring under the reverse light switch, so unscrew the switch. It is located in the gearbox housing.
35. Then press out the secondary shaft bearing using a special puller or screwdriver.
36. Remove the oil sump, which is located under the bearing.
37. Press out the input shaft bearing using a special puller. If this is not available, then you need to bend the wire into the shape of a hook, insert it into the groove in the crankcase and place the hook under the bearing. Use a screwdriver to press the bearing out of the crankcase, place a wooden block under the screwdriver and hit the screwdriver with a hammer, rearranging the hook in the grooves.
38. In the clutch housing, taking a suitable mandrel, press new front bearings all the way to the stop.
39. Move the edge in the protective boot of the gear selector rod using a screwdriver. Move the edge together with the rod support sleeve.
40. Move the rod by unscrewing the bolt on the gear selector lever mount and remove this lever. Then remove the gear selector rod from the clutch housing.
41. If it is necessary to replace the rod hinge, you need to move the protective cover on it and unscrew the bolt on the hinge fastening. TB-1324 glue was applied to the bolt for strength. Therefore, before assembling, clean the bolt and apply this glue. If the protective cover in the rod joint is frayed or not elastic, then it must be replaced.
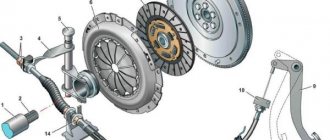
42. Replace the clutch housing. To do this, remove the clutch release fork and bearing from the boat, then press out the seals.
43. In the clutch housing and gearbox, it is necessary to check all surfaces of the rear cover. If there is minor damage, they can be cleaned with sandpaper, and if there is significant damage to any part, such as cracks, chips, dents, it should be replaced.
44. Then check the clutch and gearbox housings for their integrity. In case of any defects, the crankcase must be replaced.