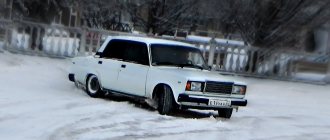
Gearbox VAZ 2106-2103
Before we start removing the VAZ 2106 gearbox, let's take a rough look and determine the main faults that result in its removal. The box should be removed if:
- There is increased noise in the box.
- If while driving you feel that it is difficult to change gears, then this is another sign for subsequent repair of the gearbox.
- Speed slippage or unclear gear shifting.
In addition to the above faults of the VAZ 2106 gearbox, which require removal, the box is also removed when replacing the clutch, when replacing the rear crankshaft oil seal, when replacing the clutch release bearing.
The work itself of removing and then installing the gearbox is very labor-intensive and requires a sufficient investment of physical effort and time on your part, so before you repair the VAZ 2106 gearbox, make sure that the true cause of your car’s breakdown lies precisely in the gearbox , and not in anything else.
To remove the gearbox from a VAZ 2106 car, you will need the help of an assistant, wrenches “10”, “13”, “19”, a head with an extension or universal joint, prepare yourself a key for the oil drain plug from the gearbox, and of course screwdriver and pliers. If everything you need is present in your combat arsenal, then let's start repairing.
- The first step is to disconnect the ground wire from the battery.
- The handbrake lever must be lowered to the lower position.
- You will also need to remove the radio panel.
- We turn on the neutral position and remove all the decorative body kits and so on from the gearshift knob. It is also necessary to remove the gear shift lever rod; to do this, use a screwdriver to press out the locking sleeve.
After you have removed the lever rod, the remote, elastic and locking bushings will still remain on the lever itself, which also need to be removed. And we will remove them using two screwdrivers, with which we will open the petals of the spacer bushing and then remove all the others.
Now we get rid of the decorative trim of the interior that will interfere with us, namely, look at the fastenings of the floor mat and, if necessary, unscrew it and move it to the side, remove the decorative cover of the parking brake lever, remove the front sill trim, wrap the mat so that the clip of the decorative cover is moved through gear shift lever.
Now let's get to work outside the car, namely you need:
- Unscrew the fastening bolts and remove the exhaust pipe (see Removing and installing the exhaust pipe).
- Unscrew the lower starter mounting bolt and move it to the side.
- Take an empty container and, using a special wrench, unscrew the oil drain plug from the gearbox housing, drain the oil and screw the plug back on.
- Disconnect the parts attaching the main muffler to the body (see Replacing the main muffler) and disconnect all additional mufflers (see Replacing the additional muffler), there is no need to disconnect them from the main muffler, then remove the exhaust pipe from the car.
- Next, you need to remove the driveshaft safety bracket from the car. Then unscrew the nuts securing the flexible coupling to the gearbox flange and, turning the driveshaft, remove the bolts from the coupling one by one. Remove the coupling from the flange by using a screwdriver to move it away and lower it down.
- Disconnect the reverse light switch wires from the gearbox, unscrew the nut and disconnect the speedometer gear cable.
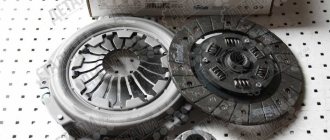
- It is necessary to remove the slave cylinder from the clutch housing (see Removing and installing the clutch slave cylinder).
- Next, you need to install a stop under the cross member, then unscrew the four bolts securing the clutch housing cover and remove the spring washers.
- After you have installed the stop under the cross member, unscrew the two fastening nuts and remove the washers.
Having unscrewed the nuts securing the cross member, remove the stop and smoothly lower the gearbox down; you will need the help of an assistant to support it, then move the stop under the front of the engine in order to fix it at a certain point.
- Unscrew all the nuts securing the clutch housing to the engine, remove the washers and carefully remove the gearbox from the engine.
After carrying out repair work on the gearbox, install it back on your car. Perform all steps for installing the VAZ 2106 gearbox in reverse order. Pour the required amount of oil into the crankcase.
How to install a new gearbox?
As soon as the old one is removed. Clean the junction between the engine and the gearbox. Be sure to check the clutch. If it needs replacing, it is better to do it now to avoid these difficulties in the future.
With the help of a partner, install the new transmission and drive it into the engine. It is worth noting that one of the most difficult procedures is inserting the transmission input shaft into the rear crankshaft bearing, so you will need a lot of physical strength and a little patience. After the box is attached, tighten the nuts securing the gearbox to the engine.
Install the crossbar and tighten it. Now the front box is securely fixed. At this time, you can already hang individual elements. These include: the speedometer drive, contacts for turning on the reversing lights and the clutch drive. After all this “trifle” has been installed, you can put the driveshaft in place. To do this, insert it into the slot of the elastic coupling and put on the fixing seal. Next, using a screwdriver and pliers, bend the metal antennae to the oil seal.
The final step is to install the cross member and tighten it. After this, you can install the exhaust system and connect the battery terminal
How to remove a gearbox (gearbox)
For any repair of the VAZ 2106 gearbox, you will need to completely dismantle it from the car. This procedure is certainly not the simplest, but if you have a garage and a pit, then every car owner can do it.
I personally removed the transmission on all my cars probably more than 10 times, since I often had to disassemble the “classic” models. And unfortunately, it was not possible to record a detailed photo report on the work done. The last time this happened, I was able to take a few pictures to at least roughly show how this work was done.
So, the first thing to mention is the tool that you will need to do this job:
- Hammer
- Pliers
- Driver and ratchet handle
- Extension
- 13 mm socket head
- Key to 19
- Split wrench for unscrewing the brake fluid pipe
Before you begin the repair, you will need to take some preparatory measures, namely:
- Drain the oil from the gearbox, since during repairs it should be drained in any case
- Disconnect one end of the driveshaft from the transmission
- Disconnect the speedometer drive cable and the reverse power supply wire.
- From inside the passenger compartment, unscrew the black plastic trim under the gearshift lever, and also remove the lever - it is highly advisable
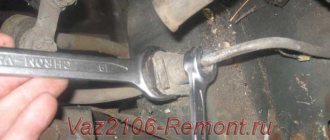
So, when all the preparatory steps have been made, you can proceed directly to the removal itself. To do this, unscrew the brake fluid supply pipe to the gearbox, as shown in the photo below:
How to Remove the Engine from a VAZ 2106
How to remove a VAZ engine?
So let's start, how to remove a VAZ engine? First of all, let's decide why to remove the engine from the car. This is usually done during major repairs, damage to parts of the crank mechanism and other malfunctions in which the engine needs to be removed.
To work, we will need professional tools and a lifting device to remove the engine from the engine compartment. If the latter is not the case, then invite your comrades to help you remove the VAZ engine.
First, carefully remove the hood. In order to save time and nerves during its installation and subsequent adjustment, you need to mark the places to which the canopies are screwed, to do this, take a black marker and draw a black stripe around the perimeter of the canopy.
After applying the marks, holding the hood, remove the spring and unscrew it.
Now we need a couple of blankets or bedspreads. We cover the front fenders with these blankets so as not to damage the paint.
Now let's get to work. The first thing to do is drain the coolant. If there is water in it, then simply pour it into a container and take it outside, and if there is antifreeze or antifreeze, then you need to take a small watering can with a hose and a canister. unscrew the plug in the cylinder block and drain the fluid.
It is better not to drain the radiator; there is always a clogged tap there and attempts to unscrew it lead to damage to the radiator, so it is better not to touch it. We add the rest of the liquid by unscrewing the lower radiator pipe. After draining the liquid, unscrew the pipes and remove the radiator.
Next, remove the electrical wires from the distributor, from the oil sensor, from the coolant temperature sensor and from the carburetor (if any).
Using a screwdriver, release the clamp and remove the fuel supply hose. We definitely lift it up.
Review of how to remove a VAZ 2106 engine
I’ll explain the words, if you have questions, ask, I’ll answer everyone Subscribe to the channel please!!! Need 100
THIS IS INTERESTING: VAZ 2110 engine repair
ICE theory: How to remove the engine?
Lectures on the topic “Theory of ICE” Group “Theory of ICE” VKontakte: .
We go to the other side of the engine compartment and unscrew the exhaust pipe from the exhaust manifold.
Be careful, the nuts that secure the downpipe are made of a soft alloy (brass) and excessive force can damage the edges. Also, be careful if there are ordinary metal nuts, they can stick to the studs and when unscrewing, you can break the stud. Recovery is very nerve-wracking :)
After disconnecting the terminals from the battery, remove the starter. To do this, take a 13mm wrench and unscrew the three bolts. And we take out the starter itself.
Next, we disconnect the electrical wires from the generator and for convenience, you can remove the air filter housing.
Now, in order to remove the VAZ engine, we need to unscrew it from the gearbox. The top two bolts can be easily unscrewed using Chinese socket wrenches bent to the side. Unscrew the two top bolts.
We arm ourselves with a screwdriver and release the clamps on the heater radiator pipes, and also remove the accelerator pedal linkage.
We disconnect the choke cable from the carburetor and lower ourselves into the inspection hole.
First of all, remove the clutch slave cylinder. Remove the spring and use a 13mm wrench to unscrew the two bolts. Take him aside so as not to interfere. Attention. Do not accidentally press the clutch pedal, otherwise you will also need to sort out the slave cylinder.
Now all that remains is to unscrew the bottom two bolts that secure the gearbox to the engine.
Next we need to unscrew the four small bolts that hold the protective casing.
Now, we have come to the final stage of how to remove a VAZ engine. After the above operations, we just need to unscrew the engine from the support pads. Using a 17t socket, unscrew the nuts from both pillows.
We place a jack under the gearbox and lift it a little so that the engine mounts come out of the studs of the support pads.
We hook the engine with belts and lift it slightly with talc. We put the box in first gear and lift the engine out of the guides. As soon as the engine comes off, remove it.
Next, we send the engine for washing and subsequent repairs.
Well, that’s probably all, here we showed how to remove a VAZ engine.
- How to remove a VAZ engine
- Disassembling the VAZ engine. Part 1
- Disassembling the VAZ engine. Part 2
- Disassembling the VAZ engine. Part 3
- Replacing the cylinder head gasket for a VAZ 2109
- Replacing the air filter on VAZ cars
- Replacing the cylinder head gasket VAZ 2106-07
- Replacing the VAZ 2109 pump
Source: https://5net.ru/kak-snjat-dvigatel-s-vaz-2106/
Removing the VAZ 2106 gearbox
All residents of Novosibirsk now have the opportunity to purchase a VAZ gearbox in retail auto stores.
st. Rassvetnaya 17/2
All residents of St. Petersburg have the opportunity to purchase and install a VAZ gearbox from our partners.
Request a call back
Enter your Name and Phone Number and we will definitely call you back!
- Home >
- How to remove and install a gearbox >
- Removal and installation of the Gearbox (Gearbox) VAZ 2101, 2104, 2105, 2106, 2107
Removal and installation of the Gearbox (Gearbox) VAZ 2101, 2104, 2105, 2106, 2107
We carry out the work on a car lift.
Lower the parking brake lever to the down position. Remove the gear shift rod.
Align the two screws securing the parking brake lever boot and remove the boot from the lever.
Remove the front carpet.
Remove the floor tunnel cover.
Disconnect the battery.
Remove the warm air wire hose from the air filter housing.
Remove the two upper starter mounting bolts.
Unscrew the nuts securing the exhaust pipe to the exhaust manifold and remove the locking plates. (If you have difficulty removing the nuts, complete the operation from underneath the vehicle.)
Unscrew the lower starter mounting bolt and...
...move the starter forward.
Drain the oil from the gearbox housing. Close the drain plug.
Disconnect the parts securing the main muffler to the body.
Disconnect the additional mufflers from the exhaust pipe without disconnecting them from the main one.
Remove the exhaust pipe from the car downwards.
Remove the driveline safety bracket.
Unscrew the three nuts from the bolts securing the flexible coupling to the gearbox flange.
Remove the bolts from the flange and coupling one by one by turning the driveshaft.
Using a screwdriver, pry the coupling away from the flange and lower it down.
Disconnect the wires from the reverse light switch (located on the right rear of the transmission).
Unscrew the nut and disconnect the cable from the speedometer drive gearbox (located in the left rear part of the gearbox).
Remove the slave cylinder from the clutch housing without disconnecting the hose from the cylinder.
Unscrew the four bolts securing the clutch housing cover and remove the spring washers.
Place a support under the crossbar.
Unscrew the two nuts (the second one is not shown) securing the cross member to the body and remove the washers.
Remove the stop and smoothly lower the gearbox down.
Place a stop under the front of the engine to secure it in position.
Using extensions and universal joints, remove the left and right upper bolts securing the clutch housing to the engine. Remove the spring washers and eyelets.
Unscrew the left and right lower bolts securing the clutch housing to the engine. Remove the spring washers.
(An assistant must support the rear of the transmission.)
Remove the gearbox by first moving it backwards until the input shaft leaves the clutch, and then downwards.
Install the gearbox on the vehicle in the reverse order of removal. Fill in the required amount of oil.
Before installing the gearbox, apply a thin layer of LSC-15 or Litol-24 lubricant to the splined part of the input shaft and engage 1st or 3rd gear
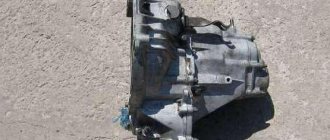
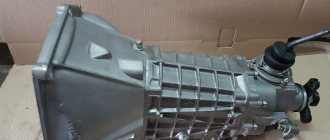
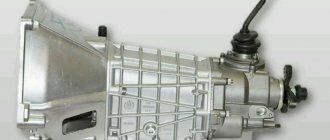
Gearbox VAZ 2106
The VAZ 2106 can be equipped with a four-speed or five-speed gearbox. The five-speed transmission is based on the four-speed, so both transmissions are interchangeable and have most of the same parts.
Since the manufacturer installs only five-speed gearboxes on VAZ 2106 cars of the last years of production, and they are gradually displacing four-speed ones from service, repair of a five-speed gearbox will be considered as more complex.
Malfunctions that require box repair.
Loud noises in the box
Worn gear teeth or synchronizer teeth;
The shafts in the housing are loose, and during operation they undergo axial displacement.
Having difficulty changing gears
The spherical joint of the lever is worn out, there is no lubricant in the switching unit;
The shift lever is deformed;
(rods) have burrs, deflections, the rod seats are dirty, the blocking crackers are jammed;
Clutch splines or hub splines are clogged;
Shift forks are damaged.
Jumping or incomplete engagement of gears
The holes for the balls or the balls themselves on the rods are worn out, the springs of the clamps are broken;
The locking ring on the synchronizer is worn;
The synchronizer springs are broken;
Worn teeth of synchronizer couplings or ring gear.
Lower oil level
The gearbox shaft seals are worn out;
The fastening of the gearbox covers to the housing is loose, the sealing gaskets are damaged;
The fastening of the clutch housing to the gearbox body is loose.
Warning: The listed malfunctions can be caused by other reasons, the elimination of which does not require removal and disassembly of the gearbox. Since removing and disassembling the gearbox is a very labor-intensive process, be careful when diagnosing faults and be sure to make sure that such repairs are necessary.
How to check the vacuum brake booster using the link.
Gearbox VAZ 2106 and their design
This car was equipped with two types of gearboxes, one of them was a manual 4-speed transmission. The second is an improved version of the previous one, designed for 5 speeds, also of a mechanical type. At the same time, the five-speed gearbox, due to its modernization, was more expensive and more demanding to maintain. In addition, both of these gearboxes (5-speed and 4-speed) can be interchangeable.
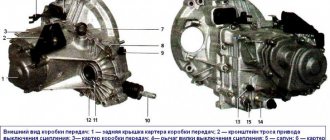
The VAZ 2106 gear shift diagram is shown in the photo.
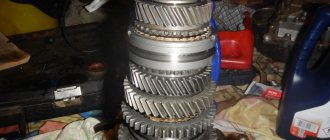
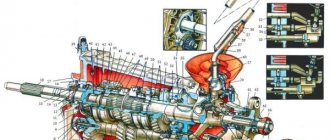
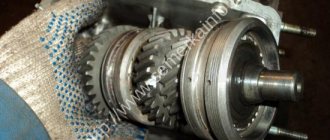
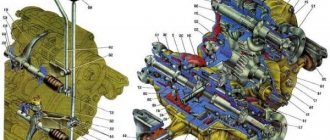
The device of any of them is a simple structure consisting of several shafts (primary, secondary, intermediate), a crankcase and a gear shift mechanism with synchronizers. On the input shaft there is a firmly seated gear, which is in constant mesh with all other gears. The shaft rotates due to two bearings located at the front and rear; the front one is also located in the crankshaft socket at the end. The rear one is located inside the crankcase and is sealed with an oil seal. The presence of the latter is explained by the fact that there is transmission oil in the crankcase.
The secondary shaft rotates due to three bearings. The front needle bearing is firmly seated in the input shaft socket, the ball bearing in the center is located in the crankcase seat, and the rear bearing is pressed into the socket on the rear wall. It also has a seal element that prevents possible oil leakage from the gearbox housing.
The intermediate shaft is a shaft with a gear block that rotates on two bearings. There is a ball bearing at the front and a cylindrical roller bearing at the rear. On the side there is a gear with reverse motion. As for synchronizers, they are structurally the same and consist of a hub, springs and couplings, equipped with locking rings.
Largely thanks to the simple, reliable and high-quality gearbox, the VAZ 2106 can boast of good dynamics and speed characteristics. All gears, with the exception of those at reverse speed, have an oblique tooth and are in constant mesh. Such a design, with its small size, allows more torque to be transmitted to the shafts, especially since the gear ratios of the VAZ 2106 gearbox are selected correctly. In reverse, gears with straight teeth are installed, so the car cannot gain high speed when the reverse gear is engaged, since such gears cannot transmit large torque.
VAZ 2106 gearbox device
Speed shifting occurs as a result of the operation of clutches with synchronizers. The shift lever itself and the entire mechanism are forks with rods. After switching, the speed is fixed by balls with springs that hold the rod. The engineers also provided protection against the possibility of turning on two speeds at once, using special blockers or, in common parlance, “crackers” for this. In order to change the oil, the gearbox has special holes with plugs with threads and rubber seals.
Basic faults
The gearbox used on the Kopeyka is structurally a fairly reliable unit, capable of handling a significant resource without any special intervention. But still there are problems with the gearbox.
The main problems with this unit are:
- Increased operating noise. This happens mainly due to wear of bearings and gears. To restore functionality, it is necessary to replace all worn elements;
- Difficulty changing gears. The reasons for this may be problems with the clutch, deformation of the gearshift lever or shift forks. Troubleshooting is carried out by replacing damaged clutch and gearbox elements;
- Spontaneous transmission shutdown. This malfunction occurs due to wear of the clamps of the sliders of the power forks. The malfunction is eliminated by replacing the springs and the clamps themselves, sliders;
- Oil leaking from the box. Leaks occur due to damage and severe wear of the box seals. Everything can be eliminated by replacing rubber elements;
Of course, there are other types of malfunctions, for example, jamming of the gearbox while driving, inability to engage or disable any gear, destruction of gears or shafts, breakdown of the gearbox housing. But such problems arise much less frequently and are mainly due to improper operation of the gearbox, as well as design defects in the component elements of the box. Elimination of any of the malfunctions is carried out on the removed box. Therefore, in order to restore the functionality of the gearbox, you must first know how to remove the gearbox on a VAZ-2101. Moreover, it doesn’t matter whether the VAZ-2101 gearbox is being repaired or replaced, it will still have to be removed.
What you need
This operation is not particularly complicated, but it requires certain skills and knowledge of the sequence of work. The complexity of the operation lies in the fact that many elements have to be unscrewed and disconnected, and access to them is not always convenient.
To remove the box you will need the following tools and accessories:
- A set of keys and sockets (including keys for 10, 14, 17, 19);
- Screwdrivers (thin flathead, Phillips, impact);
- WD-40;
- A section of the gearbox input shaft;
- Long wooden beam;
- Rags;
- Marker;
- Container for draining transmission oil;
All work is carried out in three places - the interior, the engine compartment, and under the car. Therefore >a viewing hole will definitely be required.
Transmission oil for gearboxes
To select gear oil for the Lada gearbox, you need to take into account the region where the car will be operated.
The best oil is synthetic, but semi-synthetic and mineral oils will not harm the Seven’s transmission. The amount of oil in the VAZ 2107 gearbox is about 1.6 liters. The oil change time is carried out according to the instructions in the technical instructions supplied with the car.
Manual transmission oil level
The oil level in the box is checked as follows:
Oil change
It is better to change the oil on an overpass or pit with a warm engine, so the oil will drain faster. Prepare the tool in advance, a container for working out at least two liters, oil for changing.
Sequence of work
Having prepared everything you need, you can begin work.
The removal sequence is as follows:
- We place the car in the pit and immobilize it with wheel chocks installed under the wheels. We put the gearbox in the neutral position, do not tighten the handbrake;
- First we will do all the work in the salon. At this point it is necessary to remove the lever from the box rod. To do this, pull the lever boot up, which will provide access to the fixing sleeve. You need to carefully pry it up with a thin screwdriver so that it pops out, after which you can pull the lever off the rod;
- Remove the upper plastic bushing from the rod by loosening the petals with a screwdriver, then the rubber boot and the lower bushing. As a result, there should be nothing left on the rod;
- Remove the plastic trim located under the floor covering. To do this, you need to remove the seats, their guides, etc. from the car. It is much easier to make a cut towards the rear seats, this will allow you to not disassemble the interior. Having provided access to the cover, unscrew the 4 screws securing it and remove it. We turn on 1st gear at the gearbox;
- Let's go under the car. For ease of work, the exhaust system should be completely dismantled. To do this, unscrew the muffler from the exhaust pipe. To make it easier to unscrew bolts and nuts, you should treat them with WD-40 in advance;
- Having removed the muffler, we go into the engine compartment and unscrew the nuts securing the exhaust pipe to the exhaust manifold. Then we remove this pipe from the car;
- All subsequent work is carried out under the car. Unscrew the driveshaft from the gearbox flange. Next, unscrew the two safety crossbars to lower the cardan down;
- We substitute the prepared container and unscrew the drain plug to remove oil from the gearbox;
- Unscrew the fastening of the clutch slave cylinder. In this case, there is no need to disconnect the pipe from it; after unscrewing the fastening, it should simply be moved to the side;
- Unscrew the 4 bolts securing the clutch housing cover;
- We support the back of the box with a beam and unscrew the nuts securing the cross member. Carefully pull out the timber. In this case, the rear of the gearbox will go down a little, this will provide more convenient access to the remaining elements that need to be removed;
- We disconnect the chip with the wiring suitable for the gearbox. Unscrew and remove the clutch cable;
- We get to the bottom and unscrew the starter mounting bolts. Start with the top bolt. After unscrewing the fastening, move the starter away;
- We place a support under the rear part of the engine, after lifting the box by hand;
- We unscrew the bolts securing the gearbox to the power plant;
- Supporting it with your hands, rock it up and down to remove it from the guides, and then remove the input shaft from the clutch and lower the box down;
- We install the prepared section of the input shaft into the clutch to prevent displacement of the driven shaft.
If the gearbox is to be repaired, then the VAZ-2101 gearbox is then disassembled, followed by replacement of worn elements, and then the unit is assembled and installed in place.
Reinstalling the box is carried out in the reverse order. In this case, you should check the installation of all removed elements in place, as well as the reliability of tightening the fasteners.