Print this article Font size 16
The CV joint is a constant velocity joint. People simply call it a grenade. This is due to the appearance of the device. Its task is to transmit rotational motion from one axle shaft to another, and they are at a constantly changing angle in relation to one another.
This element is always under load, which is why its failure is rather a matter of time. This is even despite the fact that high-quality carbon steel is used in the production of CV joints, which can withstand severe regular loads over a long period of time.
But the grenade on the VAZ 2110 still fails. The main reasons are pollution, sand that gets inside the structure, loss of lubrication, damage to elements, torn rubber boots.
Constant velocity joint or CV joint
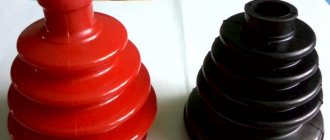
VAZ 2110 grenade boot
The design of the car provides that the hinge is subject to a significant load and is made of very strong alloys. A well-maintained and good CV joint (grenade) can last longer than the car itself. To achieve this result and save money, because the procedure for replacing a hinge is expensive, you must follow some rules. One of these rules is to systematically check the condition and timely replacement of the grenade boot. The most important enemies of a car grenade are dirt, dust, water and sand that enter the working part while driving. To protect against such destructive factors, anthers are installed, which are protective rubber cones that very tightly cover the CV joint mechanism of the vase. If you find that the grenade boot is torn, it must be replaced immediately. During periodic technical inspections, you need to carefully inspect the boots and replace them if necessary.
Note. If folds, cracks, deterioration in the elasticity of the rubber and other deformations and damage are found on the anthers, replacement should not be shelved.
Replacing the CV boot
VAZ 2110 grenade and its boot
The process of replacing the boot is not as complicated as it seems at first glance. Most car owners change the boots one at a time, that is, when the inner boot wears out, the grenades change it without touching the outer one. And after a while, after damage or wear of the outer boot, they change it. This is a pointless waste of money, effort and time.
Note. It is strongly recommended that if it is necessary to service and repair CV joints, remove the entire shaft and replace both the inner and outer boots at the same time.
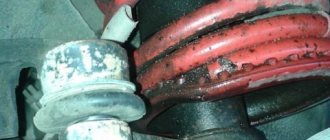
VAZ 21102 grenade
There are logical explanations for this:
- Firstly, if one boot is damaged, it is foolish to assume that the second one is in perfect condition. Most likely, the second boot will remind itself after a short time and the car will have to be repaired again.
- Secondly, when removing one CV joint, the second one is removed much more conveniently and easily in order to check its condition and simultaneously replace two boots.
Note. Replacing and inspecting the lubricant in the hinges is never too much, and allows the car to travel tens of thousands of kilometers more.
- Thirdly, even with repeated replacement of boots and grease in grenades, it costs much less than buying new hinges due to stupid savings and simple laziness.
VAZ 2110 grenade replacement
Stages of work
The boot is replaced in the following order:
- First, the vehicle is set to the parking brake and locking bars are placed under the rear wheels.
- Then the hub nut is loosened, after removing the protective cap with a screwdriver.
Note. For this procedure, a reliable tool is required along with the pipe, because this nut is clamped with great force.
- After unscrewing the hub nut, the wheel bolts are loosened (all manipulations are carried out on a machine located on the ground).
- Then the front wheel of the car is lifted and supports are installed under the body to secure the front section of the car.
- The wheel bolts are unscrewed and the hub nut lock washer is pulled out.
- Unscrew the two bolts securing the lower ball joint from the steering knuckle.
- After this, the steering wheel turns to the side, depending on which replacement is being made.
- The steering knuckle with the stand is pressed out and the splined end of the outer CV joint is pulled out from the hub.
Grenade for VAZ 2110
- Using a pry bar, the internal grenade is pushed out of the gearbox.
- After this, the drive shaft is secured in a vice, the clamps from the outer and inner CV joints are removed, and the boots are unscrewed inside out.
Note. If the anthers are damaged, they can be cut off with a knife.
- Using a drift and a hammer, the CV joints are knocked off the shaft, applying force to the joint cage.
- Then the CV joint is washed with gasoline, old grease and trapped dirt are removed.
- The new boot is placed on the shaft and pressed onto the splines, which are pre-filled with CV joint lubricant.
- Using pliers, the boot clamp is clamped onto the drive shaft.
Note. To equalize the air pressure in the boot, unscrew the outer edge of the cover with a screwdriver, only after that the outer clamp is clamped.
- When installing the inner CV joint, do not forget about the plastic plug located at the end of the shaft.
- Before installing the assembled drives, a new thrust ring is installed on the inner CV joint.
- After inserting the drive into the gearbox, it is pushed until it is fully secured in the CV joint axle gear.
Note. In the process, you should use a hammer, hitting it along the axis along the shaft. (You also need to use a softening spacer, for example, a wooden block).
- Further installation is carried out in the reverse order, and do not forget to change the old hub nut. Also, after tightening, it is necessary to secure the end of the nut to avoid unscrewing.
Note. When replacing boots, it is recommended to inspect the general condition of all existing working parts and update the lubricant.
Add a commentAdd a comment We recommend reading How to fix play on a VAZ 2109 wheel with your own handsTips on choosing wheel rims for a VAZ 2109Maximum wheel size for a VAZ 2109. Which wheels and tires to chooseDetails with all the nuances about wheel bolts for a VAZ 2109
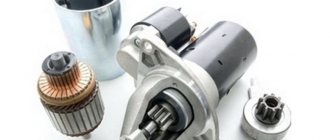
CV joint (constant velocity joint) is a mechanism that allows you to transmit torque between misaligned shafts. The device is actively used on front-wheel drive vehicles. On each shaft coming out of the gearbox there are two of them - internal and external. Repair is impossible; if the unit breaks down, it is replaced as an assembly.
Content
In what cases is it necessary to replace the inner CV joint?
Replacing the internal CV joint on front-wheel drive VAZ vehicles is required if the following symptoms are present:
- Crunching and knocking noises when driving and accelerating in a straight line;
- Vibration and shock when changing gears;
- Significant play when testing by hand;
- If the “grenade” fails completely, the vehicle cannot move further.
» alt=»»> The main reason for the malfunction of the VAZ “grenade” is the entry of water and dirt through the hole in the torn boot. The second possible cause of failure is a sharp press on the gas with the wheels fully turned, although in this case you risk killing the external rather than the internal grenade.
In addition to the above, replacing the internal CV joint on VAZ-2110 and other models may be necessary if the quality of the previously installed joint is poor.
Diagnostics of CV joint performance before installation
- The CV joint should be inspected visually, as well as by rotating it relative to the position of the bearings.
- If no crunching or crackling noises are detected when turning, and the presence of dirt and sand on the lubricant is minimal, then the joint can be cleaned in gasoline by soaking and cleaning.
We fill the grease into the CV joint
Replacing the inner CV joint with your own hands
» alt=»»> The procedure for replacing a “grenade” is the same for the entire front-wheel drive VAZ line, starting with 2108 and ending with VAZ-2115, “Kalina”, “Priora”, “Grant”. Before removing the inner CV joint, the oil is drained from the gearbox. Then proceed according to the following algorithm:
- Unlock and unscrew the hub nut. To make the work easier, a piece of pipe about 1 meter long should be put on the key.
- The desired side of the car is hung on a jack or lift.
- Remove the wheel.
- Remove the washer located under the hub nut installation site.
- Disconnect the steering tip.
- The CV joint is removed from the hub.
- Using a pry bar, remove the drive and internal joint from the gearbox.
Note: when removing both drives at the same time, a suitable mandrel should be installed in their place.
How to change the “grenade” with the drive removed? To do this, clamp the shaft in a vice, loosen the clamps and remove the boot. After this, the hinge is knocked off the splines with hammer blows.
The new CV joint should be hammered by applying light blows to its end with a hammer. For this it is better to use a wooden mallet. The “grenade” is first filled with a special lubricant.
Before installing a new constant velocity joint, it is necessary to clean its seat from old grease and install a new boot. Assembly is carried out in reverse order.
The repair is considered complete after successful sea trials. In this case, there should be no extraneous sounds from the drive side in all modes of vehicle movement.
What will you need at work?
When replacing the internal CV joint of a VAZ 2110 car, you need to select the right equipment and tools, without which the next job is impossible. Repairing the unit does not seem likely; it will only need to be replaced .
To perform the following operations, you will need a set of equipment and tools:
- A new internal grenade, which includes a clamp and lubricant, will ensure subsequent trouble-free operation of the system over a long period of time;
- A lift, or a special inspection hole with a jack, will be required to lift and secure vehicle , guaranteeing safety during the work;
- A set of standard tools used to replace the internal CV joint. Includes wrenches, screwdrivers, pliers and much more needed for repairs.
Replacing the boot of the outer CV joint of a VAZ 2110
https://www.aliprice.com/go.php?z=WQqaSf8lhhext=1 Which is cheaper? Change the CV joint boot
or change
the CV joint
?
Replacing the outer and inner CV joints of the drive on VAZ 2110, 2112, Kalina, Granta, Priora, 2109, 2114
Video
instructions for
replacing
CV joints or drive assemblies on
VAZ
. Description on the website: https://ladakalinabl.
Boot replacement and repair
The boot can be changed without removing the grenade if you have special equipment. His work is demonstrated on video." alt=»»> If you do not have such a device, to remove and replace it, you must perform the above-described procedure for removing the drive and dismantling the hinge. The procedure is necessary if there is even minor through damage on the boot.
Temporary repairs to the CV joint boot can be made without removing it from the vehicle. To do this, you need to thoroughly clean and degrease the damage, then seal it with a piece of rubber and cyanoacrylate-based glue (superglue).
An alternative repair method is to seal the holes with silicone caulk. It should be remembered that it takes a day to completely polymerize.
Note: express repair is a temporary measure. Replacing the inner joint boot may be delayed for a short time, but not completely cancelled. Typically, these types of repair methods are used to get to the point of repair.
Functionality check
of the inner and outer CV joints should be examined separately , since the procedures and signs are somewhat different.
External grenade
Grenade
If you want to verify that the outer CV joint is faulty, do the following:
- When starting from a standstill, deliberately create jerks, but not strong ones;
- Try to accelerate sharply and slow down;
- Move the shaft transversely between the CV joints. If you feel any play, then the grenade is definitely worn out.
Internal grenade
But to understand whether an element really needs to be replaced, do this:
- Raise the drive wheels, which will allow you to bring the inner CV joint to its maximum angle;
- Start the engine;
- Turn on first speed;
- If the hinge is at the limit of wear, you will hear a characteristic crunch. This is a signal that you need to change the grenade.
CV joint repair
As mentioned above, the hinge cannot be repaired. Conventionally, one of the repair measures includes washing the “grenade” after driving with a damaged boot.
Washing is carried out at the same time when the damaged boot on the pomegranate is replaced. The hinge is carefully knocked off the shaft, inspected for damage and thoroughly washed to remove any dirt and grease in gasoline or kerosene.
After washing, the assembly is filled with lubricant and mounted in place, having previously installed the boot. The procedure makes sense only if there are no obvious signs of a joint malfunction.
A crunchy or knocking part definitely needs to be replaced, since wear forms on the working surfaces of the inner race, and it is no longer possible to stop the destruction. Continued operation of the vehicle may be dangerous for the driver and other road users.
The transmission of torque from the engine to the wheels is carried out through drive shafts and constant velocity joints, abbreviated as CV joints. The VAZ 2110, like many cars, has front-wheel drive. Drive shafts go from the engine to the wheels. CV joints are attached to the shaft on both sides. The inner CV joint comes out from the box side, and the outer CV joint comes out from the wheel side. Among car enthusiasts, these hinges are called “grenades” due to their external similarity.
Kinds
In a VAZ 2110 car, the CV joint may need to be replaced. But which one exactly? After all, in the “ten” there are two of them - internal and external. They are necessary in order to effectively overcome all obstacles. Here one CV joint will clearly not be enough.
Internal and external
- The first grenade is internal, and it transmits torque to the shaft from the transmission.
- The second grenade is external and engages with the car's wheel hub.
Despite the fact that their operating principle is the same, they differ in design and price.
Diagnose part problems
The grenades are protected by a rubber boot. It is mounted on an external and internal hinge. The boot prevents dirt from getting into the CV joint. Another of its functions is to retain lubricant; without it, the hinge will not work.
If the boot wears out over time or is torn, sand, small stones and dirt will begin to get into the joint. After some time, the CV joint will become unusable and the grenade will have to be replaced. Such repairs will cost much more. Therefore, it is important to monitor the integrity of the anther. If a defect is detected, replace the CV joint boot.
You can visually check the condition of the anthers yourself, without resorting to the services of service station workers. It is best to drive your car into the inspection hole. First of all, you should pay attention to the boot of the outer CV joint. The VAZ 2110 has two boots on each outer side of the wheels. These anthers most often fail. The inner boot needs to be replaced much less frequently than the outer boot.
You can check the integrity of the outer CV joint boot without a hole. We stop the VAZ 2110 on the road, preferably in a place where the car will not interfere with the movement of either cars or pedestrians. We turn the steering wheel to the right to the extreme position, this will be enough to diagnose the outer boot on the left side.
We similarly inspect the boot from the opposite side. If traces of grease are visible on the boot or there are cracks and cuts, then the boot should be replaced. The design of the VAZ 2110 allows you to cope with the replacement yourself.
Following the recommendations of experienced craftsmen, you should replace the boots of both the outer and inner CV joints at the same time. Even if the inner CV boot still looks intact and without cracks.
Replacing the CV joint boot
Required tools and spare parts:
- set of wrenches: ring and open-end wrenches for 13, 17, 19;
- WD-40, if you don’t have it, you can use brake fluid;
- brush with metal bristles;
- mount;
- screwdriver;
- hammer with lead or brass head;
- container for oil from the gearbox;
- a new outer joint boot and an inner CV joint boot - 2 sets in case of replacement on both sides.
The most convenient way to change CV joint boots on a VAZ 2110 is in the inspection hole. The car is first set to the parking brake. We install the wheel stop. It ensures the vehicle remains stationary during repairs.
We'll look at how to change CV joint boots in step-by-step instructions. It should be noted that this procedure can take about 2 hours even for a non-professional in car repair.
Instructions:
- After making sure that the car is stationary, we tear off the wheel studs. We jack up the side from which we are replacing. Remove the cap that protects the CV joint nut. Unscrew the wheel bolts and remove the wheel.
- If the crankcase protection is installed below, then remove it. Before dismantling, all threaded connections should be treated with WD-40 or brake fluid. We unscrew the plug in the gearbox and drain the oil into a prepared container.
- We unscrew the two bolts that hold the ball joint on the steering knuckle of the front suspension. To facilitate dismantling, spray the joint generously with WD-40.
- We ask your partner to press the brake pedal, then unscrew the nut securing the outer CV joint to the hub. If you replace the CV joint boot on a VAZ 2110 yourself, you can block the brake disc using a screwdriver.
- We turn the steering wheel to the right all the way if we are replacing it on the left side. Remove the outer CV joint from the wheel hub. To prevent the drive shaft from falling, we tie it up using a regular wire or rope.
- Holding the axle shaft with your hand, use a pry bar to remove the inner CV joint from the box. DO NOT REMOVE TWO DRIVE SHAFT AT THE SAME TIME. The gears in the box may shift, and installing the drive shafts back will be very difficult.
- We remove the clamps that secure the anthers. We clamp the axle shaft in a vice. Using a soft-head hammer, knock the grenades off the drive shaft. After washing the CV joints in gasoline to remove the old lubricant, we make sure that the joint is intact. We fill the hinge with new special lubricant. We install new boots and secure them with clamps. We press the CV joints onto the shaft.
- Having replaced the retaining ring on the inner CV joint, we insert the axle shaft into the box. To fix it in the box, carefully hit the axle shaft with a hammer through a wooden block several times.
- Install the drive shaft into the front wheel hub and secure it with a washer. Don't forget to put a washer under the nut. We attach the ball joint back to the steering knuckle.
- To replace the CV joint boot on the VAZ 2110 on the other side, repeat paragraphs. 1-9.
Timely replacement of the CV joint boot on a VAZ 2110 will allow you to save quite a large amount on car repairs. Since the cost of a grenade is much more than the cost of a CV joint boot.
The CV boot is a special element designed to protect constant velocity joints from the effects of dirt dust and various external factors. It is made of rubber and is mounted on the outer and inner CV joints, thereby holding all the lubricant inside, which is necessary for operation.
The video shows the process of replacing the CV joint boot on front-wheel drive cars of the VAZ family.
Assembly nuances
Before reassembling, we also recommend watching a video about replacing the inner CV joint on a VAZ 2110. Plus, follow a few tips.
- A plastic plug must be installed at the end of the shaft.
- Before installing a new CV joint, the element must be lubricated with special compounds.
- You need to install the retaining ring before installing the new unit - the grenade.
- Having installed the drive, it is mounted on the gear, achieving complete fixation. At this point you will need to use a hammer.
You can see for yourself that replacing a grenade does not pose any special difficulties. However, unless you have absolutely no experience repairing your car yourself, doing the work yourself is highly not recommended.
The best solution would be to find a good service station, where real professionals work. Trust them to replace grenades to guarantee high quality repairs and efficient operation of the entire chassis of your car.
Well, if this is not the first time you are repairing your “ten”, then such a procedure as replacing a CV joint will become an easily feasible task for you. Just remember to follow the recommendations from the instruction manual for your VAZ 2110.
The CV boot is a special element designed to protect constant velocity joints from the effects of dirt dust and various external factors. It is made of rubber and is mounted on the outer and inner CV joints, thereby holding all the lubricant inside, which is necessary for operation.
The video shows the process of replacing the CV joint boot on front-wheel drive cars of the VAZ family.
Tool for the job
Before you start working, you need to prepare all the tools.
- Jack.
- Wheel chocks.
- Set of keys and socket heads.
- Collar.
- WD-40.
- Hammer.
- Mount.
The process of replacing the CV boot
Before you get started, make sure the vehicle is parked on a level surface, the handbrake is on, and wheel chocks are installed under the rear wheels.
- While the car is fixed on the ground, we tear off the wheel bolts and hubs on the side where all the work will be done.
May require a long lever, a VERY long lever! - Next, we lift the car on a jack.
- Unscrew the bolts and remove the wheel.
- We dismantle the mudguard of the engine compartment. Further, if work to replace the boot will be carried out on the inner CV joint, then it is necessary to drain the oil from the gearbox , but if replacement is to be carried out on the outer one, then such work is not required.
- Next, we turn the wheels in that direction, depending on which side we are replacing.
- We unscrew the bolt that secures the ball joint to the steering knuckle.
By disconnecting the cotter pin, the bolt will easily come out of its place of fixation. - Then we pull back the steering knuckle assembly with the strut, thereby pulling the end of the outer CV joint away from the hub.
- We remove the retaining ring on the shaft.
For dismantling it is better to use pliers or a small screwdriver. - When it is free, we release the boot from the fixation of the clamps. It is better to throw out the old elements and use new ones when replacing.
If the inner CV joint is to be replaced, then using a pry bar, we push it out of the gearbox, and then insert a technological fastener into the gearbox housing, which can be used as an old CV joint. If this is not done, the differential gears may become misaligned, making subsequent installation of a new joint difficult.
- Work that involves replacing the boot on the outer joint may not involve dismantling the entire shaft and is done directly on the machine, but the help of an assistant will be helpful.
By holding the shaft, the CV joint will easily come out of its place. - Using a hammer with a drift, we knock the CV joint off the shaft, while simultaneously holding it from slipping out of the gearbox housing.
- When the CV joint gave in and jumped out of its place, we move it to the side.
- Next, we dismantle the old boot and clean the shaft from traces of lubricant using gasoline.
- A new boot is put on the shaft and then it is necessary to diagnose the condition of the CV joint as a whole.
- Next, we carry out the assembly in the reverse order, drive the CV joint onto the shaft, and secure the boot with clamps.
First of all, put on a small collarAdvice! Before finally tightening the largest clamp, expel all the air from the boot, and then tighten it.
- Don't forget to put the retaining ring back on the shaft.
The ring is indicated by an arrow. - We insert the CV joint into the hub, tighten all the bolts, and do not forget about reinstalling the ball joint.
What does a torn boot threaten the car owner with?
And if a rupture occurs, or cracks are already found on it, then one way or another moisture with elements of sand and dirt begins to seep inside. This will not have the best effect on the operation of the front-wheel drive system as a whole. Despite the fact that the elements are assembled from high-quality and durable materials, rupture can occur at any time.
Reasons for boot failure
Among all the reasons for the premature failure of the boot, the following can be distinguished:
- Low quality spare parts, possible presence of fakes or defective parts.
- The amount of lubricant inside is minimal , therefore, the material dries out over time.
- The driving style of the car is harsh, therefore, the boot breaks due to strong and sudden turns of the steering wheel .
- Poor quality of the road surface negatively affects the condition of the front suspension as a whole, and in particular the constant pressure on the CV joint boot.
All of the above reasons in one way or another have a negative impact on the general condition of the CV joint boot, and below we offer you a way to replace it yourself without resorting to the help of a car service center.
Why is it necessary to replace the boot?
It is known that any part is subject to wear during operation and this is due to the appearance of various cracks and gaps on its surface. These are exactly the symptoms that are characteristic of the CV joint boot. But what is a CV joint?
This is what the new CV joint and boot look like
CV joint (constant velocity joint - approx.) is a special joint equipped with transverse grooves and able to change the angle between the driven and driven axle shafts. In other words, thanks to this element, the car transmits torque from the gearbox directly to the wheels.
And over time, when the boot wears out, dust and dirt get inside the CV joint, thereby mixing with the lubricant, which leads to the formation of a kind of “crunch” when turning the steering wheel or sharply accelerating the car. In this case, the grenade itself will need to be replaced.
Additional factors that may indicate CV joint wear:
- When the car starts to move, or when the moment of movement changes, small jerks appear.
- There is play on the shaft between the inner or outer CV joint.
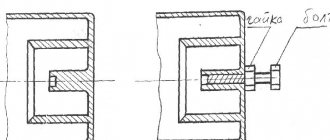
SHRUS device diagram
In order to study in more detail the structure of CV joints and their anthers, we offer a detailed diagram:
This is what the diagram looks like.
Thus, long-term driving with a torn boot, and even more so with a faulty CV joint, is highly not recommended. Can knock out a grenade.
"Grenade" defects
Before replacing CV joints on a VAZ 2110, you need to make sure that they are made with high quality and can effectively perform their job in a new place.
Alas, sometimes replacing the inner CV joint on a VAZ 2110 does not give the expected result, since product defects .
The literature indicates that CV joints are made from special high-strength alloys that practically do not wear out. But in practice everything looks a little different. Whatever one may say, there are no eternal parts, and CV joints are no exception.
Defects may be as follows:
- Low quality of alloys used in manufacturing;
- Banal fakes and defective components;
- Poor quality or complete lack of lubricant, which leads to rapid failure of even a new grenade;
- Damaged anthers, due to which all kinds of debris get into the grenade.
Regarding the replacement of CV joint boots on a VAZ 2110, we recommend watching a video that will help you cope with the problem that has arisen. This issue should be approached thoroughly.