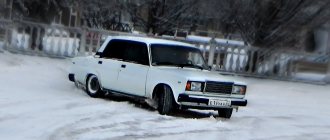
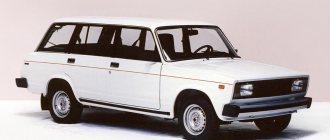
The Soviet Union is not just a state, but an entire era that lasted more than 70 years. The state sought to become one of the leaders on the world stage, so it was extremely important that the automotive industry be no worse than in the countries of the Western world. One of the brightest representatives of this race in the automotive industry was the legendary VAZ 2106. Several generations of our citizens have grown up who consider the six to be the best domestic car. And this is not without common sense, because the engineers of the automobile plant in Togliatti created a simple and therefore reliable car.
The gearbox of the VAZ 2106 car was also distinguished by a high degree of reliability and quality. However, without high-quality gear oil, the operation of the gearbox would not be long. The six gearbox is the main element of the transmission, with the help of which torque is transmitted from the power unit through the clutch to the drive of the drive wheels, regulating the speed of their rotation.
Gearbox VAZ 2106 and their design
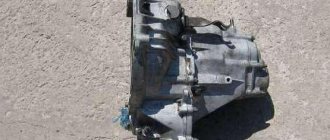
This car was equipped with two types of gearboxes, one of them was a manual 4-speed transmission. The second is an improved version of the previous one, designed for 5 speeds, also of a mechanical type. At the same time, the five-speed gearbox, due to its modernization, was more expensive and more demanding to maintain. In addition, both of these gearboxes (5-speed and 4-speed) can be interchangeable.
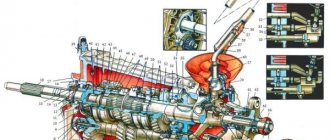
The VAZ 2106 gear shift diagram is shown in the photo.
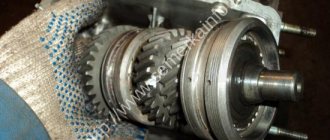
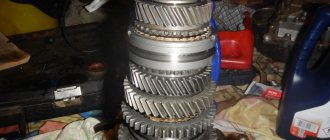
The device of any of them is a simple structure consisting of several shafts (primary, secondary, intermediate), a crankcase and a gear shift mechanism with synchronizers. On the input shaft there is a firmly seated gear, which is in constant mesh with all other gears. The shaft rotates due to two bearings located at the front and rear; the front one is also located in the crankshaft socket at the end. The rear one is located inside the crankcase and is sealed with an oil seal. The presence of the latter is explained by the fact that there is transmission oil in the crankcase.
The secondary shaft rotates due to three bearings. The front needle bearing is firmly seated in the input shaft socket, the ball bearing in the center is located in the crankcase seat, and the rear bearing is pressed into the socket on the rear wall. It also has a seal element that prevents possible oil leakage from the gearbox housing.
The intermediate shaft is a shaft with a gear block that rotates on two bearings. There is a ball bearing at the front and a cylindrical roller bearing at the rear. On the side there is a gear with reverse motion. As for synchronizers, they are structurally the same and consist of a hub, springs and couplings, equipped with locking rings.
Largely thanks to the simple, reliable and high-quality gearbox, the VAZ 2106 can boast of good dynamics and speed characteristics. All gears, with the exception of those at reverse speed, have an oblique tooth and are in constant mesh. Such a design, with its small size, allows more torque to be transmitted to the shafts, especially since the gear ratios of the VAZ 2106 gearbox are selected correctly. In reverse, gears with straight teeth are installed, so the car cannot gain high speed when the reverse gear is engaged, since such gears cannot transmit large torque.
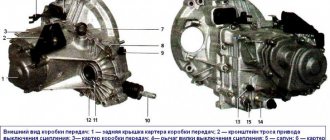
VAZ 2106 gearbox device
Speed shifting occurs as a result of the operation of clutches with synchronizers. The shift lever itself and the entire mechanism are forks with rods. After switching, the speed is fixed by balls with springs that hold the rod. The engineers also provided protection against the possibility of turning on two speeds at once, using special blockers or, in common parlance, “crackers” for this. In order to change the oil, the gearbox has special holes with plugs with threads and rubber seals.
Please note: the performance characteristics of metal parts are selected taking into account the use of high-quality gear oil.
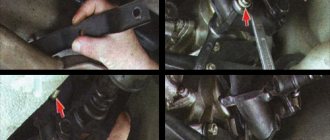
First stage. Removing the gearbox from the car
- the starter is removed;
- the “cross” is removed;
- the support cross member of the power device is disconnected;
- it is necessary to remove the flexible shaft, which is connected to the speedometer drive;
- The hydraulic drive cylinder must be separated from the crankcase. Important! The hose attached to it does not need to be touched;
- remove the bolts securing the clutch housing cover using a ten key;
- it is necessary to install a support under the gearbox;
- you need to take an extension cord and put it on a 19 socket type key;
- using a key and a “cross” hinge, you need to unscrew the bolts securing the cylinder block with the clutch;
- using a screwdriver that was inserted into the gap, it is necessary to press the clutch away from the cylinder;
- remove the starter from the directional bushings;
- the input shaft of the VAZ 2107 gearbox must be removed from the driven disk hub;
- we displace the primary shaft from inside the bearing ring located in the crankshaft;
- and finally, remove the gearbox from the car.
Main faults on the VAZ 2106 gearbox and how to fix them
Malfunctions of the “six” gearbox have more than one cause. Accordingly, the methods for eliminating them will vary.
| Cause of malfunction | Remedy |
| Presence of noise in the gearbox (may disappear if you depress the clutch pedal) | |
| Lack of oil in the crankcase | Check the level and add oil. Check for oil leaks, clean or replace the breather. |
| Worn bearings or gears | Replacement of damaged or worn elements |
| There is no noise, but the speeds are difficult to switch on | |
| The shift lever is damaged, the spherical washer is worn out, the gearbox lever travel limiting screw is worn out, the lever is bent. | Replacement of damaged parts |
| The lever joint jams | Replace the worn element, lubricate the joint with the recommended lubricant |
| Rusks and dirt get stuck in the fork rod sockets. | Replacing parts |
| Difficult movement of the coupling on the hub | Cleaning splines, removing burrs |
| Fork deformations | Replace with new ones |
| Clutch won't disengage | Troubleshoot clutch problems |
| Between third and fourth gear there is no way to lock the gear lever in neutral | |
| Breakage of the release spring | Replace the spring or replace it if it has come off |
| Spontaneous gear shutdown | |
| Loss of elasticity of clamps, wear of balls or rod seats | Replacing parts |
| Worn synchronizer rings | Replacement |
| Clutch teeth or synchronizer ring are worn out | Replace damaged parts |
| The synchronizer spring has failed | Install a new spring |
| There is a noise, crackling or squealing sound when shifting gears | |
| Incomplete clutch disengagement | Troubleshoot clutch problems |
| Insufficient oil level in the crankcase | Check for oil leaks, add oil, clean or replace the breather |
| Gear teeth worn | Replace parts |
| The synchronizer ring of a particular gear is worn out | Replace worn ring |
| Presence of shaft play | Tighten bearing fastenings, replace worn ones |
| Oil leak | |
| Worn cuffs | Replacement of worn elements. Cleaning or replacing the breather |
| Wear of shafts and nicks in places where cuffs are installed | Cleaning with fine grain sandpaper. Replacing cuffs. In case of severe wear, replace parts. |
| Breather clogged (increased oil pressure) | Cleaning or replacing the breather |
| Weak crankcase cover, worn gaskets. | Tightening fasteners or replacing gaskets. |
| Oil drain or fill plugs that are not fully tightened | Tightening traffic jams |
It is worth considering that some of the faults are related to other components and assemblies of the car.
Noise Removal
The noise of the VAZ-2105 gearbox can occur due to wear of bearings, wear of gear teeth and gears, as well as synchronizers, and axial displacement of the shafts relative to each other.
If such a problem occurs, it will be necessary to remove the transmission from the car, since it cannot be repaired otherwise. Note that eliminating noise is one of the most difficult operations to perform, since it requires complete disassembly and reassembly of the gearbox with replacement of worn elements.
In addition to the standard set of keys and screwdrivers, you will additionally need a universal puller. Next, we’ll look at how to completely disassemble a VAZ-2105 5-speed gearbox.
So, all work is done on the removed gearbox:
- Drain the oil and remove the bottom cover. We immediately assess the condition of the gear teeth. If their damage is not noticeable, most likely the noise is coming from the bearings;
- We check the position of the gearshift lever (it should be in neutral), after which we dismantle the gear shift mechanism (link) from the gearbox;
- Remove the cover of the clamps and remove the springs and balls;
- We remove the elastic coupling from the secondary shaft, and then its hub (to unscrew the hub nut, unscrew the bolt securing the 3rd and 4th gear forks, engage 1st gear in the gearbox and displace the 4th gear synchronizer clutch. Two at a time the gears are engaged, the gearbox will be blocked and the nut can be unscrewed);
- We unscrew the speedometer drive, the sensor for turning on the reverse speed light and the exhaust system pipe mounting bracket;
- We unscrew the fastening elements of the rear gearbox cover (5-speed gearboxes have 5 external nuts and 1 internal nut, 4-speed gearboxes do not have an internal nut). Then remove the cover. In this case, the bearings are second. the shaft and the 5th gear block will be disassembled - the inner races will remain on the shafts, and the outer ones, together with the rolling elements, will be in the cover, and all this will need to be dismantled for replacement;
- Remove the speedometer drive gear and oil deflector from the secondary shaft;
- We dismantle the gear block of the 5th and reverse gears by unscrewing its fastening bolt installed in the shaft, as well as the reverse intermediate gear from the axle;
- Remove the 5th gear synchronizer from 2nd. shaft, the 5th and reverse gear shift fork together with the axle, then remove the 3rd and 4th gear axle block;
- We dismantle the synchronizer hub and the reverse gear from the second. shaft;
- We unscrew the bolts securing the pressure plate of the secondary shaft bearing and remove it;
- Unscrew the clutch housing from the gearbox;
- Unscrew the intermediate shaft bolt and remove the front bearing;
- We remove the rear bearing of the intermediate shaft, after which it can be pulled out of the box body;
- We remove the axles and forks of the remaining gears, as well as the axle block of the 1st and 2nd gears;
- We take out the input shaft;
- We remove the secondary shaft along with the gears;
Well, then troubleshooting of the component elements is carried out, worn and damaged components are replaced and assembly is carried out.
Note that this disassembly diagram is general and does not consider such nuances as removing retaining rings, sealing washers, engravers and other small elements.
How to replace a gearbox on a VAZ 2106
Before proceeding with dismantling the gearbox and further disassembly, you need to make sure that the cause of the malfunction is in the gearbox itself and is not related to other elements. For example, the following options are possible.
- The oil in the box is below the minimum level or is completely absent. As a rule, in such a situation, the gears will be engaged with a strong crunch and great difficulty.
- The fastenings of the box have become loose and it is hanging loose. Basically, a weakened gearbox is noticeable on the move when driving over bumps.
- Clutch malfunctions. The clutch drive has failed; in this case, if you press the clutch pedal all the way, the gears will also be engaged with difficulty and with a strong crunch.
If you are absolutely sure that the cause of the malfunction lies directly in the gearbox, then you can proceed to the process of removing it.
Dismantling the gearbox
The car must be placed above the inspection hole (unless, of course, it is possible to use a lift). Wheel chocks must be placed under the rear wheels and the parking brake lever must be lowered. The gear shift lever must be removed.
Removing the lever is not enough, since there are still three bushings left on the rocker (the main gear shift lever) that need to be unscrewed.
To do this, use two screwdrivers to carefully separate the petals of the upper bushing. After this it must be removed. Then, with a little effort, you can remove bushings A and B from the lever.
Unscrew the two screws securing the cover to the floor and remove it. Using a screwdriver, loosen the two screws holding the handbrake lever cover and remove it. Remove the screws under the front seats that secure the front floor mats to the floor.
Move the front seats all the way back and bend the edges of the floor mats.
Unscrew the nuts on the front seats that secure the slides to the brackets.
Unscrew the four screws securing the trim to the threshold and remove it (the trims are removed from both sides).
Lift the floor mat and push it forward as far as possible, with the mat ring (A) threaded through the drawstring (B).
Unscrew the screws that secure the plastic cover of the rocker and remove it.
Remove the hose that supplies warm air to the air filter housing. After disconnecting the warm air supply hose, you need to, armed with a wrench, unscrew all the bolts that secure the starter and move it forward. Disconnect the crankcase drain plug and drain the oil into any suitable container.
Remove the exhaust system, starting with the exhaust manifold. You need to disconnect the propeller shaft coupling from the gearbox flange (after removing the muffler). Disconnect the wire block (see photo) from the reverse signal switch (located directly on the gearbox on its right side).
Using a handy tool (pliers or just your hands), loosen the speedometer nut and disconnect the end of the cable from the gearbox.
Remove the clutch slave cylinder (there is no need to remove it completely, just remove it from the bracket; it is not necessary to remove the cylinder hose). Remove the four bolts that secure the clutch housing cover.
Using any suitable wooden block, you need to support the bracket, placing one side of the block on the crossbar and the other on the ground.
Unscrew the nuts that secure the cross member to the body. Remove the block and bring together the rear part of the gearbox. Using the same block, you need to support the front part of the engine, always in the place indicated in the photo.
Remove the top bolts that secure the clutch housing to the engine. An assistant must support the rear of the gearbox, and at this time you need to unscrew the lower bolts securing the gearbox housing to the engine. After all the manipulations done, together with an assistant, you need to move the gearbox back in the direction of travel until the input shaft disengages from the engine flywheel. In fact, there is nothing complicated about replacing this unit; no special knowledge or skills are required.
Replacing oil seals
The need to replace oil seals arises when an oil leak occurs from the gearbox housing. Both the front and rear cuffs can fail. In this case, the seals will need to be replaced.
Input shaft oil seal
If signs of damage to the input shaft oil seal were noticed, i.e., traces of lubricant leakage appeared in the area of the clutch housing, then the likely cause is failure of the input shaft seal. An oil leak may also appear from the engine when the rear crankshaft oil seal wears out. In order to determine where exactly the oil is leaking from, you can try to figure it out by smell, since motor lubrication is different from transmission lubrication.
The gearbox input shaft oil seal is installed in the clutch housing
Description and dimensions
The VAZ 2101 gearbox input shaft oil seal has the following dimensions: 28x47x8 mm, which corresponds to the inner and outer diameter, as well as the thickness of the race.
Replacing the input shaft oil seal
To replace the cuff on the input shaft, you will need to remove the box from the car and remove the clutch housing. Then, using the adapter, we knock the oil seal out of the housing and remove it with pliers. To install a new part, you will need a suitable mandrel and a hammer.
To replace the input shaft oil seal, you will need to dismantle the gearbox, remove the clutch housing and knock out the damaged element. The new cuff is installed in the reverse order
Secondary shaft oil seal
When the secondary shaft oil seal fails, traces of oil leakage appear in the rear part of the gearbox. In this case, the part needs to be replaced.
Description and dimensions
The secondary shaft cuff has the following dimensions: 32x56x10 mm. When purchasing a seal, you should pay attention to these parameters so as not to mistakenly take a part of a different size.
Replacing the secondary shaft oil seal
On the secondary shaft of the VAZ 2101 gearbox, compared to the primary shaft, the oil seal is much easier to change, since there is no need to dismantle the unit. Preliminary measures include removing the cardan together with the elastic coupling. After this, perform the following steps:
- Remove the centering ring from the secondary shaft.
- Remove the locking element.
- Unscrew the nut by 30.
- We remove the flange with a puller or knock it down with a hammer.
- We pry up the old oil seal with a screwdriver and remove it from the rear of the gearbox.
- We press the new cuff with a suitable piece of pipe.
Video: replacing the oil seal on the secondary shaft on a “classic”
From 4-speed to 5-speed
Finally, let’s consider such an issue as converting the gearbox from 4 to 5 stages of the VAZ-2105. Such a modification is quite possible, since when the five-speed gearbox was created, the basis for it was the 4-speed version. But in this case, you will have to replace some of the components taken from the 5-speed gearbox, namely:
- Back cover;
- Intermediate shaft (with a hole for mounting the 5th gear gear block);
- Secondary shaft (in the 5-speed version it is slightly shorter);
- 5th speed gear block;
- Reverse idler gear axis;
- A set of rods together with a fork for 5th and reverse gears;
- Gear shift mechanism (slide);
- Reverse light sensor;
- Power unit mounting bracket;
Next, it is enough to completely disassemble the 4-speed gearbox and assemble it as a 5-speed gearbox using the specified components.
Oil leaks
The last common cause is a lubricant leak. This can happen through loosely screwed plugs or a damaged bottom cover gasket. But most often it is the input shaft seal that leaks.
In the first case, the problem can be eliminated simply by pulling the plugs or replacing the gasket. And for this you do not need to dismantle the gearbox from the car. But in the case of a leak in the input shaft oil seal, you will have to remove the box, but you won’t need to disassemble it to replace the damaged rubber element as a whole.
Replacing the gearbox oil seal, if it concerns the input shaft, is not difficult. It is located in the clutch housing, but from the inside, that is, it will have to be disconnected from the gearbox housing. And then the damaged oil seal is removed and a new one is installed.
Then everything is put back together. In case of damage to other seals, the gearbox is disassembled and the damaged element is replaced.