Automotive gasoline vapor trap: adsorber and its purpose
You should immediately understand the question of what an adsorber is and why it is needed on a car. Initially, it is worth noting that the correct name of this device is an adsorber, that is, it is written with the letter “d,” although many call it an absorber, which is not entirely correct. The difference between an adsorber and an absorber is that the first one accumulates vapors (in this case, gasoline) and holds them, while the second one completely absorbs the substance (that is, with the impossibility of their subsequent release).
We will find out why cars use an adsorber and not an absorber after understanding the purpose of this device.
A gasoline vapor collector is a kind of filter that prevents direct contact of gasoline with the atmosphere, which reduces the level of pollution. Such devices were invented after the introduction of the Euro-2 environmental standard, which prohibits atmospheric pollution with gasoline vapors.
The main purpose of the device is to temporarily absorb the vapors that form in the gas tank and use them for selfish purposes, that is, not just suppress, but transport them to the engine, where they will be supplied to the cylinders for combustion along with the fuel assembly.
Returning to the name of the device, we can safely say that the Priora and other modern cars use an adsorber that only temporarily accumulates gasoline vapor (which occurs while the engine is not running). The use of absorbers would not allow vapors to be directed into the combustion chambers of the engine due to their complete absorption by the sorbent.
This is interesting! Activated carbon is used as a sorbent in automobile adsorbers.
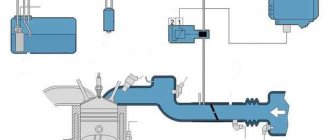
Design and general diagram of the EVAP gasoline vapor recovery system
The design and operating principle of the device in question is quite simple. Below is a diagram.
To understand this, you need to know that the system consists of a number of the following parts:
- The separator is needed to capture gasoline vapors and then return it in liquid form back to the tank. On Priora it is located in the left rear wheel niche. It is important not to confuse it with an adsorber. The separator (top) has a built-in gravity valve.
- The gravity valve is needed to eliminate the possibility of fuel leaking from the tank if the vehicle rolls over in the event of an accident. It is also called a safety or safety valve, which is triggered when the vertical deviates by an angle of more than 90 degrees.
- The pressure relief valve is a device that eliminates the possibility of deformation of the metal tank when gasoline is used up. To put it simply, as fuel is consumed, a vacuum forms inside the sealed tank, which can cause deformation of its walls. To prevent this, a pressure sensor is used, which is also called a breather. With its help, the pressure inside the tank is equalized with atmospheric pressure. Its role is played by the atmospheric channel on the adsorber. When a vacuum is created in the tank, air is sucked in through the air channel, thereby equalizing the pressure in the tank. If the channel is faulty (contaminated), then the risk of tank deformation increases. That is why the Priora uses a gas tank cap with a valve for air intake as a safety net. This valve does not release air from the tank, but lets it in to stabilize the pressure.
- Absorbent - as mentioned above, it is activated carbon that temporarily absorbs and retains gasoline vapors that enter the engine during purging.
- The filter prevents the possibility of activated carbon granules entering the purge valve, as well as contaminants entering the adsorber through the air channel.
- Electromagnetic valve (canister purge valve)—its role in the system is key, since it is responsible for opening the channel for sucking gasoline vapors from the canister.
- Connecting tubes - needed to connect the adsorber to the gas tank, separator and other structural elements.
The operation of the system is controlled by an electronic control unit, so its malfunction is necessarily accompanied by the display of the corresponding error codes on the BC screen.
Troubleshooting
No pressure in the fuel rail? Causes:
If the pressure in the fuel rail gradually drops, the cause may be:
Let's check it like this. We clamp the leading rubber hose of the fuel rail:
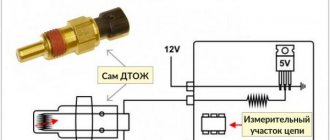
Checking the RTD. Connect the pressure gauge hose to the outlet fitting of the fuel pump and turn on the ignition:
If the pressure in the fuel rail is within normal limits, we look for the causes of engine malfunctions elsewhere.
Modern cars are equipped with electronic fuel pumps; mechanical ones are found only in cars manufactured before 2000. The task of this component is to ensure an uninterrupted supply of fuel. Everything functions well at high engine speeds, but problems arise when moving to low and idle speeds. Increased pressure damages fuel supply hoses and other system components. The fuel pressure regulator protects against such consequences. If there are malfunctions in it, this can be determined by several signs.
Source
Diagram of the fuel vapor recovery system on Priora: design and designation of the main elements
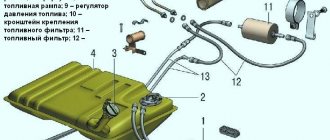
The diagram of the gasoline vapor recovery system on Priora is as follows:
Fuel vapor recovery system VAZ-2170
In the diagram, each element has a corresponding name and purpose. The name of each item is listed in the description below:
The purpose of each element of the system is described in detail in the material below.
This is interesting! The vent tube numbered “9” is designed to remove air from the tank as it fills with fuel.
How does a car's gasoline vapor recovery system (adsorber) work?
The principle of its operation on Priora is identical to other brands of cars, so let’s look at the overall picture.
- Gasoline has the property of releasing vapors, which usually accumulate in the upper part of the filler neck of the tank. For this, a separator is used, with the help of which these vapors are condensed and returned in liquid form back to the tank.
- Some vapors do not condense in the separator, so an adsorber is provided for this. In it, vapors accumulate and are retained (this happens when the car engine is turned off).
- After starting the engine, reaching operating temperature, and only with the throttle valve open (this is very important), the solenoid valve opens. When it is triggered, for which the ECU is responsible, gasoline vapor is supplied from the adsorber to the throttle assembly. This process is called purging. Its duration is controlled by the ECU.
- The process occurs as follows: the adsorber has a channel connecting it to the environment. As soon as the solenoid valve opens, the engine sucks in air, which, together with gasoline vapor from the adsorber, enters the throttle assembly.
- From the throttle, these vapors, along with the air, enter the intake manifold, where they are mixed with a portion of gasoline released from the injectors and are sucked into the combustion chambers of the cylinders. As a result, they are burned, thereby increasing the efficiency of the internal combustion engine.
The operating principle of the system is quite simple and reliable, but malfunctions occur, which leads to problems with engine operation. What are the signs of a malfunction of the adsorber and its valve on a Priora, and how to determine the failure of parts of this system, we will consider further.
Cleaning Priora injectors
There are two options for washing injectors: with and without removing them from the car. The removed injectors are washed on special stands using ultrasound, under the influence of which even the oldest contaminants disappear. Ordinary drivers do not have such stands, so below we will consider a more popular option for washing injectors without removing them from the Priora. Here's what you'll need for this:
Flushing sequence
Ordinary car nipples are inserted into the holes of a plastic bottle
Priora injectors are washed using a filter and a plastic bottle
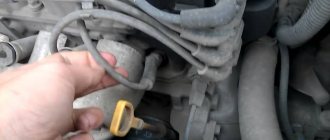
The green button is clearly visible on the Priora fuel hose
The main fuel hose of the Priora is connected to the fuel filter for flushing
The device for washing Priora injectors is assembled and ready for use
A car water pump plays an important role in the operation of a car engine. It is possible to recognize its malfunctions using the following article: https://vazweb.ru/desyatka/pitanie/zamena-forsunok-vaz-2114.html
Malfunction of the adsorber and adsorber valve on a Priora: main symptoms
The fundamental element of the entire system is the solenoid valve, which is controlled by the ECU. It is because of the failure of this element that problems arise on the car. However, let’s look at the main signs of a malfunction of the gasoline vapor recovery system:
- Floating speed. Naturally, there is no need to rush to diagnose the system, since this phenomenon is often associated with a number of other problems, but it should not be ruled out either. Why do the revs fluctuate? The cause is a solenoid valve that may be stuck open. As a result, it turns out that air is sucked into the throttle assembly when starting the engine, which ultimately leads to the appearance of the effect of changing crankshaft speeds. Prior owners often encounter this problem, so it is important to pay attention to the serviceability of the solenoid valve. You will find out where it is located on Priora and how to check it in the sections below.
- The engine does not gain full power, which is quite understandable; an element of the fuel vapor recovery system is faulty. As a rule, this can be caused by clogged adsorber, which reduces throughput.
- The engine stalls at idle when trying to add gas.
- Fuel indication sensor readings are incorrect. It shows either a full tank or an empty one. This usually happens when the pressure relief valve does not cope with its function. The possibility of failure of the gas tank cap, which has a built-in breather, cannot be ruled out.
- Increased fuel consumption.
- When you unscrew the cap from the neck of the tank, a long hissing sound occurs, indicating that the pressure valve is not coping with the task (the pressure is not equalized). If hissing does not occur at all when unscrewing the lid, then this may also be a sign of a malfunction of the breather in the lid, since depressurization of the product is appropriate.
These signs indicate that there is a malfunction in the gasoline vapor recovery system on the Priora. In addition, if the solenoid valve (purge) fails, the Check Engine may light up on the instrument panel, and the corresponding error codes will be displayed on the on-board computer:
- P0441 - incorrect air flow through the adsorber valve;
- P0442 - leak in the gasoline vapor recovery system;
- P0443 - malfunction of the valve circuit of the gasoline vapor recovery system;
- P0444 - break in the canister valve wire;
- P0445 - the control circuit for the canister purge valve closes to ground;
- P0446 - malfunction of the control circuit of the vapor valve for collecting gasoline vapors EVAP (Evaporative Emission Control System Vent Control Circuit Malfunction).
If one of the errors listed above is displayed on the BC, then you need to look for a malfunction in the gasoline vapor recovery system. Typically, this error can be associated with a failed solenoid valve, a clogged filter element, or a faulty pressure relief valve.
Fuel system diagram for VAZ-2112 injector 16 valves
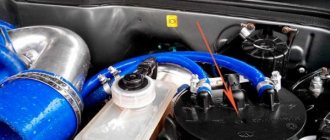
The fuel hose of the Lada Priora is the main artery that ensures a reliable supply of gasoline to the internal combustion engine. The fuel system consists of several component hoses. Some of them are made of metal, others of plastic, and others of rubber of very low quality, which ultimately leads to significant wear of such products when exposed to sub-zero temperatures.
Unfortunately, it is impossible to completely avoid the use of elastic materials such as rubber. The thing is that the parts that are located on the engine are subject to some vibrations. In order for displacements to be damped, elastic materials are used when transferring fuel from one unit to another. A good example of this is the Priora’s rubber fuel hose.
Causes of malfunction of the adsorber on Priora and features of its self-check
The adsorber contains activated carbon in granular form, which gets wet over time, which reduces the level of air permeability. Typically, such a malfunction is accompanied by error on BC P0441. However, in addition, a more common problem is when coal particles enter the body of the solenoid valve and, accumulating in large quantities, do not allow it to close, which leads to the problem of floating speed on Priora.
The causes of adsorber malfunction are the following factors:
- Depressurization of the adsorber housing. Usually occurs in case of mechanical damage. If such a breakdown occurs, the part must be replaced.
- Damage to the integrity of the power supply wires of the solenoid valve. In this case, errors P0443/P0444/P0445 and P0446 are displayed. This could be an open circuit, short to ground, or low voltage.
- Air inlet fitting and filter element are dirty. Air enters the device through the inlet fitting, as a result of which accumulated vapors are purged. Through the fitting, contaminants enter the adsorber, which leads to a decrease in the level of air permeability. This causes the device to operate ineffectively.
To determine the cause of the malfunction, you will need to focus on the corresponding errors or symptoms. For example, if there is a suspicion of a violation of the seal of the housing, then it is necessary to remove the adsorber and inspect its condition. If no defects are found, then its tightness is usually checked as follows:
- the connections to the atmosphere and to the solenoid valve are plugged;
- compressed air is supplied to the remaining fitting connecting the device to the gas tank;
- the absence of signs of air leakage indicates the integrity of the adsorber housing.
Be sure to inspect the integrity of the power wires of the solenoid valve, and if necessary, call them. If there is a suspicion that the valve is jammed in the open position, then a simple and reliable way to check is to start the engine and plug the fitting connecting the adsorber to the atmosphere with your hand. If after this the engine operation changes, then the cause of the malfunction has been identified, and all that remains is to eliminate it by replacing the part.
It is important to note that if the adsorber is dirty, it must be replaced. This device is non-separable, and if a malfunction is suspected, it must be replaced. As for the resource, there are no exact figures here. The service life depends on many factors, including the quality of the device itself.
This is interesting! The adsorber on Priora has the following article number 2170-1164010. Its price is approximately 500-800 rubles.
How to check on VAZ and foreign cars
To determine a breakdown, the following procedures are performed:
You can check the performance of the RTD yourself, even without tools. To do this, just pinch or disconnect the valve and study the intensity of the stream. A pressure gauge will give a more accurate result. It should be connected between the fitting and the fuel hose, having first disconnected the vacuum hose. The measurement is taken at idle speed. The information obtained depends on the car model - for example, in a VAZ 2110, the pressure indicator should start at 0.3 and gradually increase to 0.7 Bar.
Fuel pressure regulator with connected pressure gauge
Has your blood pressure changed? You may have connected the pressure gauge incorrectly. Check the connection. If everything is correct, it means the regulator has become unusable.
Where is the fuel pressure regulator located and how does it work (video)
Where is the adsorber located on Priora and how to replace it
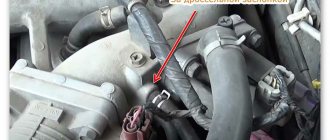
It should be emphasized once again that often the cause of a malfunction of the fuel vapor recovery system is the solenoid valve, so troubleshooting should begin with it. If this part on the Priora is working properly, then there is a high probability that the adsorber has failed. To replace it, you must first understand the location. Typically such devices are located next to the gas tank, but not always. On a Priora, the adsorber is located in the engine compartment. You need to look for it next to the generator under the right headlight. The photo below shows the location of the adsorber on a Priora with air conditioning.
It is important to note the fact that the Priora can have an adsorber, both rectangular and round.
Despite the differences in shape, the products are completely interchangeable.
The photo below shows the location of the element on the radiator side.
Now let's figure out how the adsorber is removed on a Priora. The process will be slightly different depending on the vehicle configuration. If the Priora is 8-valve and without air conditioning, then the process of removing the adsorber is as follows
:
- Initially, you should disconnect the hose fastenings “3” and “4” in the figure below. To do this, press the latches and pull the hoses.
- Using a wrench at “8”/“10” (may differ), unscrew the fastening bolts (2 pcs.). For unscrewing, it is recommended to use a spanner wrench with a ratchet, since they are the most convenient for unscrewing fasteners in hard-to-reach places.
- After this, you can remove the part. There is enough space to remove it, and you do not need to remove the generator or headlight to do this.
- Check for serviceability or replace. Installation is carried out in the reverse order of removal. When installing, it is important to observe the tightening torque of the mounting bolts. They are tightened with a force of 1.6-2.8 Nm.
However, the process of dismantling the gasoline vapor trap is not difficult on a Priora without air conditioning, where there is free access to the device. On 16-valve VAZ-2170 models with Halla and Panasonik air conditioners, the process will be slightly different. The difference is that you need to remove the right headlight, under which the adsorber is located. The principle of dismantling the adsorber is to perform the following actions:
- First you need to remove the top trim from the headlight by unscrewing the four fasteners using a Phillips screwdriver.
- Disconnect the power supply from the headlight from the inside using a screwdriver.
- After this, you need to loosen the bumper (right side).
- This is necessary in order to gain access to the mounting bolt, which is located under the headlight. We unscrew it.
- Unscrew the Phillips screwdriver located on the side.
- The headlight is secured with three fasteners. The third bolt is at the top. After unscrewing it, you can remove the headlight to gain access to the adsorber for subsequent removal.
Having gained access to the adsorber, disconnect the hoses from the device and unscrew the two fastening screws. We remove the device, check it or change it.
Assembly is performed in the reverse order of dismantling. The example of removing the generator shows how to get to the adsorber on a Priora with air conditioning.
This completes the procedure for replacing the adsorber on a Priora with and without air conditioning. Despite the laboriousness of the process, everything is done very quickly and without the need to visit a car service center.
Important nuances
There are a few things to keep in mind when cleaning your injectors. Here they are:
Replacing injectors is a long procedure. Nevertheless, it is quite within the power of a novice driver if he has at least a vague understanding of the structure of an injection engine. When cleaning the injectors, the situation is much simpler: you just need to be able to use a drill and know where the main fuel hose is located.
Carburetor cars are slowly but surely becoming a thing of history. Float chambers and diffusers have been replaced by injectors and distributed fuel injection, the quality of which is controlled by the car’s on-board computer. On the one hand, injectors have made life much easier for motorists. On the other hand, even these reliable devices periodically fail. Fortunately, the driver can replace them with his own hands. The main thing is to know how it's done.
Instructions for checking and replacing the adsorber valve on a Priora: where it is located, cleaning, article number
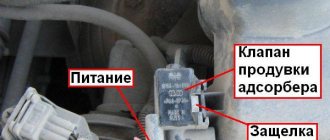
A headache on VAZ cars is the solenoid valve or the adsorber purge valve. Let's look at this device in more detail. First, let's find out where it is located on Priora. The photo below shows the location of the canister purge valve on a Priora.
It is located near the right “glass”. The material repeatedly mentioned why the canister purge valve on a car is needed and what function it performs. Below is another reminder of what the part is for.
First, let's understand the principle of operation of the valve. The electrical diagram of the canister purge valve on the Priora along with the pinout will help with this.
The device is a valve that is controlled by electrical impulses. To do this, the design of the device has a winding, which, when power is applied, retracts the metal core, which leads to the opening of a channel through which air passes from the adsorber to the throttle assembly. The part is non-separable and non-repairable, therefore, if there are signs of malfunction, it should be replaced. Below in the photo is the canister purge valve (from Kalina) in cut form.
The device receives two contacts: one from the relay (plus), and the second control from the ECU (ground). The valve opens when a voltage pulse is supplied from the ECU. The operating principle of this device is simple. However, despite this, on all VAZ cars, the canister purge valve is a common cause of floating speed, a decrease in engine power and an increase in fuel consumption. This happens due to the fact that activated carbon granules from the adsorber get into the channel with the valve, which ultimately leads to the device jamming in the open position. After starting the engine, the valve should be closed, but since it jams, it remains open, so air leaks into the throttle assembly at idle.
To check the functionality of the solenoid valve, you need to perform the following steps:
- First you need to remove the device from the car. To do this, you need to disconnect the power supply and loosen the clamps (if any) that secure the hoses. After this, remove the part by pressing the latch and pulling it up. Often the latch fails, so you can use a plastic clamp.
- Carry out an inspection. After inspection, you can draw conclusions about the serviceability of the product, as evidenced by the photo below.
- Now let's proceed to the actual verification. Using a bulb, syringe or compressor, we supply air into one of the channels. Air should not escape from the second, since when the power is turned off, the valve closes. If it is blown through, then there is a high probability of it getting stuck in the open position.
- Another way to check is to apply 12V power to the contacts of the device. In this case, a characteristic click will be heard, indicating that the valve has been activated (its opening). We stop the power supply, and at the same time it should click again, which indicates that it is closed and serviceable.
- Don't forget to make sure that the valve is receiving power. To do this, we measure it in the chip using a multimeter. The voltage should be 12V. Contact “A” is positive, and “B” is “ground” from the ECU.
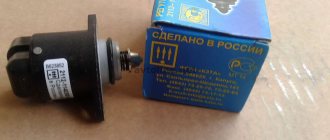
The verification procedure is not at all complicated and takes about 10 minutes. Based on the results, a decision is made about the need to replace the valve. If it is not working, then it must be replaced. We buy a new device, which has the code 21103-1164200-02/21103-1164200-03 (the products are interchangeable).
If the malfunction occurs on the road, then you can try to clean the valve if it is jammed due to clogging of the channel with activated carbon. To do this, you need to remove the valve and clean the channel with carburetor cleaner or WD-40. In this case, we definitely gain access to the adjusting screw, which is filled with compound. We unscrew the screw (remember the number of turns so that we can screw it back to the same value, otherwise there will be suction), and clean it.
We repeat the procedure several times, and if there is a compressor, we blow the channel with compressed air to remove contaminants from it. When assembling, be sure to fill the location of the adjusting screw with sealant to prevent suction.
If it is possible to restore the functionality of the device, then it will still serve for some time. However, you should not delay replacing it, as liquids that get inside can lead to winding failure.
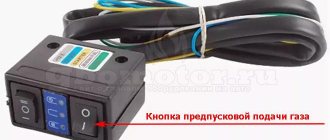
And in conclusion, it is worth noting that the optimal way to prevent the adsorber purge valve from becoming clogged with activated carbon is to install a filter at its inlet. A regular gasoline or gas filter is suitable for this, as shown in the photo above.
This is interesting! A valve malfunction may manifest itself as a clicking sound after starting the engine. In this case, the part must also be replaced.
How to remove the gasoline vapor separator and gravity valve on a Priora: repair and replacement
Often Prior owners wonder what kind of structure this is, which is located in the left rear wheel arch liner. This device is mistakenly called an adsorber. In fact, this is a separator, which is designed to allow gasoline vapors to condense on its walls, after which the fuel is returned to the tank in liquid form.
One of the most common types of separator malfunction is a violation of the seal of the housing.
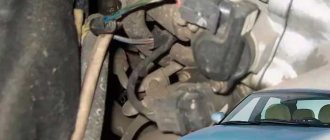
This can be determined visually by inspecting the part, as well as by detecting oil stains on the surface and the characteristic smell of gasoline. Damage usually occurs at the fitting through which gasoline flows back into the tank. The photo below shows what a leak in the Priora separator housing looks like. If the hose does not have a clamp, it is recommended to install one.
If the part fails (if the body is damaged, which usually happens when the car does not use locker wheel liners), it must be replaced. It is completely replaced along with the gravity valve and tubes. The removal and replacement process is performed as follows:
- Jack up the rear left side and remove the wheel. If there is a fender liner, it must be removed. If it is not there, it is recommended to install it, which will increase the service life of the car body parts and the separator.
- Disconnect the fuel drain pipe that comes from the separator from the gas tank by squeezing the quick-release connector clamp to do this.
- Use a screwdriver to pry up the tube holder and remove it.
- Unscrew the four nuts securing the fuel vapor supply pipes to the separator and gravity valve using a 10mm wrench.
- Above the brake hose of the left wheel there is a mount for the gravity valve tube. Unscrew the nut with a “10” wrench.
- Above the clamp that connects the pipe of the main and additional mufflers, there is another pipe fastening, which is also unscrewed with a key “10”.
- After this, you can unscrew the separator mount (2 nuts at “10”) and remove it from the car along with the bracket.
- The separator is removed along with the tubes and gravity valve. After this, you should check the condition of the tubes and body of the product. Replace the device with a similar one along with the tubes.
- To remove the separator without removing the tubes, then follow these steps: Disconnect the tube from the separator at the bottom (after loosening the clamp), through which vapor flows from the tank into the device, and gasoline back into the tank.
- Unscrew the two nuts securing the separator bracket, then lower the part down, gaining access to the gravity valve (top).
- Using a slotted screwdriver, pry up the flange of the gravity valve and remove it from its seat. It is important not to damage the O-ring.
- Next, you can remove the separator. If the gravity valve O-ring is damaged, it must be replaced. This is very important, since often, in the absence of visible damage to the separator, the cause of the smell of gasoline not only in the rear of the car, but also in the cabin, is a malfunction of the rubber seal (its damage).
- On Priors, such an o-ring is used from Chevrolet Niva cars. And if you are convinced that the part is damaged and cannot be repaired (if the ring cannot be glued), then we buy a new one. The sealing ring for the gravity valve on the Priora from the Chevrolet Niva has article number 2123-116485-10.
- If the separator is completely replaced, the gravity valve tube must also be removed. To do this, disconnect the connection of the tubes from the gravity valve to the adsorber.
When purchasing a new separator for Priora, you need to know its number 2170-0116400502. It is equipped with a gravity valve and connecting pipes, so there is no need to purchase anything separately.
This is interesting! Violation of the integrity of the separator housing or the sealing ring of the gravity valve causes not only the smell of gasoline, but also unstable engine operation, as air leaks will occur.
Signs and Symptoms of a Malfunctioning Fuel Pressure Regulator
All these problems arise due to the fact that the regulator becomes clogged or completely clogged over time. Another common cause of failure is weakening of the spring, leading to a strong decrease in pressure. In the absence of normal pressure, fuel supply decreases, power decreases and controllability deteriorates. Such problems are especially common on Ladas - Kalina and Priora, as well as on cars of the 2110, 2112, 2114, 2115 series.
To check the part, you need to carefully inspect it itself, the vacuum hose and all connections. Any leaks found must be corrected. It is also recommended to check the membrane. Disconnect the tube that goes from the RTD to the receiver and shake it. If no gasoline comes out from inside and there is no strong odor, then the membrane is in order.
RTD in diesel engines
Diesel vehicles running on the Common Rail system are also equipped with a pressure regulator. It fits into the fuel rail or is located on the high pressure fuel pump housing. The principle of operation is approximately the same. A special valve diverts unused fuel into the return line, preventing excessive loading.
In diesel engines, the regulator has a slightly different structure than in gasoline engines. It consists of a solenoid and a rod, which rests against a ball to shut off the return line. The design protects the engine from hydraulic vibrations and, as a result, from rapid wear.
Summing up and whether it is worth removing the adsorber on a Priora car
In conclusion, it is worth noting that some car owners resort to such a solution as removing the adsorber from the car. It is quite possible to do this, but this will require not only physical removal, but also software, that is, replacing the firmware. This process is not discussed in the material, since such processing is incorrect, and not only from an environmental point of view. Removing the adsorber will increase consumption, since gasoline vapor will not enter the throttle assembly for mixing with air and combustion.
And if the issue of ecology and economy does not interest you, then there is another very important argument. After removing the adsorber (canister and separator purge valve), the smell of gasoline will be present in the cabin
. And this is true (check with your friends who have decided to take such a step), so before resorting to such a modification of the car, you should think again. If you are faced with the problem of a constantly clogged adsorber valve, then it can be solved as follows:
- a gasoline filter (or a gas filter for fine cleaning) must be inserted into the hose that connects the adsorber to the solenoid valve, as shown in the photo below;
- this will prevent the possibility of coal particles entering the valve from the adsorber and eliminate the possibility of it jamming, as mentioned above.
The problem is solved quite quickly, effectively, and most importantly, without the need to remove the adsorber and its components.
In conclusion, it is worth noting that the adsorber and gasoline vapor recovery system is a very important element, which is responsible not only for preventing gasoline vapors from entering the atmosphere, but also preventing the possibility of tank deformation, increasing engine efficiency, reducing consumption, and increasing comfort ( due to the absence of gasoline vapors in the cabin). And most importantly, such a device does not require expensive repairs, and it rarely fails, especially if the adsorber valve is protected from the entry of contaminants into it.