Probably no car enthusiast would dare to drive without a rearview mirror. But this simple device also fails. The fastening of the interior mirror sometimes suddenly becomes loose. And someone can hit the outside mirror and accidentally break it. In addition, the angle adjustment drive in the mirror periodically breaks down. Is it possible to solve all these problems on your own? Of course: most car enthusiasts can disassemble, remove or glue the mirror on their own. It's not as difficult as it seems.
Removing the outer and inner rear view mirrors
Rear view mirrors are an integral part of the car. Even those drivers who have equipped their “swallow” with a monitor or camera cannot do without mirrors. Therefore, keeping them in good condition is the primary task of every car owner. Before moving on to the procedure for dismantling the mirrors, we will list the tools that we will need for the job.
Tools required for dismantling
- Phillips screwdriver;
- flat blade screwdriver.
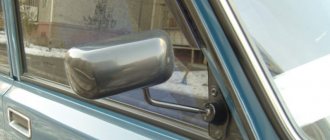
How to disassemble an external mirror
It is advisable to dismantle the exterior mirrors in a certain sequence.
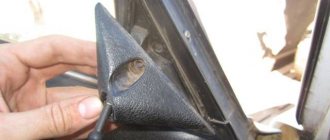
- Using a screwdriver, remove the locking bracket to which the mirror angle adjuster is attached.
The side mirror retaining bracket is removed using a Phillips screwdriver. - Use the same screwdriver to remove the fastening screws. There are only three of them. Be sure to hold the mirror while removing these screws.
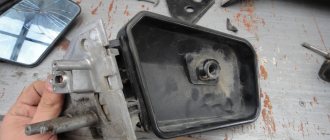
The screws holding the side mirror are unscrewed with a Phillips screwdriver - After removing the screws, the mirror is removed. To do this, you need to slightly pull it towards you.
After removing the screws, the mirror is removed manually
How to properly remove the interior mirror
Changing the rear view mirror in the cabin is a little more difficult. Work must be carried out in the following sequence:
- The plastic plugs above the interior mirror mounting screws are carefully pryed off with a flat screwdriver and removed.
- The mounting screws are unscrewed with a Phillips screwdriver.
The mounting screws for the interior mirror are unscrewed with a Phillips screwdriver. - The mirror is carefully removed.
How to remove a mirror from a windshield
Dismantling a glued mirror does not require any special skills. Proceed as follows:
- In some modern cars, the bracket with the interior rear view mirror is glued directly to the windshield. To remove it, you must remove all plastic plugs from the bracket (if any).
- After this, the mirror is turned counterclockwise with both hands and removed from the socket.
The glued mirror rotates 90 degrees and is removed manually
Dismantling
You have decided to carry out dismantling work with your own hands and then reinstall it. The only question now is how to remove and disassemble the element, so that later everything can be returned to its place without any risks. In the meantime, glass replacement or another procedure will be carried out, depending on the specific situation.
To carry out dismantling work, you need to take:
- curved screwdriver;
- flat screwdriver;
- wrench to match the size of the fasteners;
- hair dryer;
- degreaser;
- rags;
- high-quality glue;
- some free time;
- clean garage;
- good mood.
Add to this set of tools a couple of skillful hands, and everything will go great.
As you understand, rear and interior mirrors are removed differently.
Work in the salon
Let's start with the interior design. A lot depends on what kind of car you are working with.
Automakers use different mounting systems. Therefore, start from the specific situation. So, for example, different fasteners are used on cars such as:
- Deo Lanos;
- VAZ 2110;
- Niva Chevrolet;
- Ford Focus;
- Renault Logan;
- Chevrolet Cruze;
- Lada Priora;
- Lada Kalina;
- Hyundai Solaris, etc.
Still, owners of inexpensive cars mostly do this work on their own.
And here you may encounter glue and suction cups, or bolts and screws. These are the most common installation methods.
Domestic cars mostly come with bolts. Therefore, it will be easy to remove the structure. The plug is removed, the key is taken and the fasteners are unscrewed.
But there are also brackets glued to the glass. Here you will first have to figure out whether it is actually possible to separate the fastening element from the glass. Most often, designers use clamps or rotating mechanisms. If this is not possible, you will have to remove not only the bracket, but also the windshield itself. The glue holds the element very tightly, and therefore it will not be difficult to damage the front cover.
We recommend: The main symptoms of a malfunction of the VAZ-2110 TPS: how to check them
Please refer to the instruction manual. There you will probably find a hint on what exactly to do in this situation. Sometimes it’s better to visit a car service center, where specialists will do everything carefully and clearly.
Side dismantling
Everything is clear in the cabin. Now you need to dismantle the exterior mirror structure. Left or right, it doesn’t matter much here. What is more important is what type of design is used. The side mirrors are power driven. And it can be mechanical and electrical.
Almost any car is structurally designed to allow access to fasteners through the doors. You just need to remove the casing. Again, look in the manual for your car, since there are no universal instructions on this matter.
If you have a mechanical drive, then:
- The locking bracket of the existing regulator is removed;
- The fastening screws are tightened on the inside of the door;
- The mirror itself is removed.
In the case of an electric drive, everything is somewhat different. You need:
- raise the hood;
- find the battery;
- remove the negative terminal from the battery;
- disconnect the block with wires;
- remove the door trim;
- unscrew the mirror fasteners;
- remove element;
- rejoice at the result.
The last point is especially important. Know how to be enough for yourself even for small achievements.
Disassembling rear view mirrors
The procedure below applies to both exterior and interior mirrors.
- The mirror is removed from its regular place.
- Use your hand to gently press the top edge of the mirror glass until it unrolls.
Side mirror mirror element rotates manually - A piece of rag or napkin is placed in the gap that appears between the mirror body and the glass.
- Then a flat-head screwdriver, pre-wrapped with electrical tape, is inserted into this gap.
The latches holding the mirror element are bent with a flat screwdriver - The latches holding the mirror are pryed with a screwdriver and removed from the protrusions.
- The mirror glass is carefully removed.
This is interesting: New types of car batteries
The left mirror is dismantled in the same way as the right one.
Third way
Press on the top edge of the mirror without much effort. Place a screwdriver on the raised edge and pry out the hooks. The mirror element must be removed.
Hit the massive part of the car mirror against a hard surface, but not too hard. With sufficient force, the internal grooves open and the mirror flies out. But here you need to be very careful so as not to accidentally break it.
Removing the fastening to the body is carried out as follows: remove the spring and unscrew the adjustment rod from the fastening side. All assembly work on the mirrors, if everything went without damage, is carried out in the reverse order.
Remove the rubberized pads. Unscrew several screws that regulate the position of the mirror. Before further disassembly, we sketch (remember) the position and colors of the cables, since each of them works in a certain direction and performs its own function.
How to glue a car mirror to the windshield
First we need to decide on the glue that we are going to use.
What glue should I use?
The main rule: the glue holding the interior mirror to the windshield must be two-component. Yes, there are many varieties of all-purpose glue. But in this case, universal glue will not work. The fact is that two-component glue perfectly withstands sudden temperature changes, high humidity, and most importantly, vibration. Conclusion: the mirror element should not be glued with universal glue.
There is a second option: use light-curing glue. This is a substance that quickly “sets” when exposed to sunlight. This glue can be purchased at specialized auto stores. But it has a serious drawback: to work with it, a powerful ultraviolet lamp is required, without which reliable bonding cannot be achieved. Some car enthusiasts claim that you can do without it, just sticking the mirror on a sunny summer day is enough. But such gluing cannot be called reliable.
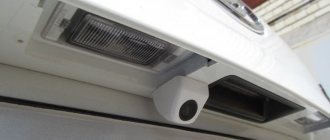
The conclusion is simple: the best and least troublesome option for gluing a mirror is two-component glue. For example, Loctite 37438, which has become incredibly popular recently. By the way, it is sometimes used to glue DVRs that have a loose fastening device.
How to attach a mirror element
To keep the mirror securely on the windshield, you must follow the following algorithm:
- Select the location for installing the mirror. It should be glued in the center of the glass, at the same distance from both the passenger and the driver.
- The windshield is cleaned of dirt. First, this is done with a rag, then the surface of the glass is wiped with alcohol.
- The mirror is disassembled as indicated above (after all, in fact, only the bracket on which the mirror will be installed needs to be glued to the glass).
- A thin layer of glue is applied to the bracket and to the windshield. After this, you must wait at least 15 seconds.
Glue is applied to the interior mirror bracket - Then the bracket is installed on the windshield and lightly pressed down manually (and if you decide to install the mirror entirely, without disassembling, then after installation it must be additionally secured with tape, which will support the mirror until the glue sets).
The interior mirror is glued to the windshield - The glue must dry properly, so you cannot drive the car for 24 hours.
Video: gluing a mirror to the glass inside the cabin
Mounting the Device on a Bolt-On Bracket
Not all modern cars have interior mirrors glued to the windshield. In some cases, the mirror bracket is attached the old fashioned way: with bolts to the ceiling. In this case, you need to act like this:
- The mirror together with the mounting bracket is installed in the ceiling niche and held by hand.
The interior mirror is installed in a niche and held by hand - Self-tapping screws are inserted into the holes and tightened using a Phillips screwdriver.
- Sockets with installed self-tapping screws are closed with plastic plugs (provided that such are provided in the design of the bracket).
This is interesting: How to get benefits when buying spare parts?
How to install and secure heated side mirrors
To assemble and connect the side mirrors yourself, you will need minimal electrical knowledge and dexterity. You must act in the following sequence:
- A set of mirrors equipped with an internal heating system is purchased.
Heated mirrors for Lada Granta - The standard side mirrors are removed from the car in the manner described above.
- After installation, the top cover on the side mirror housing opens. This gives access to the wiring socket (it is supplied with the mirrors).
The side mirror housing is opened and the electrical wiring is connected. - The wires are connected to the socket and inserted into the door through the mirror housing.
- Use a Phillips screwdriver to remove the plastic trim from the door.
Plastic trim removed from car door - The wiring runs through the door and dashboard to the fuse box, next to which there is a relay with a plug for turning on the heated mirrors.
Mirror wiring is connected to the heating relay - The wiring plug is connected to the socket shown in the photo, after which the car door trim is reassembled.
How to remove a mirror element on a Priora
Priora Lada (2013+). Disassembling the outside rear view mirror
We disassemble the outside rear view mirror to replace the heated reflective element, gear motor unit or side turn signal. The work is shown on the left mirror; we disassemble the right mirror in the same way. At low ambient temperatures, in order not to split the reflective element, we recommend removing the mirror and gradually warming it up with a household hairdryer or warming it up indoors.
To replace the heated reflective element, turn the reflective element all the way down.
Pulling the reflective element towards you, press the upper latches of the element with your finger. . remove the element from the mirror body (arrows indicate the upper clamps of the element).
Disconnect the wire block from the pointer block. _
. and remove the turn signal.
The indicator is equipped with LEDs; if they fail, the turn indicator assembly must be replaced. Install the side turn signal in the reverse order.
I think many will find my photo report of how the mirror is disassembled useful. It all started with the sound of a clatter coming from these mirrors when the music was turned on - the door was taped with noise. And this rattle got to me. It turns out that without knowing, you can easily break the mirrors during disassembly.
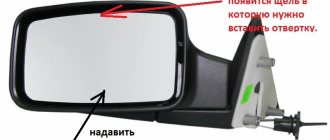
1. Using the handles, tilt the lower part of the mirror away from you until it stops. A gap appears at the top. You need to insert a screwdriver into it, see photo
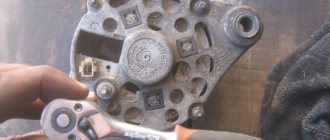
2. There are latches inside that fasten the mirror to the electric drive.
Having reached the mounting spring, I decided to tighten the nut tighter - the breakpoint probably appeared from its loosening.
And just in case, I laid a noise between the connection of the mirror and the mounting base.
Then I reassembled everything and installed it back. THE RATTLE DISAPPEARED.
There is an idea to add repeaters to these paws like the deluxes. I’ll post a separate report on how to do it.
For those who find it useful, click (like)
Issue price: 0 ₽ Mileage: 25,000 km
Common device problems
Let's look at a few troubles that every car enthusiast may encounter.
Peeling off the mirror surface
Sometimes this kind of trouble happens even on new cars. The reasons can be very different.
- the manufacturer decided to save money and used a low-quality adhesive;
- during the work, the master did not allow the glue to set properly;
- the mirror came unstuck due to too sudden temperature changes (and this is the most common reason, especially in frosty winter).
In all these cases, the car owner will have to use two-component glue, as shown above.
Glass replacement procedure
The mirror element of both the exterior and interior mirrors may be damaged. Below is the sequence for replacing it:
- The glass is removed from the mirror body.
- The new mirror element has several plastic hooks (in our example there are 4). These hooks are inserted into the mounting holes in the mirror body, after which you need to press very carefully on the mirror element.
The new mirror element is installed into the mirror housing manually - A characteristic click will be heard, indicating that the plastic hooks have engaged and the glass has “settled” into place.
The procedure for replacing mirror elements in interior mirrors is similar to that given above (the only difference is that there are usually 2 plastic latches in the interior mirror, not 4).