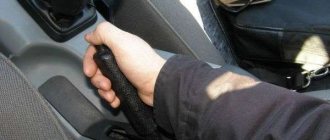
Many car enthusiasts remember the immemorial times of the Soviet Union, when many vehicle owners made wheel alignment on their Zhiguli using a thread. If this technology was already available then, then purely theoretically, this operation could be done with your own hands on any car.
The video will tell you how to independently adjust the wheel alignment angle, what tools and knowledge you will need, and also talks about the subtleties and nuances of the procedure.
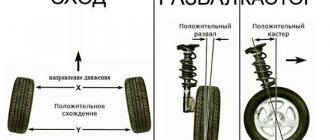
Camber and toe angles
Tire tread wear, depending on the position of the wheel alignment angle.
When you have finished familiarizing yourself with the theoretical part, you can proceed directly to practice. To begin with, it’s worth understanding about camber and toe specifically for the “ten”.
For the VAZ-2110 (as well as the rest of the series, such as 2111 and 2112), the wheel alignment should be set to “zero”. That is, the indicators must correspond to: 0 degrees +-30 minutes for camber and 0 +-10 minutes for toe-in.
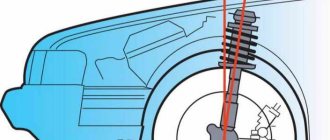
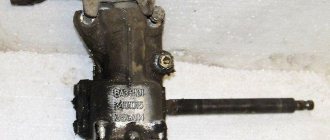
Wheel alignment and caster.
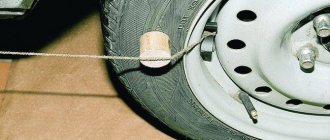
Changing the normal wheel alignment angle leads to negative consequences, especially wear on the tire tread or the inability to drive the car normally. Adjustment can be made using a thread and a weight.
Tires with different camber and toe.
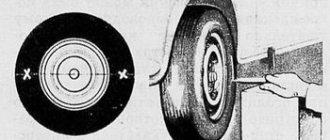
Zero camber corresponds to the fact that the values of A and B are equal (Fig. below).
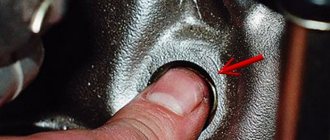
Changing the camber angle using a thread.
To accurately determine the toe angle, you will need special equipment, such as a chain with a dynamometer or a sliding ruler.
Changing the toe angle.
hodovik-razval › Blog › Wheel alignment on a Zhiguli (VAZ 2101-07)
The entire process is captured on video. Well, some pictures that explain the topic. Here in the picture are the keys (tools) that will be needed for adjustment:
Well, I sketched out a table that shows how adjusting washers, placed between the lever axis and the beam, on the camber bolts, change the camber and caster on Zhiguli cars.
Comments 15
Hello! Today I had a wheel alignment done, they set the alignment at the rear, but they couldn’t adjust the alignment, they say there is nothing to turn to adjust the alignment. Is only toe-in done on the front axle? Ford Focus car.
That’s right - front and rear, on Focus, only toe is adjusted. The remaining angles can only be changed by replacing chassis parts or editing the body geometry. On the rear of the Focus, there are homemade adjustable suspension arms (to adjust the camber in the rear). But all this is unnecessary fuss. The camber is practically not felt by the driver at all when driving (especially on the rear axle).
Do-it-yourself adjustment on the VAZ-2110
To begin with, you should use a self-locking nut marked M12x1.25. In order not to search for a long time, the article number for the VAZ is 16105011. One washer reduces the caster by 19 arc minutes.
We change the camber angle with our own hands:
- To change the adjustment, you need to hang the wheel and remove it.
Layout of suspension parts.
Changing toe
- There is a hexagon on the steering rods with which you can adjust the toe.
We adjust the right wheel.
Position of the adjusting hexagon.
Outer tip clamping screw.
Castor adjustments
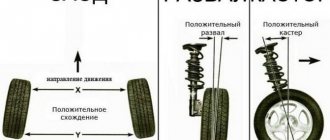
Caster angle is the angle between the steering axis of the wheel and the vertical in a side view. It is considered positive if the axis is tilted backward relative to the direction of movement.
Camber is the inclination of the wheel plane to the perpendicular restored to the plane of the road. If the top of the wheel is tilted outward of the car, then the camber angle is positive, and if it is tilted inward, it is negative.
Toe-in is the angle between the longitudinal axis of the vehicle and the plane passing through the center of the steering wheel tire. Toe is considered positive if the planes of rotation of the wheels intersect in front of the car, and negative if, on the contrary, they intersect somewhere behind.
Below are experiments to understand how wheel adjustments affect the behavior of the car. The Samara VAZ-2114 was chosen for testing - most modern foreign cars do not burden the owner with a range and choice of adjustments. All the parameters there are set by the manufacturer and it is quite difficult to influence them without structural modifications. The new car has an unexpectedly light steering and slurred behavior on the road. The wheel alignment angles are within the tolerance range, with the exception of the longitudinal angle of inclination of the left wheel (caster) axis of rotation. In relation to the front suspension of a domestic front-wheel drive car, setting the angles always begins with adjusting the caster. It is this parameter, on the one hand, that is decisive for the rest, and on the other hand, it has a lesser effect on tire wear and other nuances associated with the rolling of the car. Moreover, this operation is the most labor-intensive - I think that is why they “forget” about it at the factory. Only then, having dealt with the longitudinal angles, does a competent master begin to adjust the camber, and then the toe-in.
Wheel alignment VAZ 2101 1986
We do not always undertake to do wheel alignment on VAZ 2101-2107 (classic). In this case, this is rather an exception, since the chassis on this car was in very good condition. In all other cases, before sending such a car for wheel alignment, it is advisable to make sure that it is possible to unscrew and move the lower arms (the fastening bolts should not turn, and the threads on them should be intact).
We drive the car into the workshop. Check and equalize tire pressure. We attach measuring targets and cameras to the wheel rims. You can start measuring.
The most important step when measuring wheel alignment is the wheel runout compensation procedure. Using it, the stand can calculate the real plane of rotation of the wheel, taking into account errors from the curvature of the wheel rims. On modern 3D wheel alignment stands, to do this, it is enough to roll the car a quarter turn of the wheel back, and then forward.
So, the measurement is completed and the result is displayed on the stand screen. At first glance it looks scary, but everything can be fixed.
In general, there is nothing difficult in adjusting classic VAZs, provided that everything unscrews normally. The main problems include turning the bolts securing the lower arm axle (sometimes to solve this problem it is enough to slip a flat-head screwdriver under the head of the bolt) and sticking of the axle to the cross member (the manufacturer prohibits using a chisel to separate the lever axle from the cross member).
To adjust (on the front axle) caster and camber, it is necessary to loosen the nuts of the lower arm mounting axis, move the arm away with a mounting blade and add or remove adjusting washers (1). To adjust the toe (2), you need to loosen the nuts of the tie clamps and turn the split threaded bushing on the steering linkage rod.
For the convenience of calculating the required number of shims, the manufacturer generously shares a table in which the values are given for washers with a thickness of 0.8 mm.
We take repeated measurements. All values are within tolerance. The wheel alignment has been adjusted. We print the report and return the car to the owner.
Source
Option 1
The master shifts the angles of the longitudinal inclination of the racks as much as possible, taking them to the “minus”. We seem to be moving the front wheels back towards the mudguards of the wheel arches. A situation that quite often occurs on old and heavily used cars or after installing spacers that raise the rear of the car. The result: light steering, quick responses to its slightest deviations. However, “Samara” has become overly nervous and fidgety, which is especially noticeable at speeds after 80-90 km/h and above. The car has unstable responses when entering a turn (not necessarily fast), tends to venture to the side, requiring the driver to constantly steer. The situation becomes more complicated when performing the “rearrangement” maneuver.
Option 3
Excessively “positive” camber. It is undesirable to change it without toe correction, therefore positive toe is also introduced. The steering wheel became lighter again, the responses when entering a turn became lazier, and the lateral movement of the body increased. But there is no catastrophic deterioration in character. However, when simulating an extreme situation, the “steering feel” is lost. With the advent of slips, unexpectedly early it becomes difficult to get into the given corridor at the “rearrangement” and the car begins to slide too early. In fast corners, the strongest slip of the front axle dominates.
Option 4
Option with sporting ambitions: everything is “minus”, with the exception of the caster. A car with such settings turns more confidently and faster, as does the “rearrangement” maneuver. Hence the best result.
So, there are a lot of simple and very effective ways to change the character of a car without resorting to expensive replacements of components and parts. The main thing is not to neglect the adjustments - they often turn out to be very important. Which option should you prefer? For most, the second will be acceptable. It is the most logical for everyday driving, both with partial and full load. You just need to take into account that by increasing the longitudinal tilt of the rack, you not only improve the behavior of the car, but also increase the stabilizing (return) force on the steering wheel. The last, “fastest” tuning option is more suitable for the near-sporting public who likes to improvise with the car. When giving preference to these adjustments, it must be taken into account that with increasing load, the values of the toe and camber angles will increase and may go beyond the permissible limits.
What makes this adjustment
The point of adjusting the alignment is that the wheels of the car are set at a certain angle to the horizontal, as well as relative to each other. This is necessary in order to try to give the wheels the maximum possible vertical position while driving, i.e. Regardless of the position of the wheel relative to other structural elements, it must remain in a vertical plane. In this case, close to ideal contact of the tire with the road is achieved.
Camber concept
Fallout determines the angle at which the wheel is set relative to the road surface. A visual image of this parameter can be obtained by plotting the angle between the plane of rotation of the wheel and a vertical line intersecting the center of the so-called tire contact patch with the road.
Incandescent angles
It is generally accepted that if the top of the wheel deviates from the center axis of the car, the cam is positive, otherwise the angle is negative. Each manufacturer recommends its own adjustment of the linings depending on the technical characteristics of the car.
The most accurate determination of the tilt angles of the VAZ 2107 is possible at the moment when the car is loaded with a weight of 320 kg: 4 passengers and the weight in the trunk weigh approximately the same. The tank must be filled with fuel. The cutting angle should be:
- For a loaded car 4°30'20';
- For the unloaded. 0°5'20′.
As a rule, a negative cut angle creates a larger contact patch between the rubber and the road surface, but due to accelerated abrasion of the inner edge of the tire, its service life is reduced. The car will not go straight if the camber is 30′ or more.
Convergence concept
If you imagine the angle between the plane of rotation of the wheel and a conventional axle, which divides the car lengthwise into two parts, this will be the wheel toe. For one wheel, the toe is considered separate: two separate ones from the total amount give a common toe.
The value of toe angles
When the front of the wheel rotates towards the longitudinal axis of the car, we are dealing with a positive toe, otherwise. Negative. A positive toe angle is used more often, but in some cases a negative toe angle is recommended: it increases machine stability, but also increases tire wear.
READ How to set marks on a VAZ 2107 Injector
Normal convergence for VAZ 2107:
- 2–4 mm for a loaded machine;
- 3-5mm for machine without load.
Spelling
In addition to the bar and toe, there is another wheel tilt adjustment called a caster. This adjustment also represents an angle, but between a vertical line and the projection of the wheel axis of rotation onto the longitudinal plane of the machine . The value of this angle, as a rule, does not exceed 6°. A properly tuned motorcycle will self-align the drive wheels when the vehicle picks up speed.
Boat nominal value:
- 4°±30′ for a loaded machine;
- 3°±30′ for empty vehicles.
Automatic errors due to incorrect configuration
A non-adjustable tube and sock tend to make driving difficult and lead to a number of vehicle malfunctions.
Instability on the road
A car with an incorrectly adjusted stick and toe will often involuntarily "roll" left or right, forcing the driver to exert extra effort to go straight. At the same time, we are not talking about a comfortable ride; moreover, the driver gets very tired while driving such a car.
Increased tire wear
The most common consequence of improper foot alignment is rapid wear of your vehicle's tires. Obviously, too much positive cutting angle causes accelerated wear on the outside of the tire and a negative angle on the inside. You should know that tires wear out quickly also due to incorrect air pressure in them (high or low) and due to angular vibrations of the wheel.
Another
In addition to road instability and increased tire wear, non-adjustable cams and toes can cause premature failure of seals, gaskets, pins and suspension.
We check and adjust the wheel alignment with our own hands
The chassis of a car is a complex component with many parameters. Any intervention in it will lead to a change in the wheel alignment angles. As a result, the behavior of the car on the road changes for the worse: cornering becomes difficult, the car can wobble when braking and accelerating, it becomes difficult to direct it in a certain direction, and skidding occurs. To fix the problem, they resort to wheel alignment. Is it possible to make it yourself and what is needed for this?
How to adjust camber and toe, aka wheel alignment angles on a VAZ 2101-VAZ 2107?
Note! A more accurate check of wheel installation must be checked in a specialized workshop on a special stand. But if you don’t have the money for this, then you can almost as well adjust the wheel angles without using a stand!
And also when adjusting, pay special attention to the suspension elements, because if the suspension is faulty or if play is detected in most of its parts, adjusting the wheel angles will lead to nothing!
What is wheel alignment
Wheel camber is the angle between its central plane and the road surface. It directly affects the quality of the clutch and the accuracy of car control. If everything is set up correctly, the wheels will turn exactly where you point it.
Toe-in is the difference in the distances between the extreme front and rear points of the rims. It is measured in millimeters or degrees. Toe-in affects tire life. If it is incorrect, the tires will quickly become unusable.
Another important parameter of the wheel is caster, i.e. the longitudinal inclination of the kingpin. It affects the accuracy of car control and the ability of the wheels to self-balance. If the caster is not adjusted correctly, steering difficulties will occur.
Wheel alignment is the adjustment of the listed parameters to ensure controllability and reduce tire wear.
Wheel alignment adjustment on a stand in a car service center
Meaning of the term "alignment"
Often, after completing repairs to the front suspension of a VAZ 2107, the auto mechanic informs the car owner that the alignment needs to be checked and adjusted. This type of adjustment is one of the most important, since it affects the durability of car tires and the degree of stability of the vehicle on the road, and therefore traffic safety. . Adjusting the equation most often concerns domestic cars, since the suspension design of modern foreign cars, as a rule, does not allow changing the wheel alignment angles. Fixing a collapse or climb may only make sense on a foreign car after a serious accident or replacement of parts such as shock absorbers or springs.
When and why do you need it
Manufacturers recommend that owners of foreign cars carry out the procedure every 30,000 km, and owners of domestic cars - every 15,000 km. The period may be reduced if the car is operated in difficult conditions and often drives on bad roads. In some cases, an unscheduled procedure may be required:
- if the disc is crushed when entering a hole at high speed;
- if the chassis was repaired;
- if shortened springs were installed on the car or the ground clearance was changed for other reasons, auto buffers were installed;
- if when driving you clearly feel the car “pulling” to the side;
- if the tires begin to wear out much faster;
- if the steering wheel does not return well after negotiating a turn.
How to Make a Camber on a Classic
Aligning wheels and socks on VAZ 2101-VAZ 2107
The destruction of this term refers to how the car's wheel will stand relative to the vertical. If the top edge of the wheel is missing, this means that the Camber is positive, and if the same top edge of the wheel is located in the inside of the car, then this destruction will already be considered negative and is indicated by the value “-”.
An incorrectly adjusted tire, or rather an adjusted tire, only the 1st front wheel , while driving the car can be pulled to the side, it is not at all difficult to find it by removing your hands from the steering wheel while driving!
Convergence, this term refers to how the wheels will converge relative to the road. For example, in rear-wheel drive, the wheels are at a positive angle, and in the front. under negative, as shown in the photo. And all this is done so that at the start and future driving the wheels are aligned and become absolutely smooth.
If the pin is not adjusted properly, the tires on your vehicle can wear out much faster than if the pin is adjusted, so always look at it and adjust to its capabilities!
What tools do I need to configure?
A caliper is absolutely necessary for adjustment, as well as a set of basic wrenches, Cobra pliers, some plain short thread, and some fancy thread with hooks tied at both ends.
You will also need a 22mm wide strap and a different one. only 6 mm wide.
When do I need to adjust my wheels?
They are subject to adjustment:
- By changing the direction of a car, for example, you drive straight while the car is driving.
- In addition to the obvious deviations in these wheel alignments, there will be uneven and early tire wear, as well as increased fuel consumption by the vehicle, and as a result, suspension parts may fail early.
- Take a closer look at Camber and rapprochement is necessary after a tragedy in which essential suspension parts were damaged and altered.
READ How to Make a Stove Warmer VAZ 2115
Content
How to adjust the alignment and toe, these are the wheel angles on a VAZ 2101-VAZ 2107?
For a more accurate wheel alignment check, see the specialist workshop at the dedicated panel. But if you don't have the means to do so, you can adjust the wheel angles with almost equal success without using a shield!
And also, when adjusting, you should pay close attention to the suspension elements, because if the suspension is faulty or when most of its parts have found free play, adjusting the steering angles will do nothing!
Preparing for setup:
Writing VAZ 2106 [Collapse] [Part 2]
In this video we break the wheels with homemade spacers from the axis of the lower shoulder VAZ classic
Do-it-yourself wheel alignment
Minimize
Make a convergence yourself
how to make
a similar
Camber
Do it yourself.
1) Firstly, for more precise adjustment of wheel angles, it is recommended to load the machine with an additional weight of “320 kg”. For example, you can put a 4D person in a machine and weigh about 50 kg.
2) Now check how much fuel is in the fuel tank, if it is not enough, adjust it as the tank should be completely full.
3) Then check the tire pressure, it should also be normal.
Checking and simultaneously adjusting the crossbar and legs in the machine:
Unfortunately, it is very difficult to independently establish the angle of destruction, since it is unlikely to be adjusted correctly. But you can check whether the angle of the cut is okay without the help of others, which we will do!
READ How to Make Disc Brakes on a VAZ 2106
1) To check the camber, first sit in the car and turn the steering wheel so that it is aligned.
2) Then get out of the car and squeeze the car suspension, carefully by the trunk or, best of all, for the bumper press with a force of “40-50 kg”, “2-3” times. Perform the same operation with the front bumper of the car.
3) Then take the thread and caliper and then pull them vertically as shown in the picture. And after the thread is pulled out, use a caliper to attach it first from the bottom and then from the top, and as a result you will know the camber wheels.
If you get a difference between the top and bottom of the wheel, say "3mm", then that means the notch angle is about "30". The cutting angle should be within “4°3020”, this is when the machine is loaded and provided that there are people in the machine with “4-PE”. And when the machine is unloaded, the cutting angle should be “0 ° 520”!
4) Now, to check the toe, you must do almost the same thing as when checking the deadbolt, namely, align the wheels according to their ability to properly load the machine, and only then should you carry out the test.
5) For the test, use a fancy thread with hooks on both ends. Then attach one side of the thread to the beginning of the front wheel , and the other side to the end of the back, but securely so that everything is even, in other words, so that the thread runs smoothly and does not bend.
The track of the rear wheels is slightly narrower than the front ones, about 44 mm, so for more precise adjustment, attach a block about 22 mm wide to the rear wheel and thus pass the thread through this strip!
READ How to Disassemble the Door of Nissan Almera Classic
6) Then take the wheel and turn the control wheel so that the thread touches both sides of the front wheel.
7) Then secure the thread to the back, but only now place two strips under the back of the wheel, one of which will be 6 mm wide and the other 22 mm wide. So if we add these two values, the total we get is "226 = 28mm" of the rod thickness.
After the whole operation, make sure that the thread lightly touches "1-2mm" for the 1st front wheel at both points of the tire, if not touch, then in this case, adjust the toe of the front wheel!
 To adjust the toe using 2 wrenches, unscrew the outer collar of the dumbbell collar.
9) Then, using Cobra pliers, rotate the clutch itself and, as a result, adjust the length of the tie rod until the clearance between the threads and the front tires is normal.
10) Finally, tighten the rods and do the same work with the second wheel, bringing them about 2mm closer together.
Follow the same procedure with the wheel on the opposite side of the car. And when you recheck the toe, remember one thing: if you are going to make the toe of one wheel not "1mm" and say "2mm", then under the thread you need to put the bar "2212 = 34mm" if" 1.5mm "then" 229 = 31 "respectively!
Correct toe for the front wheels of Classic cars. “2-4 mm” in an unloaded car and “3-5 mm” in a loaded one!
Signs of the need for such work on a car
There are several signs and symptoms that can help you understand that it's time to adjust your wheels.
- When driving, the steering wheel is in the central position, and the car leans to the side.
- The steering wheel is turned to one side, but the car still drives in a straight line.
- If you just bought a car, be sure to contact a car service for an alignment. Masters at the store's internal service station must carry out the procedure before selling, but in practice this does not always happen. Ideally, it is better to ask about this before purchasing.
- When changing tires, stop by a service station to check your wheel alignment. You may not have to do it, but there is a possibility.
- Also, pay attention to fuel consumption and tire wear rates. If these parameters have increased, perhaps the problem is in the condition of the wheels.
Uneven tire wear is one of the signs that a wheel alignment is needed.
Rear wheel alignment
Is it necessary to perform a rear wheel alignment in a front-wheel drive car? Yes, but you need to keep in mind a small nuance. If the rear wheel is turned outward, the rear axle will be pulled to the side of the road, which will lead to severe skidding when cornering. If the wheel is turned towards the center of the turn, the car will have difficulty turning. However, a slight reduction of these parts of the car to one another only benefits the driver, since it will be easier to move in a straight line, and the suspension will be able to better “steer” in a certain direction even with strong gusts of side wind, which is a constant help for a novice driver.
So, if the undersides of the rear wheels are slightly turned towards each other, this is normal. But their discrepancy needs to be eliminated.
Chassis problems and setting wheel parameters
Be sure to perform a wheel alignment if the vehicle's chassis has been repaired. It is especially important to do this when replacing the following parts:
- silent blocks;
- tie rod ends;
- suspension arms.
Theoretically, when replacing upper and lower ball joints, springs and shock absorbers, there is no need to resort to the procedure, but some experts recommend performing it when working with absolutely any chassis component. Just in case.
What should the installation angles be: negative and positive values?
The optimal value for a passenger car is either zero or slightly negative (i.e., the wheels should point slightly outward with their bottoms). Positive values can be set from 0 to 4.5 degrees. Sports cars use a negative value of -0.5 to -5.5 degrees. Thanks to this, a high level of grip is achieved and cornering stability is increased.
Negative angles have disadvantages. So, when driving in a straight line, the inner edge of the tire will wear out faster, and instability may occur during acceleration and braking on a straight path. The best option is to set the indicator at -0.5 degrees.
Positive and negative camber
Checking and adjusting the angles of the front wheels of the VAZ 2101 Zhiguli
- Repair manuals
- Repair manual for VAZ 2101 (Zhiguli) 1970-1985.
- Checking and adjusting the angles of the front wheels
Checking and adjusting the angles of the front wheels is carried out on special stands in accordance with the instructions for the stand. Warning
Checking the wheel alignment angles is mandatory if suspension parts are being replaced or repaired, which may result in a change in the wheel alignment angles.
For a new car (before the first maintenance), the wheel alignment angles have the following values:
| – longitudinal angle of inclination of the axis of rotation – 4° | +1° | mm; |
| –1° 30’ |
| – camber 0° 30' | + 40’ | mm; |
| – 30’ |
– toe-in – 1/7 mm.
After the first maintenance (after 2000–3000 km) and during further operation of the vehicle, the wheel alignment angles should be:
– longitudinal angle of inclination of the rotation axis – 4°±30' (3°30'±30')*; – camber – 0°30'±20' (0°5'±20')*; – toe-in – 2/4 mm (3/5 mm)*.
The difference in the longitudinal angles of inclination of the turning axes of the right and left wheels should not exceed 0°30'.
Before adjusting wheel alignment, check:
– air pressure in tires; – axial clearance in the front wheel hub bearings; – serviceability of the shock absorber (no rod jamming); – radial and axial runout of tires; – clearance in the upper ball joints of the suspension; – free movement of the steering wheel.
Eliminate any detected faults and make the necessary adjustments.
Monitoring and adjustment of wheel alignment angles can be carried out both on a loaded vehicle and on an unloaded one, however, monitoring the angles on a loaded vehicle gives more accurate results. Therefore, in critical cases, it is recommended to carry out control and installation of angles on a vehicle under a static load of 3136 N (320 kgf), which corresponds to approximately the weight of four people and a load of 40 kg in the trunk.
The car is loaded either with special weights suspended from the bottom of the body, or with ballast (280 kg) placed on the seat cushions and in the trunk (40 kg). The front seats should be in the middle position of their longitudinal travel. The cargo in the trunk is evenly distributed. The lack of fuel is compensated by the cargo located on the right side of the trunk area.
After installing the car on the stand, immediately before checking the corners, “press” the car’s suspension, applying a force of 392–490 N (40–50 kgf) 2–3 times, directed from top to bottom, first on the rear bumper, and then on the front. In this case, the wheels of the car must be parallel to the longitudinal axis of the car.
The sequence of checking and adjusting wheel alignment angles is as follows:
– angle of longitudinal inclination of the axis of rotation; – camber angle; – toe-in.
* The values of angles without a load are given in parentheses; without brackets - with a load.
AXLE TILT ANGLE
If, when checking, the angle value does not correspond to the data given above, change the number of adjusting washers 27 (see Fig.
Front suspension ) installed between the axis of the lower arm and the cross member.
To adjust the longitudinal inclination of the steering axis, loosen the nuts securing the lever axis to the cross member and change the number of adjusting washers under the bolts to obtain the correct longitudinal inclination of the steering axis, using the table below as a guide.
Changing the camber angle and longitudinal inclination of the turning axis when changing the number of washers in the packages
| Number of washers added to or removed from the bag | Wheel camber | Longitudinal angle of inclination of the wheel turning axis | |||
| Front bolt | Rear bolt | Washer thickness, mm | |||
| 0,5 | 0,8 | 0,5 | 0,8 | ||
| +1 | +1 | — (7’–9’) | — (11’–14’) | 0 | 0 |
| -1 | -1 | + (7’–9’) | + (11’–14’) | 0 | 0 |
| +1 | 0 | 0 | 0 | — (18’–20’) | — (29’–32’) |
| -1 | 0 | 0 | 0 | + (18’–20’) | + (29’–32’) |
| 0 | +1 | — (7’–9’) | — (11’–14’) | + (18’–20’) | + (29’–32’) |
| 0 | -1 | + (7’–9’) | + (11’–14’) | — (18’–20’) | — (29’–32’) |
| -1 | +1 | — (7’–9’) | — (11’–14’) | + (36’–40’) | + (58’–64’) |
| +1 | -1 | + (7’–9’) | + (11’–14’) | — (36’–40’) | — (58’–64’) |
Tighten the nuts with a torque wrench and check the caster angle of the steering axis. Warning
When adjusting the angles of the front wheels, it is allowed to use U-shaped adjusting shims, which must be installed with the slot down.
FRONT WHEELS CAMBER ANGLE
If the camber angle differs from the norm, adjust it by changing the number of adjusting washers 27 (see Fig. Front suspension ) installed between the lever axis and the cross member, following the table.
To increase the camber angle, remove the same number of washers from both bolts, and to decrease it, add more.
FRONT WHEELS TOEING
| EXECUTION ORDER | ||||||
| CHECKING AND ADJUSTING CLEARANCES IN THE FRONT WHEEL HUB BEARINGS Front wheel hub bearing adjustment diagram
|
Adjusting camber and toe without visiting a car service center
Preparation
Prepare the following items:
- telescopic ruler for checking wheel alignment;
- chalk;
- cord with a plumb line;
- standard set of motorist keys.
Ruler for measuring toe. Once upon a time, every car was equipped with it
Work should be carried out on a site without uneven surfaces. It is advisable that there is a lift on it, but a pit will do.
First you need to determine how accurate the existing wheel alignment indicator is. To do this, we put the car on a flat area, turn the steering wheel in one direction until it hits an obstacle, and make a chalk mark in the middle of it. Then we rotate the steering wheel in the opposite direction (also as much as possible), counting the number of revolutions and circles required for this. Divide the result by 2 and turn the steering wheel back to the resulting number of revolutions. If, as a result, the steering wheel is set to your usual position, everything is in order. If not, you will have to start adjusting the rack.
Adjusting the steering rack yourself
- Remove the steering wheel by unscrewing the nut.
- Fix the control element in the previously determined optimal position.
- Locate the nuts on the tie rod ends and loosen them. Unscrew one of them a little, counting the number of revolutions needed for this. Then tighten the second nut the same number of turns.
That's it, the car is ready for wheel alignment adjustment.