The parking brake, or as it is popularly called the “handbrake,” although it is intended to immobilize the car while parking, not all drivers and do not always use it. If the car has an automatic transmission, then, by and large, a handbrake is not needed at all, but owners of cars with manual transmission, as a rule, prefer to leave the car in first gear when parking. This is due to one of the most important reasons - harsh winter conditions and poor road quality may not allow the handbrake to operate when necessary. This may be caused by icing on the pads or clogged pads. But first things first.
How does the handbrake system work?
Applying the parking brake activates the rear brakes and ensures that the vehicle does not roll, even on a relatively steep incline. However, if the handbrake does not hold the vehicle, there is a problem that must be corrected to ensure the safety of the driver and others.
Parking brake systems vary greatly from one automaker to another and even between different makes and models of cars. In general, they are divided according to the type of brakes and the method of their use.
It is immediately necessary to understand that in the vast majority of cases in passenger cars, parking brakes use the rear wheels and are divided into two types:
- drum - consisting of two semicircular blocks that are located inside a cylindrical drum. If, on one side, they are rigidly fixed, then on the other there is a special piston mechanism that forces the pads to move when using the handbrake;
- disc brakes - consisting of a special brake disc mounted on the car axle and two pads. When you use the handbrake, the pads compress and prevent the car from moving.
The car's braking system can also be mechanical or hydraulic. If in the first option, braking is carried out using a system of cables and the force of a person who puts pressure on the handbrake, then a special piston is used in hydraulics.
Important! Depending on the type of braking system, the reasons why the handbrake does not hold may vary significantly.
How to change a torn or stretched parking brake cable on a VAZ classic
All work must be done in the same way as during adjustment, placing the car above the inspection ditch, or lifting it using a lift. There are also some pitfalls. The brake drums, which will have to be removed, are tightly “stuck” to the axle shaft flanges. Beating the drums themselves is more expensive, they are fragile and break easily. Therefore, we will do this: - by hanging the wheels, we will reliably strengthen the car from rolling in a way suitable for your conditions; — fourth gear, release the clutch, “accelerate” and sharply “hit” the brakes; — we repeat this “procedure” until the inertia tears the drums away from the flange; — we clean off the rust from the hub flange with a file - it interferes with pulling out the drum; — rocking from side to side, using wooden drifts, remove the drum. A protrusion on its inner side, formed over years of wear, can also prevent successful removal of the drum. Now, inspect what is inside - the pads and cylinders. Severe wear on the linings is a reason to replace the pads. The cylinders should not leak brake fluid, the boots should be intact without breaks. The cable sheath is bolted to the brake shield. You need to unscrew them very carefully, generously watering them with “Vedashka”, otherwise you will twist the “head” and will have to drill it out. Have you turned away? Wonderful! All that remains is to pull out the old cable and lay a new one in its place. We put everything else back together, and then, having installed the drums and wheels in place, we adjust the parking brake, as described above. Everything is ready, we have successfully replaced the parking brake cable of a VAZ classic. Video on this topic
Read, it might come in handy: Which shock absorbers to choose for a car? One more thing
How does the handbrake work?
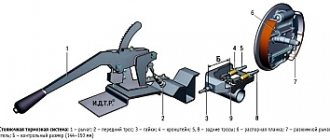
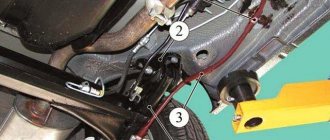
When the driver activates the handbrake, either by pulling the handle between the front seats (3) or by pressing the parking brake pedal under the dashboard, a cable (12) running to the rear of the car is pulled, applying tension to the brake pads. When the driver lowers the handle, the return spring (11) helps return the brake system to its normal configuration.
The system itself is quite simple and banal - the parking brake handle is connected to a cable in a special plastic sheath, in which it can move freely. This cable goes to the adjusting bolt, which can be loosened or tightened. Then it splits into two cables that go to the brakes on the rear wheels.
In simple words, by activating the handbrake, the cable tightens and brings the pads together, which then secure the car.
Replacing the handbrake: instructions
- After dismantling the rear wheels and brake drums, you need to head into the pit and find the tension adjustment rod. This rod is equipped with a spring that must be unscrewed with a screwdriver.
- Next, you need to unscrew the 2 nuts and begin dismantling the adjusting bar. Then the cables (rear and front) of the parking brake are dismantled.
- Use a wrench to unscrew both nuts securing the brackets. The latter just prevent the cable from falling. There are screws under the nuts that prevent them from unscrewing unintentionally.
- The next step is to remove the rear drums and then remove the springs that secure the brake pads. The latter are also timely to be replaced if they are worn out excessively.
- Now you need to pull the cable. This way it will be possible to disengage it with the bracket where it rests.
- Next you need to remove the brake pads. There is no need to remove both elements on the wheel. To replace the rear cable, you only need to remove one rear block.
- On the opposite side of the brake shield of both wheels, you need to unscrew 2 mounting bolts, with which the cable tip is secured. After unscrewing both bolts, pull the cable.
- Using a 10mm wrench, you now need to unscrew the front cable fastening brackets. When the bolt is unscrewed, carefully remove the roller. To do this, you will need to roll it forward in the direction of the tip.
- To remove the front part of the mechanism, pull the device to remove it from the intermediate support and bracket structure.
- Then you can get out of the inspection hole and head to the S7’s interior. The handbrake is kept in the down position throughout the entire process. While in the cabin, you need to unscrew the 2 screws that secure the handle trim.
- So, there are 4 bolts under the cladding. They need to be unscrewed, and then proceed to dismantling the handle with the front cable.
- To disconnect the cable fastener from the handle, use pliers to remove the small cotter pin that clamps the device to the parking brake handle.
- Now the device can be removed from the car and a new cable can be installed. The installation procedure for both mechanisms is carried out in the reverse order of removal. After all, you need to fix them and move on to adjusting the tension.
Note. When installing the rear cable, it is important to remember that this part has both a right and a left side. On the right there is a rubber tube that serves as auxiliary insulation of the braid from the hot pipe of the resonator located nearby.
The procedure for adjusting and replacing the parking brake cable is not as complicated as it seems. Any VAZ-2107 car owner can cope with the task.
Causes of malfunction and their elimination
As a rule, the reasons why the handbrake does not work are quite simple and do not require long or expensive repairs:
- torn cable . One of the common causes is a broken cable on the handbrake or under the car. The problem is solved by simply replacing the cable;
- jammed cable . Due to damage to the sheath in which the cable moves, it may become jammed, preventing you from using the handbrake. And the cable itself consists of many steel strands, which, if damaged, can also prevent proper operation. The solution is to replace the cable;
- dirty brakes . If dust, dirt, ice or reagents that are sprinkled on roads in winter get on the pads, this can cause the brakes to not work properly. The solution is to press the brake pedal several times smoothly while the car is moving. Thanks to friction, the pads will be cleaned;
- incorrect adjustment . It may happen that the cable system is not adjusted properly, the bolt is not tightened correctly, or the length of the cables is incorrectly selected. The solution is to adjust the system and correct tension of the cables;
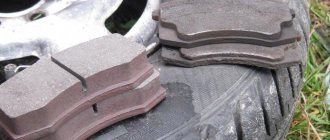
- pad wear . The pads are subject to abrasion during operation. Every time you apply the brakes, the pads gradually become unusable. The solution is to replace the pads;
- oil in the pads . Oil or brake fluid leaks can cause the car to not hold up with the handbrake. The most important thing in this case is to identify the cause of the leak - it could be the rear axle seal or the brake cylinder. The solution is to eliminate the leak and clean the pads. If the pads are very oily, replace them.
Diagnostics
What to do if you couldn’t identify the reasons yourself? In this case, you should contact a car service center, where a mechanic will carefully inspect the entire system. To do this, you may need to remove the rear wheels and check the drums. In any case, handbrake breakdowns do not require expensive repairs, since important components and assemblies in the braking system are not involved.
It is important to know how many clicks the handbrake should have. The golden rule of auto mechanics is THREE clicks, then the parking braking system is considered working.
↑ How to remove the handbrake of a VAZ 2106
We work on an inspection ditch or on a lift.
To replace the rear parking brake cable, hang up and remove the rear wheels (preferably at the same time).
- Lower the parking brake lever to its lowest position.
- Using pliers, disconnect the spring from the front (short) cable.
- Using two “13” wrenches, loosen the tightening of the adjusting and locking nuts and unscrew them, holding the tip of the front cable with pliers.
- We remove the equalizer.
- Remove the brake drum and shoe from its support.
- Disconnect the cable end from the lever.
- Using an “8” wrench, unscrew the two bolts securing the cable to the brake shield and remove the cable from the shield.
- Using a 10mm wrench, unscrew the two nuts securing the cable bracket to the body and, removing the bracket, release the cable.
- We disconnect the tip of the cable sheath from the bracket by sliding it back and down.
- Similarly, remove the second branch of the rear parking brake cable.
- To replace only the front parking brake cable, perform the work shown in photos 1–4.
- Inside, use a Phillips screwdriver to unscrew the self-tapping screw securing the protective casing.
- For convenience, it is advisable to remove the driver's seat.
- We remove the casing.
Replacing the rear parking brake cable on a VAZ 2106
Replace the rear parking brake cable if it is excessively stretched (impossibility of adjusting the parking brake), mechanical damage or loss of mobility in the sheath. It is more convenient to replace the handbrake cable on a lift or inspection ditch. To replace the parking brake cable on a VAZ 2106 car, you will need: keys “10”, “13” (two), cobra pliers, pliers. 1. Remove the brake drums (see “Removing and installing brake drums”).
2. Disconnect the rear brake pad of the left brake mechanism. 3. Disconnect the end of the parking brake cable from the drive lever and... 4. ...remove the brake pad (do not remove the front brake pad). 5. Similarly, disconnect the right cable end. 6. Loosen the locknut on the front cable end. 7. While holding the tip from turning with pliers, unscrew the lock nut and the adjusting nut to the end of the tip. 8. Using pliers, grab the hook made on the spring coil and disconnect the tension spring from the tip. 9. While holding the tip from turning, remove the locknut, adjusting nut, and spacer from the tip. 10. Remove the guide from the end and disconnect it from the cable. 11. Unscrew the two nuts securing the left bracket to the body, remove the spring washers and the bracket from the studs. 12. Remove the bracket from the cable. 13. Pull the cable back and bring it down from the bracket on the body. 14. Remove the two bolts securing the shell tip to the brake shield. 15. Pull the cable forward from the brake shield. 16. Similarly, disconnect the right branch of the cable and remove the cable from the car. 17. Install a new handbrake cable on the VAZ 2106 car in the reverse order of removal.
NOTE
The right (along the direction of the car) branch of the handbrake cable differs from the left by the presence of a rubber tube 2 on the shell between the front tip 1 and the bushing 3 of the bracket. 18. Lay the cable sheath on the inside of the limiter on the lower longitudinal rod of the rear suspension. 19. On both sides of the car, install the ends into the body brackets. 20. Attach the brackets to the body on both sides of the car. 21. Adjust the parking brake drive (see “Checking and adjusting the parking brake”).
decide the fate of the article:
Pinned
Liked
< Previous Next >
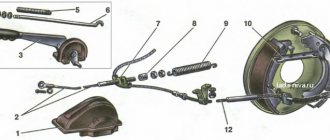
| 1. Remove the brake disc. | |
| 2. Clean any dust or dirt from the backing plate and brake pads. | |
| 3. Using pliers, remove the brake pad retaining spring plate by pressing the plate and turning it 90°. | |
| 4. Remove the spring and remove the retainer pin. | |
| 5. Mark the location of all handbrake parts and remove the adjusting bar from the top of the brake pads. | |
| 6. Using pliers, remove the upper return spring from the brake pads. | |
| 7. Remove the lower return spring. | |
| 8. Remove the brake pads. | |
| 9. Using a screwdriver, disconnect the handbrake cable from the special bracket. | |
| 10. Disconnect the return spring from the support plate and remove the lever. | |
| 11. The handbrake brake pads can be installed in the reverse order of removal. However, it is most convenient to install the handbrake pads after removing the rear hub. In this case, it is necessary to temporarily secure the support plate with two bolts. | |
| 12. Assemble the handbrake lever, applying lubricant to the contact surfaces. Then install the lever to the base plate by inserting it through the window with the rubber seal. | |
| 13. Install the handbrake cable on the lever. | |
| 14. Install the handbrake cable onto the mounting bracket. | |
| 15. Using pliers, tighten the mounting bracket. | |
| 16. Then install the return spring. | |
| 17. Apply a thin layer of high-temperature grease to the contact points between the brake pads and the brake shield. | |
| 18. Install the front block. | |
| 19. Install the spring and brake pad fixation plate. | |
| 20. Secure the spring and spring plate. | |
| 21. Install the rear brake pad and install the lower return spring. | |
| 22. Install the brake pad on the lower support plate. | |
| 23. Install the spring and spring plate securing the brake pad to the brake shield. | |
| 24. Install the adjusting bar between the upper ends of the brake pads. | |
| 25. Install the upper return spring. | |
| 26. Install the rear hub. | |
| 27. Temporarily install the brake disc onto the brake pads. Using a screwdriver, turn the adjuster nut just enough to remove the brake disc without jamming. | |
| 28. Install the brake disc. | |
| 29. Adjust the handbrake. | |
| 30. Install the wheels and lower the vehicle. | |
turbiruem.ru
↑ Assembly of the VAZ-2106 hand brake
We assemble the parking brake system components in the reverse order of removal or disassembly, and check the drive adjustment.
Lower the lever all the way. Using an adjusting nut, we tighten the cable so that the full upward stroke of the lever with a force of 40 kgf is 2–4 teeth (“clicks”) along the sector.
When the lever is fully lowered, the wheels should rotate freely without jamming.
How to properly adjust the handbrake, video
One of the elements of the braking system of a car is the parking brake; in motorist circles it is called the handbrake. The mechanism is needed to ensure that the car remains in place while parked (especially on slopes). Every self-respecting motorist simply must know how to tighten the handbrake.
What is the importance of system health?
The serviceability of the parking lock is very important, like any other elements included in the list of the car’s braking system. Tasks that a well-functioning handbrake performs:
- Ensures that the machine stops on any uneven terrain (rises, slopes, etc.).
- Helps in situations where the main brake has failed or during emergency braking.
- Creates a controlled skid (requires certain skills).
- Can temporarily replace the main system (when it fails).
But remember - the use of such a mechanism instead of the main system is strictly prohibited, if only because it is not intended for this. As a last resort, when such use is still necessary, do not apply the handbrake too sharply, this can cause the car to skid, provoking a dangerous situation in which both you and other road users may suffer.
The handbrake consists of three main parts:
- Handbrake drive.
- Actuating mechanism.
- Control node.
The drive is a metal cable. It is this cable that activates the car’s brake pads or its stopping system (depending on the design features of the car). The part that transmits force to two cables is designed to evenly distribute the force between the wheels.
Sometimes the cable can become loose, which leads to a situation where the handbrake does not hold and needs to be tightened. As a result, the handbrake adjustment must be carried out jointly by the service station workers or with their own hands.
The actuator of the handbrake, which needs to be tightened, is the pads of the rear units, which are driven by both hand and foot drives. Thus, the design does not have to be very complicated.
Main causes of failure
The main reason why such an important device may break and need to be replaced is mechanical wear of the handbrake. As you know, the basis of the system is a small cable that transmits forces from the lever to the mechanism. It actually turns on this node.
The operating conditions of the cable are quite complex - the constant load from the force that the driver transmits through the handbrake lever to the system, sooner or later, can damage the device.
However, the cable breaks extremely rarely - most often, the cables simply jump off. Or the tips fixed in the drum are ground with very long wheel bolts. Needs renovation. Also, the parking brake may not work due to wear on the rear drum brakes (as well as abrasion of the pads, depending on the design).
As a result, the unit ceases to perform the functions assigned to it - the handbrake simply does not hold. The parking brake needs to be replaced and subsequently adjusted. But not everything is so simple - in some cases, the device can be damaged during emergency braking of the car - as a result, it will require repair or replacement.
Often the metal is not completely ground, but the steel fibers are stretched and moving in the shell is very difficult. But it doesn’t matter what the reason for the parking brake failure is, why it doesn’t hold. The purpose of our article is to figure out how to solve the problem.
Rolling down a hill or replacing the handbrake cable on a VAZ 2109 and 2110 in a garage. The topic is quite relevant in view of the fact that the degree of fixation of the handbrake has always been of interest to every driver. Whatever one may say, this is an additional guarantee of safety both on the highway and in the parking lot. In some cases, emergency situations occur due to the fact that most drivers neglect the rules for using the handbrake, or deliberately bring it to a faulty state. Let's look at how to use it correctly and what is needed for this below.
Operating principle and replacement algorithm
Replacing the handbrake cable on a VAZ 2109 and 2110 can be done on your own within half an hour, unless of course you are lazy and go to a car service center for repairs. To do this we need the following equipment and tools:
Provided that we have all this ready, we can begin the repairs . So,
- It is necessary to have an overpass or inspection hole, since without them we will not be able to get under the bottom of the car;
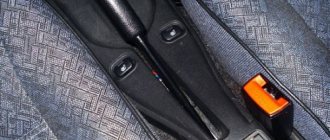
For those who do not fully understand, the handbrake in all cars is located between the two front seats. It can be covered with various drawers - glove compartments, but this is not important. The main purpose is to fix the parking of a car without outside help, even when neutral is turned on and the road is downhill under the wheels, which is a ratio of no more than 1/4.
Reasons for adjusting the parking mechanism
The condition of the brakes should be checked once every 30,000 kilometers or monthly. If you suspect that something is wrong with the device, you can check the part more often, especially since there is nothing complicated in such a check, and it goes very quickly.
- You can drive up a steep hill and tighten the handbrake handle well. If the car doesn't start to roll after you release the main pedal, then everything is fine. If the car starts to move, try to tighten the handle more, is it the same? You can safely drive the car into the inspection pit and change consumable parts.
- There is another way to check functionality. Engage the first gear, pull up the handbrake handle and slowly, smoothly, start to move away; if the handbrake is working, nothing will work out for you, and the engine will simply stall. If the car moves, although it is slow, it means that the handbrake needs to be tightened, traffic safety is already at risk. To do this, again drive the car into the pit and inspect the system.
Adjusting the handbrake cable on viburnum
Welcome! Handbrake cable - time passes and it gradually stretches out and stretches out and there comes a moment when it simply cannot pull the rear brake pads because it has stretched out too much and it simply cannot pull anything anymore, we will analyze everything in order so that you it was clearer!
In general, this cable, who doesn’t know, goes from the parking brake (runs under the bottom) and to the rear brake pads, the cable itself is attached to these pads, and thus when you lift the handbrake up, the rear pads also begin to move, namely, they come into contact with walls of the brake drum and, in connection with this, friction occurs between the pads and the drum (the pads are firmly pressed against the drum, preventing it from moving) and because of this friction, the rear wheels stand and do not move anywhere, but when the cable weakens or is pulled too far, then it can no longer pull the brake pads to the drum as strongly and therefore the friction occurs with less force and thus the handbrake holds the car worse and worse each time.
Note! In order to adjust the parking brake cable, stock up on the tools with which you will carry out the adjustment, namely: A wrench with a socket head, and we also recommend that you take with you an extension cord on which you can also put the socket head on, in addition, stock up on the basic set wrenches and a lubricant like WD-40 so that all soured and rusty bolts come out better and don’t break off!
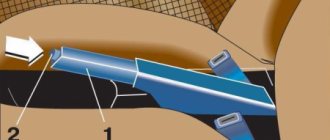
Where is the parking brake cable located? There are only two cables in Kalina and they pass under the bottom of the car, for example, if you take classic cars such as VAZ 2106, VAZ 2107, etc., then two cables were also installed on them, but the rear cable was a single whole and went straight to two rear wheels, and in Kalina it’s a little different, here there are two cables and each of them leads to a separate rear wheel of the car (the cable in the diagram below is indicated by a red arrow for clarity), and both of these cables are combined due to the leveling bar, which is indicated by a blue arrow , by the way, you will need to adjust this bar and thereby you will adjust your parking brake, but more on that later in the article, but now let’s move on with the scenario.
When should you adjust the parking brake cable? It needs to be adjusted when it is stretched too much (In fact, if the cable is of high quality, then it will stretch much longer and to a much shorter length), and it also needs to be adjusted if your rear pads are worn out (Rear pads are like any other the mechanisms of the brake system wear out and wear out, as we said earlier, due to these pads, only friction is created that holds the car, but the more the pads are worn out, the worse this friction becomes and in connection with this, the handbrake begins to hold the car in one place very poorly) .
Note! If you want to learn in more detail about how you can check the operation of the handbrake cable, then read an interesting article in which we described all this in detail, and it’s called: “Checking the parking brake on all cars”!
What else do you need to know? Have you ever noticed how many clicks the handbrake makes when you lift it? So, if the cable is stretched, then the handbrake will definitely have to perform around 2-4 clicks, and in everyday driving, when the cable has already stretched a little, then the parking brake can perform about 2-8 clicks but no more, if more then urgently adjust the cable on a car, since the car will no longer be able to hold the handbrake stationary.
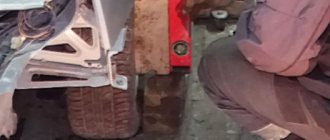
1) Many people are afraid to get into their car, although there is nothing bad about it, the main thing is not to use too much brute force when working, but that’s not about that now, let’s return closer to the topic. First, you will need to drive the car into the inspection hole and from there unscrew the four nuts (they are numbered in the photo below) that secure the metal casing and then you will need to move this casing to the front of the car.
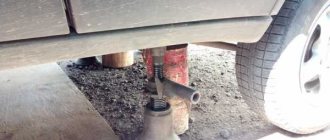
Note! This casing protects the handbrake mechanism from salt and water particles getting on it, which can quickly deform it and render it unusable, and as you have already noticed, it is located in the front of the car just above the muffler, almost next to the engine!
By the way, since this is the bottom of the car, all the dirt and water gets on these nuts, so to speak, without any problems, and over time they turn sour and rust, in connection with this it becomes very difficult to unscrew them, as was said earlier, there is no need to use brute force because that you can simply break off the studs or tear off the edges on the nuts, and therefore you will have problems when reinstalling this metal casing, so stock up on some kind of lubricant like WD-40 and apply it to all the nuts and especially to the threaded part of the studs, after After this, let the lubricant soak in a little and carefully slowly unscrew all four nuts that secure this casing!
2) When the nuts are unscrewed, as mentioned earlier, you will need to take this casing with your hands and move it to the front of the car (You need to move it until you see the parking brake mechanism, which is shown in the small photo below for clarity), but in order to fully see this handbrake mechanism, we recommend that you remove the muffler from the side cushion as shown in the large photo below, just if you don’t do this, it will be much harder to move the metal casing.
Note! Be careful with the muffler so you don't get burned on it, especially if your engine is warmed up to a high temperature or is simply at operating temperature!
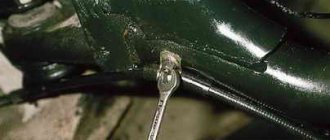
3) And finally, when everything is done and you have full access to the entire mechanism, then pick up a wrench or whatever is more convenient for you and use it to first unlock two nuts (Unlocking nuts is when you twist one, for example, clockwise and counterclockwise, in general in two different directions, in connection with this they disengage and can continue to spin, it’s just that if the nuts are locked, then you are unlikely to unscrew one of them without unlocking them), and after that you will need rotate the adjusting nut (Indicated by a red arrow) in whichever direction you need, that is, if you need to tighten the handbrake then tighten the nut so that it moves the same equalizing bar mentioned above (Indicated by a blue arrow), and if you suddenly need to loosen the handbrake (To for example, tightened), then you will need to unscrew the adjusting nut.
Note! When everything is done and you achieve those same 2-4 clicks, then complete your work and be sure to lock both nuts together, but to lock the adjusting nut you don’t need to touch it, that is, just use a wrench to screw the lock nut that is indicated to the adjusting nut with the green arrow in the photo above and then lock them so that the adjusting nut does not come loose while driving!
Additional video: For more information about how you can adjust the parking brake mechanism, see the video below:
Vaz-Russia.ru
When to adjust the handbrake
Proper operation of the parking brake system ensures road safety and should therefore always function properly.
The handbrake needs to be tightened and adjusted when:
- linings or discs (drums) were changed;
- brake pads or linings were adjusted;
- The hand brake cable has been replaced;
- the control mechanism has been reinstalled;
- The free play of the parking mechanism handle has increased significantly.
To fix the system, you can go to a service station, but you can do it yourself, for this you need to know how to properly adjust the parking brake.
In principle, having a general understanding of the process, you can tighten the parking mechanism. The only thing you should remember before tightening the handbrake cable is that the entire process must be carried out in compliance with safety precautions and in the designated place. Otherwise, harm may occur to the person doing the repairs.
How to tighten up
So, your handbrake is not holding. Therefore, you need to either change or tighten its cable. Anyone can cope with this without much difficulty. A sign of correct adjustment is the fact that the number of clicks of the free movement of the lever is approximately 5.
Adjusting the handbrake cable is similar everywhere and depends little on the characteristics of the car model; simply by loosening the cable, the gap is set between the linings - the rear brake pads, the brakes (if the handbrake does not hold one wheel) of the car.
To tighten the handbrake cable, follow these rules:
- Raise the car on a support or roll it into a viewing hole.
- Raise the parking brake handle 2-3 clicks.
- In the drum, loosen the locknut that secures the cable tension.
- Tighten the cable by rotating the adjusting nut.
- When adjusted correctly, a pulled handbrake should provide braking, which can be verified by trying to turn the car's disk.
At the end of the adjustment, you need to put the car on the ground and check the handbrake in action; if everything is done correctly, the car is well fixed in place, it is impossible to move it even for several men. Otherwise, the mechanism must be re-tightened.