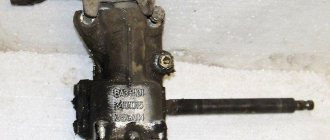
The steering gearbox is a rather old mechanical device that is now used mainly on cars of the classic LADA family. Today you will learn what a steering gearbox is - repair, replacement, adjustment with your own hands.
The steering gearbox is a small mechanism designed to transfer rotational motion to translational motion. This means that the gearbox converts the rotation of the steering wheel into a force that moves the steering rods in the right directions, causing the wheels to turn and change the direction of movement of the car.
The gear used in the gearbox is a reduction gear and consists of two elements - a worm and a gear. In addition, the mechanism has a special lever that moves the steering rods in the right directions.
The steering gearbox of the VAZ 2107 is sealed and filled with oil, which significantly increases its service life and makes it easier to turn the steering wheel, reducing the effort exerted by the driver.
Repair of VAZ-2107 steering gearbox
Removing the bipod
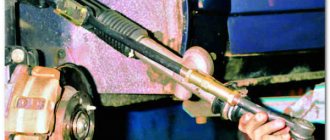
We remove the steering gearbox from the car.
We wet the connection of the bipod with the shaft in advance with kerosene or WD-40 liquid.
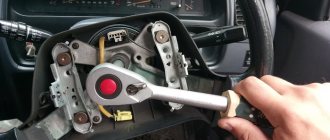
1. Using a 30mm wrench, unscrew the nut securing the bipod.
Use a special puller to press the bipod off the shaft.
If you don't have a puller, you can try to knock it down with a hammer.
We rest the bipod shaft against a wooden block.
Using a heavy hammer (sledgehammer), we press down on one stop of the bipod, and hit the second with another hammer.
In some cases, you have to sacrifice the bipod by cutting it with a cutting machine.
The bipod is installed on the shaft in only one position: when the double spline on the shaft coincides with the wide groove of the bipod
Gearbox repair
Drain the oil from the gearbox housing, unscrew the adjusting nut and remove the lock washer.
Using a 13mm wrench, unscrew the four bolts securing the upper gearbox cover.
We remove the head of the adjusting screw from the groove on the bipod shaft and remove the cover.
When replacing the bipod shaft, the axial clearance between the screw head and the shaft groove is set by selecting the thickness of the adjusting plate.
The gap size is allowed no more than 0.05 mm.
The plates have a thickness of 1.95 to 2.20 mm in increments of 0.025 mm.
We remove the bipod shaft with the roller from the crankcase.
Using a 13mm wrench, unscrew the four bolts securing the worm shaft cover
Remove the cover along with the ball bearing adjustment gaskets.
Gaskets are available in thicknesses of 0.1 and 0.15 mm.
Installation and repair of the steering column on a VAZ 2107
One of the elements of the VAZ 2107 car, which received a number of improvements in this model compared to the previous ones, is the steering column. How is its device different? In the VAZ 2107, the steering column shaft consists of two parts connected by a cross. Thanks to this design, driver safety is significantly increased, since in the event of a collision the shaft simply bends at the hinge joint and does not cause serious harm to the person. Also, the shaft in the VAZ 2107 has bearings, so turning the steering wheel requires much less effort.
The steering column of the VAZ 2107 consists of a shaft with an articulated joint and a gearbox with a worm gear. Column repair is a very rare occurrence. If you ensure timely maintenance of this unit, it may never be needed. Steering column maintenance work includes lubricating the steering shaft joint, tightening the steering wheel nut, changing the oil and adjusting the gearbox. Let's look at possible problems associated with the steering column and methods for eliminating them.
- Creak in the column
- Steering wheel play
- Removing the gearbox
Creak in the column
As a rule, creaking occurs due to insufficient lubrication of shaft parts - bearings or crosspieces. It can be treated with lubrication, does not cause any particular difficulties, and no repairs are required.
Steering wheel play
The appearance of steering play can be caused by two reasons. First, the nut securing the steering wheel to the shaft is loosened. If the nut is not tightened promptly, the splines on the handlebar and shaft will become damaged over time and one of these parts may need to be replaced. The second reason may be wear of the worm gear. To eliminate this malfunction, a special device is provided - an adjusting bolt with a lock nut.
In order to adjust the worm gear, the nut is released, the screw is turned using a screwdriver until the backlash is eliminated, after which the nut is tightened to prevent spontaneous unscrewing. If it is impossible to eliminate the backlash by adjustment, it means that the gearbox needs to be repaired and the worm pair replaced.
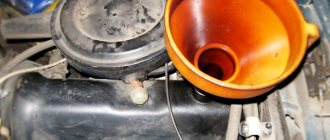
To prevent premature wear of gearbox parts, periodic monitoring of the oil level and its replacement is recommended. Level control is carried out as follows:
- Using a 8 key, unscrew the filler plug;
- Use a screwdriver or other object to check the oil level. It should be level with the bottom edge of the filler hole.
- If necessary, add oil using a special supercharger until it begins to flow out of the hole.
To change the oil, unscrew the screws securing the gearbox cover, having previously placed a container under it to collect used oil. Since complete removal of the cap is not required, it is moved to the side and the oil is drained. This operation is best performed on a hot engine. Warm oil has greater fluidity and drains faster. After all the oil has drained out, the cap is screwed into place and new oil is poured into the gearbox using the method described above.
Removing the gearbox
The design of the gearbox does not allow it to be repaired without removing it from the vehicle. In order to remove it, you must:
- Disconnect the tie rod ends from the gearbox. First, they are uncoiled, then the nuts are unscrewed with a 22 wrench and the tips are pressed out using a special puller.
- Unscrew the clamp securing the steering shaft to the gearbox.
- Remove the three bolts that secure the gearbox to the car body.
The gearbox design should not cause any particular difficulties when repairing it. You just have to take into account that the worn elements, called the worm pair, are both replaced at the same time. After this, adjustments must be made.
Gearbox oil
To reduce friction of the internal elements of the steering column, GL-4, GL-5 transmission oil with a viscosity grade of SAE75W90, SAE80W90 or SAE85W90 is poured into the mechanism. In the old fashioned way, many car owners use TAD-17 oil for the unit in question. The filling volume of the gearbox on the VAZ 2107 is 0.215 liters.
Checking the oil level
To avoid premature failure of mechanism parts, it is necessary to periodically check the oil level and replace it. It is worth taking into account that the fluid from the gearbox, although slowly, leaks, and the leak occurs regardless of whether the column is new or old. The level check is performed as follows:
- Use a 8 wrench to unscrew the filler plug.
How to change the oil in a gearbox
As for changing the oil in the steering device, this procedure should be carried out every year and a half. If the decision has been made to change the lubricant, you need to know how to perform the procedure. In addition to the new lubricant, you will need two syringes of the largest possible volume (purchased at the pharmacy) and a small piece of washer hose. The procedure is carried out in the following order:
Repair of VAZ-2107 steering gear
Hello, dear forum users. After a minor accident, an oil leak, play and deformation of the bipod appeared in the steering gearbox. But it was decided to put it in order. There are not many photographs, since it was a pity to get the camera dirty, but it is enough to understand the main points. For the work you will need the following tools: two 17mm wrenches, one 13mm wrench, a 30mm socket or wrench (a wrench is preferable in my opinion), a hammer (preferably heavier), a 19mm wrench, a slotted screwdriver, a chisel and probably a bipod puller will be handy, but I didn't have it.
What needs to be changed will be determined after disassembly, but in any case, two oil seals and a cover gasket will need to be replaced with new ones, as well as three self-locking nuts securing the gearbox to the spar. We hang up the front part of the car (or work in a hole). Remove the steering rods from the bipod. In the cabin, unscrew the bolt securing the intermediate steering shaft from the worm (gearbox) shaft. Then unscrew the three nuts of the bolts securing the gearbox to the spar. It is more convenient to use spanners. Under the hood, remove the expansion tank, adsorber (on the injector), spark plug wires, and vacuum brake booster hose. When the gearbox is unscrewed from the spar, then remove the steering shaft from its shaft in the cabin - if you can’t pull it off by hand, carefully use a hammer. Then turn the bipod all the way to the left and remove the gearbox up. Actually, here he is. There may be gaskets under the gearbox - remember their location.
Next, unscrew the filler plug and drain (if any) the oil.
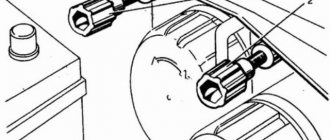
Next you need to unscrew the bipod nut and remove it. This is the hardest part in the truest sense of the word. Before doing this, it is recommended to fill everything with WD 40. I used this. The ones on the left were broken. I recommend using the ones on the right. You can use a 30mm head if the knob for it is strong enough. We place the gearbox on a flat, hard surface and place two planks so as not to damage the splines of the worm shaft and create stability for the gearbox - the side we look down at in the first photo. Next, hold the gearbox tightly and, putting on the key, unscrew the nut with a hammer on the key. Next, we place the gearbox on the end of the bipod shaft and remove it with a hammer (or puller). Those who are afraid of damaging the thread on the shaft can screw a nut onto it until its plane coincides with the plane of the shaft end. Removing the bipod is quite problematic and you may have to cut it off - so we replace it with a new one. It’s true that even if you remove it with a hammer, its restrictive ears become very wrinkled. Next, unscrew the bolts of the gearbox covers, unscrew the locking nut of the adjusting bolt and by rotating it clockwise, slightly lift the previously unscrewed cover and move it towards the worm shaft and remove it. Next, we take out the bipod shaft, knock out the worm shaft with light blows (while keeping the outer ring of the bearing and the separator from falling) and take it out. Then we take out the oil seals: we knock out the worm oil seal with a long screwdriver and a hammer from the opposite side through the cavity of the gearbox, and the bipod shaft oil seal with a chisel - we insert it from the outside so that it catches on the edge of the oil seal and, placing a key under the chisel, hitting the opposite end of the chisel, we knock out the oil seal (we do type of swing). We wipe everything with a rag and inspect it for damage, scuffs, dents, and so on. We replace damaged parts. Here is the disassembled gearbox. The photo shows metal spacers for adjusting the clearance in the worm bearings (upper right corner), new and old oil seals (lower right corner), bipods (on the left is new, and on the right is old - you can see how the ears are wrinkled from hammer blows and that the holes for the steering rod fingers are not in the same plane after an accident). On the left is not a meat grinder, but a steering gear housing. Next, we assemble everything in the reverse order, not forgetting to lubricate all parts with transmission oil and the seals with lithol. We put a new cardboard gasket under the cover with the adjusting screw. We put on a new bipod (I lubricated the shaft splines), a bushing and tighten the nut. The nut must be tightened to 20 kgf/m. I tightened it as much as I could, but within reason. Next, install the gearbox in place. It’s more convenient to work with two people. The assistant will especially come in handy to connect the worm shaft to the steering shaft. There's one catch. The bipod should be exactly in the middle, and the steering wheel should be in the straight forward position. But in reality it is difficult to do this alone. So, you can assemble it as best you can, and then set the bipod to the middle position and remove the steering wheel and set it straight. But there is a problem here too - in this case, the steering wheel will not be locked in a straight position, which does not play a special role, but for some it may not be convenient. In this case, you will have to remove the steering column and set everything correctly. We set the middle position of the bipod as follows: count the number of revolutions from lock to lock and divide by two. I had 2.5 turns. This means that from the extreme position, turning the steering wheel 1.25 turns, we get the middle position of the bipod. I advise you to fix this position with the gearbox adjusting bolt, tightening it (but moderately). We'll adjust the play later. Next, tighten the new gearbox mounting nuts and connect the steering rods to the bipod. Fill the gearbox with oil up to the edge of the hole. Then we adjust the steering gear play. It’s more convenient to do it in a car, with the muzzle hanging out. By rotating the adjusting screw, we ensure that there is no play and that the steering wheel does not rotate too tightly (a slight turn of the steering wheel by a couple of millimeters is visible when the wheel moves). Next, we adjust the toe—either ourselves or at a service center. We rearrange the steering wheel if it is in an indirect position. That's all. Dimon on greenery
especially for the site https://www.semerka.info
- Login to leave comments
Pros and cons of steering gear
The advantages include the self-braking effect, large gear ratios due to the use of only two parts, low noise levels and smooth running.
The disadvantages of a worm-type steering gear are increased wear, excessive heat generation due to friction forces, jamming and relatively low efficiency. To prevent jamming and rapid wear, it is necessary to adjust the mechanisms and comply with assembly accuracy requirements.
The main advantage of a worm gearbox over a gearbox is that the initial contact of the links occurs along a line, rather than at a point. The input and output shafts in a worm-type steering gearbox can be crossed at different angles (most often at 90°). Another significant advantage is that with the same gear ratio, the worm gear takes up much less space.
Steering mechanism VAZ 2107
VAZ cars, which are classic models, are distinguished by pleasant reliability. This also applies to the steering mechanism.
It is quite complex, but its design allows you to maneuver and ensure reliable vehicle control even in the most difficult road conditions.
The modernization process led to the installation of a composite shaft and a safety column. Due to the size of the steering wheel, the driver makes the necessary maneuvers without any problems. From lock to lock, it takes 3.5 turns to turn the steering wheel completely. The force from the steering column is transmitted to the drive via a composite shaft.
The current steering mechanism on the VAZ 2107, a product of the Volga Automobile Company, is quite informative and does not allow the driver to get tired during long trips. There are certain difficulties when turning in a parking lot, but as soon as the car begins to move, the resistance weakens and turning the steering wheel becomes easier.
There is one more nuance - when the steering mechanism is working properly, there is a slight play. But its limit value complies with the traffic rules. This is due to the fact that there are steering rods on the VAZ 2107 and an impressive number of elements in the gearbox.
In general, the steering of the 7 can be considered reliable.
Mechanism design
To repair the steering column on a VAZ 2107, you first need to understand its structure, as well as the principle of operation.
The seven is in many ways similar to the “penny”. Therefore, the device and design received minor changes. The structure includes:
- A mechanism that transmits the driver’s force to the executive components;
- A steering drive that turns at an angle specified by the driver.
In turn, the steering mechanism consists of:
- Composite shaft with cardan transmission;
- Steering wheel (steering column together with a steering wheel with a diameter of 520 mm);
- Worm gearbox of the VAZ 2107 steering mechanism.
The control system has the following components:
- Bipod;
- Pendulum arm;
- Swivel arms;
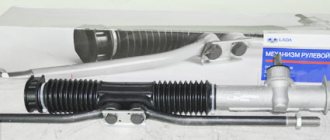
- Steering rods for VAZ 2107 (one middle, two side).
The outer rods include two parts, which allows you to change their size by adjusting the toe angle.
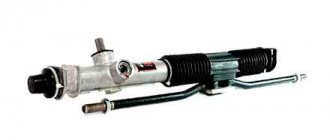
Tie rod/end set for VAZ 2107
The operating principle of the steering mechanism looks like this:
- The driver begins to rotate the steering wheel, the wheel size of which ensures that this task can be performed quite simply;
- By means of a composite shaft, a worm gear is activated, which reduces the speed;
- The steering mechanism is lubricated with special oil (TAD 17) poured into the gearbox;
- The worm gears rotate, which causes the double ridge roller to move;
- This, in turn, causes the secondary shaft to rotate;
- The tray mounted on the secondary shaft makes a turn and pulls the rod system behind it;
- These components influence the levers that synchronously rotate the wheels to the required angle specified by the driver.
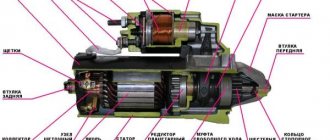
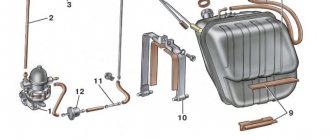
Parts of the steering gear housing
1 - housing; 2 - bipod; 3 — lower crankcase cover; 4 — adjusting shims; 5 — outer ring of the worm shaft bearing; 6 — separator with balls; 7 — bipod shaft; 8 - adjusting screw; 9 — adjusting plate; 10 — lock washer; 11 - worm shaft; 12 — upper crankcase cover; 13 - sealing gasket; 14 — bipod shaft sleeve; 15 — worm shaft seal; 16 — bipod shaft seal.
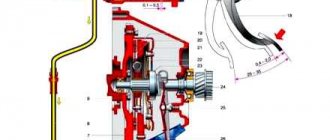
Details
1 — steering gear housing; 2 - shaft seal; 3 - intermediate shaft; 4 - upper shaft; 5 — fixing plate of the front part of the bracket; 6 — bracket for fastening the steering shaft; 7 - upper part of the facing casing; 8 — bearing sleeve; 9 — bearing; 10 — steering wheel; 11 — lower part of the facing casing; 12 — bracket fastening parts
Repair and maintenance
Over the years of operation it has been proven that the steering on VAZ 2107 vehicles has impressive reliability. However, this does not take away the fact that the machine requires periodic inspection and repair.
- When performing maintenance, it is important to check for increased play as well as increased wear on the ball joints. To do this, you need to turn the steering wheel from one side to the other. If the wheels do not respond when the steering wheel is turned 5 degrees from its original position, this indicates severe wear. Here you will need to repair the steering column on a VAZ 2107.
- To avoid the need for urgent and rather expensive repairs of the steering gear on a VAZ 2107, it is necessary to change the oil in the worm gear housing. This is done at intervals of 60 thousand kilometers. Leaks may occur through the seals, so they are carefully checked 2-3 times a year. This is one of the weak points of the system.
- The swing arm should be inspected by slowly rotating the steering wheel from side to side. If the parts move in a vertical plane, then surgical intervention is required.
Adjusting the steering column
Adjustment work on the steering gearbox on a VAZ 2107 is resorted to when the steering wheel becomes difficult to rotate, jamming occurs during rotation, or when the steering shaft moves along the axis with the wheels straight.
To adjust the steering column, you will need an assistant, as well as a 19-mm wrench and a flat-head screwdriver. The procedure is carried out in the following sequence:
- The machine is installed on a flat horizontal surface with the front wheels located in a straight line.
- Open the hood and clean the steering gear from contamination. The adjustment screw is located on top of the crankcase cover and is protected by a plastic plug, which is pryed off with a screwdriver and removed.
Video: adjusting the VAZ 2107 steering unit
Replacement, repair and adjustment of the VAZ 2107 steering gear
How can you determine when it’s time to look under the hood of the G7 and check the serviceability of the steering gear? It's very simple.
↑ Malfunctions of the VAZ 2107 steering gear
Listen and take a closer look at your car:
- if it makes an uncharacteristic sound,
- there is a radiator oil leak,
- and the steering wheel turns with the last human strength.
With such “symptoms” you will inevitably have to carry out repair measures.
The unit in question, if the operating rules are followed, is quite reliable, however, sooner or later there comes a time when the steering gearbox fails. The car enthusiast can be pleased that the repair can be done with his own hands without the involvement of service station specialists.
↑ What spare parts will be needed?
In case of replacing the entire assembly, the only thing that needs to be purchased is the original part (part number 21050-3400010-00). If this is not possible, you can buy units with other designations, but it is still better to use original components.
↑ Tools and accessories for repairing the steering gear
- set of wrenches;
- beard;
- screwdriver;
- hammer;
- vice;
- mandrel (you can take a piece of pipe of the appropriate size);
- rags.
The repair sequence for the VAZ 2107 steering gear can be divided into two main stages.
↑ Removing the VAZ 2107 steering gear
First you need to remove the VAZ 2107 steering gear. This is done in the following sequence:
- The car is driven into a pit or placed on a lift.
- Next, you will need to clean the rod fingers, after which the rod is separated from the bipod. It is best to start with cotter pins and nuts, then move on to pressing out the pin.
- Removing the intermediate shaft fasteners. This element serves to connect the entire mechanism to the steering wheel. Fastening is carried out using three nuts that must be unscrewed.
Now you can remove the unit from the body.
↑ Disassembly and repair of the VAZ 2107 steering gear
- To repair individual parts and elements, you will have to completely disassemble the gearbox. To do this, clamp it in a vice and unscrew the bipod nut. Then the shaft thrust is tested.
- Removing oil. In order to pour out the lubricant, you need to unscrew the filler plug. After this, the adjustment nut is unscrewed and the lock washer is disconnected.
- Then you need to remove the bolts (there should be four of them) and remove the cover.
- The thrust shaft is carefully pulled out along with the roller.
- Next, you need to unscrew the fasteners of the worm cover and dismantle it.
- A series of blows with a hammer will knock out the shaft, which comes out along with the bearing.
- The oil seal and seal are removed with a screwdriver.
- Finally, you need to remove the outer race of the second bearing using a tool and a hammer.
↑ Cleaning all elements and troubleshooting them
After the gearbox has been removed and disassembled, you need to wash all the elements with diesel fuel (an alternative is kerosene). This will make defects more visible.
↑ Installation of a VAZ 2107 steering gear on a car
The second stage is the reinstallation of the repaired VAZ 2107 steering gear. It is carried out in the reverse order.
↑ Adjusting the VAZ-2107 steering gear
Also, the procedure for adjusting the steering gear should not be neglected. Adjustment measures may be necessary if the steering wheel movement becomes difficult, or jamming or blocking is felt.
It is better to make the adjustment with an assistant. The tools you will need are a screwdriver and a 19 mm wrench.
↑ Steering gear adjustment sequence
- the car must be on a level surface, the wheels are oriented strictly in the center;
- The plastic casing used for adjustment is removed.
- after this, the nut is loosened, protecting the screw from unintentional vibrations;
- the assistant begins to rotate the steering wheel in one direction and the other, at this time the master finds the correct position in the hooks. The adjustment is complete.
Replacement
This must be done in the following sequence:
- We disconnect the negative terminal of the battery just in case.
- Carefully, using a screwdriver (preferably the screwdriver slot is small), pry up the “Lada” badge in the middle of the steering wheel, which is a plug, and pull it out. As a result, we see a 24 nut inside.
- We put the steering wheel in a position so that the wheels “look” straight.
- We take the head of the required size, insert it into the extension, and then put it on the nut. We insert the crank into the extension, rest our knees on the steering wheel so that it does not turn when unscrewing the nut, and with a sharp movement of the crank counterclockwise we try to twist the nut. I don’t recommend unscrewing the nut completely, because... The steering wheel sits firmly on the shaft and, if removed abruptly, can hit you in the chest painfully.
- Then we take the steering wheel in both hands and rock it, from side to side, pulling it up. Moreover, it is desirable that the range of movements be frequent. When our steering wheel hits the nut, unscrew it completely and completely remove the steering wheel from the shaft.
With these simple manipulations and using a simple tool, you can remove the steering wheel on a VAZ-2107.
After removing the steering wheel, you need to inspect the copper horn contact located on the steering column. If necessary, clean it and bend it.
If your horn does not work, you must first remove the steering wheel in the sequence indicated above, and only then unscrew the screws on the back of the steering wheel to remove the panel along with the fasteners and contact plate, placing the steering wheel on the workbench.
Because it is easier to do this in the public domain than to look for holes by touch in the limited space of the car interior. And, as a rule, the sound signal does not work precisely because of the contact that is located on the steering column, so it may not be necessary to completely disassemble the steering wheel.
Good luck to everyone and safe driving!
We recommend: How to repair car air conditioning pipes with your own hands
Repair of steering gearbox on VAZ 2104, VAZ 2105, VAZ 2107
Welcome! Steering gear - if you go to a car store and buy it new, then it won’t take you that little money, if you go to a service center and ask to have it repaired, you’ll also spend quite a bit of money; it’s easier to buy it new right away, which is why many people prefer to do it something yourself, especially when you do some work yourself, you can be 100% sure that nothing will break soon (of course, if the work was done correctly).
Note! In order to repair the control gearbox, you need tools, namely: Wrenches (Set), you will also need a screwdriver, a hammer, a bit, and we also recommend that you find some kind of mandrel or pipe section, but what size should the mandrel and pipe section be? , you will only find out when you remove the gearbox from the car!
Summary:
Where is the steering gear located? It is located in the engine compartment and immediately under the vacuum brake booster (Indicated by a blue arrow), for clarity, just below you have already seen that it is shown in the photo with a red arrow, so you shouldn’t have any problems finding it, but only this gearbox can you might end up in dust and dirt and therefore you won’t find it right away, so keep this in mind.
When is it necessary to repair the steering gearbox? The gearbox must be repaired if the threaded part on its shafts is damaged, and due to damage or severe wear of the threaded part of both shafts located in the gearbox, the following problems with the steering may occur, namely, the steering wheel may rotate and have play, in addition, the steering the wheel may rotate, but the wheels themselves are not there, and the steering wheel may simply be blocked in one place and will remain there without moving anywhere; also, oil may still leak from the steering gearbox, but this will already happen for several reasons, namely if the gearbox housing is damaged and has through cracks (For example, this can happen after corrosion), also if something happens to the seals, then the oil will also constantly flow out of the gearbox and therefore the steering wheel will turn harder (If the oil all leaks out) and On the body or at the bottom of the car, you will also constantly notice traces of oil leaking from the gearbox.
Design and principle of operation of the steering gear
All gearboxes have a housing made of cast iron or welded steel. The housing contains transmission elements - gears, shafts, bearings, etc. Sometimes the gear housing may contain devices for lubricating bearings and gears.
Today, there are many types of gearboxes known. They can be classified: by type of transmission (worm and gear); by type of gears (bevel, cylindrical, bevel-cylindrical); by the number of stages (single-stage, two-stage, etc.); depending on the features of the kinematic scheme (with a deployed coaxial scheme or with a bifurcated stage); depending on the location of the shafts in space (horizontal, vertical).
With all the variety of designs, cars are most often equipped with worm gearboxes. Such gearboxes transmit torque using a worm gear, the main elements of which are a worm screw and a toothed worm wheel. Worm gears are used in all steering gears today.
The worm is a special screw made of durable materials and having a trapezoidal thread profile. A worm wheel is very similar in appearance to a regular gear wheel, but the threads on such a wheel are carefully adjusted to the shape of the threads of the mating worm. Typically, gears for heavy-duty worm gearboxes are made from two different materials. The raw material for the core is any inexpensive and at the same time durable steel (or ordinary cast iron), and the teeth are made of high-strength anti-friction materials. Due to its design, the worm gear is effective in applications that require high torque combined with low angular velocity.