Wheel alignment. What is it and why?
If we mentally draw one line along the vertical plane of the wheel and a second along the plane of its rotation, then we can see the camber angle, which is responsible for the position of the wheels when the car moves in a turn, for the clarity of its passage.
Camber angle
| Positive | The imaginary vertical plane of the upper part of the wheel relative to the plane of rotation is located outside |
| Negative | The imaginary vertical plane of the upper part of the wheel relative to the plane of rotation is located on the inside |
Positive and negative camber angle values
Now let's play with our imagination, looking at the car from above. We draw the lines of the plane of rotation of the wheels and the lines of the direction of its movement. Here we can observe the toe angle of the wheels, which gives our car stability and further predictability.
Toe angle
| Positive | The plane of rotation of the wheels is inside the frame of the direction lines |
| Negative | The plane of rotation of the wheels is outside the frame of the direction lines |
Positive and negative toe angle values
To understand the full importance of the wheel alignment process, you need to understand that the correct installation of the car’s wheels determines its stability while driving (tendency to rollover and skids), directional stability (controllability and maneuverability), the economic component (increased tire life and fuel economy ).
Wheel alignment angles - adjustment
Wheel alignment angles are design parameters that determine the position of the wheels in straight-line motion and in turns.
Deviation of wheel alignment angles from standard values can cause unstable vehicle movement (spontaneous deviation from a straight line, “yaw”), uneven and premature wear of tires and suspension parts, as well as increased fuel consumption. The caster angle is the angle between the vertical and the steering axis of the wheel when viewed from the side. The angle is adjusted by changing the number of adjusting washers on the bolts securing the axis of the lower arm, suspension, which ensures stabilization of the wheels when the car moves in a straight line.
The camber angle is the angle between the plane of rotation of the wheel and a vertical straight line passing through the center of the tire contact patch with the road surface. The angle is adjusted by simultaneously changing the number of adjusting washers of the same thickness on both bolts securing the lower arm axle, which ensures the correct position of the wheel during suspension operation. Wheel alignment
— the difference in the distances between the front and rear points of the inner part of the rims of the right and left wheels.
It is recommended to check and adjust the alignment angles of the front wheels on a stand in a specialized workshop, however, the verification operation (with the exception of checking the longitudinal inclination of the steering axis) can be performed independently with sufficient accuracy.
If the body was repaired after an accident or suspension parts were changed, it is necessary to check the wheel alignment angles.
More accurate results are obtained by monitoring angles on a loaded vehicle under a static load of 320 kgf, which approximately corresponds to the weight of four people placed on the seats and a load of 50 kg in the trunk. The fuel tank must be completely filled.
After the first maintenance and subsequent operation, the angles must correspond to the following values:
A little about the cluster or how to adjust the position of the rear tires
A cluster is the longitudinal and transverse angle of an axis. It also needs to be taken into account when adjusting car wheels. If the cluster is not set correctly, the steering wheel will not be able to align the wheels automatically after making a turn.
Attention! The zero parameter of the longitudinal and transverse angles of the axle is the maximum angle of rotation of the wheel.
Cluster adjustment is performed by increasing the washers on the suspension braces. If the car owner wants to increase the angle, then he must reduce the number of washers. This procedure will correspond to the adjustment of the rear tires.
Signs of broken wheel alignment
As the car mechanic’s “manual” says: “...for the domestic fleet of early years of production, the frequency of checking the “geometry” is 10,000...15,000 kilometers...”, but for foreign-made cars, experts recommend carrying out diagnostics every 30,000 kilometers. For me, this is too vague an indicator that does not at all reflect the realities of modern operating conditions. Agree, it’s hard to bind to these recommendations an off-road enthusiast on a tuned Pajero, which actively “collects” all the bumps and potholes, and a grandfather on a “Seven”, for whom overcoming road unevenness is associated with a complete stop of the car. Therefore, the following signs can be used to determine the condition of the wheel alignment angles of the front and rear wheels:
In order not to be confused by the last point of this list of “symptoms”, it is necessary to periodically check the air pressure in the tires, as, in principle, the car’s operating instructions say. Normally, tire wear should be caused by the conditions of its operation, and not by the consequences of mechanical faults in the car’s suspension.
Examples and causes of premature wear
In addition, there is also an unscheduled need to check and adjust the wheel alignment angles. As a rule, this procedure should be carried out after:
Adjusting the toe and camber of VAZ-2101 wheels
To check the wheel alignment angles, you need the simplest tools - a ruler or caliper with a length of at least 100 mm, a plumb line (thread with a weight), a cord about 3 m long - and a horizontal platform. Since in most cases, after checking, it becomes necessary to adjust the angles, it is better to carry out this work on an overpass or inspection ditch so that the tool can be reached to the front axle of the car. The platforms on which the wheels will stand must be in the same plane and located horizontally. It should be noted that correct wheel alignment angles can be ensured only when the position of the wheels themselves is stable while driving. Therefore, the camber and toe are checked after first making sure that the front suspension and steering are in full working order, that there is no increased play in their moving joints - the front wheel hub bearings, the ball joints of the swivel struts, the tie rod ends, the bushings of the suspension arms and the axle of the pendulum arm. In addition, the condition of the rubber bushings of the rear suspension rods is monitored; tighten all mounting points of the front and rear suspensions, loading the car (320 kg). Then check the fastening and condition of the wheels and tires, bringing the pressure in them to normal (or 0.1 atm more than prescribed in the instructions).
Determination of wheel equal runout points
Only after all this do they begin to adjust the unloaded machine. Having hung the front wheels and turning them, we determine and mark with chalk diametrically opposite points of equal runout on the protruding parts of the tire sidewalls. Then we remove the decorative caps from the front wheels and install the steering wheel in a position corresponding to the linear movement of the car - its spoke should be located horizontally.
Wheel position when checking camber
Now we turn the front wheels so that the previously marked points of equal runout of the tires of both wheels are located vertically. By pressing on the bumper, we roll the car forward and backward to eliminate the influence of the supports on the position of the wheels.
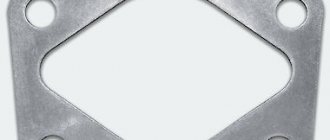
Determination of wheel camber
: 1 - cross member; 2 — adjusting washers; 3 - lower lever; 4 - plumb line; 5 — wheel tire; 6 — upper lever; a and b - distances from the thread to the edges of the rim
Finally, you can begin to determine the camber angle of the wheels. To do this, we bring a plumb line to the top of the tire and measure with a ruler the distances “a” and “b” between its thread and the rim at the lower and upper points of the wheels. If the difference between the obtained values (b-a) is in the range from 1 to 5 mm, then the camber angle of the wheels is normal. A difference of less than 1 mm indicates that the angle is insufficient. To increase it, you should remove the required number of shims (washers) located between the axis of the lower suspension arm and the cross member, after first loosening the two fastening nuts. If the camber angle is excessive (b-a more than 5 mm), washers must be added. Remember that the change in their total thickness should be the same under the front and under the rear bolt. Otherwise, the longitudinal angle through which the steering axis of the wheel tilts will be disrupted, and as a result the car will be pulled to the side.
Wheel toe determination
: 1 — points of equal runout; 2 - cord; 3 - ruler; c is the distance from the cord to the front part of the sidewall of the rear wheel tire.
After checking and adjusting the camber of the front wheels, we will determine their toe angle. To do this, we will install the car so that the previously marked points 1 of equal tire runout are located in a horizontal plane. The steering wheel, as before, is in the straight-ahead position. We invite an assistant and pull the cord with him at the level of the axles of the front and rear wheels, making sure that it touches points 1 on the front wheel without bending. In this position, use a ruler to measure the distance “c” from the cord (replacing in this case a beam of light or a stand ruler) to the front part of the sidewall of the rear wheel tire. Distance “c” should be 26-32 mm. In cases where “c” is outside the specified limits, we will determine the toe-in of the wheels on the other side of the car in the same way. If the sum of the “c” values measured on both sides of the car corresponds to twice the required value (52-64 mm), and the steering wheel spoke is at a small angle (up to 15-20°) to the horizontal during straight-line movement of the car, toe-in can be prevented regulate. If the value equal to “2c” does not fit within the specified limits or the spoke is located at a large angle, it is necessary to ensure the required toe-in by adjustment.
Adjusting wheel alignment on passenger cars
Let's start with the fact that wheel alignment angles on different brands of cars can differ significantly. This is due both to the design features of the car’s suspension and directly to its purpose. For example, racing cars for drifting have negative camber, which gives them a small contact patch on a straight line (reduces rolling resistance), but when cornering, the contact patch has a maximum value, which allows you to corner at maximum speed. And camber naturally changes the values of the toe angles.
This “geometry” is common for drifting
Due to the above, I suggest you get acquainted with the methodology for setting wheel alignment angles using the example of a VAZ 2110 car, and then, if you wish, you can successfully apply it directly on your car.
Tools and prerequisites
Camber
Preparation
We install the car on sliding supports (pancakes), checking that they are on the same level, since the curvature of the floor greatly affects the accuracy of measurements.
I understand your dumb question about the presence of support “pancakes”; I propose to make them from four sheets of metal, having previously lubricated each pair with grease for better sliding.
I draw your attention to this, since when adjusting the wheel alignment angle of one of the wheels, the second one must be stationary.
Diagnostics
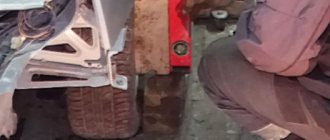
At this stage, we have a choice in the method of taking the wheel position values: using a plumb line or a building level.
In order for all measurements to be correct, we need to align the wheels strictly along the line corresponding to linear movement;
Having attached a plumb line to the wing (for example, with a magnet with a cloth placed under it), measure the distance “A” and “B” on the left and right wheels (the reference point is the wheel rim!), and write down the result;
How to adjust camber and toe, aka wheel alignment angles on a VAZ 2101-VAZ 2107?
Note! A more accurate check of wheel installation must be checked in a specialized workshop on a special stand. But if you don’t have the money for this, then you can almost as well adjust the wheel angles without using a stand!
And also when adjusting, pay special attention to the suspension elements, because if the suspension is faulty or if play is detected in most of its parts, adjusting the wheel angles will lead to nothing!
Preparation for adjustment:
1) At the beginning, for more precise adjustment of the wheel angles, it is recommended to load the car with an additional weight of “320 kg”. For example, you can put “4” people in a car and a load of about “50 kg”.
2) Now check how much fuel is in the fuel tank, if it’s not enough, bring it up to normal, because the tank must be completely filled.
3) Next, check the tire pressure, it should also be normal.
Checking and at the same time adjusting the camber and toe of the car:
Note! Unfortunately, setting the camber angle is very difficult to do yourself, because it is unlikely that it will be possible to adjust it properly. But you can check whether the camber angle is ok or not yourself, which is what we will do!
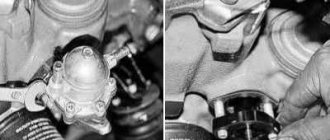
1) To check the camber, first sit in the car and turn the steering wheel so that it is pointing straight ahead.
2) Next, get out of the car and squeeze the car’s suspension, to do this, carefully use the trunk or, best of all, press the bumper with a force of “40-50 kg”, “2-3” times. Do the same operation with the front bumper of the car.
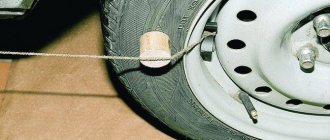
3) Then take the thread and a caliper and then pull it vertically as shown in the figure. And after the thread is tensioned, apply a caliper first from below, and then from above, and as a result you will find out the camber of the wheel.
Note! If you get a difference between the top and bottom points of the wheel, say, “3 mm”, then this will mean that the camber angle is approximately “30'”. The camber angle should be within “4°30'+20'” - this is when the car is loaded and provided that there are “4” people in the car. And when the car is unloaded, the camber angle should be “0°5'+20'”!
4) Now, in order to check the alignment, you need to do almost the same thing as when checking the camber, namely, align the wheels, if possible properly load the car, and only after that you need to start checking.
5) To check, take in your hand an unusual thread with hooks tied at both ends. And then hook one side of the thread to the beginning of the front wheel, and the other side to the end of the rear one, but hook it so that everything is on the same level, that is, so that the thread runs smoothly and does not bend.
Note! The track of the rear wheels is slightly narrower than that of the front wheels, approximately 44 mm, so for more precise adjustment, apply a block with a thickness of about 22 mm to the rear wheel and thereby draw the thread over this block!
6) Next, sit behind the wheel and turn the steering wheel so that the thread touches both sides of the front tire.
7) Then fasten the thread on the opposite side, but only this time place two bars under the back of the wheel, one of which will be “6 mm” thick and the other “22 mm”. Thus, if we add these two values, then the sum we get is “22 + 6 = 28 mm” the thickness of the bar.
Note! After the entire operation, check that the thread lightly touches “1-2 mm” for one front wheel at both points of the tire; if it does not touch, then adjust the toe-in of the front wheels!
 To adjust toe using two wrenches, loosen the outer tie rod coupling clamps.
9) And after that, using Cobra-type pliers, rotate the clutch itself and, as a result, adjust the length of the tie rod until the gap between the thread and the front wheel tire returns to normal.
10) And finally, tighten the tie clamps and do the same work with the second wheel and thereby achieve their total toe-in of about “2 mm”.
How does the procedure work on trucks?
Setting camber angles
On cars with a front axle and on trucks with a beam, this parameter is unregulated. The camber angle is set by the position of the kingpin at the factory and can only change due to its wear. We can only check it using a plumb line using the method described above. Eliminating wear and tear is a purely plumbing issue.
Setting toe angles
How to check
To take measurements on trucks, it is better to use a telescopic ruler, since due to the large wheelbase, when measuring with a tape measure, you can get an error due to its deflection.
Most likely, most will have problems finding a telescopic ruler. I offer my solutions to the problem:
Wheel alignment for VAZ 2106-2107 - we do it ourselves
Do-it-yourself wheel alignment adjustment on a VAZ-2107 is a procedure that is carried out to ensure the correct alignment of the wheels. The value of the presented indicator can be positive, that is, when the upper edge of the wheel is directed in an outward direction, and, conversely, negative when the wheel is directed inward. They are indicated by the corresponding signs: “plus” or “minus”. Wheel alignment (VAZ-2107/2106) needs to be adjusted as necessary or according to regulations. Wheels that are not adjusted even by a millimeter can lead to increased wear on the chassis components, tires and wheels. In addition, they can lead to the creation of an emergency situation.
Wheel alignment - what is it?
First, let's look at the theory: wheel alignment - what is it? What are the wheel alignment angles, and how does the car’s behavior on the road depend on them?
Camber is the angle between the vertical and the plane of the wheel. It ensures reliable contact of the tire with the road (see picture above).
Toe is the angle between the direction of travel and the plane of rotation of the wheel. The stability of the car in corners and tire wear depend on it.
- On rear-wheel drive cars, the wheels should be slightly turned towards each other - this is called positive toe. When moving, they move apart and become parallel.
- For front-wheel drive vehicles, on the contrary, the toe-in should be negative (see the diagram below).
Caster is the longitudinal inclination angle of the king pin. This parameter very rarely needs adjustment, only on a newly assembled front suspension from new parts, so we will not consider its adjustment.
Repairing the suspension or steering (replacing the same shock absorbers or steering joint) leads to a significant change in the wheel alignment angles. Daily use of the car also makes adjustments to these parameters over time, so the need to adjust the wheel alignment periodically arises.
It is best to adjust wheel alignment twice a year, during seasonal tire changes. During this time, you will fall into a hole more than once or run over a curb, causing the chassis to become loose and the angles to change. Timely alignment adjustment will cost much less than a set of new tires.
In 1955, American engineer Lee Hunter developed the first wheel alignment stand. Sensors mounted on the wheels sent focused beams of light and accurately measured angles. That's why the stand was called optical. But already in 1969 it was connected to a computer, and in 1995, 3D technology was first used to measure and adjust angles.
True, Soviet car enthusiasts managed without any stands or computers - using wrenches, calipers, thread and a plumb line, they adjusted the camber and toe angles with their own hands.
Why adjust wheel alignment?
According to the regulations and recommendations of experienced car enthusiasts, wheel alignment on the seventh model VAZ should be carried out every 10 or 15 thousand km. This is due to wear and tear on components and assemblies, which leads to deviations from the established angles and factory parameters. However, such adjustment may be necessary earlier, especially if the car often falls into potholes at high speed, and damage to wheels and discs occurs.
A correctly set wheel angle setting has a positive effect on the vehicle's driving characteristics and reduces wear on suspension components.
Incorrect setting of the camber parameter, if at least one front wheel is positioned incorrectly, you can notice that the car on the road is pulled to one side. This can be understood quite simply; you just need to let go of your hands from the steering wheel for a short time.
As for toe-in, it serves to determine how and by how much the wheels can converge with each other in relation to the road surface.
There are some nuances for cars with different types of drive. Front-wheel drive vehicles have a negative toe angle. But rear-wheel drive cars, on the contrary, have a positive toe angle. This is done so that when driving the wheels have the ability to self-align and continue moving in this state.
Not all car enthusiasts understand the importance of the presented characteristics and do not pay due attention to it. This is wrong, because incorrect installations and adjustments of both camber and toe lead to increased wear of the structural elements of the car. This also affects the cost of maintaining the vehicle, since you have to change spare parts more often and contact a service center for this.
You can perform the procedure yourself. To do this, you can use instructions and diagrams, which are sufficiently presented on the Global Network.
hodovik-razval › Blog › Wheel alignment on a Zhiguli (VAZ 2101-07)
The entire process is captured on video. Well, some pictures that explain the topic. Here in the picture are the keys (tools) that will be needed for adjustment:
Well, I sketched out a table that shows how adjusting washers, placed between the lever axis and the beam, on the camber bolts, change the camber and caster on Zhiguli cars.
Comments 15
Hello! Today I had a wheel alignment done, they set the alignment at the rear, but they couldn’t adjust the alignment, they say there is nothing to turn to adjust the alignment. Is only toe-in done on the front axle? Ford Focus car.
That’s right - front and rear, on Focus, only toe is adjusted. The remaining angles can only be changed by replacing chassis parts or editing the body geometry. On the rear of the Focus, there are homemade adjustable suspension arms (to adjust the camber in the rear). But all this is unnecessary fuss. The camber is practically not felt by the driver at all when driving (especially on the rear axle).
thanks for the answer!) in the rear everything was normal, after replacing the levers, the camber on the right was in the red zone, and on the left in the allowed zone
When to do it
It is important for every car enthusiast to know when to carry out the procedure. Certain types of replacements or installations of various parts may signal the need for repairs, for example, when the following spare parts were changed:
There are times when the car starts to swerve on the road. This may be a reason to check and adjust the wheels, especially when the following cases occur:
According to the recommendations of professionals, there are certain parts on the “seven”, the replacement of which does not require wheel alignment adjustment. These are the following elements:
What is needed for repair
To adjust the wheels, the car enthusiast will need certain parts and devices. They need to be prepared before the procedure begins, since it is simply impossible to do without some tools. These are the following devices:
There are several ways to adjust wheel angles. The most common ones are using a ruler or using a rope.
As you can guess from the name, each one uses simple devices. Therefore, if a car enthusiast prefers the first option, he will need a simple ruler and a special one. In the second case, you need a dense thread of short length for camber and longer for toe. It is recommended that it has hooks on the ends, otherwise it will be more difficult to attach it to the wheel.
Self-adjustment
First, you need to place the car on a flat surface so that the wheels are straight. After this, you need to prepare all the tools and devices for the chosen method of performing the procedure.
Using thread
In this case, you will need a caliper, thread and weight. Stages of self-repair:
Ideally, the upper and lower distances should be equal. However, if this cannot be achieved, then the upper distance must necessarily exceed the lower one. This will give increased stability to the car on the road surface. But it is better to achieve equal values.
After this, you should proceed to adjust the convergence parameter:
Using a ruler
The second method is an alternative to thread tension. In this case, a special ruler is required, which must meet the following indicators:
The toe adjustment process itself goes like this:
Examination
The essence of self-adjustment is that you can only check the wheel alignment indicator. Personally, it is very difficult to adjust and set the angles correctly. This will require the help of a qualified technician and special equipment, which is available at service stations. Adjusting the angles also involves installing the castor, which is almost impossible to do yourself without certain skills and experience.
The wheel alignment on a VAZ-2107 car can be adjusted independently. There are two ways to do this: using a thread or a special ruler. However, maximum accuracy will be ensured only by special equipment at the service station.
Source
Adjusting wheel alignment angles
In order for the wheel alignment of your car to meet the standard, you need to install the steering wheel in a perfectly level position and ensure that the load on the rear and front bumpers is at least 50 kilograms each. After this, the procedure is performed in several main steps:
- pull the thread from the highest point of the wheel down;
- We measure the distance from below and from above, using a caliper for this purpose. As a last resort, you can use a regular ruler;
- We carry out the necessary calculations based on the fact that 1 millimeter of difference in the results obtained is 10 degrees;
- We attach a rope with hooks to the front and rear wheels. In this case, it is necessary to install a wooden block 22 millimeters thick under the thread on the rear wheel;
- turn the steering wheel so that the wheels on both sides touch the stretched rope;
- the next stage is to place two bars at once under the thread, the total thickness of which is 28 mm. If one of the wheels does not reach the rope, we adjust it;
- We repeat the procedure until the correct angle is set for each wheel of your car.
The adjustment itself is performed by moving the tie rod couplings.
To do this, use two 13mm wrenches to loosen the clamps holding this part. As soon as the clutch starts moving, you need to move it in one direction or another until it comes into contact with the thread. Wheel alignment is a necessary procedure that must be carried out as part of every maintenance service. The thing is that if the wheel alignment angles are incorrect, the car will behave unpredictably. This, in turn, will affect the safety of the driver and passengers and may cause a traffic accident.
If you notice one of the symptoms of incorrect wheel alignment, it is absolutely not necessary to contact a service station to have it adjusted. Use our instructions, watch the video carefully, and you can easily solve the problem yourself.
Why adjustment is needed
It is recommended to check and adjust wheel alignment for domestically produced cars every 10–15 thousand km. mileage This is due to the fact that even with a serviceable suspension, over such a mileage on roads with poor surface quality, the parameters can change quite a lot, and this will affect the handling. One of the common reasons why UUCs go astray is when a wheel falls into a hole at speed. Therefore, even an unscheduled inspection may be required. In addition, the procedure is necessary in the following cases:
Wheel alignment adjustment at a service station
If you suspect that your “six” has a bad wheel alignment, then you should visit a car service center to diagnose the suspension and wheel angles. If it is discovered that some suspension elements are out of order, they will have to be replaced and only then adjustments must be made. The procedure can be carried out on different equipment, for example, an optical or computer stand. It is not so much the equipment used that is important, but the experience and approach of the master. Therefore, even on the most modern equipment, the setup may not give the desired result. The technology for checking the UCC may differ in different services. First, the technician checks the pressure in the wheels, inflates them according to the installed tires, enters the values into the computer, and then begins adjustment work. As for the car owner, he should be concerned not so much with the equipment that will be used for adjustment, but with the fact that after the procedure the car behaves steadily on the road, it does not go anywhere or throw, and does not “eat” rubber.
Video: wheel alignment installation under service conditions
Instructions for adjusting wheel alignment yourself
Before you begin adjusting the camber and toe angles, it is imperative to check the vehicle's chassis. If repairs are needed, then doing a wheel alignment is pointless. The steering and suspension must be in perfect order.
Pay attention to three points on which the wheel alignment angles on a car greatly depend:
- Serviceability of the chassis (more information about car suspension diagnostics);
- Tire pressure;
- Loading the machine.
Be sure to check the tire pressure before adjusting the wheel alignment and make sure that you haven’t accidentally forgotten a couple of bags of potatoes or cement in the trunk