During the operation of the vehicle, the advantages of the chassis fade away. But this happens not only over time, but also with improper repair of the chassis. If during such a repair a threaded connection was damaged, the wheel alignment will immediately change. You can feel it as soon as you start moving. The car may begin to pull to the side, cornering will become more difficult and problematic, in other words, the vehicle's controllability will decrease. Negative camber of the rear wheels is necessary precisely in order to increase the car's controllability. The grip on the road surface will be better, and cornering will become easier.
What is wheel alignment?
The concept includes the toe-in and camber of wheels relative to the road and the car body. Toe is a certain angle that is formed between the plane of the wheel and the axis of symmetry or traction.
Pay attention to the drawing! It shows positive toe-in, i.e. in the direction of movement the wheels are facing each other. There is also negative convergence when the situation is the opposite.
Camber is a certain angle that is formed between the plane of the wheel and the asphalt.
If the upper part of the wheel is tilted towards the body, the parameter is considered negative, if it is tilted away from the body, it is considered positive.
Another term that is also important is “castor” or “tilt of the axis of rotation.”
This is the angle between the steering axis of the wheel and the vertical when viewed from the side.
In other words, when we turn the steering wheel completely, the wheel tilts in the direction of the turn (falls on its side).
Wheel alignment, camber and castor
Option 4
Option with sporting ambitions: everything is “minus”, with the exception of the caster. A car with such settings turns more confidently and faster, as does the “rearrangement” maneuver. Hence the best result.
So, there are a lot of simple and very effective ways to change the character of a car without resorting to expensive replacements of components and parts. The main thing is not to neglect the adjustments - they often turn out to be very important. Which option should you prefer? For most, the second will be acceptable. It is the most logical for everyday driving, both with partial and full load. You just need to take into account that by increasing the longitudinal tilt of the rack, you not only improve the behavior of the car, but also increase the stabilizing (return) force on the steering wheel. The last, “fastest” tuning option is more suitable for the near-sporting public who likes to improvise with the car. When giving preference to these adjustments, it must be taken into account that with increasing load, the values of the toe and camber angles will increase and may go beyond the permissible limits.
Acceptable values (errors) for wheel alignment
There are certain limits that cannot be exceeded. In other words, as the left axle of the car is configured, so should it be the right axle. But it will not be possible to set the parameter with an accuracy of 0′, so certain errors are allowed, in which controllability and straight driving will not be affected.
- The camber difference (for example: left wheel 39′ - right wheel 33′ = 6′ permissible camber difference) should not exceed 30′ minutes, otherwise the car will drift to the side when driving.
- The same applies to the caster angle: the difference in angles (subtract the smaller angle from the larger angle) should not exceed 30′.
- Front axle offset - if this value is positive, then the left front wheel is closer to the rear than the right, if negative, vice versa. This parameter is very important, because it characterizes the state of the body geometry, and the closer this indicator is to zero, the better. The permissible deviation is 20-30 minutes.
What is wheel alignment and why is it needed?
This is an adjustment of the most commonly adjusted vehicle suspension angles. These angles themselves have a similar name. The camber value shows the deviation of the plane of rotation of the wheel from the vertical. Toe-in refers to the angle between the direction of movement of the entire vehicle and the same plane. The parameters of these angles affect:
- Uniform wear of wheel tires;
- Controllability;
- Machine stability.
Therefore, it is necessary to regularly check and, if necessary, adjust the angles of the front suspension. The camber of the rear wheels on the Lada Priora is not adjustable, since an elastic beam is used at the rear.
What parameters should I set the wheel alignment to?
We have already talked about permissible errors, now let's move on directly to choosing parameters for our driving style.
Front axle
It's one thing to adjust the wheel alignment for racing: drift, drag, rings, rally; another thing is to customize it for the daily comfortable use of the car.
Castor
AvtoVAZ recommends the factory caster position with a value of +1 degree. But if you go the other way and set it to +3 degrees, then the car will confidently and smoothly hold a straight line at high speeds. By the way, +3 degrees is the limit of positive castor for our cars; if you make it higher, then you will need to change the engine mount, gearbox, and you will have to regularly buy new grenades.
Camber
AvtoVAZ sets the camber to 0 degrees from the factory. To improve cornering control, you can shift the camber to the negative side for 45 minutes.
Convergence
Again, the factory setting is "0" with tolerances allowed.
But if we changed the camber in a negative direction, then we will definitely need to set the toe to +0.5 - +1 mm.
Rear axle
Camber
On the rear axle you can set the camber from -1 to -2 degrees. In this case, it is advisable to use special negative camber spacers.
Castor
Toe will need to be made from +2 to +4 mm.
Do-it-yourself wheel alignment on a VAZ 2110
You can check and adjust the appropriate angles on the vehicle in the garage or on any flat, flat surface, for example, asphalt. Before starting, you should measure the tire pressure; its value must correspond to the norm:
- For 13 inch tires – 1.9 bar;
- For 14 – 2-2.1 bar.
You need to remove all heavy objects from the car and unload it. To work you will need a basic tool and several auxiliary items.
It is important! Before setting the camber and toe angles, it is recommended to first adjust the caster.
Equipment
To carry out the work you will need:
- Set of wrenches;
- Short building level;
- Roulette (3-5 m);
- Vernier calipers (can be replaced with a steel ruler);
- Chalk;
- Plumb line with cord;
- A special device is a ruler for checking alignment (you can make a homemade device from two tubes, one of which goes into the other).
To check the toe-in, it is recommended to use a pit (an overpass will also work).
Camber Angle Adjustment
The following numbers appear in the car owner's manual: 0 degrees ±30 minutes.
This is interesting! It is recommended to moisten the fastening nuts with kerosene or a “Liquid Wrench” type compound in advance so that they rotate freely.
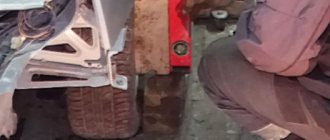
It is convenient to measure the camber angle using a building level. The adjustment process looks like this:
- With chalk, 2 lines are placed on the surface of the rim - at the top and bottom of the wheel.
- A string with a plumb line, attach (you can use a magnet) to the fender of the vehicle. Now you should measure the interval from the wheel to the lace in the area from the top and then from the bottom mark. The values should differ by no more than ±1 mm.
- Since the geometry of the wheels cannot be absolutely ideal, you should roll the car forward so that the lines (marks) move by 90. Now you should make two additional marks and take measurements again.
- Points 2,3 and 4 will have to be repeated for the second wheel.
- Next, you need to place the vehicle 180° compared to the previous position and repeat the measurements.
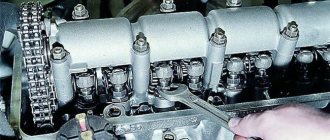
- Using a wheel wrench and a car jack, remove one of the wheels. Using a pair of 19mm wrenches, loosen the 2 bolts that hold the shock absorber strut bracket to the steering knuckle.
- Using a 19 key, move the steering knuckle the required distance inward or outward, moving the eccentric of the bolt head. This will allow you to change the camber angle.
- Then you should fasten the counter-bolts, put the wheel back in and rock the car, pressing 3-4 times on the corresponding front fender. Repeat angle measurements.
- Check measurements and make adjustments until an acceptable result is achieved.
On most domestic front-wheel drive cars (including the VAZ 2110), a camber of -1/+1 mm should be installed.
Adjusting the toe angle
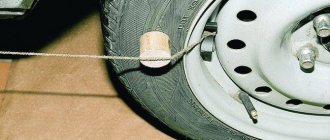
Although this parameter is sometimes adjusted using a thread, a more accurate option is to use a special device (ruler). To begin with, we drive the car onto an overpass or pit, and set the steering wheel straight. Next you need to perform the following sequence of actions:
The angle value must be controlled using a ruler
- With chalk, draw two lines on the tires - on the inside and next to the rims.
- Using a ruler, set it so that its tips touch the lines. Other parts of the line should not touch anything other than the wheels.
- If you are using a factory measuring device, you need to look at the moving scale, align 0 with the pointer, and then fix it. When using a homemade ruler, you will have to perform all manipulations manually - that is, use a tape measure to measure the ruler each time and write down the values.
- Pull the vehicle forward to move it a few tens of centimeters; the ruler should move (if the ruler was made independently, you just need to take the measurements again).
- Check the value on the ruler scale.
- The distance between the wheels on the rear axle and the similar distance between the front wheels are not the same, although they should have equal values. Most likely, it will be necessary to adjust the length of the tie rods, plus or minus (make them longer or shorter).
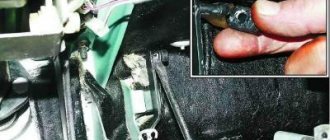
- Using a 27mm wrench, loosen the tie rod locking nuts.
- Using a 24mm wrench, you can change the length of the tie rod (you should turn it exclusively by the clutch).
- Now you should set the factory scale so that it is possible to adjust the toe to 0, then slightly move the vehicle back.
- When the readings are equal to -1/+1 millimeters, the installation is considered complete. It is very important to move the vehicle forward again and check the measurements.
- Particular attention should be paid to the steering wheel. If suddenly it turns out to be shifted to the side, it means that the length of the rods is set incorrectly, and some of them are currently displaced. To correct it, you will have to change the length (for example, increase) of one (any) rod by a certain number of revolutions, and change the second (for example, reduce) by the same number of revolutions. If the steering wheel returns to its normal position, the problem is solved.
Conditions under which the correct wheel alignment is set
- All car tires must be the same size with the same pattern.
- Wheels must be balanced.
- Wheels (stampings) must fully comply with the factory parameters of the car (radius, offset, width, bore diameter).
- Same pressure in all tires.
- All suspension elements and body geometry must be in full working order.
- Find out in advance what is included in the cost of car service services.
Which wheel alignment stand to choose: optical or computer?
I’ll say right away that if the “master” has crooked hands, optical or 3D camber, it makes no difference.
The first method is the use of old reliable instruments by a technician, which have relatively large measurement errors compared to computer ones.
Another significant drawback is the inability to adjust two axes at once.
A computer stand - in addition to the correct placement of wheel toe and camber, the ability to immediately assess the condition of the body geometry, participation in an accident, etc.
Angle adjustment
It should be understood that diagnostic and adjustment work can only be carried out on a special diagnostic stand, since especially on modern cars, tolerances are determined in minutes and have a range of no more than half a degree, which is almost impossible to determine by eye.
At the moment, there are several types of diagnostic stands:
- light;
- laser;
- computer.
The most accurate are computer stands that have four diagnostic reading heads installed on each wheel, the bottom of which is displayed on the monitor and shows a complete real picture of the position of all four wheels
This is especially important for diagnosing cars with fully independent suspension, which have toe-in and camber adjustment units located on the rear axle.
Often it is on such stands that the misalignment of the transverse axes and the deformation of the rear beam or axle stock are easily determined, which is very difficult to do on a light or laser stand, and it is almost impossible to determine the axial misalignment of the car.
It is worth noting that the adjustment is carried out only on a technically sound vehicle, the chassis of which does not have any backlash. Tire pressure must be set in accordance with the manufacturer's technical requirements.