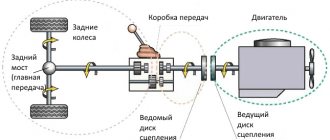
How does the ignition system work?
The standard ignition system consists of the following components:
- High voltage coil;
- Cables;
- Candles;
- Breaker;
- Switch and Hall sensor (if it is contactless);
- Distributor;
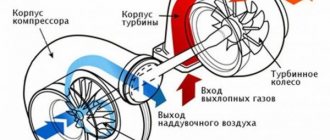
During operation, a low voltage current is applied to the primary winding of the coil and creates a magnetic field, through which it creates a high voltage current on the secondary winding. By means of a distributor and a breaker, the impulse is distributed to the desired spark plug.
Slider resistor
BSZ uses the operation of a commutator and a Hall sensor, which transmit energy taking into account the number of revolutions of the distributor. The electronic ignition switch distributes currents more efficiently. Its advantages are that there is no need to clean the contacts and it makes it easier to start the engine in the cold season.
Ignition coil
Unlike a carburetor, an injection system uses an ignition module to distribute energy, the operation of which is adjusted by the ECU, which fixes the position of the crankshaft at top dead center. This is why there is no need for adjustment.
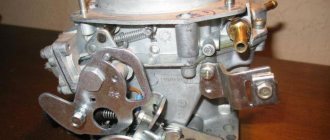
Adjusting the gap of the VAZ 2107 distributor breaker
The quality of the spark depends on the gap between the breaker contacts and the condition of the contacts themselves. To adjust the VAZ 2107 distributor, you must perform the following operations:
- unclip the fastening brackets and remove the distributor cover;
- unscrew the screws securing the slider;
- remove the slider;
- Clean the breaker contacts with sandpaper (to avoid damaging the contacts, you must use sandpaper with a grain size no larger than 600).
- loosen the screw securing the breaker contacts;
- turn the adjusting screw to set the gap to 0.4 mm, using the appropriate feeler gauge;
- tighten the fixing screw;
- install and secure the slider;
- fix the distributor cover.
In addition to adjustment, repair of the VAZ 2107 distributor may be required. This consists of cleaning the contacts on the distributor cover or replacing the cover itself, replacing the slider, resistor or contact group.
The ignition system is one of the components of any gasoline engine. Incorrect ignition adjustment of the VAZ 2107 becomes a problem: the spark plugs flood, and the engine completely loses power. Let's look at what the advance angle is, what it affects, and how the ignition of a VAZ 2107 carburetor is installed.
Adjusting the ignition of a VAZ 2107 carburetor
What is ignition timing?
For the ignition to work correctly, the following condition must be met: sparking must occur at the moment when the piston is at TDC. This should be a compression stroke. This moment should be the flash point.
- Do-it-yourself carburetor adjustment for VAZ 2107
| Options | Classical | Contactless | |
| Spark energy | mJ | 20 | 60 |
| Secondary voltage rise time from 2 to 15 kV | mks | 30 | 20 |
| Secondary voltage max | kV | 26 | 29,5 |
| Spark duration | ms | 1,5 | 2 |
However, that's not all. The time it takes for the fuel mixture to completely burn must also be taken into account. Therefore, the spark plugs must create an impulse with some advance, which is called the advance angle. As a result, the mixture reaches the peak of combustion, and the cylinder begins to move downward.
If sparking occurs earlier, then such ignition is called earlier, and if late, then later. Early leads to detonation. This is why the engine quickly overheats and becomes inefficient, although fuel consumption can sometimes be greatly reduced. This can be determined by the spark plug electrodes, which are covered with a white coating. With late ignition, power is noticeably lost, and black smoke comes out of the exhaust pipe, which indicates that gasoline, without having time to burn in the cylinder, burns out in the exhaust system.
The spark plugs, in this case, turn black. Popping noises in the exhaust pipe can also tell this. Late ignition means that the spark plugs are simply flooded with fuel, which does not burn or burns incompletely. When they are flooded, they do not work.
Ignition systems are divided into 3 groups:
Contact ignition system
Contact ignition system
Contactless ignition system
Contactless ignition system
Electronic ignition system (microprocessor ignition system)
Electronic ignition system
Pros and cons of contactless ignition
| Pros + | Minuses - |
| Current is supplied to the ignition coils through a semiconductor switch to the primary winding, this makes the spark energy much greater due to the higher voltage on the secondary winding of the ignition coil (up to 10 kV). | The most significant disadvantage of this ignition system is its low reliability compared to others. The well-known switches that were initially installed on these systems were characterized by very low reliability and often failed. |
| Functionally replacing the CG, an electromagnetic pulse shaper made using a Hall sensor and which, compared to the CG, provides a significantly better pulse shape, as well as stability, throughout the entire engine speed range. In this regard, an engine equipped with BSZ produces significantly better power indicators and allows significant savings on fuel (up to 1 liter per 100 km). | If any problems arise, you will not be able to do without new spare parts. |
| A significant advantage of this ignition system is the low need for frequent adjustments and maintenance compared to KSZ. But as for servicing the system, everything is simple and comes down to lubricating the distributor shaft every 10 thousand km. mileage |
Pros and cons of contact ignition
| Pros + | Minuses - |
| This is the simplest ignition system, it can be repaired in an open field using a spool and a match within 10 minutes; this number will not work with a contactless number. Failure of the contact ignition system is unlikely. | Current is supplied to the primary winding of the ignition coil through a contact group. In connection with this, there is a significant limitation on the voltage on the secondary winding of the coil (up to 1.5 kV), which means there is strong spark formation. |
| Maintenance is required frequently. It is necessary to constantly monitor the gap in the CG, the angle of the closed state of the CG. It is necessary to constantly clean the KG contacts because they burn during operation. Also, the distributor shaft needs to be lubricated every ten thousand kilometers. It is also recommended to lubricate the distributor cam. | |
| The reliability of this system is low; it often breaks down and requires constant maintenance. |
Pros and cons of an electronic ignition system
| Pros + | Minuses - |
| A significant advantage of the MPSZ is that it provides high-quality ignition control depending on the crankshaft speed, pressure in the intake manifold, engine temperature, and carburetor throttle position. There is no mechanics in the system, so this ignition system produces a spark perfectly, the sparking is very powerful. | Cannot be repaired in the field. Difficult to find spare parts. Low reliability. |
Electronic ignition connection diagrams: VAZ 2101-VAZ 2107
Scheme of a contactless ignition system for VAZ cars:
1 - switch; 2 — ignition coil (bobbin); 3 — distributor; 4 — ignition key; 5 - Hall sensor.
How contactless ignition works
The sequence and principle of operation of the BSZ is as follows:
- The driver turns the ignition key.
- The circuit is closed and constant voltage from the battery is supplied to the primary winding of the ignition coil. The energized primary winding forms a magnetic field around itself.
- When the starter starts, it begins to rotate the crankshaft of the internal combustion engine and rotates the shaft, which is located inside the distributor along with the slider.
- The hall sensor detects how the distributor shaft rotates (along the protrusion on the shaft) and transmits a signal to the switch.
- The electronic unit turns off the voltage supply to the primary winding based on the signal from the Hall sensor.
- When the voltage supply circuit is interrupted, at that moment a high voltage pulse of up to 24 kilovolts appears in the secondary winding of the coil, which is transmitted through a thick wire to the slider (the moving part of the distributor).
- Fixed contacts are built into the roof. The runner throws an impulse onto one of these stationary contacts. From the contact that received the high voltage pulse, it is transmitted through high-voltage wires to the spark plugs of those cylinders in which the pistons are at top dead centers.
- When voltage is applied to the spark plug, the working combustion chamber of the cylinder already contains fuel and air in a compressed state for ignition.
- The distributor slider rotates to spark all spark plugs according to a certain sequence pattern: 1-3-4-2. Depending on how to install the slider, the entire operation of the system depends, early ignition or later, we learned to determine in another material.
- The car engine starts.
ECMs are sometimes interchangeable, but sometimes they are not repairable.
Diagram of an outdated VAZ ignition system (without switch)
1 — distributor (distributor); 2 - breaker; 3 - capacitor; 4 — ignition coil (bobbin); 5 - battery; 6 — ignition switch; 7 - spark plugs.
This scheme is in systems where there is no switch. The circuit is broken mechanically using a breaker.
Disadvantages of contact ignition:
- The contacts burn and oxidize, which reduces the power to create a spark.
- There are wear parts that are recommended to be changed every 20 thousand km. mileage
- Converted power in contact systems is up to 18 kilovolts. For electronic or contactless ones - up to 24 kilovolts.
Disadvantages of contactless ignition:
- The Hall sensor cannot be repaired. Working service life up to 50 thousand km. mileage
How to set the ignition on a VAZ 2107 carburetor with your own hands?
There are many ways to set up the ignition on a VAZ 2107, so let's start with the simplest one, which will not require any costs. The posting process doesn't change much. To do this, the car is placed on level ground, wheel chocks are placed under the front wheels, and neutral gear is installed at the gearbox. Prepare your instrument. If you don't have a ratchet wrench, lift the rear wheel and engage 4th gear. The car must be insured to avoid injury.
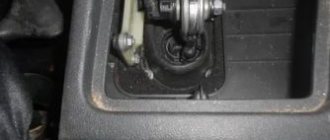
First of all, it is necessary to install the piston in the 4th cylinder at TDC and this must be a compression stroke. To make it easier to set up contactless ignition, remove the spark plugs and install a paper plug in the 4th cylinder in place of the spark plug holes. Rotate the crankshaft using a ratchet or spin the wheel as it rotates. As soon as the plug flies out, this will be TDC. It is exhibited there. After this, loosen the nut 13 holding the distributor and pull it out. It must be installed so that the slider faces the contact of the fourth cable. To do this, you need to look at the distributor cover, where all the cables are marked with numbers. The housing is located next to the engine.
Now tighten the distributor nut slightly so that the breaker can move. Ask an assistant to start the engine after installing the spark plugs. While the starter is rotating, you need to position the distributor so as to catch the starting moment and tighten the nut. You need to adjust slowly. When the engine starts, you also need to install the distributor so that the speed becomes stable. This ignition setting for the VAZ 2107 carburetor is optimal.
- Adjusting the idle speed on a carburetor VAZ 2107
If you have any questions, I recommend watching this video on installing the ignition on a classic VAZ:
Do-it-yourself ignition adjustment
On some domestic cars, such a procedure as adjusting the ignition timing is relevant. For example, the classic VAZ, before they began installing an injection engine power system, often bothered car owners with incorrect ignition timing.
For a long time, from the very birth of VAZ cars, these cars used a contact spark generation system. Initially, it required frequent ignition adjustments for these first VAZ 2101s.
It is this contact system that is an outdated (although very cheap), the most complex scheme for distributing and transmitting sparks to the coil and then to the cylinders.
The fact is that before adjusting the ignition of the VAZ 2106 begins, which in itself is archaic, several preparatory actions have to be performed. Let's list which ones.
- It is necessary to inspect the very contact group that is located in the distributor. The contacts close depending on the position of the eccentric, which rotates from the motor shaft. The contacts are often covered with soot; if they are black, they need to be cleaned with a piece of sandpaper. In addition, it is necessary to set the correct gap between the breaker contacts of 0.4 mm.
- It is also necessary to make sure that the carburetor is working properly, is in perfect condition, and that no problems will arise with the supply of gasoline to the pistons on time.
Only after all this can you begin to adjust the ignition of the VAZ 2106 or another modification of the classic VAZ. Also read about replacing the VAZ 2114 generator brushes and replacing the VAZ 2110 clutch cable.
How to set up contactless ignition using tags?
This method is not much different from the previous one, but this time the first cylinder is used. There are marks on the large crankshaft oil seal cover, and on the pulley itself there are marks. You need to turn the mechanism so that the mark on the crankshaft coincides with the middle mark and does not move to the side.
The further procedure is similar to the previous one: install the distributor and collect the elements.
After complete assembly, it is necessary to check the operation of the system. Otherwise, the installation will not work properly.
How to check early/late ignition?
To check the correct setting of early or late ignition, you need to do this while driving. To do this, you need to accelerate at 4th speed to 60 kilometers per hour and reset it to 40. Now sharply press the gas pedal and listen to the engine. If the angles are set correctly, a chirping sound will appear and disappear after a few seconds. The car should begin to pick up speed. With early ignition, detonation will not disappear for a long time, and with late ignition, it will not appear at all.
That is why you need to adjust the position of the distributor by loosening the nut to 13. If you cannot achieve the desired adjustment, proceed to the next step.
How to adjust the contactless ignition of a VAZ 2107 using a light bulb
All previous methods are primitive and allow you to set the desired angle only approximately. To achieve the most accurate adjustment, you must continue the adjustment using a regular 12-volt test light. This will allow you to set the most optimal lead angle.
Adjusting contactless ignition
One of the wires of the light bulb needs to be connected to the positive contact of the ignition coil, and the second one should simply be shorted to ground. Loosen the nut by 13 and, holding the octane corrector, slowly turn the distributor until the light goes out. Next, rotate the breaker clockwise until the light comes on. The moment when this happens and there will be the most optimal ignition timing angle on the VAZ 2107. Now the nut can be tightened. If the spark plugs are still flooded, then you need to check the engine power supply system - the carburetor. It needs to be adjusted. There may be reasons in other systems.
Adjusting the ignition by ear
On the Lada 2107 you can also adjust the ignition for gas. This is a cruder method, but its advantage is that no additional equipment is required. Before starting, you need to warm up the Semyorka engine. After this, drive onto a straight and level road. When you reach a speed of 60 km/h, you need to sharply press the gas pedal.
By detonation you can determine whether the ignition settings are correct. If weak and rapid detonation occurs, the ignition timing is considered within normal limits.
Severe detonation indicates too early ignition. In this case, you need to turn the regulator clockwise.
No detonation means late ignition. In such a situation, turn the distributor counterclockwise.
Is there a difference between contact and electronic ignition?
On carburetor VAZ 2107, both an electronic and a contact device were installed. The adjustment process is no different. The only difference may be that before setting the marks, it is necessary to clean the contacts on the contact breaker and check the gap so that the system can be adjusted more accurately.
- How to adjust the ignition: early or late ignition
By the way, many people mistakenly call the switch the ignition relay. This relay is only a way to reduce the inrush current and is designed to preserve the life of the contacts. This relay is located in the engine compartment. The ignition setting does not apply to it.
This is how you can adjust the ignition on a carburetor VAZ 2107. Good luck on the roads!
Owners of VAZ classics with a carburetor engine are aware of its imperfect ignition system, with which difficulties often arise. Models with an injection engine are equipped with a different system called contactless. To avoid difficulties with a carburetor engine, a contactless ignition system is installed on the VAZ 2107. How the system works and how to install it on a VAZ 2107 is described in the material.
How to be sure to perform the procedure correctly
Often, owners of “classic” VAZ cars who decide to independently install and adjust contactless ignition have certain questions regarding the implementation of this procedure. This is due to the lack of experience in this matter. That is why, before carrying out the procedure of dismantling the “native” system and then installing a contactless one, you should study the connection diagram for the contactless ignition. If you neglect this procedure, then most likely you will have difficulties even at the stage of dismantling the old system. In the worst situation, it may happen that certain technical components will simply be damaged and repairs will be quite expensive.
That is why, if you are not sure that the installation and configuration of contactless ignition can be done by you yourself, it is recommended to seek help from professional craftsmen who specialize in this issue. It is worth saying that today installation services for such systems are widespread and, as a rule, are provided at every service center. At the same time, it is also necessary to be extremely careful in this matter.
It is worth recognizing that “classic” VAZ cars are already outdated and the issue of installing an ignition system is being addressed less and less. Therefore, you may encounter a situation where a technician who has been working at a service station for a long time has never encountered this procedure before.
Please note that when searching for specialists, it is recommended to give preference to those who have experience and know how to correctly carry out the procedure so that the car works as it should. If the work is done correctly, you will immediately notice that the car begins to start without problems in the cold season, and gasoline consumption has been significantly reduced.
Installing contactless ignition is the most correct solution that will make the vehicle work better, as well as help save money on purchasing fuel for the car.
Design and principle of operation of the BZ
Contactless or electronic ignition on the VAZ 2107 is installed on models with injection engines. Carburetor sevens were supplied from the factory with contact ignition systems, which have many disadvantages. If you plan to install a contactless ignition module, then before starting it won’t hurt to understand the issue of its design.
The ignition system is the mechanism by which a pulsed voltage is created to supply the spark plugs in order to promptly ignite the fuel-air mixture in the cylinders. The main disadvantage of contact SZ is that the contact groups require regular cleaning, replacement and adjustment. As soon as difficulties arose with igniting the combustible mixture, the car owner immediately knew where to look for the reasons.
With the advent of the BSZ, these difficulties automatically disappeared. To understand why, let’s look at the components of the mechanism:
- Electronic type switch with transistors.
- Double winding coil.
- A distributor or distributor equipped with a Hall sensor, a slider and a contact cover.
- Spark plugs with armored wires.
The BSZ diagram for the VAZ 2107 is shown in the photo below.
Ignition circuit for VAZ 2107
Based on this diagram, let's consider the principle of its operation:
- When you turn the ignition key, current is supplied to the primary winding of the coil, thereby creating a magnetic field.
- When the engine starts, power is supplied to the starter coil and the rotor begins to turn the crankshaft.
- In this case, the crankshaft rotates the distributor shaft, which is connected to the runner.
- As soon as the shaft with the slider rotates, this phenomenon is detected by the Hall sensor (along the protrusion on the shaft) and transmits the corresponding signal to the switch.
- When a signal arrives at the switch, the primary winding of the coil is de-energized (on the low-voltage side).
- A powerful discharge of about 25-30 kV is induced in the secondary (high-voltage) winding, transmitted to a moving contact located at the end of the distributor shaft.
- When the slider moves in a circle, it practically touches the contacts in the cover, a spark occurs between them, and a high voltage discharge is transmitted to each of the contacts in turn.
- This discharge flows through armored cables to the spark plug electrodes.
The mechanism in question received the name “contactless” due to the connection and disconnection of the circuit of the primary winding of the coil with a commutator due to the output transistor (without using contacts).
Pros and cons of the system
If you decide to install a carburetor-type BSZ on a VAZ 2107, then it is recommended that you first understand all the advantages and disadvantages of the device. The advantages of the mechanism under consideration include:
- The absence of contacts automatically eliminates the need for their maintenance. As a result, we have a more reliable system that does not require frequent maintenance.
- Stability of spark propagation through the cylinders, which is due to the absence of the breaking effect of the contacts using the cam method.
- A large discharge in the spark plug, the value of which reaches 25-30 kV, while in contact modules it does not exceed 12 kV. High voltage promotes a stronger spark and improved ignition of the fuel assembly, as well as its complete combustion.
- Simplified engine starting at low temperatures.
Why is a strobe not used?
Most people who study the issue of installing electronic ignition on a “classic” think about why a strobe is not used when performing the action algorithm. In fact, the answer in this case is very simple. The fact is that the practical experience of service center specialists performing similar work does not imply the use of a strobe due to the regular stretching of the chain on the engine. Even if we are talking about a new target, after tightening it with the help of a tensioner, it is stretched in such a way that the points on the engine cannot coincide. As a result, it becomes impossible to achieve the most accurate alignment using a device such as a strobe.
Note that the process of replacing contact ignition with non-contact ignition in the VAZ-2107, which has an injection engine, is impossible. If a wiring harness from a newer car model was installed in the vehicle and the vehicle refuses to start, this indicates that the connectors for the EPHH and the switch were mixed up during the work. The fact is that in their design they are completely identical. As a result, in order to identify the problem, it is necessary to swap them.
Setting the ignition timing with advance
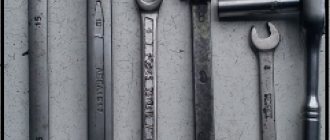
This setup is completely easy to do. Even a beginner can cope with this task. To do this, prepare a 13 mm wrench and a special 38 mm crankshaft wrench in advance.
If your car is started, be sure to turn off the engine, since you can only turn on the ignition when the engine is turned off. First, the piston of the first cylinder is installed at the top dead center of the compression stroke, that is, in the ignition position. Before doing this, remove the candles and plug the hole from them with cotton.
You need to align the mark on the crankshaft and the front engine cover. To do this, use a wrench to start turning the crankshaft clockwise. During this action, the air compressed there should push out the cotton wool, thereby indicating the compression stroke. Continue turning the shaft slowly until the marks on the timing belt pulley and cover line up.
Please note that there are 3 marks on the cover:
- The first indicates ignition advance by 10º;
- the second – by 5 º;
- the third is equal to zero.
Since a VAZ 2107 engine with a carburetor runs on 92 or 95 gasoline, we need to set the ignition for these types of fuel. That is why you should select the second mark, which will indicate an ignition advance of 5º.
Once the required parameters match, put the spark plugs in place and remove the wires. The system is ready for use.
How to adjust the torque of the classic and “nine”
Let's now look at how adjustments are made in carburetor classics, for example, in the VAZ 2107. We will need:
- wrenches;
- light bulb with wires.
Begin.
- First of all, turn off the engine.
- We unscrew the spark plugs and carefully close the vacated holes in the cylinders with rag swabs.
- Set the piston of the first cylinder to top dead center. To do this, use the “38” key to turn the crankshaft in a clockwise direction until the mark of the crankshaft pulley aligns with the mark on the engine block. In this case, the tampon should fall out of the hole in the first cylinder. However, a block usually has three marks. The first means an advance of 10 degrees, the second - 5, the third - 0. We need the second.
- Screw in the candles.
- Loosen the nut securing the distributor.
- We connect one wire of the light bulb to the low-voltage terminal of the coil, and the second to ground.
- We get behind the wheel and turn the key to turn on the power.
- Let's return to the distributor. Rotate it very slowly clockwise until the light comes on and then goes out. Returning the distributor back, counterclockwise, we wait until the lamp lights up again, and the contacts separate. This is the right moment.
- Tighten the distributor fastening. The ignition adjustment of the rear-wheel drive VAZ is completed.
However, a front-wheel drive VAZ equipped with a carburetor has exactly the same spark excitation system. Therefore, the ignition adjustment of the VAZ 2109 is carried out according to similar instructions.
Now let’s look at the processes for setting up other systems below.
What to do with other cars
Let's look at how to adjust the ignition on a Buran snowmobile. For this you will need:
- strobe;
- keys, screwdrivers;
- sheet of paper, pencil, protractor, compass.
The actions are as follows.
- On a sheet of paper, draw a circle with a diameter equal to the size of the stationary element of the variator.
- Using a protractor, we mark the degrees around the circle from 0 to 30. Moreover, we put 0 at the top, where the clock shows noon.
- Having unscrewed the spark plugs, insert a screwdriver into the left cylinder.
- By turning the variator with your hand, we catch the moment when the screwdriver shows that the piston has reached top dead center.
- We put a mark on the variator opposite the zero of the scale we made.
- We connect the strobe to the high-voltage wire of the left cylinder, screw in the spark plugs.
- We start the engine, point the strobe light towards the scale. The device lamp should light up when a spark appears, and it should show which scale mark corresponds to the variator mark. This way we find out the existing advance angle.
- To install it, turn off the engine and loosen the magdino mount. Then we turn the magdino, maintaining the desired angle.
This is interesting: Replacing the power window cable of a VAZ 2107
The setup is complete. But here you will have to buy a strobe to adjust the ignition angle.
Now let’s look at the adjustment process on the Ural motorcycle. Modern Ural motorcycles are equipped with a contactless system. However, sometimes it also needs adjustment. Let's see how this happens.
Next you need to prepare:
- wrenches, screwdriver;
- light bulb with wires.
- Using the crankshaft mark, set the piston of the first cylinder to top dead center.
- The microprocessor unit, having loosened its fastening, is turned counterclockwise until it stops.
- The flywheel mark must match the motor mark.
- The light bulb should light up, one contact of which is connected to ground, and the second on the microprocessor unit.
- Turn the block further until the light goes out. This is the right moment. Tighten the fastening.
Next, we will study how ignition adjustment is done on the still popular ZIL-130 trucks. For work you will need:
- First, unscrew the spark plug from the first cylinder and insert a paper plug in its place. We turn the crankshaft by hand, when the plug flies out, we align the mark of the crankshaft pulley with the mark of the timing gear block. The piston of the first cylinder should be at top dead center.
- We install the distributor drive in the cylinder block. We align the holes in the lower drive plate with the holes in the cylinder block. Tighten the bolts.
- We turn the crankshaft until the pulley mark is in front of the mark on the block between 3 and 6 combs.
- Using the adjusting screws, set the upper plate of the corrector to the “0” position of the lower plate.
- We turn the breaker by the body until the cam of the moving contact shaft is pressed out. Tighten the breaker fastening.
- We secure the high-voltage wires, start the engine, and check the operation of the system.
The same principle is used to adjust the ignition on the YaMZ 238 truck engine. Although for detailed instructions it is better to refer to the technical data sheet.
The same applies to ignition adjustment for Kamaz modifications. The presence of a high-pressure fuel pump in Kamaz makes it necessary to set the exact angle of injection of diesel fuel into the working cylinder. An inaccuracy of one degree can lead to engine repair.
In general, in all cases, adjusting the correct ignition timing helps engine performance:
- firstly, it makes it easier to start;
- secondly, fuel consumption is optimized.
Settings price
But the car enthusiast is not always confident in his abilities. Sometimes it’s easier to go to a car service center to adjust the correct ignition timing.
We have indicated how much they will charge for this operation in large cities of Russia in the lines of this table.
Adjusting the ignition timing
For subsequent actions, use a 13 key to loosen the fastening nut of the distributor (ignition distributor). Connect one wire from the light bulb (it will act as a voltmeter, that is, indicate the presence of voltage) to the low-voltage terminal that the coil has, the second to ground.
Now turn on the ignition. Slowly and carefully rotate the distributor body clockwise, stopping immediately when the light goes out. The sparks that appear will indicate the moment of ignition. Move the distributor counterclockwise until the contacts are disconnected and the lamp lights up again. Everything is in order, you can safely tighten the distributor, the setup is complete.
Installation of electronic ignition
Electronic ignition makes engine operation smoother and softer, makes it easier to start in the winter, and reduces fuel consumption. If you, having a carburetor engine, decide to switch to contactless (electronic) ignition, we will tell you how to correctly install it on a VAZ 2107 car.
An electronic system for a car with a carburetor should not be too expensive or cheap. It is best to opt for a product in the mid-price category, so that later you don’t have to change anything after a while.
Before work, prepare a drill and a set of keys.
For an overview, first read the included instructions carefully and open the carburetor type engine kit. It includes:
- ignition coil;
- distributor;
- switch;
- 4 candles;
- connecting and high-voltage wires.
The system is easy to install. First of all, remove the negative terminal from the battery and turn the crankshaft until marks numbered 3 and 4 align, that is, the highest dead center.
Now you can begin the main steps. The coil should be disconnected from all wires, remove it and install a new one. The coil can now be connected to the central high voltage wire. Connect 2 brown wires to contact “K”, and 2 blue wires to contact “B”.
Now remove the distributor cover. Please note that the slider must be set exactly as shown in the picture. Mark this place with a marker on the block to correctly install the new distributor. Now you can unscrew this part and put it to the side.
After opening the cover of the new distributor, place the slider perpendicular to the engine and insert it into the hole in the cylinder block. Align it with the mark on the block. Next, put on the cover and connect the wires.
Decide where the switch will be located, since there is no space for it in the VAZ 2107 car. We recommend installing it next to the washer reservoir. Secure it with self-tapping screws and install the connector.
Don't forget the candles. To replace them on a VAZ 2107 car, you will need a spark plug wrench, which you should use to unscrew the old spark plugs from the cylinders and put new ones in place.
Their color can say a lot about the engine's performance, so if the spark plugs have black carbon deposits, the air filter should be replaced. Normally, candles should have a light brown color.
Instructions for installing a contactless system on the seven
Manipulations for converting the ignition system on a VAZ 2107 from contact to contactless are carried out according to the following principle:
- First, you should turn off the power to the car by disconnecting the minus terminal from the battery.
- Disconnect the armor wires from the spark plugs.
- The spark plugs are unscrewed, after which the crankshaft should be turned with a key set to “36”. This is done in order to set the piston of the 1st cylinder to TDC. To determine that the piston has reached top dead center, use a screwdriver. The notch on the crankshaft pulley must be on the cylinder block.
- The steel latches of the switchgear cover must be snapped off and then removed along with the wires.
- A mark must be placed on the engine valve cover next to the moving contact of the slider.
- All wires are disconnected from the distributor along with a thin tube connecting the device to the carburetor fitting.
- Using a wrench, you need to loosen and unscrew the nut, which is used to press the distributor skirt to the BC.
- The old distributor must be removed, and at the same time pay attention to the gasket so as not to lose it.
- The wires from the coil are disconnected, remembering their locations. The coil mount is unscrewed and the device is dismantled.
- The next step is to install the mounting block.
- Make holes to secure the switch.
- The cover is removed from the new distributor and the gasket is installed. The distributor must be placed in the mounting hole of the cylinder block, and this should be done so that the moving contact is located at the level with the top dead center, which is drawn on the valve cover (the slider should point in the same direction as on the old distributor).
- The distributor skirt is fixed.
- The coil is placed in place of the old device, and terminals with wires from the ignition switch, as well as the tachometer and switch are connected to it.
- The wire from the EB of the first contact must be connected to the coil terminal marked “K”.
- The wire from the fourth contact is connected to terminal “B”.
- The spark plugs are screwed into place, after which the armored wires and the wire suitable for the coil can be connected.
- At the final stage, all that remains is to attach the vacuum tube and proceed to the stage of adjusting the ignition.
This is interesting: Will replacing the valve stem seals save you from oil leaks or is it a waste of money?
At this point, the installation of electronic ignition on the VAZ 2107 is completed, and before testing the device, you will need to make preliminary adjustments.
Distributor
The sequence of work that must be performed in order to install a set of new parts on a VAZ 2107 does not make much difference. Therefore, we can start by replacing the distributor. Remove the distributor cover to access the slider. To simplify the task of further adjusting the BSZ, you should immediately perform some preparatory measures: installing the distributor slider in a position that will be easy to repeat when installing a new distributor; mark on the block opposite the middle mark on the distributor scale, which is used to adjust the ignition.
Using a 13mm wrench, completely unscrew the nut securing the distributor and then remove it. Disconnect the high voltage wire connecting the ignition coil and the distributor. We install a new non-contact sensor distributor, and you need to set the slider so that it matches the position of the old one. The body of the new distributor needs to be aligned according to the marks, the middle one opposite the one previously left on the engine body. We put on the distributor cover and a set of high voltage wires.
Coil
Next, you need to replace the ignition coil. Using a size 8 wrench, unscrew the nuts securing the wires to the coil contacts. Using a 10mm wrench, unscrew the mount of the coil to the body. Installing a new coil requires special attention - you should take into account the possible discrepancy between the locations of contacts “B” and “K”. For convenience, you can rotate the new electronic coil relative to the fastener, thereby placing the contacts in the same way as on the old one.
Having secured the coil, we connect old wires to its contacts (usually one blue, the other brown), and new ones, with connectors for connecting to the distributor and switch. They usually have the same colors as the standard ones. Typically, in a VAZ 2107, brown wires are connected to contact “K”, and blue wires are connected to “B”. It remains to connect the high-voltage wire that connects the coil and the distributor.
Switch
The last element in the circuit, the presence of which is required by a contactless electronic ignition system, is a switch. The ideal place in which it can be installed in a VAZ 2107 is between the washer reservoir and the left headlight. There is a flat area on which we will install the switch, with the radiator facing the body. Having leaned the switch, we mark the places for drilling holes in the body, through which we fasten it with self-tapping screws; in this case, you need to screw the black (neutral) wire from the connection block under one of the screws.
After completing all the work described above, you should once again carefully check the connection of the wires according to the circuit diagram. If everything is done correctly, you can try to start the engine. Usually there are no problems with this; all that remains is to adjust the ignition to ensure the most efficient operation of the engine.
Checking correct ignition
After completing the steps, it is necessary to check the operation of the ignition system.
To do this you need:
- start the car and drive off;
- Accelerate the car to 50 kilometers per hour, engage fourth gear and sharply press the accelerator pedal. Then, engine detonation will appear, which will decrease (and then disappear altogether) as the speed of the car increases.
There can be two types of problems:
- Engine detonation occurred, but did not disappear as the vehicle speed increased (it is assumed that the ignition was turned on earlier ). In this situation, the switchgear must be turned half or one division to the right.
- Detonation did not occur at all - ignition was delayed . To eliminate this problem, you need to turn the switchgear half or one division to the left .
As you can see, setting the ignition on the VAZ 2101 is quite simple. However, if difficulties or additional questions arise, it is better to contact certified car services for advice.