Problems with the starter on the VAZ 2114 and their elimination
If the car does not start, the starter does not turn, and the traction relay clicks characteristically, then the problem should be looked for in the power circuit. First of all, attention should be paid to the battery. It should not be discharged. You also need to inspect the battery terminals. The presence of oxides can cause the starter connection circuit to have a voltage drop under load. If a discharged battery is detected, it must be charged using a charger. It is recommended to sand oxidized terminals and coat them with conductive lubricant.
To find problems related to the starter, you need to disassemble it. First of all, attention should be paid to the brush assembly. A large current flows through it, which leads to thermal damage. It is important to check that the brushes slide easily in the guides and do not jam. Springs must have sufficiently high elasticity. Any deformation of the brush holders is unacceptable.
The weakest link of the VAZ 2114 starter is four brushes. They are highly susceptible to wear due to friction against the manifold. Therefore, when visually inspecting them, it is important not only to control the absence of thermal and mechanical damage, but also to measure the remaining length. If the size is close to 4 mm, then the brushes must be replaced.
The planetary gearbox contains lubricant. Over time, it thickens and the starter begins to rotate the crankshaft less intensively. Therefore, when disassembling it is important to wash the gears. During assembly, the gearbox must be filled with fresh lubricant.
Article number and approximate price for the original VAZ 2114 starter
There are two main types of starters used on VAZ 2114 cars. With a carburetor engine, a unit with the factory index 29.3708 is used. Its cost is from 3600 rubles.
On VAZ 2114 cars that have an injector, a starter 5712.3708 is used. It is distinguished by the presence of a planetary gearbox. The presence of a gear in the design made it possible to increase engine speed. Therefore, planetary starters have gained great popularity compared to those previously discussed. At the same time, carburetor VAZ 2114 car owners, when replacing a starter, give preference to units with a planetary gearbox. The price of a new such product starts from 2200 rubles.
In retail sales, original starters are found with article numbers 2108370801006 and 21130370801000. They are interchangeable, but it is recommended to choose a unit with a planetary gear, regardless of the type of vehicle power unit.
Catalog number and cost of analogues
Finding a branded VAZ 2114 starter is not always easy. At the same time, the quality of the original components is very poor, which is further complemented by a high level of defects among the products sold. Therefore, experienced car owners recommend purchasing analogues from third-party manufacturers. The best alternative options for the original VAZ 2114 starter are presented in the table below.
Table - Good analogues of the original VAZ 2114 starter
| Manufacturer | vendor code | Approximate cost, ruble |
| As-pl | S9008 | 1750-2300 |
| HC Parts | CS332 | 2650-3500 |
| Startvolt | LST0115 | 3400-3800 |
| Bosch | 986014950 | 7300-8900 |
| WPS | 30714N | 2880-3500 |
Required Tools
In order to carry out repairs yourself and replace a faulty starter, you need the tools that are listed in the table below. Table - Tools required to replace the front strut
| Name | Note |
| open-end wrench | "at 8", "at 13" |
| Spanner | "at 13", "at 14", "at 15" |
| Ratchet | With extension |
| Head | "at 13", "at 14", "at 15" |
| Pliers | Can be replaced with pliers |
| Penetrating lubricant | For example, WD-40 |
| Screwdriver | With flat cross blade |
| Wire brush and rags | For cleaning contaminated surfaces |
Starter replacement process
In order to remove the faulty unit and replace it with a working one, you will need to follow the step-by-step instructions below.
- Use the handbrake to brake the rear wheels, securing the vehicle.
- Open the hood.
- Remove the negative terminal from the battery.
- Disconnect the terminal block of the mass air flow sensor.
- Using a screwdriver, unscrew the clamp that secures the air duct pipe, as shown in the photo below.
- Disconnect the air duct from the air filter housing.
- Remove the air filter. This action will allow you to gain access to the place where the starter is located.
- Disconnect the red wire that goes to the starter relay. Using a wrench, you need to unscrew the terminal nut, the wire from which goes to the battery.
- Unscrew the two nuts that hold the starter on top.
- Unscrew the lower fastening.
- Release the starter completely.
- Install the new starter into place.
- Reassemble everything in the reverse order of disassembly.
- Check the functionality of the mounted starter by test starting the VAZ 2114 engine.
Removing the starter
A complete replacement of the VAZ 2114 starter is performed in the following order:
- Remove the terminals from the battery.
- Unscrew the 3 mounting bolts securing the device body to the box (if they are heavily oxidized and do not give in, you should first fill them with kerosene or “Vedeshka”).
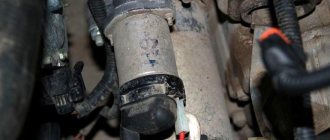
- Disconnect the negative terminal from the solenoid relay (the red wire that goes to the device ends with it).
- Remove the positive terminal from the solenoid relay, having first unscrewed its fastening nut using a 13mm wrench.
- Slide the starter to the right and remove it from the mounting studs.
- Install the new device and fix it in the same order, but in reverse order.
Before installing a new starter, it is recommended to treat all 3 mounting studs with graphite grease - it will protect them from corrosion and will help dismantle the device during the next repair without any problems.
Removing the starter
It should be remembered that a new starter installed to replace a worn one must be exactly the same type, namely 5712.3708. Most often, owners of the 14th model recommend purchasing devices from manufacturers such as PRAMO, Eldix and KATEK.
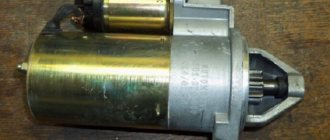
VAZ 2114 starter device
A car starter is designed to start an internal combustion engine by driving the engine crankshaft. The movement from the starter to the crankshaft is transmitted through the flywheel.
The VAZ 2114 car began to be produced by the Tolyatti Automobile Plant in 2000; it adopted many components and parts from its predecessor - the VAZ 2108-09 series. Accordingly, the design of the VAZ 2114 mechanism is very similar to its predecessor from the “nine”. The parts have external design differences, but the parts themselves are completely interchangeable with each other.
The VAZ 2114 starter consists of the following main parts:
- Stator, which is made in the form of windings located in the housing;
- Rotor (or armature), moving part;
- Bendix, transmits motion from the rotor to the engine flywheel;
- Solenoid relay is a device that drives the rotor by turning the ignition key.
Replacing the starter on VAZ 2108, VAZ 2109, VAZ 21099
The starter is necessary to start the car; it is switched off while the engine is running. Its bendix with gear moves back and thereby disengages with the flywheel - a part mounted on the end of the crankshaft (attached directly to the tip). The flywheel rotates along its axis if you start the car’s engine, and the starter is inserted with its front part (mask) inside the flywheel, and when you start to start the car’s engine, the bendix with gears engages in the flywheel standing still (there the starter gear comes into contact with the teeth flywheel). After entering the starter, current flows and the starter gear begins to rotate. The gear rotation speed is 250 crankshaft revolutions per minute, respectively 4 revolutions per second). When you remove your hand from the ignition key, it is pulled back with the help of a spring, and the bendix at the starter returns to its place. At this time, the gear disengages with the flywheel. We tried to explain the mechanism of how the starter works, and now we’ll figure out how to change it.
Note! Front-wheel drive cars are much more convenient to repair than classic ones: in classic models, to remove the starter, you need to disassemble the engine, otherwise you won’t be able to get to it due to its inconvenient location. In Samara, this point is more thought out, which means you will need few tools: wrenches and an inspection hole.
Starter location
On cars of the Samara or Samara 2 family, the starter is located in the same place. When looking for a starter, you should first focus on the battery (shown by the red arrow in the small photo), then, looking deeper into the engine compartment, you will find the starter (indicated by the white arrow). It is best to drive the car into the inspection hole and from there look at the starter (the large photo was taken from the bottom of the car) inserted inside the engine.
The main reasons for the failure of the VAZ 2114 starter
There are not many reasons why a starter may fail. It could be:
- Manufacturing defects;
- Operation of the device with unacceptable overloads;
- Violation of operating rules;
- Natural wear and tear of parts.
It should be noted that in pursuit of compactness of all parts of the engine compartment, the manufacturer slightly did not calculate the power of the starting mechanism. The starter often fails due to its low power, which is a design flaw, a “disease” of the VAZ 2114. Often the starting mechanism breaks down in cold weather, when the engine has to be turned for a long time to start. It can fail prematurely if it is not secured properly. Wear of the bushing in the gearbox, which supports the starter armature, also contributes to breakdown (the bushing is shown with an arrow in the picture below).
Another typical factory defect is that the solenoid relay stops working the first time after a certain time. The factory apparently saves lubricant. Often, when disassembling an almost new solenoid relay, you can observe a completely dry core and the housing in which the core moves.
Price issue
Purchasing a new solenoid relay for a VAZ 2114 is not such a big financial loss. Depending on the region and the store where you purchase the spare part, price tags can range from 300-600 rubles.
Often, many VAZ 2114 owners are faced with a situation where the car does not start or starts very poorly. There can be many reasons for this behavior of a car, but the first thing everyone looks for is a problem with the starter. One of the main problems in its operation is the relay.
Signs of a faulty VAZ 2114 starter
- When you turn the ignition key, the engine does not start;
- When starting, the engine continues to spin, the bendix does not disengage from the flywheel. You can stop the movement only by removing any terminal from the battery;
- When you turn the ignition key, “dry” clicks occur and the engine does not turn over;
- When you try to start the engine, smoke comes out of the starter and smells like burnt wire windings;
- When starting the engine, the starter buzzes and does not engage the flywheel. The launch does not happen the first time.
The principle of the device and its operation
Structurally, the starter 2114 is an electric motor powered by 12 volt direct current (on-board power supply). When the key is turned, its rotor begins to move, after which, with the help of a retractor relay, which brings the Bendix starter into engagement with the crankshaft flywheel, the latter begins to unwind.
After the combustion of the working mixture is initiated during rotation of the crankshaft and the engine starts, the retractor relay will move the bendix to the rear position and the starter will disengage with the flywheel.
Due to the fact that the starter has a fairly high load, its rated power is 1.55 kW.
In this case, the current strength in its circuit can reach:
- 80 A at idle;
- 375 A at maximum load;
- 700 A when in a braked state.
Starter device
As for the internal structure, the starter includes such components as:
- stator (fixed winding);
- rotor;
- bendix;
- brushes and their holders;
- solenoid relay;
- frame.
Also, sliding bushings, of which there are 3, are used as supporting elements for the rotor shaft in the starter. Two of them - front and rear - are pressed inside the body of the device, and the third is located at the point of contact between the bendix and the rotor.
Replacing the VAZ 2114 starter
Replacing a starter on a VAZ 2114 is most often done when the device has significant defects and its repair is not practical. In other cases, it is more logical to repair the device. The reason for the replacement may be a lack of time, when you need to leave urgently, and there is no time to understand the causes of the breakdown. This kind of work is mainly done in car repair shops, but it is easy to do it yourself. In this case, you don’t even need a car lift or inspection hole.
Removal
The starter is removed not only to replace it, but also for the purpose of repair. Without removing the device, you can only repair or replace the solenoid relay. When replacing the Bendix or its fork, armature and brush assembly, the starter must be removed. After the repair work has been carried out, the serviceable part is installed in place.
Many people are interested in how to remove the starter on a VAZ 2114. Before removing the starter on a VAZ 2114 car, you need to figure out where it is located under the hood.
We perform the following actions:
- Open the hood;
- Disconnect the battery terminals;
- Remove the air filter pipe;
- Remove the air filter housing.
Now that we have freed up some of the space in the engine compartment, we can look at where the starter is located on the VAZ 2114. It is located approximately in the center of the engine compartment between the radiator and the gearbox (gearbox) and is secured with three nuts to the gearbox. In the picture below the arrow indicates the location of the starter.
Location of the starter on the VAZ 2114
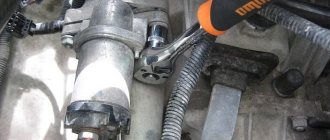
- First, disconnect the red wire from the starter that goes to the solenoid relay. It can be easily removed, just gently pull it to the side.
- Take a 13 key and unscrew the positive terminal of the thick brown wire.
- Then, using the same size 13 wrench, unscrew the three nuts securing the part. Two of them are indicated by arrows in the picture below.
- The third mount is located inconveniently, so you will have to work a little to get to it. Here it is shown with the starter removed (picture below).
Lower starter mount VAZ 2114
- Having disconnected all the fasteners and wires, we dismantle the device.
Installation
To install another starter in place, you must perform all the steps in reverse order. The fastening nuts must be tightened with force, but you should also not overdo it to avoid the threads on the fasteners from turning off. On a VAZ 2114 car, replacing the starter is a completely simple procedure and does not require much knowledge or special skills.
Malfunctions
During the operation of the vehicle, the following malfunctions of the starter are possible, which may lead to its replacement:
- overrunning clutch is faulty;
- short circuit of the stator or armature windings;
- significant wear of the brushes.
These malfunctions are characterized by the following symptoms:
- the starter armature rotates slowly;
- Uncharacteristic noises are heard when starting the engine.
If you ignore the slow rotation of the armature, of course, you won’t run into expensive repairs in the future, but you can run into trouble like this. But in case of noise, there is no need to postpone repairs.
It is quite possible, for example, that a malfunction may occur such as breaking out the teeth of the gear of the overrunning clutch mechanism, and here you can already run into an expensive replacement of the flywheel. However, before buying a new starter, you need to make sure that it is not possible to repair it!
Prices for starters for VAZ 2114 in online stores are in the range of 2784...4520 rubles, and the cost of replacing it averages 500 rubles.
In order to save a little money, you can replace the starter yourself, especially since this will require the following tools:
- keys for 8 and 13;
- WD-40 liquid.
It is better to carry out work under a canopy or in a garage.
Due to the fact that getting to the starter is not very convenient, we will simplify our task by removing the air filter housing. To do this, disconnect the contacts of the mass air flow sensor, release the pipes from the body, and then use a 8mm wrench to unscrew the two bolts securing the front support brackets.
Having carried out the preparatory work, we proceed to the main thing - replacing the starter. We carry out the work in the following sequence:
- We de-energize the electrical circuit of the car by removing the “negative” terminal from the battery.
- We treat the threaded connections attaching the starter to the gearbox with WD-40.
- Disconnect the negative terminal of the solenoid relay (red wire).
- Using a 13mm wrench, unscrew the nut securing the “positive” terminal.
- Using a 13mm wrench, unscrew the three starter mounting nuts.
- Remove the starter from the studs.
We carry out the work on installing a new spare part in the reverse order, lubricating the studs located on the gearbox with graphite lubricant, which will help in the future to reduce the time for unscrewing if you need to remove the starter for any reason.
As can be seen from the description of the work, removing the old starter and installing a new starter is not difficult and does not require special tools or skills. Good luck on the roads and, of course, no breakdowns!
Tips that may be useful when replacing a starter
- Before removing the starter, you need to make sure it is faulty. First of all, you need to check the reliability of the terminals on the battery. Oxidized terminals should be cleaned of deposits and re-secured. The reason for the failure may also be poor weight of the engine and the body. You should also check whether the solenoid relay wire has come loose from the connector and whether the positive terminal nut on the starter is tightly tightened;
- When removing a part, you can disconnect the positive wire of the terminal last. In this version, it is more convenient to unscrew the nut of the positive wire. By pulling the starter closer to you, it will be easier to get to the desired nut;
- You need to install the solenoid relay wire in place until it stops. The connector must be fixed, and in this case the wire will not fly off during movement due to shaking;
- Do not forget to first remove the terminals from the battery and turn off the ignition - this will save you from additional problems.
That’s basically all that can be said about how to change the starter on a VAZ 2114.
Starter for VAZ 2114: finding, removing and troubleshooting
In the ignition system of an injection engine, the starter is one of the key components. Its functional purpose is to spin the crankshaft until gasoline ignites in the cylinder block and the engine begins to rotate the crankshaft on its own.
This article will examine in detail the design features of the starter on the VAZ 2114 and the principle of operation, its location, as well as signs of malfunction, causes and methods for eliminating typical breakdowns.
Location of the starter on the VAZ 2114
DESIGN FEATURES AND OPERATING PRINCIPLE
The starter on the VAZ 2114 (5712.3708) has an operation cycle, which can be divided into four main stages:
- After turning the ignition key, the fourteenth battery in the contact chain begins to supply power to the starter and traction relay;
- The Bendix gear drive (overrunning clutch) is connected to the flywheel;
- At the moment the gear drive is connected, power begins to be supplied to the electric motor of the unit;
- The electric motor begins to spin the drive, the revolutions of which are transmitted to the crankshaft of the car, as a result of which the engine starts. When the engine speed begins to exceed the starter speed, the drive and the crankshaft are disconnected.
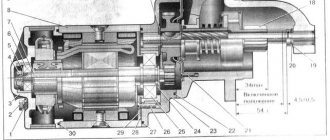
Now let's look at the design features of the fourteenth starter. In the diagram below you can see the main elements of the device.
Starter device
- Housing - is made in the form of a cast steel cylinder at the ends, closed with lids, inside which the cores and the exciting winding (stator) are located;
- Solenoid relay - consists of a movable jumper and power contacts. The purpose of the solenoid relay is to close the contacts when the ignition is turned on, as a result of which power begins to be supplied to the electric motor. Upon completion of the operating cycle, the solenoid relay disconnects the power and the device turns off;
- Bendix of the VAZ 2114 starter (aka overrunning clutch) - at the beginning of the operation of the device, the bendix is connected to the crankshaft and transmits the electric drive speed to it through the engagement gear; at the end of the cycle it is disconnected. The serviceability of the entire device depends on the normal functioning of the bendix, since if disconnection does not occur at the moment when the engine speed exceeds the speed of the electric drive, the unit will be damaged;
- Anchor - is a cast axle made of alloy steel, onto which collector plates and a core are pressed;
- Brushes and brush holders are structural elements that are necessary to supply power to the armature. Properly functioning brushes increase the power of the device's electric drive;
- The starter bushing - there are three in total: the rear and front - are pressed into the body, the third is located at the junction of the armature and the bendix. The bushings are responsible for fixing the drive shaft.
The cost of a new device varies between 3.5-5 thousand rubles, depending on the manufacturer. Owners of fourteen speak positively about devices manufactured by Eldix, KATEK and PRAMO. If you buy Bendix separately, it will cost you 300-500 rubles.
SIGNS AND CAUSES OF MALFUNCTION
Like any other part that is in constant use, over time the starter wears out and fails. Let's look at the main signs that can help identify a device malfunction:
- When the ignition is turned on, the engine does not start or clicks are heard, but the engine does not turn over;
- After turning on the engine, the starter continues to spin (the bendix and flywheel are not disconnected);
- Smoke begins to come out from under the hood with the smell of burnt windings;
- When the ignition is turned on, the starter begins to buzz, and the engine starts only after repeated attempts.
To determine the reason why the unit failed, it is necessary to remove the VAZ 2114 starter.
It is worth noting that this device has good maintainability, so a complete replacement of the starter is not always required - in most cases it can be cured by changing only some components.
Let us highlight the main reasons for starter failure:
- It doesn’t turn: the winding is shorted or the armature on the solenoid relay is stuck, the contacts of the positive terminal on the battery may have oxidized;
- It turns, but at an insufficient speed: the armature or stator winding has broken or shorted, the brushes have worn out;
- It turns, but does not transmit speed to the crankshaft: idling - typical signs of a Bendix malfunction;
- Does not turn off after turning on the engine: the traction relay is stuck or the spring on the freewheel is broken.
Malfunctions and their symptoms
But it is not at all necessary to disassemble the assembly to recognize the signs of a faulty solenoid relay. They look like this:
- The engine runs, but the starter still turns. At the same time, the sound is too loud and uncharacteristic;
- When the ignition is turned on, the starter does not spin, although the relay makes a characteristic click;
- The ignition is turned on, but the starter is idling and the engine does not respond.
All this suggests that there is a high probability of your transmission on the VAZ 2114 breaking. Therefore, it must be removed and a new element installed in place of the damaged one.
REMOVAL AND REPLACEMENT
Let's figure out how to remove the starter on a VAZ 2114. To work, we will need a key for 13 and 10, a hammer, a flat-head screwdriver and VD-40 (if the bolts have not been unscrewed for a long time).
The algorithm of actions is as follows:
- Remove the “-” terminal from the battery;
- The starter is secured to the clutch housing with three screws - two upper and one lower. The lower one, as a rule, is removed during the first car repair, since, in fact, it is not needed, but it adds significant inconvenience. If there is no lower bolt, then you can remove the starter on a VAZ 2114 without a pit, but if there is a lower lock, then to get to it you need to drive the car into a pit or crawl under the car. Unscrew the screws with a 13 key;
- We remove all wiring from the device (when installing a new unit, it is most convenient to install the wiring in advance, before attaching the starter to the engine);
- We move the starter to the right so that it comes off the guides on the engine, and remove it.
To determine the malfunction, unscrew all the screws connecting the housing and disassemble the device (you may need to tap the housing with a hammer). Check the wear of the brushes, field winding and flywheel teeth.
The most typical failure of the unit is wear or mechanical damage to the bendix.
Bendix (its location in the starter is shown above in Fig. Device)
Replacing the Bendix on a VAZ 2114 is carried out as follows:
- Using a flat-head screwdriver, bend the Bendix fork at its connection to the body;
- We remove the ring, under which another one is hidden - the locking ring. It can be removed with a 13 key; you may need to knock down the fastening with a hammer;
- We remove the retaining ring using a screwdriver; it’s easy enough to pry it off;
- Pull the bendix out of the body.
Do not think that if there is no visible damage on the bendix, then it is working, since it usually breaks from the inside . If typical signs of a Bendix malfunction are detected, it needs to be replaced.
If you are interested in how to remove the starter on a VAZ 2115, then you can do everything according to the algorithm given in the article - the technology for removing the starter for the fourteenth and fifteenth VAZs is identical.
Starter repair
It should be noted that complete replacement of the device is an extreme measure, necessary only in case of very serious damage (for example, short circuit of the stator windings or mechanical failure of the housing). In all other cases, the most correct solution would be to repair the VAZ 2114 starter, which is also performed after removing the device.
In order to do this, you will need to unscrew the tightening screws of the device and halve the starter.
Starter repair
If you cannot divide the starter housing into two parts even with the screws removed, you should use a rubber or copper hammer and carefully apply several blows to the joint.
After the starter is halved, you should carefully examine the condition of its parts, namely the stator windings, rotor, graphite brushes and bendix.
Worn brushes should simply be replaced with ones of similar size, but to dismantle the bendix, you will need to perform a number of additional operations:
- use a slotted screwdriver to bend the flat fork at the point of its connection with the Bendix body;
- remove the protective ring;
- Using a flat screwdriver, remove the retaining ring;
- pull the bendix out of its body.
Installing a new bendix is done in the reverse order.
Installing a VAZ 2114 starter
At the end of the conversation, it is worth noting that you should not wait for serious starter malfunctions. Even minor problems with this device can be detected by a number of indirect signs - louder than usual clicks of the solenoid relay, the engine taking too long to start, loud sound during operation, and many others. Having noticed them, you should immediately dismantle the starter, disassemble it and diagnose the condition of its parts.
The starter on a VAZ 2114 does not turn, how to remove, repair or replace?
Hello, dear car enthusiasts! Once again we appeal to owners and admirers of cars from the domestic automobile industry. The Lada of the fourteenth model is equipped with a starter 5712.3708, which is noticeably different from similar VAZ starting devices in its smaller dimensions and weight.
But, despite such a modest size of this device, it is subject to the same requirements as other starters for the start of rotation of the flywheel and the movement of the crank-piston group.
Perhaps, this design feature can be attributed to the disadvantages of this model, because situations when any malfunctions of the VAZ 2114 starter occur, unfortunately, are not uncommon. So, even the most careful driver of the “fourteenth”, at least once every five or six years, has to face a problem when the VAZ 2114 starter does not work, does not turn.
How to remove the VAZ 2114 starter yourself?
If you have to remove the VAZ 2114 starter, be prepared to drive the car into a pit or onto an overpass. For a VAZ 2114 car, replacing the starter in this case will not be particularly difficult, since it is convenient to unscrew the fastening bolts and remove the starter itself from the studs only while under the car.
After installing the machine, remove the engine protection. Open the hood, disconnect the “–” battery, remove the block with wires and the wire that goes to the traction relay. Then unscrew the three mounting bolts and remove the starter.
If you do not have the opportunity to drive the car into a pit, then there is nothing left to do but remove the VAZ 2114 starter in a regular garage. In this case, after you disconnect the “-” battery, remove the air intake bellows and the air filter (this will make room for removing the starter through the top of the engine compartment).
Then proceed to disconnect the wires from the solenoid relay and starter and dismantle the starter itself. To carry out work on removing the VAZ 2114 starter, you will need 13, 14, 15 mm keys or a set of starter keys.
What to do if the VAZ 2114 starter does not work - typical reasons?
1. If, when turned on, the starter does not turn, the traction relay does not operate, perhaps the cause should be sought using traditional methods, namely:
- The battery is faulty or discharged. By charging or replacing it, you will fix the problem.
- Severe oxidation of battery terminals and wire tips. After cleaning the leads and tips, lubricate them with Vaseline.
- There is a short circuit between the turns of the relay pull-in winding, a break or a short to ground. In this case, the solenoid relay must be replaced.
- There is a break in the power supply circuit of the solenoid relay. It is necessary to check the integrity of the wires and their connections.
- There is a fault in the contact part of the switch. The contact part must be replaced.
- The retractor relay armature is stuck. Pay attention to the armature stroke (of course, this will require disassembling the starter).
1. If, when turned on, the starter armature does not rotate at all, or moves slowly, and the retractor relay is working:
- The battery is faulty (discharged). Replace it or charge it.
- The battery terminals and wire tips are oxidized, or the wire fastenings are loose. Clean the leads and tighten the fasteners.
- Commutator burning. The collector needs to be cleaned.
- Stuck or worn brushes. Replace brushes.
- A break or short circuit has occurred in the armature winding. Replace anchor.
Pay attention to the surface of the armature shaft. If there is a yellow mark from the gear bushing, be sure to remove it. This mark may be the cause of poor starter performance due to gear sticking.
After diagnosing the condition of the VAZ 2114 starter and troubleshooting, assemble the starter and install it in place in the reverse order of disassembly and removal.
Before assembly, lubricate the drive gear and cover liners with oil, and the gearbox gears with grease or any other grease. After assembling the starter, check its operation on the stand.
We change Bendix on a VAZ-2114 with our own hands
The Bendix or starter drive is a unit consisting of a clutch with a gear and a fork connected to a solenoid relay. The clutch is also called an “overrunning” clutch. Three types of starters were installed on Lada 114 hatchbacks: 29.3708, 423.3708. and also 5712.3708. The first two differ only in the shape of the fork, as well as in the design of parts not related to Bendix. And the starter 5712.3708 is a modern device equipped with a gearbox. The seating dimensions of all starters do not differ in any way. On any car, including the VAZ-2114, replacing the Bendix begins with dismantling the starter. We will look at this operation now.
The following video shows how a starter behaves with a faulty bendix.
Preparing to replace the bendix: removing the starter on a VAZ-2114
The starter can be accessed from above or from underneath. Let's consider the second option: roll the car into the pit and use the handbrake. Next, use a 10mm wrench to unscrew two screws from the bottom (photo 1) and two screws on the side members.
Finally, the screws on the cross member are unscrewed (photo 3) to remove the engine splash guard.
Disconnect the negative terminal from the battery - you will need a 10mm key.
On a VAZ-2114, you can replace the bendix in one way - remove the starter.
The location of the starter under the hood is marked with a red arrow.
- Unscrew the nut securing the power wire to the starter (photo 1). Remove the terminal and also disconnect the block with the control wire (photo 2);
Installation is carried out in reverse order.
The appropriate key size is “13 mm”.
Repair of starters 29.3708 and 423.3708
Use a screwdriver to unscrew the screws securing the solenoid relay. Then the relay is removed - its armature is disconnected from the plug.
Down with the relay... and both rings
Taking a tube of suitable diameter, knock the upper retaining ring off the shaft. Then remove the lower retaining ring using special pliers. The top ring must also be removed.
The body is disassembled: the protective cover is unscrewed, the stopper and all washers are removed, then two nuts are unscrewed and the rear casing is removed.
Disconnect the rotor and stator
Next, being careful, dismantle both brushes and remove the brush holder. As a result, what remains is an “assembly” consisting of parts: rotor, front cover, bendix.
Removing the stopper and rotor
Now you need to remove the plastic fork stop from the cover. The rotor is then pulled back.
The Bendix assembly with the fork is easily removed from the cover. Installation of the unit is carried out in the reverse order.
How to disassemble the bendix itself
Remove the retaining ring - here you need pliers again. Then the disc and thrust washer can be easily removed. The result is shown in the photo.