Repairing a car on your own is not only a way to save money, but also to do it efficiently, since not every master approaches his work responsibly. The owners of this car can easily adjust the wheel alignment on a VAZ 2106, especially if the car is operated at a considerable distance from the city and there is simply no opportunity to visit a car service center.
- Why adjustment is needed
What is camber - What is toe-in
Video: when to do a wheel alignment
- Table: angles of installation of the front wheels on the sixth model Zhiguli
- Road instability
- Video: wheel alignment installation under service conditions
- Preparatory work
Table: pressure in the wheels of the “six” depending on the tire size
- Video: do-it-yourself wheel alignment using the example of a VAZ 2121
Preparation and procedure for adjusting wheel alignment angles of VAZ 2107
Having a level area, balanced equal-sized wheels and tires with the required pressure are far from the only requirements. It is equally important to remove the decorative caps before starting the adjustment and ensure:
- lack of free movement in “running” units;
- permissible play in the steering;
- proper tightening of all connections in the chassis;
- serviceability of the depreciation system.
It is advisable to check and adjust the chassis by first placing 70 kg on each seat and 40 kg in the trunk. However, adjustments can also be made on an empty car. With the steering wheel in the direction of straight-line motion, you should remove all the play in the suspension by shaking each of the four bumpers several times.
The geometry specified by the manufacturer should be installed according to a strictly defined relationship: castor-wheel-alignment.
Adjusting wheel alignment angles
In order for the wheel alignment of your car to meet the standard, you need to install the steering wheel in a perfectly level position and ensure that the load on the rear and front bumpers is at least 50 kilograms each. After this, the procedure is performed in several main steps:
- pull the thread from the highest point of the wheel down;
- We measure the distance from below and from above, using a caliper for this purpose. As a last resort, you can use a regular ruler;
- We carry out the necessary calculations based on the fact that 1 millimeter of difference in the results obtained is 10 degrees;
- We attach a rope with hooks to the front and rear wheels. In this case, it is necessary to install a wooden block 22 millimeters thick under the thread on the rear wheel;
- turn the steering wheel so that the wheels on both sides touch the stretched rope;
- the next stage is to place two bars at once under the thread, the total thickness of which is 28 mm. If one of the wheels does not reach the rope, we adjust it;
- We repeat the procedure until the correct angle is set for each wheel of your car.
Briefly about adjusting camber
You can set the correct suspension geometry on an ordinary flat area, armed with primitive tools:
- template defining caster angle;
- plumb line;
- caliper or ruler;
- long fishing line with two hooks;
- bars 28-37 mm thick;
- set of open-end wrenches.
Having ensured the required caster angle by moving the washers from the far bolt to the near bolt securing the lower arm to the axle, you can begin adjusting the camber and toe of the VAZ 2107 wheels with your own hands in a strict sequence:
- adjust the camber by adding/removing washers simultaneously from two bolts located in the lower arm mounting axis;
- adjust the alignment by rotating the movable joints of the steering rods.
The alignment of the VAZ 2107 must be checked regularly or after an accident, when the first signs of deviation from the norm appear.
It is better for the adjustment to be carried out by service specialists, but this procedure can be done with your own hands. The main thing is to do everything as carefully and carefully as possible.
The described definition refers to the vertical angle of inclination of the VAZ 2107 wheel. If the top is tilted outward, there is positive camber. Accordingly, if the element is inclined inward, then such an angle has a “-” sign and is called negative camber.
The second part of the wording “wheel alignment” means that while the car is moving, alignment will occur. On front-wheel drive cars it is usually negative, and on rear-wheel drive cars it is positive. Such a device ensures that when moving, alignment occurs and the position is parallel.
Adjusting wheel alignment in a car service
If you are afraid to make the adjustment yourself, then it is better to take the car to a service center.
In well-equipped service stations, three types of stands are used during repair work: computer, laser and optical.
At the optical stand, special tubes are attached to the wheels of the machine, which direct the light beam onto a plane with scales located vertically and horizontally. The slant angle can be determined by the location of the light point relative to the scale.
Optical stands have one drawback - they can determine camber on only one pair of wheels; with such a stand, setting all four wheels at the same angle is a labor-intensive process that has a high error.
One step above optical stands are laser ones.
They work on the same principle, but instead of a light beam, a laser beam is used. Initially, laser emitters are installed on the car, and mirrors located parallel to the plane of rotation are attached to the wheels. The measurement scale is installed opposite the mirror surface, then with proper adjustment, the laser beam from the zero parameter of the scale should return to its place from the mirror.
If the laser beam returns to a different point, adjustment is required. A laser stand is one step higher than an optical stand in accuracy, but is inferior in this parameter to a computer stand.
The most modern equipment for wheel alignment is a computer stand.
He is able to determine all values using special sensors that are installed on the wheels. The sensors transmit the received information to a computer, where it is compared with standard parameters for a specific brand, for example with a VAZ2107. After computer analysis, automatic balancing is performed.
Checking and adjusting wheel alignment on a VAZ 2107
Camber angles are measured in the following order:
- Sit in the car and position the steering wheel so that the front wheels are straight (parallel to the axis of symmetry of the car).
- Get out of the car and “pump” the rear and front suspension several times, pressing on the rear (front) bumper with a force of 50 kg.
- Hang the thread with a weight, securing it at the top point of the wheel, and use a caliper to measure the distance from the thread to the top and bottom points of the rim.
To check alignment, you must perform the following steps:
- Align the wheels and load the machine.
- Stretch a thread with hooks, hooking it to the front edge of the front wheel rim and the rear edge of the rear wheel rim. The thread should be well tensioned and not sag.
Important: the track of the rear wheels is narrower than the front ones by 44 mm. Therefore, to properly install the toe, it is necessary to place a 22 mm thick block between the thread and the rear wheel.
- Turn the steering wheel slightly, positioning the wheels so that the thread touches both sides of the tire.
- Pull the thread along the other edge of the machine, using, in addition to the 22 mm bar, a 6 mm bar.
- Check that the wheels have not changed position and the thread still touches the front wheel on the opposite side at two points.
- Loosen the clamps holding the tie rod coupling.
- Rotate the clutch using cobra pliers so that the thread touches both sides of the front wheel tire on the other side of the machine.
- Tighten the coupling clamp. If necessary, perform the same operation with the second wheel.
When adjusting the wheel alignment of the VAZ 2107, it is necessary to take into account that adding a 6 mm block between the rear wheel and the thread corresponds to an increase in the wheel alignment by 1 mm. The total toe-in of the wheels should be 2-4 millimeters on an unloaded car and 3-5 when fully loaded.
Self-adjustment
First, you need to place the car on a flat surface so that the wheels are straight. After this, you need to prepare all the tools and devices for the chosen method of performing the procedure.
Using thread
In this case, you will need a caliper, thread and weight. Stages of self-repair:
- The thread with a weight at one end should be secured so that it hangs down exactly along the central axis of the wheel. Next, using a caliper, you need to measure the distance from the thread to the end of the rim in the upper and lower directions. The difference between the measurements taken will be the collapse. If you don't have a caliper, a ruler will do, but the accuracy will be slightly lower. The difference in measurements of no more than 4 mm for a rear-wheel drive VAZ-2107 is normal. For a front-wheel drive car, the difference should be less than 1 mm.
- If adjustment is required, you need to loosen the steering knuckle fastenings and move it in the desired direction. After this, fasten all the nuts back.
- To check the installation, it is recommended to measure the difference in the same way, only with the wheels turned first in one direction and then in the other direction.
Ideally, the upper and lower distances should be equal. However, if this cannot be achieved, then the upper distance must necessarily exceed the lower one. This will give increased stability to the car on the road surface. But it is better to achieve equal values.
After this, you should proceed to adjust the convergence parameter:
- It is required to fasten the thread to the front and rear wheels so that it runs along the central axis, but horizontally. On the "seven" the fender liners will interfere, which must be removed before starting work.
- Since the manufacturer’s classic models almost all have a narrower rear wheel track, to make adjustments you need to place a prepared block 22 mm thick under the thread. Next, by turning the steering wheel, you need to make sure that the thread touches the front tire both front and rear. If everything works out, then no adjustment is required.
- Then you will need to carry out the same actions on the other side of the car. However, here it is already necessary to use both prepared bars: 22 and 6 mm at once. After this, you also need to check whether the thread is touching the front and rear parts of the wheel rim.
When adjustment is necessary
Adjustment may be necessary if:
- the car pulls to the side on a flat road;
- deviations of wheel angles on the VAZ 2107 became visible;
- premature or uneven tire wear occurs;
- the increase in fuel consumption was higher;
- the suspension was damaged.
If the alignment does not correspond to the norm, then the car will constantly be “pulled” to one side. To determine this, just remove your hands from the steering wheel. If the adjustment is performed poorly, the car tires will wear out very quickly, and some suspension parts may also fail.
To perform a VAZ 2107 wheel alignment without the help of specialists with your own hands, you must have:
Preparatory work
Do-it-yourself wheel alignment on the VAZ-2107 is not carried out on the rear wheels, since the hubs are installed in one position and cannot be shifted to the side. The procedure is done only on the front axle of the car. Moreover, this does not depend on whether the car has rear or front wheel drive. Before starting work, do the following:
- To make the adjustment as accurate as possible, you need to load the machine. The load must weigh 320 kg and be distributed evenly across all four wheels. You can seat four people with approximately the same body weight in a car and throw a bag of cement into the trunk.
- A prerequisite is a full tank of gasoline. The capacity of the fuel tank in the VAZ-2107 is 39 liters. Make sure the gasoline level is close to the maximum mark.
- Tire pressure must be kept at a normal level - equalize it if necessary. Depending on the type of rubber, the pressure can fluctuate in the range of 1.8-2.5 Atm.
How to make negative camber on a VAZ 2106
Car repair at home. Not only is this a cost-saving method, but it's also ideal to do because not every craftsman worries about the work. to adjust the wheel alignment on a VAZ 2106 , especially if the car is operated at a considerable distance from the city and there is simply no opportunity to visit a car service center.
VAZ front suspension 2106
has two main parameters. wheel alignment and destruction, which specifically affect the maneuverability of the car. During major repairs or modifications to the suspension, the wheel angles (CS) are made for adjustment. Violations lead to stability dilemmas and excessive front tire wear.
It is recommended to check and adjust wheel alignment for Russian cars every 10–15 thousand km. run. This is justified by the fact that even with a good stop of such a mileage on roads with poor quality pavement, the characteristics, as a rule, change quite a lot, this will affect maneuverability. One common reason a CAM gets lost is because the wheel falls into a hole at speed. Therefore, even an unscheduled inspection will be required. Additionally, the procedure required in this embodiment is:
- whether the prompts, levers or silent controls have changed;
- for which the design of the standard clearance configuration is intended;
- when the car moves to the side;
- if the tires are heavily worn;
- when the steering wheel does not turn after turning.
Destruction. This is the angle of the wheels relative to the road surface. The parameter a can be negative or positive. If the wheel is tilted from above to the center of the car, then the angle takes a negative value, and when locked, it is outward. positive. With huge differences between parameters and industry values, tires wear out quickly.
VAZ collapse \
Convergence involves a difference between the front and rear points of the front wheels. The parameter is measured in millimeters or degrees/minutes, and can also be positive or negative. With a positive value, the front parts of the wheels are closer to each other than the rear, and with a negative value the opposite is true. If the wheels are parallel to each other, the finger is considered zero.
Pras777 › Blog › Making negative camber on a Zhiguli (plus castor).
You will need a pit, a mount, a tool, as well as special camber washers (they look like a horseshoe in shape) and regular washers (washers from classic cylinder head bolts work well). It's easier to do it with two people, but it can be done with one person.
There is no universal recipe, because everyone’s car is different, has different body geometry, etc. Therefore, I can’t clearly describe the steps for you like in a magazine and tell you how much of what, where and with what.
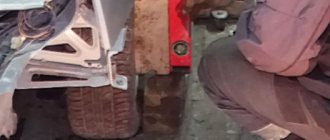
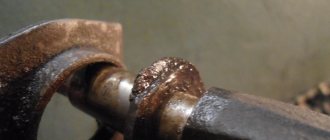
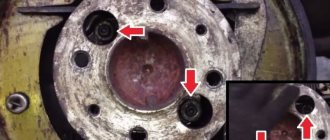
On Zhiguli cars there are such things as “camber bolts” (number 1 in the photo). There are two of these bolts on the right lower arm and two on the left lower arm. These bolts are used to adjust camber and caster.
The bolt closest to the front bumper will be called the front bolt, and the bolt that is closer to the rear bumper will be called the rear bolt. Number 2 in the photo indicates washers. In this case, only washers from the cylinder head bolts are installed, and special alignment washers (horseshoe-shaped) are not installed.
The arrows from number 2 are directed to the places where the washers need to be put on. You can build on how it was done on this machine. That is: we put three washers on the front bolts, and five washers on the rear bolts. Tighten the bolts and see if you are satisfied with the result. If the wheels are a little loose (in your opinion), then add washers. And if there are too many broken, then we begin to remove the washers.
You, of course, noticed that there are not the same number of washers on the front and rear bolts. This difference in the number of washers regulates the castor. Castor, simply put, is the return of the steering wheel. This phenomenon can be described as follows: you are rushing sideways, your steering wheel is turned in one direction, then when shifting, you release the steering wheel and it quickly turns (returns) in the other direction. This is castor.
Typically, a comfortable caster is achieved when the difference in the number of washers is approximately twofold. That is, for example, if you put three washers on the front bolts, then you need to put six washers on the rear bolts, that is, twice as many. Do this and then see how you feel when driving a car whether the caster needs to be increased or decreased.
Many people thoughtlessly strive to make a huge castor, but this is complete stupidity. The castor should not be large or small, it should be optimal and this is important. Castor is aimed at improving handling. When changing the caster (adjustment with washers), two parameters change: the speed of return of the steering wheel changes and, following this, the lightness of the steering wheel AUTOMATICALLY changes. The larger the castor (i.e., the greater the difference in the washers/the faster the steering wheel returns), the heavier the steering wheel.
Your task: to find a middle ground in which the steering wheel returns as quickly as possible, but at the same time, so that the steering wheel turns easily, so that you can handle it without problems, without getting sick from its tightness.
Also, do not forget that immediately after your intervention in adjusting the camber and castor, you will have to adjust the discrepancy. It is regulated much more simply - by steering rods (torsion of the rods). The wheels should be level or slightly to the sides.
There is no need to despair if something doesn’t work out right away. Setting up a car is always difficult. But the sooner you start trying, the sooner you’ll figure it out and understand what’s what.
An important point: if it turns out that your camber bolts are too short to put washers on them and thereby increase the camber, then simply buy longer bolts and replace them. The auto store sells bolts of different lengths, take your pick! A real camber bolt has a special rectangular head. If you want to replace your bolts with longer ones, you can install the bolts with a regular hat, it doesn't matter.
Be sure to use engraving washers and tighten these bolts regularly.
Source
What is needed for successful adjustment
In order for the adjustment to be completed successfully, it is not at all necessary to use the services of a specialized service. Both negative camber and positive camber can be brought back to normal with your own hands. Before carrying out the procedure, you should check the condition of the suspension. All its elements must be analyzed for backlash. If they are present, wheel alignment on a VAZ 2107 car is problematic and sometimes simply impossible.
Experts recommend loading the car before adjusting the wheel alignment yourself. A weight of approximately 320 kg is required. To do this, you can use some weights or seat four people of average build. It is also recommended to refuel the car to the recommended level. This is also a load that must be taken into account.
The last stage of preparation is checking the VAZ 2107 tires. Before performing wheel alignment, you should make sure that the pressure is correct. Help is required to complete the entire procedure from checking to setting the required angle. It is not possible to carry out the entire process on your own.
Check and adjustment
First of all, you need to make sure that the steering wheel is level. After that, the front and rear bumpers of the VAZ 2107 must be pressed with a force of up to 50 kg. Then from the top point of the wheel you need to pull the thread vertically down. Using a caliper, find out the distance from below and above. If the difference is, for example, 3 mm, then this means that the angle is approximately 30°. In case of any deviations, a wheel alignment must be performed immediately.
If the car's wheel alignment is normal, then the angle is 0°5'+20' without load and 4°30'+20' with load. To check the alignment, you need to take a thread with hooks and attach it to the end of the rear wheel on one side, and to the front wheel on the other.
In order to adjust the VAZ 2107 camber as accurately as possible, you need to take into account the difference between the wheel tracks, which is 44 mm. You need to place a 22mm block under the thread on the rear wheel. After this, you need to turn the steering wheel until the wheel touches the thread on both sides.
Now you need to place two bars with a total thickness of 28 mm under the thread. If the front slope does not touch at 2 points, then it is necessary to adjust the toe of the front wheels. To do this, you will need 2 wrenches, which are used to loosen the clamps on the tie rod couplings.
Afterwards, you can take pliers and move the clutch with your own hands until the thread touches the wheel at 2 points. The wheel alignment requires accuracy, so it is better to check all measurements several times.
You can adjust the wheel alignment if you perform a simple procedure with each wheel until the desired result is obtained. In order for the alignment to meet the norm, sometimes you have to spend a lot of time, so you need to be patient.
How to Make a Camber on a Classic
Adjusting camber and toe on VAZ 2101-VAZ 2107
Destruction by this term refers to how the car’s wheel will stand relative to the vertical. If the upper edge of the wheel is brought outward, then this means that the camber is positive, and if the same upper edge of the wheel is located in the inside of the car, then this destruction will already be considered negative and indicated by the value “-”.
If the camber is incorrectly adjusted, and specifically when the camber is adjusted only at the 1st front wheel, the car may drift to the side when driving; this can be found not at all difficult by removing your hands from the steering wheel while driving!
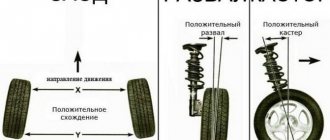
Convergence This term means how the wheels converge with each other relative to the road. For example, on rear-wheel drive cars the wheels are at a positive angle, and on front-wheel drive cars they are at a negative angle, as shown in the photo. And all this was made so that when starting off and during the upcoming ride, the wheels are aligned and become quite even.
If the toe-in is incorrectly adjusted, the car's tires can wear out much faster than with the toe-in adjusted, so always keep an eye on it and adjust as much as possible!
What tools will I need to make the adjustment?
To make adjustments, you will definitely need a caliper, as well as a set of main wrenches, Cobra-type pliers, a small long ordinary thread and an unusual thread with hooks tied at both ends.
You will also need a block with a width of “22 mm”, and another block with a width of “6 mm”.
When do you need to adjust camber and toe?
They are subject to adjustment when:
- Changing the line of movement of the car, let’s say you are driving straight and the car is pulling to the side at this time.
- And also, if there are visible deviations in these wheel alignment angles, uneven and early wear of the tires will be observed, as well as the vehicle’s fuel consumption will increase and, as a result, suspension parts may fail in advance.
- It is also necessary to inspect the camber and alignment after a tragedy in which the necessary suspension parts were damaged and changed.
How to adjust camber and toe, aka wheel alignment angles on a VAZ 2101-VAZ 2107?
A more accurate check of wheel installation should be inspected in a special workshop on a special panel. But if you don’t have the money for this, then you can actually adjust the wheel angles with the same success without using a shield!
And also when making adjustments, pay special attention to the suspension elements, since if the suspension is defective or if free play is detected in most of its parts, adjusting the wheel angles will lead to nothing!
Preparation for adjustment:
We twist the VAZ 2106 [Collapse][Part 2]
In this video we break the wheels apart using homemade spacers from the lower control arm axle of a classic VAZ
Do-It-Yourself Camber
Wheel alignment with your own hands. It is clearly demonstrated how to make a wheel alignment with your own hands.
1) First, for a more precise adjustment of the wheel angles, it is recommended to load the car with an additional weight of “320 kg”. For example, you can put “4” people in a car and about “50 kg” of cargo.
2) Now check how much fuel is in the fuel tank; if it’s not enough, bring it up to normal, since the tank must certainly be one hundred percent full.
3) Next, check the tire pressure, it should also be normal.
Checking and at the same time adjusting the camber and toe of the car:
Unfortunately, setting the angle of destruction is very difficult to do yourself, since it is unlikely that it will be possible to adjust it properly. But you can check whether the camber angle is in order or not without the help of others, which is what we will do!
1) To check the camber, first sit in the car and turn the steering wheel so that it is oriented strictly straight.
2) Next, get out of the car and push the car’s suspension, to do this, carefully use the trunk or, best of all, press the bumper with a force of “40-50 kg”, “2-3” times. Do the same operation with the front bumper of the car.
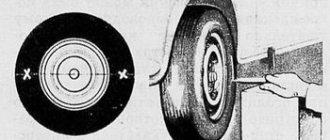
3) Then take the thread and a caliper and after that pull it vertically as shown in the figure. And after the thread is tensioned, apply a caliper first from below, and then from above, and as a result you will find out the camber of the wheel.
If you get a difference between the top and bottom points of the wheel, let’s say “3 mm”, then this will mean that the camber angle is approximately “30”. The camber angle should be within the limits of “4°3020”, this is with a loaded car and provided that there are “4” people in the car. And when the car is unloaded, the camber angle should be “0°520”!
4) Now, in order to check the alignment, you need to do virtually the same thing as when checking the camber, namely, align the wheels, load the car appropriately, and only then you need to start checking.
5) To check, take in your hand an unusual thread with hooks tied at both ends. And after that, hook one side of the thread to the beginning of the front wheel, and the other side to the end of the rear one, but hook it so that everything is at the same level, in other words, so that the thread runs smoothly and does not bend.
The track of the rear wheels is slightly narrower than that of the front wheels, approximately 44 mm, so for more precise adjustment, apply a block about 22 mm wide to the rear wheel and thereby draw the thread over this block!
6) Next, sit behind the wheel and turn the steering wheel so that the thread touches both sides of the front tire.
7) Then fasten the thread on the back side, but only now place two bars under the back of the wheel, one of which will be “6 mm” wide and the other “22 mm”. Moreover, if we add these two values, then the sum we get is “226 = 28 mm”, the thickness of the bar.
After the entire operation, check that the thread touches a little by “1-2 mm” for the 1st front wheel at both points of the tire, if it does not touch, then adjust the toe-in of the front wheels!
 To adjust toe using 2 wrenches, loosen the outer tie rod coupling clamps.
9) And after that, using Cobra-type pliers, rotate the clutch itself and, as a result, adjust the length of the tie rod until the gap between the thread and the front wheel tire returns to normal.
10) And finally, tighten the tie clamps and do the same work with the second wheel and thereby achieve their total toe-in of about “2 mm”.
Carry out the same adjustment procedure with the wheel that is on the opposite side of the car. And when re-checking the toe-in, remember one thing, if you are going to do the toe-in of one wheel not “1 mm”, but let’s say “2 mm”, then you need to place a block “2212=34 mm” under the thread, if “1.5 mm” then “229=31” accordingly!
The correct toe-in of the front wheels for cars of the “Classic” family is “2-4 mm” on an unloaded car and “3-5 mm” on a loaded one!
Making a twist on the classics
Hi all! Today we’ll look at ways to increase the eversion angle on the classics.
And so let's get straight to the point. There are a great many ways to increase the steering angle of the wheels, but there are still two main ones. A system like Wisefab and our favorite style “collective farm tuning” or as the clear guys call it custom tuning. With Wisefab everything is more or less clear, I saved some money, bought it, fitted it, and now the inversion is already 65+ degrees. More details about Wisefab are discussed here: Eversion on a Nissan Silvia.
Let's move on to our favorite topic: do-it-yourself tuning or custom tuning of vases.
To begin with, we cut the limiters on the levers and on the steering gear. On the levers:
On the steering gear:
Go ahead. To create the required negative camber, there were not enough standard bolts; to replace them, buy bolts from a VAZ 2108 generator, 4 pcs., and used washers to make the negative camber. It looks something like this:
bipod
The goal is to move the steering tip closer to the eversion axis (the upper and lower ball joints facing each other are the steering axis). And don’t be afraid to weld, the bipod is made of such metal that it will not fall apart, and the welding site will NEVER fall apart if it’s simply welded, most likely all the levers will bend (checked) and the spars will go away before the bipod bursts.
Approximate cutting location:
What happened and what should happen:
Wheel alignment - what is it?
The suspension of any passenger car consists of 3 adjustable parameters:
1, Wheel toe angle is the plane of rotation of the wheels relative to the direction of movement. To achieve greater stability and controllability of the car, it is necessary to adhere to the rules of wheel alignment.
- For cars with front-wheel drive, the wheels should be slightly turned away from each other, this is called negative toe.
- For rear-wheel drive vehicles, the situation is opposite: the wheels should be turned towards each other - this is positive toe-in.
2. Camber is the angle between the plane of contact of the tires with the road and their vertical mounting.
3. Caster is the angle by which the kingpin deviates relative to the vertical plane. This parameter very rarely requires adjustment.
It is recommended to adjust the wheel alignment yourself 1-2 times a year. Depends on the intensity of use of the car. Most often, this procedure is done after a seasonal tire change.
Adjusting wheel alignment at a service station
Work on adjusting wheel alignment at service stations is carried out using special stands, which are:
Optical stands work as follows: special tubes are attached to the wheels, directing a beam of light onto a plane with vertical and horizontal scales. The angle of inclination is determined by the position of the point of light relative to one or another scale. Such stands were widely used during the Soviet period and today are more often used to adjust wheel alignment on cars from the USSR era. Stands of this type give a high measurement error and allow you to determine the camber on only one pair of wheels (front or rear), so it can be quite difficult to set all the wheels of the car at the same angle.
In technical terms, laser stands are the next step in optical ones, i.e. the laws of optics are also applied here, but instead of a light beam a laser beam is used. To adjust the camber:
If the beam returns to a different point, adjustment is required. The accuracy of measurements on a laser stand is much higher than on an optical one.
The most advanced device for adjusting camber today is a computer stand. There are several types of such stands. Most often, a computer stand determines all the necessary quantities using special sensors installed on the wheels of the car . Information from the sensors is transmitted to a computer, where it is compared with the standard parameter values for a given car brand, after which automatic wheel balancing occurs.
The 3D stand is capable of creating a three-dimensional model of a car using:
A computer stand, as a rule, in addition to its main function, is capable of performing many other related tasks. The measurements taken on such a stand are as accurate as possible, and the adjustments fully comply with the manufacturer’s requirements.
Wheel alignment parameters
And 20-30 years ago, on the “classics”, do-it-yourself alignment was the norm. Moreover, equipment for wheel alignment does not require special knowledge and skills. We are talking about a ruler for adjusting the toe angle of the wheels.
But suddenly the unexpected happens. There is mobile Internet, but there is no workshop in the area that has equipment for wheel alignment. This is where our advice will come in handy.
It would be absolutely useful to undergo virtual training, in which we will describe wheel alignment as a manual. In addition, a video specially filmed by our volunteer helpers will help you do your wheel alignment correctly.
Before you perform the wheel alignment procedure yourself, of course you need to know the basic parameters, which are the starting point for successful wheel alignment.
Replacing a shock absorber, tuning the suspension, or some other minor repair of the chassis requires mandatory control adjustment of the wheel alignment angles.
Parameters for all wheels
Wheel camber is the angle between the vertical and the immediate plane of rotation of the wheel. Negative camber is when the top side of the wheel is directed inward to the vertical, and positive camber is when the top side of the wheel is directed outward.
Wheel toe is the angle between the plane of rotation of the wheel and the direction of movement. Toe is measured in degrees/minutes and millimeters.
Parameters for steered wheels
The longitudinal angle of inclination of the wheel turning axis (casters) is the angle between the projection of the wheel turning axis on the longitudinal plane and the vertical. This angle, if the wheel alignment is properly adjusted, ensures self-alignment of the wheels due to speed. For standard auto casters, 6° is considered the norm
The lateral inclination angle is the angle between the projection of the rotation axis onto the transverse plane and the vertical. It ensures self-alignment of the wheels due to the weight of the car.
The concept of wheel camber and toe
Camber is the angle between the vertical and the plane of the wheel. Proper camber ensures close contact between the tires and the road surface.
When the top of the wheel deviates from the vehicle's running axis, this is considered positive camber; if, on the contrary, it is negative. It is possible to accurately determine the camber angles of the "seven" wheels only when the vehicle has a load of 320 kg - this is the approximate weight of 4 people in the cabin + cargo in the luggage compartment + full tank:
- 430'+20′ - for a loaded car;
- 05'+20′ - for empty.
Toe is the angle formed by the plane of rotation of the wheel and the direction of movement of the machine.
With high-quality toe-in, the car will behave confidently when cornering, and its tires will not wear out ahead of time.
If the front part of the wheel is turned towards the longitudinal axis of the VAZ2107, then this is a positive toe-in, if on the contrary, then it is negative. A positive angle is considered common, but sometimes a negative angle should be used, then the stability of the car increases, although at the same time tire wear also increases.
The normal toe-in for the “seven” is considered to be:
- from 2 to 4 mm for a loaded car;
- from 3 to 5 mm for empty.
There is also a longitudinal inclination angle - this is castor.
Caster is considered positive when the wheel's turning axis is deflected back in relation to the direction of movement, and when it is negative, the opposite is true.
We adjust the wheel alignment.
Before proceeding with the adjustment, you must make sure that the machine is in suitable technical condition. To do this, we check 3 main indicators.
- Tire pressure (should be the same as indicated in the technical passport of your car);
- Vehicle weight (work must be carried out with the vehicle unloaded);
- Correct suspension.
As an example of how to do a wheel alignment, we will take the VAZ 2106, 2107. We take them for that reason. that many more VAZ models such as 2109, 2108, 2102 will be regulated exactly according to the same scheme. If the car is after an accident, then it is necessary to check that there is no radial runout of the tires, as well as play in the hubs.
Checking and adjusting wheel camber angles.
- You need to make sure that the car is on a level surface.
- We apply a plumb line to the wing, and measure the distance to the rope near the top of the rim, and to the bottom. The difference between these two values should not exceed 3mm.
- Repeat step 2, only before changing the position of the wheel; this is done in order to obtain accurate values, since the wheel rim may be deformed and not have an ideal circumference.
- We do the same actions with the second wheel and record the received data.
- It is recommended to move the car to a slightly different place and take measurements again; if they coincide with the first ones, then we continue further.
- Using a 19mm wrench, loosen the fastening of the shock absorber strut to the steering knuckle; this must be done by removing the wheel.
- We move the fist forward or backward to achieve the camber we need.
- Having set the desired angle, fasten the bolts and put the wheel in place.
- We take measurements by first rocking or moving the car.
For cars with front-wheel drive, the camber angle is considered normal if it is in the range from -1 to +1mm, and for rear-wheel drive from 1 to 3mm.
Adjusting the camber angle
In order for the wheel alignment to be adjusted successfully, you will need: a flat platform, ideally with an inspection hole, chalk, a cord with a plumb line and a standard set for your car. We set the wheels to the straight-line position. Use chalk to make marks along the diameter of the wheel at the top and bottom. Attach the cord with a plumb line to the wing and measure the distance from the rim to the cord in the area of the marks.
The measurement difference should be ±3 mm. In order to achieve a clean procedure when performing a wheel alignment yourself (taking into account that the rim, the wing, and the surface are not perfectly flat), you need to do the following.
Roll the car by turning the wheel 90 degrees. And repeat the procedure again. Write down the measurement results.
Then the wheel is removed and the two bolts securing the shock absorber strut bracket to the steering knuckle are released. The steering knuckle needs to be moved inward or outward, depending on the results of your measurements, and by the same distance. This way we will achieve the required camber angle. Then tighten the bolts, install the wheel and take measurements again.
Rear-wheel drive cars allow the standard camber angle of the front wheels to be within +1/+3mm, while for front-wheel drive vehicles the standard is -1/+1mm.
Wheel alignment without assistance
You can correct the wheel alignment without outside help. To do this, it is enough to have a garage equipped with an inspection hole and a set of readily available tools and materials. A prerequisite: the garage floor must be level and strictly horizontal (which does not always happen). Tools and materials you will need:
So that adjusting the wheel alignment does not turn out to be a waste of time, before starting work you need to make sure that all suspension parts are in good working order and have no defects. Among other things, you should check that the air pressure in the tires is correct.
Table: air pressure in VAZ 2107 tires for different seasons and wheel sizes, kg/cm 3
| Size | In summer | in winter | ||
| Front axle | Rear axle | Front axle | Rear axle | |
| 165/80R13 | 1,6 | 1,9 | 1,7 | 2,1 |
| 175/70R13 | 1,7 | 2,0 | 1,7 | 2,2 |
Preparing for adjustment
Before adjusting, you should eliminate:
Video: one way to adjust wheel alignment
Front wheels
The adjustment of camber and toe concerns primarily the front wheels.
Camber
The camber angle of the front wheels is adjusted in the following sequence:
If adjustment is required, you must:
Having completed the adjustments, you need to assemble all the dismantled parts and make control measurements. When adjusting the camber of a front-wheel drive car, an error of +1/-1 mm is allowed; for a rear-wheel drive car, this figure is +1/+3 mm. If it was not possible to obtain the required result the first time, the procedure is repeated.
I remember back in 1995, my father and I did our own wheel alignment on a dime in the garage. So we hung the nut from the wing on a thread parallel to the wheel axis and adjusted the steering rods by eye. Of course, this was far from ideal, but at that time there was a very simple and effective method. The main thing for us was that the tires would not eat up and the car would not drag, so we achieved this by spending half a day in the garage.
Konstantin
https://autoepoch.ru/poleznye-sovety-avtolyubitelyam/razval-sxozhdenie-svoimi-rukami.html
Convergence
Self-adjustment of toe is performed as follows:
If you need to ensure that the total toe is 2mm, you need to follow these steps:
If, after these manipulations, the fishing line slightly touches the two extreme points of the front wheel, the toe is 1 mm, i.e. the total toe will be 2 mm. To obtain other convergence indicators, you need to do the same thing, but with other substrate sizes, for example:
Measuring toe angles.
Telescopic ruler for measuring wheel alignment.
Just like for the camber angle, we will consider VAZ 2106, 2107. But as in the first case, the adjustment will be identical for VAZ 2102, 2108, 2109.
The most convenient way to measure camber is to use a special telescopic ruler.
- We drive the car into the pit and put chalk marks on the inside of the wheels opposite each other, as close to the rim as possible.
- We rest the ends of this ruler against opposite points, so that the ruler is pressed against tension.
- Set the ruler to position 0 on a fixed scale and fix it at this point.
- We slightly roll the car forward and then back and look at the deviations in the line. The ruler should rotate along with the wheels.
- If the run-up is within -1, +1. Then your toe angle is adjusted. If the values exceed the permissible deviations, then we proceed directly to the adjustment itself.
Adjusting the toe angle.
- Using a 27 wrench, loosen the tension of the nuts on the steering rods.
- Using a 24mm wrench, we adjust the rod length by unscrewing or screwing in the coupling, depending on our readings on the ruler.
- We put the ruler again, as when taking measurements, in position 0, and roll the machine to measure the angle.
- If the toe-in has become from -1 to +1 mm, then the adjustment can be completed.
During the adjustment process, it is necessary to ensure that the steering wheel spoke is in a horizontal position. And after completing all the work, once again check the tightness of all the bolts that you touched.
.
Since the price of adjustment is $10-15, and it is recommended to carry it out at least once a year. By doing the wheel alignment yourself, you will save money on something more necessary.