Despite the fact that VAZ 2107 cars appeared a very, very long time ago, many residents of our country still use them. Owners of VAZ 2107 cars often have to repair their cars, including on their own. Thus, car enthusiasts often have to do body repairs on their own, during which sometimes they need to replace doors or carry out other door repair work, and for this you should study the structure of VAZ 2107 doors.
Replacing the door and door stop
Before replacing the door, it is advisable to disassemble it.
In this case, the door will be lighter and adjusting it will not be difficult. And you can assemble the door after hanging and adjusting. Removing the upholstery and door lock is discussed in the article - “Replacing the upholstery and door lock.”
Removing the glass and window regulator is discussed in the article - “Replacing glass and window regulator”.
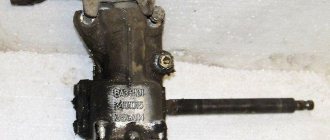
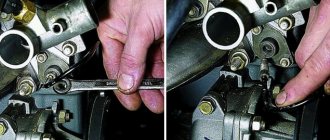
Use a hammer to knock out the door stop finger through the bit.
Use a 10mm wrench to unscrew the two bolts.
. and remove the stopper from the inner cavity of the door.
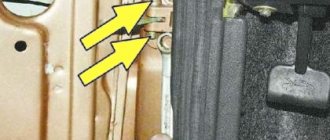
Hold the door and use a Phillips impact screwdriver to remove the five screws.
In some cases, it is difficult to unscrew the countersunk screws that secure the door hinges.
In these cases, you can drill out the screw heads with a 9 mm drill.
After removing the door, the remaining parts of the screws can be easily unscrewed with pliers.
. and remove the door from the car
Having installed the new door, we adjust its position in the opening.
How to unscrew the screws securing the doors of a VAZ 2101-2107?
Removing a door on VAZ cars of the classic family is not an easy task, but it is complicated by the fact that over time the screw heads (and it is they!) stick to the hinge and it becomes impossible to unscrew. But an impact screwdriver or a semi-automatic machine will come to our aid.
I always do the following - first I try to unscrew any screw using an impact screwdriver, and then if I can’t unscrew it with a screwdriver, then I weld the bolt to the screw and unscrew it by the bolt head. When heated, the rust on the threads and on the screw head comes off. Thus, we unscrew the door and carefully place it on the table.
Cleaning up the “patient”
Take the bolt and weld it to the door fastening screw
Welded bolt
Door adjustment
The gaps around the perimeter of the door should be the same.
To adjust the height, loosen the screws of both hinges and move the door vertically.
Holding it in the required position, tighten the hinge screws with a regular Phillips screwdriver.
We close the door and check its position in the opening.
If necessary, repeat the adjustment.
The outer surface of the door should be flush with the surface of the other door and the wing.
To do this, loosen the three screws of the upper hinge and pull out or recess the upper part of the door. We tighten the screws with a regular screwdriver, close the door and check the result.
We also adjust the lower part of the door. After adjustment, tighten all screws with a Phillips impact screwdriver.
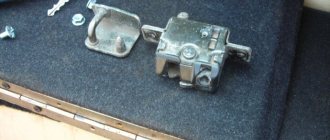
Adjusting door locks
Before adjusting the lock, it is recommended to outline the outline of the lock on the body pillar.
1. If the door closes too tightly, loosen the fastener bolts, move it outward and tighten the bolts. If the door closes poorly, move the lock inward. In this case, there should be no protrusion or retraction of the door relative to the body.
2. If the door goes down when closing, lift the lock. If the door rises when closing (sagging in the open position), lower the latch.
3. If the door is difficult to unlock with the internal handle, then the position of the internal handle of the lock drive is adjusted. To do this, loosen the screws securing the handle bracket and move the handle together with the bracket to the desired position. Then tighten the screws.
This section presents spare parts for the VAZ-2101, -2103, -2104, -2105, -2106, -2107 or, as people say, “classics”. From body hardware to electronics, the range of auto parts for classic VAZs is very wide and allows you to choose everything you need for any task related to repair or modernization.
Dismantling the front doors of the VAZ 2107
When replacing parts and door mechanisms, it must be disassembled.
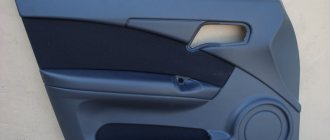
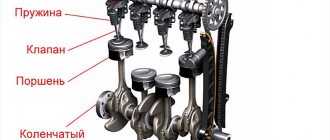
Rice. 9–2. View of the inside of the door: 1 - lock button; 2 — decorative plug; 3 — armrest handle; 4 — internal handle of the lock drive; 5 — window lifter handle; 6 — window plug. The arrows show the location of the door trim holders
Remove the decorative plug 2 (
Rice. 9–3. Front left door lock: 1 — internal lock drive lever; 2 — spring of the locking lever; 3 — external drive lever; 4 — lock switch rod; 5 — rod of the lock lock button; 6 — bracket; 7 — lock button; 8 — external drive rod; 9 — external handle of the lock; 10 — lock switch; 11 — cracker spring; 12 — retainer block; 13 — lock rotor; 14 — external drive rod; 15 — lock retainer body; 16 — lock ratchet; 17 — spring of the central roller; 18 — lock release roller; 19 — central roller; 20 — locking lever; 21 — rod of the internal drive of the lock
Remove button 7 (
Rice. 9–4. Front sliding window drive: 1 – window lifter handle; 2 – facing of the window lifter handle; 3 – power window handle socket; 4 – window lift mechanism; 5 – upper rollers; 6 – screws for fastening the pressure plates; 7 – pressure plates; 8 – sliding glass brackets; 9 – sliding glass; 10 – cable; 11 – lower roller; 12 – bolt; 13 – tension roller
Loosen the tension roller bolt 13 (
Rice. 9–5. Fastening the internal door lock drive handle: 1 - handle fastening screw; 2 — internal handle; 3 — nut securing the tension roller axis of the window lift cable
Remove two screws 1 (
Rice. 9–6. Door lock fastening: 1 - lock button; 2 — lock button rod; 3 — window lift cable; 4 — lock fastening screws; 5 — rod of the internal drive of the lock
Unscrew screws 4 (Fig. 9–6) securing the door lock and remove it, having first disconnected the locking button and lock switch rods.
Video about “Disassembling the front doors” for VAZ 2107
Removing (replacing) doors on VAZ 2101, 2103, 2105, 2106 and 2107 Repair: Doors of VAZ 2107 How to remove the door card on VAZ classic 2106
Source
Door hinge repair options
Failure or severely deformed hinges are repaired using the following methods:
- Complete door replacement. It is complicated by the fact that it is not always possible to find new VAZs for old ones. You have to buy old elements that are partially worn out.
Replacing door hinges, as well as fingers, is the most rational option in this case. It's inexpensive and relatively easy to do. If necessary, additional equipment can always be rented at a service center or automotive supply store. The cost of the hinges themselves for the VAZ 2110 and similar models is only about 300-500 rubles. You can also find old, used ones for sale. You will have to pay less for them. But new VAZ 2110 doors will cost several thousand rubles. And they are sold, as a rule, without glass and cladding. Their installation is an additional waste of money.
Replacing pins in hinges
So, if the repair only involves replacing the fingers, then the first thing you will need to do is remove the door to gain access to the hinges (3-4 fasteners are simply unscrewed, depending on the model). Next, the fingers are knocked out. If they do not come out due to corrosion or deformation, then you should first thoroughly fill everything with WD-40 to remove the rust and repeat the operation. If this fails, you will have to drill out the pins or replace the hinges completely.
When installing new pins, be sure to lubricate them with grease or oil, and after installation, adjust the door (lower or raise it a few millimeters through a tightening rod). The door should fit accurately into the catch when closing without additional physical effort. Otherwise, the wear and tear on both doors and hinges will be much higher. After 1-2 years of such operation, you will have to completely replace the door along with the hinges.
The main difficulty in repairing VAZ door hinges is to correctly knock out the pins (the same fingers). It’s most convenient to just rivet it and then straighten the loop if necessary. The most aesthetic method is to drill out each end of the finger, after which its edges are ground off or simply squeezed. The drill is immediately taken to the minimum size, then gradually increases literally by millimeter. This will take quite a lot of time, but the loop will not be damaged.
If the finger has other deformations, it may be necessary to make a through hole through the pins. This will not prevent the use of new fingers in the future. For this purpose, either an impact screwdriver or a powerful drill with a high-quality drill bit (carbon steel is ideal) will be useful.
Communities › VAZ: Repair and Improvement › Blog › Replacing door hinges (VAZ Classic)
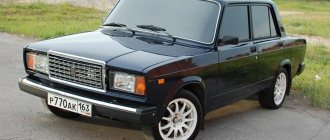
Since the car is from 1986, the driver's door hinges are tired, especially the bottom one, and the door sags accordingly. Not every straightener undertakes to replace hinges; they mostly offer door replacement, although now it’s not easy to find a good one
door, and in this door I have changed a lot. In general, replacement is not my option, I decided to change it myself and, as it turned out, there are no difficulties in this, everything is simple and quick. I ordered the hinges here > Avtoall First, I disassembled the new hinges, cut off the rod on one side with a grinder and knocked it out
The part that is intended to go inside the door is thrown away. Then I removed the door, capped it and drilled with drills in increasing order
After the old rod is drilled in the middle, the remains are knocked out in different directions.
Since I started covering my car with film, I covered the new hinges with film and put them in place. To prevent the rod from falling out, I welded it on top with a drop of welding. The top hinge was not very worn, but the bottom hinge, which is welded into the door, was also worn out, so I welded the rod on both sides and the play disappeared completely.
Next, I refined and put the door in place; I had to spend some time setting up the gaps, because... I installed it for the first time, but in the end everything was perfect, no sagging, the gaps were even, and I started installing silent front-wheel drive locks on an almost new door, but that’s another post.