VAZ 2112: steering rack repair - how to do it right?
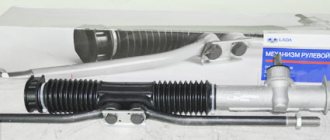
Steering mechanism of a VAZ 2112 car
An important part for controlling the movement of a car is the steering mechanism. Its main unit, the steering rack, transmits the force that the driver applies to the steering wheel through tips and rods to the steering levers, connected through axles to the steered wheels. How safe the vehicle will be on the roads depends on the good condition of all its elements. Therefore, it is very important to timely repair the VAZ steering rack. This article suggests that you familiarize yourself with the causes of malfunctions and how to fix them yourself.
Causes and symptoms of malfunction
Novice motorists are anxious about their first car. But sometimes hypotheses do not confirm the presence of a particular malfunction. Below are signs that may indicate that the unit has begun to leak: - when parked for a long time, oily spots appear under the hood;
— the oil level in the power steering expansion tank slowly decreases; — the hydraulic booster pump generates strange sounds and hums; — the steering wheel turns much harder than usual, not giving a feeling of comfort.
The most common problem is natural wear and tear of the mechanism. Less common are air getting into the control system, leakage of the grease seal, pouring of low-quality fluid, and even overheating of the pump. The best solution would be to contact a car service center, where they will identify the exact cause of the malfunction.
Consequences of untimely repairs
All this will significantly impact the budget, so it is better to take care of the repair of the mechanism in advance.
Installation of the VAZ 2110 steering rack
- On the left side, place the steering rack into the seat.
Ask an assistant from the pit to press the rack into the passenger compartment, and from the passenger compartment, put the steering shaft on the splines. For convenience, the slots can be slightly lubricated.
Install the brackets and tighten the four fastening nuts.
Install and tighten the coupling bolt securing the steering shaft to the rack shaft.
Tighten the fastening nuts of the tips on both sides and secure them with cotter pins.
- Install the wheels and tighten the mounting bolts.
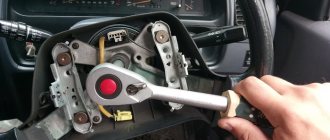
- If it so happens that you did not set the steering wheel straight or turned the steering shaft during operation, then you need to rearrange the steering wheel on the splines. To reposition the steering wheel, first remove the negative terminal of the battery.
- Use a slotted screwdriver to remove the decorative trim on the steering wheel.
- Behind the trim, unscrew the two screws using a Phillips screwdriver.
- Remove the horn button.
Unscrew the steering wheel mounting nut using a twenty-four socket.
Use a rocking motion to remove the steering wheel from the splines.
- Place the steering wheel in the correct position and reassemble it.
The process of replacing the VAZ 2110 steering rack is clearly shown in this video:
Any mechanism in a car does not last forever, so when driving on an uneven road, at one point a knock may appear, which can be heard in the steering wheel. Or, standing still, there may be a knock when turning the steering wheel. These are the first signs that it is time to repair the steering rack.
Repair
After disassembly and cleaning, it is necessary to “defect” the parts and determine the extent of replacement:
— the body is visually inspected. For chips, cracks, etc.;
— inspection of shafts for burrs, wear, scratches, etc.;
Once the defective parts are identified, assembly can begin:
— a new plastic bushing is pressed in;
— new bearings are pressed in;
— shafts are inserted and assembled;
- generously lubricated with suitable lubricant (litol, fiol, uniol)
— preliminary adjustment is made (the adjusting sleeve is tightened until it stops, then loosened until the shaft can be turned by hand);
— put on and secure the rubber boot (it is advisable to use a new one);
— install tie rods with ends without tightening them;
Which muffler to install according to the link.
Replacement
1) At the beginning of the operation, you will need to hang both front wheels from the car, for this operation you may need either one or two jacks (Just instead of one jack, you can also use logs), after the front part is hung, remove it from both sides of the car's wheel. (You can find out how to remove a wheel by studying the article entitled: “Replacing wheels on a car”)
Note! Don’t forget to stop the car with the handbrake just in case and put some more bricks under the rear wheels just in case!
2) Now you need to remove the adsorber if you have one, because it takes up quite a lot of space and if you don’t remove it, then there simply won’t be much access to the steering rack. (For information on how to remove the adsorber from a car, read the article: “Replacing a car adsorber”)
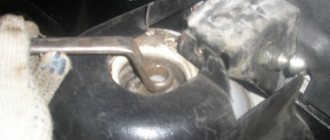
3) Then, in the very central part of the rack, unscrew the two bolts that are also indicated in the diagram above as number 10, which secure the tie rods to the rack, but keep in mind the fact that these bolts are also secured with lock washers, which you will need to bend back (You will see them immediately ), so that they do not interfere with unscrewing these bolts securing the rods to the rack.
Note! For ease of unscrewing, you can also move the steering wheel all the way in any direction, because when the steering wheel rotates, the rack also moves, and thus select exactly the moment when it will be easiest for you to unscrew these fastening bolts!
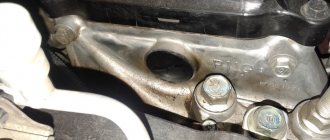
4) Next, climb into the cabin under the place where you have pedals installed and there look for the universal joint locking bolt (Indicated by the red arrow), if necessary, bend back part of the carpet (Carpet is what the floor of the car is covered with, before it didn’t exist, people replace it the styles themselves are linoleum, but this is in old cars, in new ones a carpet is used which covers the metal part of the body) if it will cover this bolt, but when you unscrew the bolt, insert a large screwdriver or a chisel into the groove indicated by the blue arrow and widen it so that the rack can be removed from the car.
DIY replacement
To replace the unit, you need the following:
- a bottle of white spirit;
- three clamps measuring 200x4;
- soft cloth;
- Movil aerosol or equivalent;
- any lubricant for processing bearings, Mobile Griz, Feola, or any other good quality will do;
- WD-40 to unscrew rusty parts.
In addition, you will need spare parts, namely:
- tubes;
- - tips;
- silent blocks;
- rack repair kit;
- anther.
The tools you need to stock up on are:
- hammer;
- keys set to “22”, with an internal octagon;
- chisel;
- cardan;
- puller for dismantling tips.
Now let's get to work
- First of all, you need to treat all fasteners and parts with engine oil (WD-40) and leave for an hour and a half. Afterwards, repeat the treatment with engine oil and it’s better to start working in a day, otherwise it’s simply impossible to unscrew the stuck parts, you’ll either break the threads and damage important components, or you’ll break something for yourself. To avoid such trouble, it is better to do everything in order, without haste.
- When the oil saturates the fasteners, you can begin dismantling. We fix the car, put supports under the wheels. Don't forget about the handbrake and lock the steering wheel.
- Disconnect the power and remove the front wheels.
- Unscrew the nuts from the ends;
- Armed with a puller, we knock out the fingers from the rack arms. To prevent the puller from flying away, hold it with a key.
- Remove the clamp fasteners.
- Now we are carrying out dismantling work in the cabin itself: the bolt on the steering shaft is removed, it is located near the floor.
- After all these operations, we pull the rail towards ourselves. It is easier to dismantle if you pull it out with a rotating motion.
- After dismantling the rack, the control mechanism is pulled out through the resulting hole.
- If the rack cannot be repaired, it is replaced with a new one. Installation is carried out in the reverse order to dismantling.
We repair it ourselves
If you have to repair the rail yourself, it is worth noting that this is a rather complex process that requires a certain skill and knowledge. Of course, DIY repairs will cost less . The work will also require the help of a partner.
Tools and consumables
Steering rack repair kit
Dismantling the rack on a VAZ-2112
First, you will need to remove the battery, the platform under it and the air duct in the engine compartment. Next, you will need to unscrew the clamps that secure the rail to the body. The difficulty of this work is that if you unscrew it carelessly, you can damage the studs , which are quite difficult to replace.
Removing the tie rod ends from the steering rack
Instructions for replacing the mechanism
Follow the steps below to perform the procedure yourself:
The procedure is simple even for a “green” motorist. You can do it yourself without resorting to the services of car services.
If you are faced with regular leaks, think about whether it is worth aggravating the situation and not taking action. Pay attention to every component and assembly of your car. This is the only way it will last for many years.
What problems do you have with your car? And how often do you have to service the steering rack? Write your answers in the comments and share useful information with your friends! See you again!
Source
The steering rack of the VAZ 2112 creaks - what to do?
Carrying out diagnostic work that will allow you to determine the causes of the squeak should begin with identifying the specific place from which the squeak is heard when turning the steering wheel. To do this, you need to put the car in a hole and ask someone to turn the steering wheel, while listening to sounds from under the car to determine the location of the squeak. Having decided which element is creaking, you can move on to repairs.
It is quite simple to determine the creaking of the steering column by the characteristic vibration, which will also occur when the steering wheel rotates. Most often, the steering column clutch squeaks, and this problem is typical for cars that were unsuccessfully restored after a serious accident. This problem, if the noise is not strong, does not affect the quality of the steering mechanism, so you can continue to operate the car. The situation can only be corrected by replacing the steering column. Also, a squeak can be heard from the steering rack and column joint if they are poorly adjusted or there is severe wear. Depending on the car model, this problem can be solved in different ways. Most often it is possible to adjust the mechanism.
What is the risk of a faulty steering system?
Timely detection of a steering rack fault and its repair is the key to safety.
If there is play in the steering mechanism, and there are also constant noises and knocks when driving on uneven roads, then this is a sign that the mechanism requires repair.
Causes of malfunction
The design of the rail itself is relatively simple. During operation, the parts of the mechanism may wear out, so gaps appear between them, which will cause backlash.
Anthers also play an important role in the rack, protecting the mechanism from dirt and dust, as well as moisture.
If the rubber boots are damaged or there are leaky places in them, this may cause some problems that may be associated with corrosion or contamination of the assembly elements .
Steering rack diagnostics
If uncharacteristic behavior of the car on the road while driving was noticed, then it is necessary to determine what caused it. There are not many ways to diagnose reiki. They are all simple. Among them are the following:
- a knocking sound is heard in the area where the rack and steering shaft meet when force is applied , then the problem is a lack of bearing lubrication.
- If, by grasping the joint of the rod in the engine compartment, play is detected , this will be evidence of wear on the bushing or insufficient tightening of the connections.
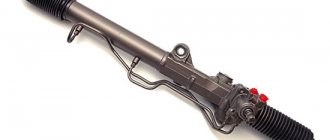
Design and arrangement of the rack on the VAZ 2110
The operating principle of the steering rack is as follows. A gear is installed at the end of the steering shaft. It meshes with a rack (hence the name). When you turn the steering wheel, the gear moves the rack left and right, turning the wheels. To do this, the steering arms are connected to the rack by steering rods.
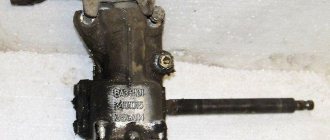
This is what the dismantled mechanism looks like
Rack designers need to strike a compromise between lightness and steering feel. It all depends on the rack-and-pinion ratio.
To maintain a balance between sharpness and ease of control, amplifiers are installed on the steering mechanism. According to the principle of operation, they are hydraulic (GUR) and electric (EUR).
Three types of steering racks are installed on the VAZ 2110: without power steering (with variable gear ratio), with power steering and electric power steering, and you can install the power steering yourself.
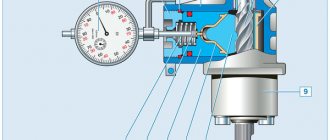
Steering rack device for VAZ 2110
In order to repair the rack yourself, you will need to study the design of this unit.
1 - clamps; 2 — protective cover; 3 — internal plate; 4 — steering rod; 5 — outer plate; 6 — bolt for fastening the rod; 7 — locking plate; 8 — protective cap; 9 — crankcase pipe; 10 - sealing rings; 11 — support sleeve; 12 — bracket for fastening the rod support; 13 — rod support; 14 - rack; 15 — nut securing the crankcase pipe; 16 — retaining ring; 17 - sealing ring; 18 — crankcase cover; 19 — gear boot; 20 — washer; 21 — cover fastening bolt; 22 — separator with rollers; 23 — steering gear; 24 — lock washer; 25 — support plate; 26 — plate body; 27 — lower gear bearing; 28 - crankcase; 29 — left protective cap; 30 — rack stop insert; 31 — emphasis; 32 - sealing ring; 33 - spring; 34 - sealing ring; 35 — stop nut; 36 - plug.
Start of repair work
Before you start repairing the steering rack on a VAZ 2110, you need to arm yourself with a repair kit, which should include:
either a minimum set of fasteners, including washers, bearings, nuts and fluoroplastic bushings;
Steering rack repair kit
- or the middle set, which still has new bearings and shafts, but costs twice as much as the first;
- or purchase a complete set, which includes the rail itself.
What is the steering rack made of?
Steering rack design
Before starting work, it is useful to know what this part consists of. Let's start with the bushing. On the steering rack it consists of:
Bearings come in the following types:
In addition to the above components, the steering rack consists of:
- steering gear housing;
- drive gear;
- anther;
- protective cap;
- slats;
- rack stop;
- clamp;
- protective cover;
- inner tie rod end;
- connecting plate;
- locking plate;
- bolt securing the tag to the rail.
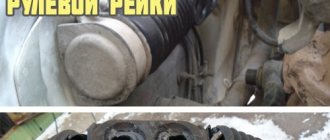
Removing the old rail
This is the steering rack on the VAZ 2110. Repairs must be carried out after removal. In order to repair or replace the rack, it must be removed from the vehicle. The dismantling process is carried out in two ways: you can remove the rack with or without rods. In the first case, it is necessary to press out the fingers of the outer ends of the rods, and in the second, disconnect the inner ends. So:
- unscrew the bolt of the elastic coupling in the car interior;
- Using a 13mm wrench in the engine compartment, loosen the nuts securing the steering rack mechanism brackets on both sides;
- we remove the splined end of the gear from the hole, moving the steering rack forward;
Removing the splined end
- The steering gear housing is clamped in a vice with soft jaws;
- remove the spacer ring and support from the right side of the steering rack housing;
Spacer ring and rack support
- We cut off the clamps that we find on the protective cover (no need to be afraid, since they are disposable);
- remove the protective cover from the support;
- go to the left side and remove the support and protective cap;
- we find the rack stop nut (it is unique and will require the use of a special tool - a 17 octagonal head);
- turn it all the way;
Removing the stop nut with a special eight-point socket
On a VAZ 2110, the steering rack, the repair of which involves dismantling, also has other complex and unique fastenings and fixing nuts. In fact, the steering rack is a very delicate mechanism that requires careful attention. And repair of the VAZ 2110 rack should be carried out without much effort and rough work. So:
- under this octagonal stop nut we find the spring and remove it;
- then remove the retaining ring located under the spring;
- We take the crankcase comfortably and try to knock out the rack stop with light blows on a wooden stand (you should know that there is a rubber sealing ring in the groove of the stop);
- remove the front shield seal;
- under it there is a boot, which we also remove (we use a screwdriver with a wide but thin blade);
- under the boot there is a locking ring, which should also be removed;
Installation
When installing the steering rack, you must remember the following conditions:
- when installing the steering column, the steering wheel must be in the center and have an equal number of turns in one direction and the other (small deviations are allowed, they will be corrected at the wheel alignment stand);
- screw the rack to the body;
- insert and tighten the tie rod ends;
- put on the wheels and lower the car;
- stabilize the suspension and tighten the steering rods on the silent blocks;
Check and adjustment
After installation, the rail must be finally adjusted. There should be no vertical play in the steering rack when checking the steering rods. The play on the steering wheel should be within normal limits (approx. 15 degrees). The steering wheel should rotate easily, without biting, with an equal number of turns in both directions. When driving and turning, the steering wheel should return to its original position on its own, without driver assistance.
The next adjustment should be in the first 500 - 800 km, after repair.
Also, after repair, it is necessary to check and adjust the wheel alignment angles. PS If you were unable to repair the steering rack yourself, then contact a professional car service center for help.
Basic faults
Like any other mechanical structure, the steering rack, due to certain circumstances, may show signs of malfunction. These include:
- crunch (knock) when turning the steering wheel;
- “tight” steering wheel;
- increased play in the steering wheel or steering shaft drive gear;
- vibration of the steering shaft when driving;
- uneven tire wear caused by improper alignment of the front wheels.
The listed symptoms indicate that it is time to repair or replace the steering rack. However, do not rush into replacement. The rail itself is made of durable steel, and it is not so easy to damage it. Most often, auxiliary structural elements become unusable:
- support sleeve;
- drive gear bearings (ball and needle);
- seals;
- anthers, etc.
There can be any number of reasons for the failure of these parts, from spent resources to mechanical damage due to off-road driving. If you are sure that the rack itself will not have to be changed, you can get by with minor repairs to the steering structure, which consists of replacing the listed “consumables”.
If you decide to repair the steering rack at a service station, expect that you will have to pay about 300 rubles for the simplest repair kit. A complete set, including bearings, will cost about 500-700 rubles. The entire filling, including the rail, will cost 1,500 rubles.
It is advisable to know the markings of the rack before purchasing a repair kit, since they may differ depending on the configuration and year of manufacture of the “tens”.
The cost of repair work, depending on the service station, will be 1000-1500 rubles. If you don’t want to overpay for the work, you can repair the rack yourself.
Work order
- Remove the steering rack assembly.
- Cut the clamps securing the boot (cover) of the steering mechanism.
- Unscrew the thrust nut of the rack (octagonal special wrench 17), remove it from the body.
- Remove the rubber plug from it. Use a screwdriver to remove the retaining ring and spring.
- Lightly tap the steering housing on a wooden block to knock out the rack stop (piston) and remove it along with the seal.
- Remove the boot and drive gear seal (slotted screwdriver).
- Remove the lock washer (slotted screwdriver).
- Unscrew the nut securing the drive gear bearing (octagonal special wrench 24 with a central hole with a diameter of at least 18.5 mm).
- Remove the rack drive gear with bearing from the housing.
- Remove the rack from the housing.
- Pull the support sleeve out of the body by prying it with a slotted screwdriver.
- Remove the retaining ring from the drive gear shaft. Check the bearing for play. If there is one, use a bearing puller to remove the ball bearing from the shaft. Install a new one in its place in the same way.
- Remove the needle bearing from the housing by drilling two holes with a thin drill (2 mm) on the back of the housing and knocking it out using a thin rod. Seal the resulting holes with “cold welding” or “fast steel”. As a last resort, the bearing can be broken using a narrow chisel (not recommended!).
- Liberally lubricate the seat, install a new needle bearing into it, and press it into place by lightly tapping its housing.
- Install a new support sleeve from the repair kit, cut its rubber O-rings, and remove unnecessary fragments.
- Fill the inner surface of the rack body with special lubricant (Fiol-1 or equivalent).
- Insert the rail into the housing.
- Reinstall the drive gear and bearing. Secure it with a nut and install a retaining ring. Place a new boot on the gear shaft.
- Replace the new stop with the new seal. Secure it with a locking ring. Place a spring in its hole. Tighten the thrust nut.
- Adjust the rack by first tightening the stop nut all the way and then loosening it 30 degrees. Plug the nut hole with a rubber plug.
- Place the boot on the rack body and secure it with clamps.
- Install the rebuilt structure on the car.