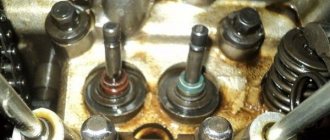
Check the condition of the valve springs. Springs that are cracked or broken must be replaced. You can compare the height of the spring with the height of the new spring. If the spring removed from the engine is lower than the new one, it must be replaced.
Inspect the valve levers. If they show wear where the lever contacts the camshaft cam, replace the lever. If a dent is noticeable on the contact surface of the lever with the valve, the surface of the lever must be sanded.
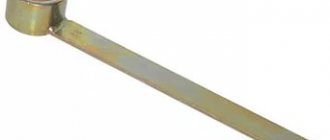
Inspect the camshaft. If there are deep scratches, grooves or burrs on the cams and journals, replace the shaft. Install the shaft into the cylinder head bearings and measure the lateral clearance between the shaft and the ignition distributor mounting plate (for MH and 2G engines - between the shaft and bearing cap No. 3). If the gap exceeds 0.15 mm, replace the shaft or plate.
Measure the diameters of the camshaft journals, which should be equal to:
– front neck – 31.45 mm; – middle neck – 39.95 mm; – rear neck – 40.45 mm.
The maximum permissible wear of the journals is 0.25 mm. The camshaft of the MN and NU engines has a cast ring between the cams of the first cylinder. The diameter of the camshaft journals for MH and 2G engines (with hydraulic valve lifters) is 26.0 mm, the minimum permissible journal size is 25.75 mm. If the measured diameter is less than permissible, replace it. Check the shaft runout by placing it on the prisms along the middle journal. Permissible shaft runout is 0.02 mm. If the runout is greater, replace the shaft. Check and, if necessary, clean the oil channels in the shaft journals.
In order to check the block head for cracks, you need to connect a compressed air hose to one of the holes in the cooling jacket. Plug all holes in the head with wooden plugs, lower the head into a bath of water and apply air. In places where there are cracks, air bubbles will come out. Check the oil channels in the cylinder head in the same way.
Reason for engine modification
The working volume of the cylinders can be increased to a certain value, so the modification is aimed at compacting the mixture. For this, camshafts with special valves with increased lift are used. In addition, the modification concerns the elimination of inaccurate joining of the manifold channels and the cylinder head.
Since the head of the engine block of domestic VAZ cars is very far from perfect, the turbulence that occurs inside the cylinders significantly slows down the flow of the mixture. The parameters of the Lada 21083 can only be improved by tuning the internal part of the cylinder head.
To do this you need the following tools and materials:
The procedure for eliminating inconsistencies in the cylinder head is as follows.
| First, tuning is directed to the manifold gaskets. | Quite often it happens that the fastening of the collectors in the Lada 2108 is not done very well. Because of this, they have a slight offset relative to the cylinder head collector plane. To make such a block more perfect, two holes need to be drilled along the edges of the manifold and cylinder head. |
| Next, two pins are pressed into the block. | They must be of the appropriate size. |
| After this, a manifold is put on the working unit of the VAZ car. | Since drilling is done without a gasket, the holes in it are made separately. |
| Sometimes modifications to VAZ engines involve reducing the weight of the valves. | They are replaced both on machines of brand 2108 and in models 21083. Instead of old heavy parts, other valves are installed in the block, in which part of the metal is ground off on both sides of the plates. In addition, the VAZ valve stem is also made thinner. |
When reducing the diameter of the rods, replacement of the guide bushings is required. Such tuning does not require large material costs.
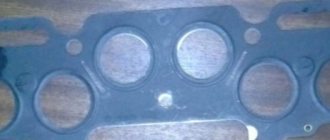
Replacing the cylinder head gasket for a VAZ 2109
The cylinder head gasket is the most important gasket in the engine. Any inaccuracy during its installation or, moreover, manufacturing, leads to the inevitable death of the engine. Without exaggeration, we can say that the head gasket delimits the engine lubrication system, the cooling system and seals the combustion chambers. If you give the gasket some slack, the engine will at least knock or jam.
Content:
Why do we need and what are head gaskets made of?
The cylinder head gasket must be replaced when the head is removed. The gasket, although expensive, is a consumable item and cannot be restored or reused. The gasket has to withstand enormous loads. Both thermal and mechanical. The temperature in the combustion chamber can reach 1200°C, and in the VAZ 2106 it is no less than 1000°C, so the requirements for the material from which the gasket is made are very high.
The heat-resistant gasket is made of asbestos-containing material, which does not collapse or change its structure when exposed to high temperatures. Asbestos was banned for use in automotive technology, so it is now being replaced with new materials, but more often than not, the asbestos content is simply not indicated on the packaging of the gaskets. Ceramic gaskets are expensive, so they are used only on expensive cars, to which the nine has nothing to do.
In addition to the thermal load, the gasket must withstand the severe pressure that forms in the combustion chamber, as well as ensure sealing of the oil channels and cooling system channels. To do this, the head gasket must have a certain elasticity and strength. Tensile strength is given to it by reinforcing materials, which most often are thin steel wire.
Signs of a broken gasket on a VAZ 2109
There are no regulations for replacing the gasket, since a good and well-made part can serve for quite a long time until the head is dismantled. But it is necessary to monitor its condition, and the difficulty is that damage to the gasket rarely manifests itself externally. Oil drips and antifreeze drips may not always indicate gasket damage. But there are a number of unconditional signs that the gasket needs urgent replacement.
- Suspension in the engine crankcase. This is determined by checking the oil level. Instead of clear or even dark oil, a watery, dark brown suspension appears on the control dipstick. The coolant can be forced into the lubrication system, where it mixes with the oil, but the mixture may not be homogeneous and looks like a suspension. The first sign of antifreeze leakage into the crankcase is an increasing oil level.
- Oily spots in the coolant expansion tank. The same story - oil got into the antifreeze, but it cannot dissolve there, so it looks like stains on the surface. This is also a signal that the gasket is broken.
- A drop in compression in a particular cylinder or in two adjacent ones. Most often this happens when the gasket is simply of poor quality and burns out in the place where the cylinder is sealed. It can burn out anywhere, along the perimeter of the combustion chamber - both outside the block and into the channels. External burnout can be heard immediately by sound. Therefore, such a nuisance must be eliminated immediately.
How to replace the VAZ 2109 block gasket
Replacing the cylinder head gasket of a VAZ 2109 is carried out according to the same scenario as on the eight, on VAZs of the tenth series, since the engine designs of these cars differ very slightly from each other. We will present the procedure for replacing the gasket schematically, since there is no need to describe the unscrewing of each bolt, and everyone has a Murzilka in the glove compartment. We will dwell only on the most important points that cannot be neglected in order to avoid failure of the entire motor.
Procedure for replacing the cylinder head gasket on a VAZ 2109-2108
The gasket may remain either on the surface of the head or stick to the block itself. You can try to remove it by hand without using any tools, and if that doesn’t work, you can carefully pry it off with a flat-head screwdriver without damaging the surface of the part.
Carefully inspect the surface of the cylinder head and if pronounced traces of corrosion are found on it, especially in close proximity to the coolant channels, then it is necessary to repair it: milling, grinding, etc. If everything is normal, then we remove traces of the old gasket using special means:
We wait a few minutes until the whole thing has cooled down and remove the residues that have not succumbed to the chemicals, if any remain, with a razor blade. Then we wipe everything dry and you can even degrease it so that no foreign traces remain on the surface:
The engine block also needs to be cleaned and then a new gasket installed on it. It is important that the holes in the gasket coincide with the guides, which are located at the corners of the block:
How to remove the cylinder head on a VAZ 2109. Replacing the cylinder head gasket with your own hands
The cylinder head (cylinder head) is usually removed to replace the gasket or block, or to repair the valve mechanism of the piston group or the head itself.
The need to remove the cylinder head may also arise in the case of engine tuning or complete disassembly of the engine. This work is carried out on an inspection pit or overpass.
How to remove the cylinder head on a VAZ 2109 - step-by-step instructions:
- Disconnect the negative terminal from the battery.
- Drain the coolant into a plastic container.
- Disconnect the exhaust pipe from the exhaust manifold.
- Now remove the receiver together with the throttle assembly (VAZ 2111), or the carburetor in the case of (VAZ 21083), as well as the intake and exhaust manifolds (remove the cylinder head without removing the manifolds).
- On a VAZ 2111, you need to disconnect the “mass” wires (they are attached to the left end of the head), remove the fuel rail with fuel pipes and injectors.
- Disconnect the high-voltage wires from the spark plugs, as well as the connectors of the coolant temperature and oil pressure level sensors.
- On the VAZ-21083, you will additionally have to remove the housing of the auxiliary units, the ignition distributor sensor and the fuel pump.
- Now remove the timing belt, then the tension pulley, spacer washer and camshaft timing pulley.
- Unscrew the rear fastening nut that secures the timing cover to the cylinder head.
- Remove the cylinder head cover.
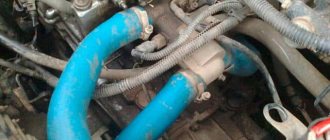
- Using a Phillips screwdriver, loosen the clamps and disconnect all the hoses from the cylinder head exhaust pipe one by one.
12. Unscrew the 10 cylinder head mounting bolts using a “10” hexagon.
13. Remove the screws and washers.
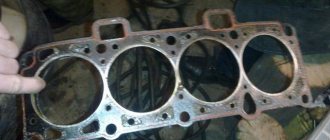
14. Now you can remove the cylinder head along with the gasket.
15. When disassembling the valve mechanism, place a wooden block under the valve plate that you are going to dry out.
16. Dry the valve.
17. Remove it from the cylinder head guide sleeve.
18. Take the key at “13” and unscrew the two fastening nuts on the outlet pipe.
19. Remove the gasket and pipe.
Assembling and installing the cylinder head is carried out in the reverse order.
- The valve stems and bushing guides are lubricated with engine oil.
- Before starting installation, it is necessary to thoroughly clean the surface of the cylinder block from dirt and oil, as well as remnants of the old gasket.
- The cylinder head gasket is replaced using two special centering bushings.
- Now you can install the mounting screws and tighten them in four steps according to the diagram below.
The first tightening of the screws is carried out with a torque of 20 N.m (2 kgf.m);
- The second - with a moment of 69.4–85.7 N.m (7.1–8.7 kgf.m);
- Third - extension by 90°;
- The fourth is to turn the screws 90°.
Now you know how to remove the cylinder head on a VAZ 2109; at this point, replacing the cylinder head gasket with your own hands can be considered complete.
Lightening thrust plates
To reduce the load on the camshaft, on the Lada 2108 you can resharpen the standard plates for the valve springs. The same applies to model 21083. However, some car enthusiasts replace them with more expensive ones cast from titanium alloy. On VAZ cars they do not deform even at the highest engine speeds, so such costly tuning still pays for itself over time.
Increasing valve capacity plays an important role in the efficient operation of cylinders. Here is the order of work. First, the general profile of the plate is changed, then its working chamfers are removed. If the Lada 21083 engine head contains eight valves, then tuning is performed in such a way that the chamfers become as narrow as possible.
Sometimes the work procedure involves tuning, in which enlarged valves are installed. In this case, the saddles are replaced. Most often, the head is modified to reduce the risk of detonation.
Upon completion of the cylinder head modification, before installing a new gasket, it is necessary to thoroughly clean the dirt from all threaded holes. Thanks to this, the bolts will press the head with the force at which gas breakthrough will be completely eliminated.
Removing the cylinder head and replacing the cylinder head gasket on VAZ 2108, 2109, 21099
Hello, in this article you will learn how to remove the cylinder head (cylinder head) and how to replace the cylinder head gasket with your own hands on a VAZ 2108, 2109, 21099. Replacing the cylinder head gasket occurs if you discover that antifreeze, antifreeze or oil is leaking in those places where the cylinder head and the cylinder block itself are connected. Of course, there is another option that the leak occurs not because of a worn gasket, but because of the head itself, which was deformed, as a result of severe overheating of the engine. Before you begin removing the cylinder head, you must remove the terminal from the battery and drain the antifreeze from the cylinder block. Then remove the terminal from the antifreeze temperature sensor
Dimensions of the cylinder head of the VAZ 21083
2.2.1.3. Inspection, testing and repair of the cylinder head
After disassembling the cylinder head, wash all parts in gasoline. Clean combustion chambers and valves from carbon deposits.
Using a metal ruler and feeler gauges, check that the plane of the head adjacent to the cylinder block is not broken. The ruler is placed edgewise on the surface of the head along, across and diagonally in different places and the gap between it and the plane of the head is measured with a feeler gauge. If the gap exceeds 0.1 mm, the head must be ground.
Cylinder head height measurement
b) MH and 2G engines with a volume of 1.6 and 1.8 liters - outer diameter of the valve seat; a - diameter of the valve plate; PERFORMANCE ORDER| 1. Place the spring on the valve. |
| 2. Apply lapping paste, which is a mixture of fine emery powder and engine oil, to the working face of the valve. |
| 3. Insert the valve with the spring into the block head; the spring should press the valve away from the seat. |
| 4. Place a lapping tool on the valve stem or a rubber suction cup on the valve plate. |
| 5. Use a tool or suction cup to turn the valve in both directions, periodically lightly pressing the valve against the seat. |
| 6. When lapping, do not remove too much metal from the working chamfer of the valve and seat, since the possible number of repairs to the seat and valve is reduced and thereby their service life is reduced. |
| 7. Towards the end of grinding in, you need to reduce the amount of sanding powder. When the ground-in surfaces become completely smooth and take on an even gray color, grind in with clean engine oil. |
| 8. An external sign of satisfactory lapping is the uniform matte gray color of the working chamfer of the valve and seat. After grinding, wipe the seat and valve with a clean rag. |
| 9. To check the tightness of a ground-in valve, you need to install it in the block head along with a spring and crackers. After this, put the head on its side and pour kerosene into the channel closed by the valve. If kerosene does not leak into the combustion chamber within 10 minutes, the valve is considered sealed. |
Check the condition of the valve springs. Springs that are cracked or broken must be replaced. You can compare the height of the spring with the height of the new spring. If the spring removed from the engine is lower than the new one, it must be replaced.
Inspect the valve levers. If they show wear where the lever contacts the camshaft cam, replace the lever. If a dent is noticeable on the contact surface of the lever with the valve, the surface of the lever must be sanded.
Inspect the camshaft. If there are deep scratches, grooves or burrs on the cams and journals, replace the shaft. Install the shaft into the cylinder head bearings and measure the lateral clearance between the shaft and the ignition distributor mounting plate (for MH and 2G engines - between the shaft and bearing cap No. 3). If the gap exceeds 0.15 mm, replace the shaft or plate.
replacing the cylinder head gasket on VAZ 2108, VAZ 2109, VAZ 21099 cars
If a leak of engine oil or coolant is detected at the junction of the cylinder head with the cylinder block, remove the cylinder head and replace the head gasket. A leak can also occur due to warping of the block head due to overheating.
WARNING The head gasket is a one-time use, so each time the head is removed, the head gasket must be replaced.
1. Disconnect the wire from the “-” terminal of the battery.
2. Disconnect the wire from the coolant temperature sensor.
3. Disconnect the wire from the oil pressure sensor. 4. Set the piston of the 1st cylinder to the TDC position of the compression stroke (see “Installing the piston of the 1st cylinder to the TDC position of the compression stroke”). 5. Drain the coolant (see “Replacing the coolant”). 6. Remove the thermostat (see “Removing and installing the thermostat”). 7. Disconnect the exhaust pipe of the muffler from the exhaust manifold (see “Replacing the exhaust pipe of the muffler”). 8. Remove the air filter (see “Removing and installing the air filter”). 9. Remove the front cover of the camshaft drive belt (see “Replacing the camshaft drive belt on VAZ 2108, VAZ 2109, VAZ 21099 cars and adjusting the belt tension”). 10. Remove the cylinder head cover (see “Adjusting the clearances in the valve drive”).
11. Secure the camshaft gear from turning by inserting a screwdriver into its hole and resting it against the pin; loosen the camshaft gear mounting bolt (for clarity, the operation is shown on a VAZ 2108, VAZ 2109, VAZ 21099 engine removed from a vehicle).
12. Remove the drive belt from the camshaft gear, tension roller, water pump toothed pulley, move the belt to the side (see “Replacing the camshaft drive belt on VAZ 2108, VAZ 2109, VAZ 21099 cars and adjusting the belt tension”).
13. Unscrew the camshaft gear mounting bolt and remove it together with the washer (for clarity, the operation is shown with the engine removed).
14. Using two screwdrivers, remove the gear from the camshaft. At the same time, do not damage the camshaft oil seal (for clarity, the operation is shown on a VAZ 2108, VAZ 2109, VAZ 21099 engine removed from a car).
15. Loosen the clamp and disconnect the fuel supply hose to the fuel pump. 16. Disconnect the hoses and wires, the choke rod and the throttle cable from the carburetor (see “Removing and installing the carburetor”).
17. Disconnect the central high-voltage wire from the ignition distributor cover.
18. Use a screwdriver to press out the spring clip and disconnect the block with low-voltage wires from the ignition distributor terminal. 19. Disconnect the tube from the vacuum corrector of the ignition distributor. 20. Disconnect the vacuum booster hose from the engine inlet pipe. 21. Loosen the clamp and disconnect the radiator supply hose from the water cooling jacket pipe (see “Removing and installing the cooling system radiator”).
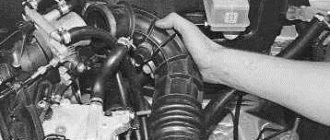
22. Loosen the clamp and disconnect the heater supply hose.
23. Loosen the clamp and disconnect the heater outlet hose.
Engine 21083 is a problematic version of Auto VAZ
The appearance of the 21083 engine is due to the need to increase the power of the serial 2108 internal combustion engine of the AvtoVAZ manufacturer. To achieve this, the designers increased the size of the cylinder, but “forgot” to design the intake manifold for the changed conditions.
As a result, cracks open in the exhaust manifold, the bosses become jammed, and the plane of the head is pressed through. Acceleration to 100 km/h occurs in 14 seconds, but the revs are too high for the resulting torque.