What is the function of the cylinder head gasket?
The cylinder head gasket is located between the cylinder head and the cylinders and performs several functions:
- seals the place where the head adheres to the cylinder block;
- prevents oil from leaking and coolant from entering the cylinders;
- Restrains internal pressure and heat.
Thus, it separates three systems: gas distribution, cooling and lubrication. Experiencing heavy loads, it wears out quickly.
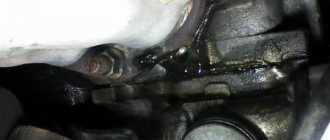
Gasket with traces of breakdowns
The following are signs that may indicate the need for replacement:
- insufficient pressure in one or more cylinders;
- foaming of the coolant, a drop in its level in the absence of an external leak, occurs due to gases entering the cooling system;
- emulsion on the oil dipstick, an increase in the oil level in the pan, the reason for this is the presence of antifreeze in the lubrication system;
- the appearance of oil stains on the surface of the coolant and the radiator neck indicates a broken gasket in the area of the oil channel;
- white smoke in the exhaust gases, while the coolant level drops;
- squeezing out the coolant fluid from the expansion tank in the form of foam indicates a violation of the tightness of one of the cylinders;
- The coolant level drops and the engine boils.
The video describes the signs of gasket burnout.
Damage to the gasket may be caused by:
- low-quality consumables;
- overheating of the power unit;
- improper tightening of cylinder head bolts;
- insufficient coolant level;
- Incorrect installation of the cylinder head.
Installing the cylinder head gasket
Before installing the gasket and cylinder head, it is necessary to thoroughly clean the contact areas of the block and head from dirt and remnants of the old gasket. If this is not done, channels may form in places of contamination through which exhaust gases, oil or antifreeze will leak. It is also worth carefully inspecting the cylinder head. If it needs repair or replacement, this should be done before installing it on the vehicle.
Installation begins by laying a new gasket and centering it using a pair of guides. The head should be installed on top.
When should you change?
Note that replacing the cylinder head gasket on a VAZ 2101-2107 is rarely done with your own hands. The manufacturer does not regulate the period for its replacement, since the part is installed for its entire service life. However, there are times when it burns out.
How to determine this malfunction? The first sign is engine overheating. The second is a leak at the junction of the block and the head. Both antifreeze and oil can escape from here. Also, these two fluids are mixed in the expansion tank. When the engine is running, there are small gas bubbles in the engine. All these signs indicate that the car needs to replace the head gasket. VAZ "Classic" is a simple car to use. Therefore, you can do this procedure yourself.
Need for replacement
There are few reasons for replacement and some of them require immediate intervention, while others not so much, that is, the vehicle can be used, albeit in a gentle manner.
Reasons for replacement:
- Damage to the gasket in the area of the cooling system channel and the drainage channel of the lubrication system. When this happens, the coolant ends up in the oil pan and mixes with the lubricant. The result is a mixture with a brownish tint. This can be detected by checking the lubricant level in the power unit on the dipstick. This malfunction is also indicated by a decrease in the coolant level in the radiator. If you do not intervene in time, the consequences can be catastrophic, including the destruction of the power unit.
- Damage to the gasket in the area of the cooling system channel and cylinder. This may occur due to a poor quality gasket or an incorrectly installed head.
- Burnout in the cylinder area. This malfunction is detected and diagnosed by a decrease in compression in the cylinders and unstable engine operation.
Burnout between cylinders - Destruction of the gasket. If coolant begins to leak through the gasket and all efforts to tighten the cylinder head do not bring any results, then an urgent replacement is necessary.
Disassembly
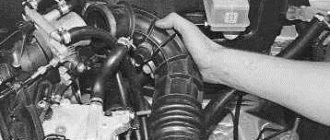
So, where does the replacement of the cylinder head gasket begin on a VAZ-2107 car? First, remove the air filter with a round metal housing (shown in the photo below).
Next, unscrew and take out the carburetor. After this, they begin to dismantle other attachments. This is the ignition distributor and high-voltage wires. After this, the coolant is drained from the engine. It is required to prepare a clean container with a volume of at least 7 liters.
Instructions for repairing, removing and installing the Lada 2110 engine shaft with your own hands, adjusting the Lada 2111 engine, VAZ 2111, VAZ 2112, VAZ 2110 engines. Maintenance of the Lada 2112 engine. Repair instructions for the cooling system, exhaust gases, power supply of the Lada 2111 Features of the 8 and 16 valve Lada 2110 engine. Operation of the main components and assemblies of the engine
We remove the cylinder head in case of replacing the gasket, repairing the valve drive mechanism of Lada 2111, 2110 and the head itself, as well as when completely disassembling the engine. We work on a lift or inspection ditch. Disconnect the negative cable from the battery and drain the coolant from the engine. Disconnect the exhaust pipe from the exhaust manifold. We remove the receiver with throttle assembly (VAZ 2111), carburetor (VAZ 2110), intake and exhaust manifolds (the head can be removed without removing the manifolds). On the VAZ 2111 engine, we disconnect the “mass” wires from the left end of the head and the fuel rail with injectors and fuel pipes. We disconnect the tips of the high-voltage wires from the spark plugs, the connectors of the oil pressure and coolant temperature indicator sensors. On the VAZ-2110 engine, remove the ignition distributor and the housing of the auxiliary units with the fuel pump. Remove the timing belt, tension roller with spacer washer, and camshaft toothed pulley. We unscrew the nut securing the rear timing drive cover to the cylinder head of the VAZ 2112. Remove the cylinder head cover. All of the above operations are described in the relevant sections. Use a Phillips screwdriver to loosen the clamps and remove all hoses from the exhaust pipe of the cylinder head. Use a 10mm hexagon to unscrew the ten bolts securing the VAZ 2110 block head. Remove the bolts and washers. Remove the cylinder head... ...and its gasket. When disassembling the valve mechanism, place a stop (a wooden block) under the plate of the valve being desiccated. We dry out the valve of the VAZ 2112 (see Replacing oil caps for valves of VAZ 2112 engines) and remove it from the guide sleeve of the block head. Using a 13mm wrench, unscrew the two nuts securing the exhaust pipe. Remove the pipe... ...and its gasket. We assemble and install the cylinder head in the reverse order. Lubricate the VAZ 2111 valve stems and guide bushings with engine oil. Before installation, we clean the surfaces of the VAZ 2110 cylinder block and head from the remains of the old gasket, dirt and oil. We remove oil and coolant from the threaded mounting holes of the block. We install the new head gasket and the cylinder head itself for the Lada 2110 using two centering bushings. We install the mounting bolts and tighten them in four steps according to the diagram (see Fig. “The order of tightening the cylinder head bolts”): first step – tighten the bolts with a torque of 20 N•m (2 kgf•m) second step – tighten the bolts with a torque of 69.4 –85.7 N•m (7.1–8.7 kgf•m) third step – turning the bolts by 90°; The fourth step is to turn the bolts 90°. The cylinder head bolts can only be reinstalled if they have been extended to a length of no more than 135.5 mm. If the length is longer, replace the bolt with a new one.
Drain antifreeze correctly
On a VAZ-2107 car, replacing the cylinder head gasket is relatively quick. However, most of the operation will be draining the old antifreeze. The fact is that the “classic” does not have the familiar drain tap. There is a “traffic jam” here. How to perform this procedure correctly? So, we need a container and a meter of rubber hose with a diameter of at least 1 centimeter. We bring one end of it to the drain plug. With the other side, quickly press the hose against the hole. So the antifreeze will pour into our container. You need to be careful not to spill antifreeze on your hands.
How to change the gasket correctly
To work, you need to place the car in a garage with a pit or drive it onto an overpass. Then make the replacement according to the instructions:
- Remove the negative terminal from the battery so that the voltage in the network disappears.
- Place the transmission lever in neutral until the first cylinder is locked at top dead center. Secure the wheels with bricks or shoes to prevent the machine from rolling during the repair process. Remove the right front wheel after placing a jack under the car.
- Remove the fasteners from the engine compartment splash guard to remove it. Find the cover covering the front camshaft drive; it also needs to be removed.
- Using the generator set fixing screw, turn the crankshaft so that the marks on its pulley coincide with those on the rear cover. The matching marks must also be checked in the clutch housing. To do this, remove the cover from the technological hole.
- Drain the refrigerant from the system, first placing a container under the plug to collect it.
- Relieve pressure in the fuel system.
- Disconnect the intake line of the gas exhaust system from the exhaust manifold.
- Disconnect the intake and exhaust manifolds, throttle body and receiver to remove the cylinder head cover. Loosen the clamp of the pipes supplying air to the throttle. After this, you can remove the throttle assembly with the air intake pipe and the cleaner housing.
- There are several wires to the right of the cylinder head. Disconnect them and remove the fuel rail assembly with other system components.
- Remove the fasteners from the front of the unit cover. Secure the crankshaft from turning, then remove the timing belt.
- Loosen the tension roller and remove it, then remove the spacer washer and remove the camshaft gear.
- Remove the screws from the back of the cover. Disconnect all conductors from the cylinder head exhaust hose by loosening the clamps with a screwdriver.
- Using a hex key, you need to unscrew 10 cylinder head fixing bolts. Do this one by one, unscrewing the outer fasteners halfway first and then the middle fasteners. After this, you can unscrew them all the way.
- Remove the cylinder head along with the gasket, and then carefully clean it and the seat from dirt and engine oil residues. After this, this component is replaced.
Now all you have to do is install a new gasket in place of the old one, placing the hole with a copper edging between the 3rd and 4th cylinders. Before reinstalling the head, check that all valves in the first cylinder are closed. It is important to tighten the head screws correctly using a torque wrench with a final torque of 69.4-85.7 Nm. Carry out the rest of the assembly in reverse order.
What's next?
How to further replace the cylinder head gasket of a VAZ-2107? The next step is to remove the valve cover. It is secured with 8 bolts. It is important not to lose the pressure washers - they will be useful to us during assembly. The next step requires removing the timing element, namely the chain drive and gear. To do this, loosen the tensioner and use a wrench to release the locknut. The chain should now loosen. Now let's disassemble the gear.
We recommend: Do-it-yourself repair and maintenance of Hyundai Solaris
It is attached to the camshaft on a lock washer. Using a screwdriver and hammer, bend the stopper and unscrew the element outward. By the way, the chain does not have to be completely removed. The main thing is that it does not fall down. To do this, it is tied with a handy tool (for example, wire).
How to replace the cylinder head gasket next? The VAZ-2107 continues to stand still, and we move on to dismantling the camshaft. To do this, unscrew the 9 mounting bolts. Then we disconnect the exhaust pipe that goes to the exhaust manifold. It is installed on 4 brass nuts. If your pipe is screwed onto ordinary steel pipes, there is a risk of tearing off the pin. Be extremely careful. If there is rust or dirty deposits, use universal lubricant VD-40.
Step by step guide
VAZ 2107 cylinder head in the engine compartment
Many problems can be solved after tightening the bolts, but if this does not help, then a major overhaul of this unit may be necessary, which involves removing not only the cylinder head, but also other parts of the block. Some parts may need to be replaced, such as gaskets, valve stem seals and valve guides.
Tools
To work we will need the following tools:
- a set of keys;
- micrometer;micrometer
- flushing liquid;
- pliers;
- hammer;
- mandrels for removing and installing valves and caps;
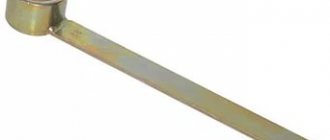
- torque wrench;torque wrench
- tiles (preferably the spiral is closed);
- desiccant.Valve desiccant
Before starting repair work on the cylinder head, it must first be removed and cleaned of dirt.
Stages
Preparatory work and head removal
- The first step is to drain the coolant from the engine.
- We remove the carburetor.
- Having disconnected the pipes and hoses, remove the air barrier. Disconnect the hoses and pipes
- Remove the head cover.
- We align the marks on the crankshaft pulley with the mark on the camshaft drive and the marks on the camshaft pulley with the mark on its body as shown in the photo. Aligning the marks
- By disconnecting the camshaft lock washer, loosen the chain tension.
- Having torn off the bolt, remove the sprocket.
- Unscrew the fastenings.
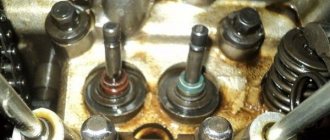
- We remove the camshaft with the housing. Camshaft
- Having previously made marks using a marker, remove the rockers. Removing the rockers
- Disconnect the wires.
- We remove the pipe and unscrew the bolts securing the cylinder head to the block.
- We remove the head.
- We inspect its condition and clean it of dirt. Inspection of the condition of the head
This video shows the process of removing the cylinder head.
Checking status
Now it's time to dry out the valves. This is done with a special device. If chips, cracks, and rust are not visible, we conduct a further inspection. We evaluate the condition of the saddles, the repair of which is recommended every two hundred thousand kilometers.
Changing guide bushings
We inspect the guide bushings; if they are in unsatisfactory condition, they must be replaced.
A special tool is used to remove them. If you don’t have this on hand, you can get by with pliers and a clamp. After removing the bushings, we measure their diameter. We buy similar ones, the size of which is 0.05-0.07 millimeters larger than the ones being replaced.
The guides are pressed in using a mandrel, an electric stove, a hammer and lubricant.
- We place the head on a stand at the edges.
- We place the electrical device under the place of work.
- We wait until the metal heats up to about one hundred degrees (so that it expands).
- Now you need to properly lubricate the bushing with grease.
- Having removed it from the holders, we drive in new guides.
- When all eight are replaced, we wait for the cylinder head to cool down.
- The valves should not dangle and move freely, there should not be any jamming.
Checking the tightness of the head
Leak test
To ensure a tight fit of the valves to the seats, you must do the following. Using lapping paste, lubricate the valve and insert it into the head. There are several techniques for rotating it, here are some of them:
- using a hose tightly placed on the part;
- using a device very similar to a corkscrew.
The main sign of good valve lapping will be a specific matte surface of the seat in the place where it contacts the part.
The tightness of the head can be checked by pouring kerosene into the collectors; you can also use gasoline. If done correctly, there should be no leaks for the first five to seven minutes.
Attention! All engine parts must be washed with a special solution, this will ensure long-term and uninterrupted operation of the power plant for a long time.
When assembling the head, be sure to pay attention to the correct tightening of the bolts. It must be carried out strictly according to the scheme. In case of incorrect broaching, distortions may appear and, as a result, all your previous work will be crossed out. If you have any questions, watch the video.
You are repairing the cylinder head on your car
Survey
- On one's own
- At the service station
- No problems yet
Loading …
What to consider when choosing a new product
In order for the gasket to perform its functions, it must be resistant to elevated temperatures and have the ability to compress. These properties depend on the material of manufacture. There are several options for making gaskets: from asbestos, paronite, metal and their combinations.
Combined options, layers of which are made of different materials, combine several properties. Gaskets made of asbestos and metal alloys have increased resistance to high temperatures, but do not strengthen the seal between the head and the cylinder block. Products made of paronite and rubber provide high-quality sealing, but their limit for high temperatures is lower. When choosing a gasket, preference should be given to products of a combined type.
In order not to make a mistake when choosing a seal, it is necessary to take into account the characteristics of the power unit that is installed on the car. The VAZ 2107 can be equipped with one of three types of engines. They differ in cylinder diameter. The power unit 2103 has a diameter of 76 mm, while the 2105 and 2106 have a diameter of 79 mm. If you install a gasket of the wrong diameter, the edges of the seal will be damaged. Naturally, the seal will be broken.
When is it necessary to replace the cylinder head seal?
When a gasket burns out, the damage is significant: integrity is lost, the part loses its shape. In the event of a breakdown, the damage is minor, sometimes even invisible to the naked eye.
The gasket becomes unusable for the following reasons:
- overheat;
- During installation, fasteners are tightened with a deviation from the tightening torque standards;
- poor quality refrigerant;
- engine malfunctions;
- defective, low-quality product.
The power unit overheats due to malfunctions of the cooling system elements: radiator, fan, etc. To burn out the gasket, it is enough to drive literally 500 meters. When installing the cylinder head seal, it is important to observe the order of tightening the fasteners and the torque to which they are tightened. If these rules are violated, the seal will be deformed and will subsequently be broken. Poor quality coolant can cause corrosion, causing damage to the seal material and even the cylinder head.
A damaged cylinder head gasket can be identified by the following signs:
- interruptions in the operation of the power unit;
- leaks of working fluids from under the cylinder head;
- rapid heating and overheating of the motor;
- traces of coolant in lubricants;
- steam in exhaust gases;
- condensation on spark plugs;
- increased pressure in the cooling system, smoke appears in the expansion tank.
Symptoms vary depending on where the gasket is damaged. If the edges of the cylinder bores are damaged, the engine may overheat and the pressure in the cooling system may increase.
If the coolant gets into the combustion chambers, the engine will start to stall, since it will be diluted with refrigerant in the fuel assembly and will not be able to burn completely. White smoke with a specific odor will come out of the exhaust pipe.
If there is damage on the edge of the seal, leaks of working fluids may occur at the point of contact between the cylinder block and the head.
Signs of a burned out cylinder head gasket.
If signs of seal burnout appear, you need to take a comprehensive approach to diagnosis. Before you start replacing the seal, you need to make sure that this is the reason. To do this, you need to perform the following series of actions:
- Having discovered fluid leaks on the cylinder block, you need to make sure that it is flowing exactly from under the head.
- We start the engine and analyze the color and smell of the exhaust. If they look like white smoke or smell like antifreeze, turn off the engine and carefully unscrew the cap from the expansion tank. The presence of exhaust gases in the cooling system is indicated by the smell of burnt fuel.
- We start the engine without a cap on the expansion tank; there should be no traces of oil or gas bubbles inside it.
- We turn off the engine and let it cool. We take out the dipstick to measure the oil level and look at its color. If its level has risen too much for no particular reason or there are traces of white-brown liquid, this indicates a mixture of oil and refrigerant.
- Let the power unit run for 5 minutes and turn it off. We take out the spark plugs and inspect the electrodes. If they are wet, then there is a high probability that coolant has entered the cylinders.
Lada 2107 MORAY › Logbook › Replacing the cylinder head gasket
The recording describes the “harbingers” of the upcoming repair, let me briefly remind you that white smoke (or rather steam) began to constantly come out of the exhaust pipe when the engine was running, which should not be in such quantities on a warm engine, antifreeze was being squeezed into the expansion tank, and there was a smell from the radiator exhaust and the antifreeze bubbled inside, as a result, due to the air in the radiator, the antifreeze did not circulate through the system and the car became very hot. All this pointed to a breakdown in the cylinder head gasket. Having driven the car into the garage, I began to slowly disassemble it. First, of course, I let the engine cool, after which I removed the crankcase protection, gearbox and hood splash guard, and drained the antifreeze from the engine block. Disassembly began with dismantling the air filter, the entire box, and subsequent dismantling of the throttle assembly and intake receiver. I didn’t photograph everything, so there are no photos of some of the components, but in principle everything is done sequentially.
I disconnected the terminals of three sensors near the throttle assembly. It is impossible to confuse them, since they are all different from each other.
The fuel line fittings, the pressure regulator tube from the receiver, the throttle heating tubes, and the vacuum booster hose were disconnected.
Having loosened 5 nuts, the receiver along with the throttle assembly was removed. The valve cover and fuel rail and injectors were also freed. To avoid getting tangled up in the fuel injector wires, I disconnected them from the intake tract along with the fuel line and pressure regulator (a pair of internal hex bolts). They are removed by applying significant force to them. The valve cover was dismantled and the camshaft with sprocket was immediately removed. I tied the chain to one of the pipes so that it would not fall into the block.
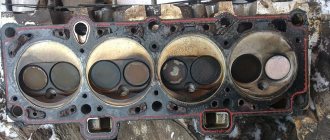
I did not find any carbon deposits or deposits on the surface of the cylinder head, rockers or camshaft.
Afterwards, problems arose with dismantling the cylinder head; 10 of the 11 bolts became tightly stuck. In this engine, to my father’s surprise, the bolts were with a 12 wrench head, while on my father’s old seven they were with a 19 wrench head (my father tore apart his seven twice without breaking a single bolt). Due to the small size of the bolt heads, it was difficult to remove the bolts. They didn’t know that they could first hit the bolt head hard from above in order to “knock it down” a little, so they “torn” them just like that. After about 20 minutes, 8 bolts were still torn out of place, but a couple of bolts were still turned, breaking a couple of heads. Since it was already evening, and all the tool stores in the city were closed, we left the whole matter until the next day. Afterwards, a dozen more heads were purchased from 12 different manufacturers; a couple of old heads and several stronger knobs were taken from the blacksmith. Already in the garage they again began to try to tear off the remaining couple of bolts. One was torn out of place with a new head, but the last one was completely “rounded”. It was pointless to sharpen it for a head of at least 11, since there was no room for this near the valves. We tried welding the head and then a large nut directly onto the head of the bolt, but nothing helped - the weld came off along with the nut. Afterwards, someone told my father that these bolts were made of some kind of high-carbon steel and there was no point in cooking them. Since all this action took place the day before my exam, my father sent me home to prepare, and he took up the drill, since this was the last thing he could think of. About 20 minutes later he came home with a drilled bolt.
Therefore, if someone encounters such a problem, don’t waste time, immediately drill a bolt in the damn thing, don’t waste time and money like we did, you won’t be able to “take it” anyway. About 600 rubles were spent on the heads, and two days to unscrew just one bolt.
After passing the exam, we bought cylinder head gaskets (for a cylinder diameter of 79 mm), a valve cover and an exhaust exhaust pipe (“pants”) +, just in case, a couple of nuts for the “pants” for a total cost of 295 rubles. .
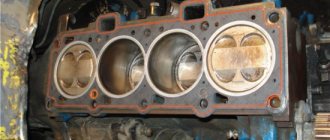
The cylinder head was dismantled. The fourth piston (on the left - already cleaned) had a black greasy coating, as well as the intake and exhaust valves on the cylinder head. The remains of the old gasket were cleaned off the block, I cleaned it with fine sandpaper until it was shiny, and I pulled out everything that got into the 2nd and 3rd cylinders with a vacuum cleaner.
This is what the valves of the 4th cylinder (on the right) looked like - a black, greasy coating, just like on the piston, which once again confirmed that antifreeze had entered the cylinder.
The base of the cylinder head was also cleared of the old gasket, and the spark plugs were unscrewed.
The spark plugs did not travel that much, but it is clear that they are clean, only the spark plug of the 4th cylinder was slightly different from the others for obvious reasons. I cleaned all the spark plugs with a soft wire brush.
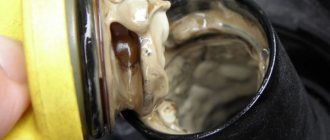
On the old gasket, a hole was found in the ring of the 4th cylinder (rust in the photo) and a small channel that connected the cooling system with the cylinder - in fact, the problem itself.
The next day I started assembling the engine. A new gasket was installed and centered with a pair of bushings at the corners of the block and the cylinder head was installed. My father tightened it with a torque wrench during entry - at first it was just a slight pull, then with a torque of about 4 kgf*m, the final torque was 11.5 kgf*m - the maximum possible for the wrench. The camshaft and sprocket with chain are installed.
IMPORTANT! Don't forget to bend the lock washer. I forgot, so I had to remove the valve cover again. Fortunately, I didn’t have time to install everything else and remembered after it was pulled through. My father adjusted the valves using a 0.15 mm feeler gauge.
Next, I hung the starter shield and “pants” on the manifold, installing a new gasket. I immediately secured the clamp holding the pipe under the car. I secured the collector, again not forgetting to lock the nuts. By the way, I was pleased that when removing these nuts unscrewed very easily; I was expecting a terribly stuck piece of iron. Later I found out that the nuts are made of brass, just so that they don’t stick - AvtoVAZ was surprised).
Next comes the fuel rail and the interior heater pipes. To put the fuel injectors in place, I had to try, since they go into place with considerable effort, the ramp is attached with 2 bolts and a chip is connected to the injectors (again, no photo, but there is nothing complicated there).
Don't forget to tighten the clamps on this pipe. I put on the pipe, but didn’t tighten the clamp, so I subsequently flooded the engine shield a little.
We connect the pipes of the cylinder head, radiator and thermostat.
Before installing the receiver, I removed the throttle assembly from it to clean it a little, as it was a little oily. Inside the receiver I found this piece of plastic tube that was just lying inside. As I later read on the Internet, this is an aerodynamic pipe, which supposedly should evenly distribute the air flow throughout the receiver, in particular to the distant channels of the receiver. But there is no sense in it as such; rather, it even gets in the way, since it is not secured in any way and stands immediately after the throttle in the receiver hole, and most likely for most owners it simply lies in the channels of the 1st and 2nd cylinders. Naturally, I threw out this pipe. I didn’t notice any difference in the operation of the engine; the car works exactly the same as with it.
The inside of the receiver is a little dirty, covered in oil, but somehow it was not possible to wash it.
To tighten the cylinder head and camshaft, a torque wrench, series 690111, was used.
After installing the receiver with the throttle assembly, I connected all the pipes, installed the air filter, put the gas pedal cable over the throttle, installed the battery and washer reservoir. The first launch was carried out without installing the engine protection, which was a mistake - I did not reach under the car and did not remember that I had left the ratchet key on the crankshaft pulley. As a result, a strong metal shock at the moment of start-up. I got scared and thought I had assembled something wrong. Then my father asked if I had removed the ratchet from the shaft. I found the key in a hole, bent into an arc) I immediately examined everything, it didn’t seem to have dented anything, it didn’t break through, and the crankshaft pulley didn’t unscrew. The subsequent start-up was accompanied by a large amount of smoke and steam; most likely, all the liquids that got on the engine, “pants” and gearbox burned out and evaporated; perhaps condensation just formed. The gasket between the manifold and the “pants” was smoking very heavily, apparently burning, but after a while it stopped. I drove out of the garage up the mountain to expel a possible air lock in the cooling system, and for several minutes the car ran with its face up. Then my father and I drove to the gas station to check how everything worked. It was slightly frosty outside, so we had to warm up the car for a long time for the fan to work, in order to make sure that the thermostat and sensors were working correctly - all functions worked correctly. The antifreeze no longer pressed into the expansion tank, the exhaust became “cleaner”, almost imperceptible - it immediately dissipated. At this point, the repair of the car was considered completed. It took 4 days to repair it yourself, but if that bolt had been drilled out right away, it could have easily been completed in 2 days of leisurely work. All that was left was to clean up the garage and go home, since the time was already approaching 10 o’clock in the evening. These are the troubles that happened to my car these days. Naturally, I was pleased with the success of independently repairing my own car, of course, under the guidance of my father, but nevertheless, this is better than simply taking the car to a service center. I wrote a lot, tried to describe it in more detail. If you have any questions, ask, I will try to answer to the best of my ability and knowledge. Immediately regarding the incidental replacement of valve stem seals, grinding in of valves, Nivov camshaft and other things. There is no money for the Nivoval yet, if you install it, then the injector will need to be sewn, since the difference without firmware will be insignificant (the engine will operate in the same mode as with the original shaft). The valve stem seals are still normal, the oil doesn’t eat or smoke, especially since it’s all factory-made – let it stand, the quality is somewhat higher than that of the spare parts sold.
It will be useful: Replacing the timing belt on lifan solano with your own hands: instructions with video
Let it be for now. Thanks to everyone who was able to read this writing)
Removing the cylinder head
Sequencing:
- Remove the battery. This will provide convenient access to the GBS head and protect against short circuits.
- Remove the air filter.
- Remove the carburetor on the carburetor version of the engine.
- Remove the ignition wires and distributor (if equipped).
- Drain the coolant from the cylinder head by unscrewing the plug. Before draining, you need to wait until the engine has cooled down.
- Loosen the clamps and disconnect the rubber pipes of the cooling system going to the cylinder head.
- Remove the valve cover by unscrewing the 8 nuts and removing them along with the shaped pressure washers.
- Loosen the chain tensioner by unscrewing the fixing nut. For convenience, you can completely dismantle it.
- Using a screwdriver and hammer, bend the edges of the lock washer on the camshaft gear mounting bolt and unscrew the bolt. Remove the gear. Tie the chain removed from the gear with wire so that it does not fall into the engine sump.
- Unscrew the camshaft mounting nuts (10 pieces) and remove it.
- Unscrew the brass nuts securing the exhaust pipe to the exhaust manifold and remove it along with the gasket.
- Using a powerful wrench, unscrew the 10 bolts that tighten the cylinder head and the eleventh bolt installed on the head casting. Remove the head. It is quite heavy, so in order not to scratch the car, it is better to remove it from the block together.
Video about replacing the cylinder head on a VAZ
Replacing the cylinder head gasket VAZ 2109 (21099)
On all carburetor cars of the 2108-09-099 family, replacing the head gasket is quite simple, first remove the cylinder head:
- disconnect the battery terminal (ground wire) and drain the antifreeze;
- remove the air filter housing;
- We pull off the crankcase ventilation hose from the valve cover, having first unscrewed the clamp;
- as on the “Classic”, we disconnect from the carburetor: the gas cable, the choke cable, the gasoline hose from the fuel pump;
- remove all pipes from the cylinder head - vacuum booster, radiator, stove hose;
- unscrew the nuts securing the exhaust pipe; you can get to them from above, from under the hood;
- remove the timing belt cover;
- dismantle the valve cover (2 nuts);
- unscrew the cam gear mounting bolt;
- loosen the tension roller, remove the belt and the gear itself;
- unscrew the bolt securing the iron timing case to the cylinder head;
- we unscrew ten cylinder head bolts, the rest need not be removed (the carburetor, distributor and intake manifold remain in place).
At this point, the removal of the cylinder head is completed, we change the gasket, thoroughly cleaning the surfaces of the cylinder head and block. Labels are set as follows:
- the camshaft marks are aligned along the left edge of the cylinder head (as in the picture);
- The crankshaft marks are aligned on the flywheel (in the gearbox housing window).
After replacing the VAZ 2109 cylinder head gasket, fill in antifreeze and start the engine; as the engine warms up, add coolant to the expansion tank and monitor the engine temperature.
Cases when it is necessary to replace cylinder head gaskets
Replacing the cylinder head gasket of the VAZ-2107 is mandatory in a number of cases:
- If there is damage near the combustion chambers, engine overheating leads to this unpleasant situation. When the cooling system malfunctions, and the driver prefers not to pay attention to the malfunction and puts off repairs, the condition of the cylinder block and its head leaves much to be desired.
- A leak of antifreeze or coolant is noticed - a breakdown is often accompanied by incorrect operation of the ventilation device, thermostat, or a banal leak of substance from the hoses.
- There is an engine oil leak. If traces of oil leakage are noticed on the outside, it means the gasket is not fitting well. Tighten the head bolts, if this does not help, then you will have to replace the cylinder head gasket yourself.
The nuances of replacing the gasket
Replacing the cylinder head gasket of a VAZ-2112 16 valves with your own hands
Some resources advise studying the gasket to find out what kind of damage has occurred on it. This, in fact, is just a waste of time, because the specified element cannot be repaired. Just throw away the old one and install a new one.
It is necessary to stop at the last point. After removing the old sealing element, thoroughly clean the surface underneath it. If necessary, treat with fine sandpaper - only on an ideal, even base does it make sense to install the purchased gasket. The slightest bulge, even with proper tightening, will cause a leak.
Before replacing the head, make sure that all the valves of your VAZ car are in good working order.
Pay special attention to the oil seals - it is better to replace worn ones immediately. If a new type of gasket is used on the machine, then it is mounted on sealant - apply it around the perimeter on both sides
Assembly
Pay attention to such a moment as tightening the cylinder head. A lot will depend on this operation. If you do not apply force, the gasket will burn out and the engine may boil. Therefore, experts recommend using a torque wrench (see figure below).
The bolts are tightened according to a special pattern - from the middle to the edges. The first tightening force is 4.1 kgf per meter. The second one is 11.45. This applies to ten large bolts. What about the little one, 11th? Here the tightening rate is 3.8 kgf/m. If your key is designed for Nm, the first tightening requires a value of 40 units. The second is produced with a force from 95 to 117 Nm. After replacing the cylinder head gasket on a VAZ-2107 car, you need to install the camshaft and split gear back. It is important to adjust the timing drive. Yes, on an 8-valve engine the pistons will not come into contact with the “plates”. However, there will be significant misfires (to the point where the engine simply won’t start). At this point, the replacement of the VAZ-2107 cylinder head gasket has been successfully completed. You can make the first start and check the operation of the motor. Don't forget to pour antifreeze into the system.
Gasket replacement and assembly
If your car had pronounced symptoms of a gasket failure, then you don’t even have to look for its damage; it still won’t be possible to repair it. Immediately buy a new one and put it in place. But you need to clean the entire surface that the gasket is attached to beforehand. There should be no remnants of the old one left. You can even evaluate how smooth the surface of the head and the block itself are. It is quite possible that the cylinder head has an uneven surface, which is why, no matter what gasket is installed, it very quickly begins to leak antifreeze or air.
Before installing the VAZ 2107 cylinder head, it is necessary to check the serviceability of all valves. If there is such a need, replace the seals. This will reduce oil consumption. When everything is complete, place the gasket on the block. Place the head on top. Please note that there are two types of gaskets - old and new. The latter is produced by a very thin layer of sealant around the entire perimeter.
Do not forget to align the gasket so that it is positioned as accurately as possible. There are two guides for this purpose. And the time has come to tighten the cylinder head of the VAZ 2107. First, tighten all the bolts and tighten them by hand until they stop. And then you arm yourself with a torque wrench and, according to the diagram, tighten it. This diagram is shown in the figure. However, it is not difficult to remember it, since everything happens criss-cross.
It is necessary that all bolts are tightened as evenly as possible. To do this, they need to be pulled in two or three passes. During the first, the tightening torque of the VAZ 2107 cylinder head is 4 kgf*m. During the second pass, you need to set the moment to 11.5 kgf*m. The small bolt should be tightened to approximately 3.8. Installation of the camshaft is carried out in almost the same way; its fastenings will need to be tightened crosswise, but the moment here is not so important. The main thing is not to break the thread.
That's it, assemble your VAZ 2107 and try to start it. Just remember to fill the cooling system with water. If the engine is working perfectly and the gasket does not allow air or water to pass through, then you can add antifreeze.
Many drivers are concerned about a fairly common issue, namely replacing the cylinder head gasket of the VAZ 2107. Cars of this model have proven themselves well on our roads and in our operating conditions. But problems associated with the repair and replacement of certain components and systems remain and many have to be solved independently.
The replacement process itself, both with an injector and on an engine with a carburetor on a VAZ 2107, is simple and in order to cope with it, you just need to carefully study the material we offer and watch the video.
Start of work
The very first step is to remove the air filter. Of course, on a carburetor engine it is somewhat easier to remove it. If you have an injector, you will have to tinker with its rubber fasteners. But the essence remains the same - it is necessary to disassemble the fuel system completely to get to the cylinder head. But we will look at the example of not an injection, but a carburetor seven. Still, there are many more classic cars with such a power system.
It is advisable to dismantle the carburetor, since if you remove the head along with it, you can accidentally damage it. On all classic series cars, the carburetor is removed in the same way. This procedure is quite simple, but it will take some time. Now you can unscrew the nut securing the distributor and remove the distributor along with the wires. Getting closer to the engine, all that’s left to do is drain the antifreeze from the system.
And then turn off all the pipes that you see. After this, it will be possible to dismantle the cylinder head cover. It is secured with nuts and shaped washers. Don't lose them during repairs. That's all, the preparation is complete, you can begin the most difficult part - dismantling and installing the cylinder head.
Replacement of cylinder head gasket VAZ 2114(2115)
On VAZ models 2113-14-15, injection 8-valve engines are mainly installed, so replacing the cylinder head gasket of a VAZ 2114 (2115) is slightly different from replacing the cylinder head gasket on a “nine”.
Unlike 2109 on the “fourteenth” and “fifteenth” models:
- the air filter housing is removed differently, and along with it you also need to disconnect the injector corrugation (pipe) and the plug from the air flow sensor;
- otherwise the fuel hoses are disconnected;
- there is no distributor on the engine, but the pipe goes behind the cylinder head;
- it will be necessary to remove the high-voltage wires, and it is better to remember their installation order (sometimes they are not numbered);
Otherwise, there are no fundamental differences in replacing the cylinder head gasket 2114 from 2109.
Which cylinder head gasket is the best?
The sealing gasket serves to strengthen the engine cooling channels and well preserves the oil channels in the cylinders that have the gas distribution function. Therefore, it is not worth saving on the cylinder head gasket. If the part is of poor quality, a breakthrough may occur between the cooling system channel and the drainage channels of the lubrication system. There is a breakthrough located at the junction of the cooling system channel and the cylinder.
By the way, the same thing happens when the cylinder head is loosely tightened, but in any case the gasket will have to be changed.
Automotive stores sell the following types of cylinder head gaskets intended for installation in the VAZ-2107:
- Asbestos - involves associated engine repairs. The advantages of the material are heat resistance, increased elasticity, and good elasticity characteristics.
- Non-asbestos products are also easy to use, and all thanks to minimal shrinkage and excellent restorative properties.
- Metal ones are considered the best among all other cylinder head seals. The point is that the pressure is distributed evenly throughout the block.
A video of how to replace the cylinder head gasket of a VAZ-2107 with your own hands can be seen below:
Step-by-step guide to replacing the cylinder head gasket of a VAZ-2107
To replace the cylinder head gasket in a VAZ-2107, you should perform the following manipulations:
- The initial stage involves dismantling the filter that filters the incoming air flows. If the VAZ-2107 is equipped with a carburetor, this is easier to do than performing the same work with an injector. Your task is to unscrew and disassemble all the parts of the entire system; this is the only way to get to the cylinder head.
- Remove the carburetor.
- Unscrew absolutely all pipes that remain visible.
- Get rid of the cylinder head cover by disconnecting the fasteners. Put the nuts and clamps aside, do not lose them, otherwise you will not be able to assemble the mechanism into a single whole.
- Place a container under the hose and carefully drain the remaining coolant in the car.
- Protect your health from electrical current by removing the battery.
- Place the ignition distributor cap aside.
- Pull out the hoses from the carburetor - one responsible for heating, and the second coming from the vacuum format regulator, which distributes the ignition.
- Remove the air collector and remove the throttle linkage.
- With your own hands, remove the sensor that controls the temperature regime from the cylinder head of the VAZ-2107.
- Connect the indicators on the camshaft drive sprocket with the markings located on the camshaft bearing housing. This simple technique will avoid re-installation of the distribution phase at the time of assembly.
- Next, bend the edges of the sprocket fixing washer in different directions and unscrew the bolt. Let the star remain in its place.
- Loosen the tensioner nut half a turn and use a screwdriver to press out the shoe. As the chain loosens, tighten the fasteners again.
- All that remains is to disconnect the bolt holding the sprocket and remove it. To prevent the timing chain from falling, support it with a soft wire.
- Remove the housing base from the bearing located on the camshaft and disconnect the nuts of the VAZ-2107 cylinder head.
- When the head cover comes off easily, position the new gasket.
- Assemble the components into a single whole, following the reverse order of the proposed instructions.
- Correct valve operation.