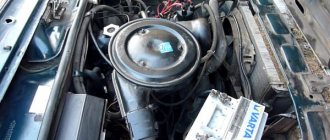
When should you change the cylinder head gasket?
There are four main reasons for replacing the cylinder head gasket of a VAZ 2107 .
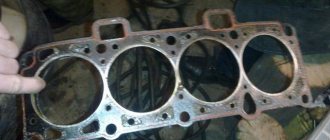
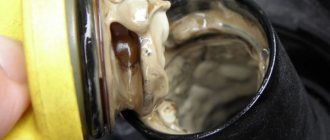
- Breakthrough of the gasket section between the lubrication and cooling channels. When such damage occurs, antifreeze begins to mix with the oil, forming a light brown emulsion, and filling the engine sump. You can detect the problem by checking the oil level by looking at the dipstick. If the oil level rises and it turns cloudy brown, then the problem is that coolant is getting into the oil. In the event of such a breakdown, operating the engine is unacceptable, otherwise it may jam.
- Breakthrough of the gasket section between the cylinder and the cooling system channel. The cause of this damage is improper tightening of the engine head. As a result, gases from the cylinder begin to break through under pressure into the cooling channel, expelling coolant from the expansion tank.
- Burnt gasket between two cylinders. Compression drops and the engine runs unstable.
- Destruction of the perimeter gasket. In this case, antifreeze leaks out. The leaks may bubble a little from escaping gases.
For all four types of damage, the cylinder head gasket must be replaced.
Gasket replacement and assembly
If your car had pronounced symptoms of a gasket failure, then you don’t even have to look for its damage; it still won’t be possible to repair it. Immediately buy a new one and put it in place. But you need to clean the entire surface that the gasket is attached to beforehand. There should be no remnants of the old one left. You can even evaluate how smooth the surface of the head and the block itself are. It is quite possible that the cylinder head has an uneven surface, which is why, no matter what gasket is installed, it very quickly begins to leak antifreeze or air.
Before installing the VAZ 2107 cylinder head, it is necessary to check the serviceability of all valves. If there is such a need, replace the seals. This will reduce oil consumption. When everything is complete, place the gasket on the block. Place the head on top. Please note that there are two types of gaskets - old and new. The latter is produced by a very thin layer of sealant around the entire perimeter.
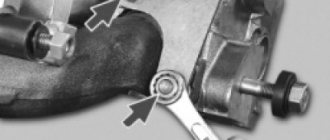
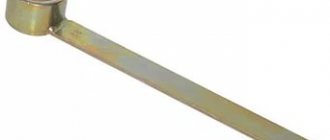
Do not forget to align the gasket so that it is positioned as accurately as possible. There are two guides for this purpose. And the time has come to tighten the cylinder head of the VAZ 2107. First, tighten all the bolts and tighten them by hand until they stop. And then you arm yourself with a torque wrench and, according to the diagram, tighten it. This diagram is shown in the figure. However, it is not difficult to remember it, since everything happens criss-cross.
It is necessary that all bolts are tightened as evenly as possible. To do this, they need to be pulled in two or three passes. During the first, the tightening torque of the VAZ 2107 cylinder head is 4 kgf*m. During the second pass, you need to set the moment to 11.5 kgf*m. The small bolt should be tightened to approximately 3.8. Installation of the camshaft is carried out in almost the same way; its fastenings will need to be tightened crosswise, but the moment here is not so important. The main thing is not to break the thread.
Removing the cylinder head
Sequencing:
- Remove the battery. This will provide convenient access to the GBS head and protect against short circuits.
- Remove the air filter.
- Remove the carburetor on the carburetor version of the engine.
- Remove the ignition wires and distributor (if equipped).
- Drain the coolant from the cylinder head by unscrewing the plug. Before draining, you need to wait until the engine has cooled down.
- Loosen the clamps and disconnect the rubber pipes of the cooling system going to the cylinder head.
- Remove the valve cover by unscrewing the 8 nuts and removing them along with the shaped pressure washers.
- Loosen the chain tensioner by unscrewing the fixing nut. For convenience, you can completely dismantle it.
- Using a screwdriver and hammer, bend the edges of the lock washer on the camshaft gear mounting bolt and unscrew the bolt. Remove the gear. Tie the chain removed from the gear with wire so that it does not fall into the engine sump.
- Unscrew the camshaft mounting nuts (10 pieces) and remove it.
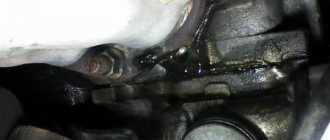
- Unscrew the brass nuts securing the exhaust pipe to the exhaust manifold and remove it along with the gasket.
- Using a powerful wrench, unscrew the 10 bolts that tighten the cylinder head and the eleventh bolt installed on the head casting. Remove the head. It is quite heavy, so in order not to scratch the car, it is better to remove it from the block together.
Video about replacing the cylinder head on a VAZ
Dismantling the unit and preparing for repair
Carrying out work of this kind requires fairly high qualifications and special equipment. Removal of the cylinder head is carried out in the following sequence:
- The car is installed in a garage box, the battery is disconnected.
- The following elements are removed from the engine: air filter housing, carburetor and head cover.
- The upper timing sprocket is unscrewed from the camshaft and removed.
- Using a socket and a powerful wrench, the head mounting bolts are removed.
- After this, the assembly is carefully removed from the cylinder block.
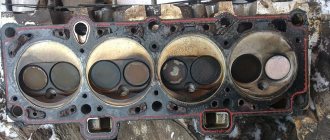
- The gasket, or rather its remains, remains on the surface; they must be removed using a non-metallic tool to avoid damage.
VAZ 2107 engines use gaskets made of fire-resistant composition. After dismantling the head from the cylinder block during the repair process, it is necessary to transfer it to a workbench for inspection and repair. It is necessary to start with a thorough inspection and testing of all components to identify parts with significant deviations from the nominal values. All such parts will require replacement with spare parts.
The VAZ 2107 block head is installed on a wooden stand on the desktop. It plays the role of a fixing valve device during their disassembly. Defective parts are removed and replaced; all sealing gaskets are also subject to renewal. At this stage, preparation for repairs can be considered complete.
Finding the cause of gasket damage
After the VAZ 2107 cylinder head is removed, you should inspect the gasket for damage and try to determine the cause. If the cause is not identified and eliminated, it is possible that the new gasket will soon also burn out.
Burnout of the gasket between the cylinders occurs due to engine overheating, constant detonation of low-quality fuel, or cylinder head deformation due to temperature effects or improper tightening. In this case, you will have to grind or change the head before assembly.
The gasket can be destroyed by rust. This happens if water is used in the cooling system instead of antifreeze. The VAZ engine is not designed for cooling with water, so after installing the gasket and cylinder head, it is necessary to flush the system and fill it with antifreeze.
Another reason for the destruction of the gasket is its poor quality. In this case, it is enough to simply replace the gasket with a good one.
Different bolts and tightening degree of the VAZ-2107 cylinder head. What is the difference
The “classic” was originally equipped from the factory with ordinary M12x120x1.25 bolts for a 19mm head. Their original catalog number was 2101-1003271 or 21213-1003271. The second number suggests that such bolts were also used on the VAZ-21213 Niva, which is why they are also called “Niva bolts”. Another colloquial name is “penny”. But most often they are simply identified as “cylinder head bolts for an old-style classic.”
On VAZ-2108 and VAZ-2109 cars, torsion bolts of a new type began to be used, which are also suitable for the “classics” - M12x115x1.25. They were unscrewed and tightened with a 12mm hexagon. It is noteworthy that AvtoVAZ’s catalog number remained the same, 21213-1003271. And it is the bolts of the new type that are sold in the original packaging. Their difference is that they “stretch” - and if correctly, they undergo elastic deformation. Actually, this is why you need to turn it twice by 90 degrees.
Old style cylinder head bolt
New sample cylinder head torsion bolt
Pay attention to the length of these bolts, encoded in the markings. 5mm difference with regular bolts. It is by these 5 millimeters that the bolt is deformed, completely filling the internal thread.
What is the difference between these bolts, other than the first ones are not sold in the original packaging and different bolts require different torque patterns? Classic bolts can be used many times if their condition allows it. But on the other hand, you need to remember to do preventive tightening of the cylinder head bolts . About once a year , or more often, you will have to check the tightening torque of all the head bolts of your VAZ-2107 and tighten them if necessary.
The new type bolts do not require such a procedure, because due to elastic deformation they provide constant pressure on the cylinder head cover . But such bolts are disposable . When disassembling the cylinder head, you will have to buy a set of new ones. And unscrewing such bolts can be complicated by the fact that bolts tightened without a torque wrench can break .
Judging by the reviews of car owners, very often they can be unscrewed only by welding the nuts to 19. Therefore, many try to find old-style bolts, which are less troublesome.
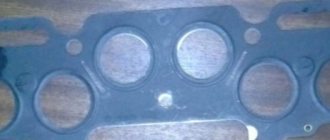
Installing the cylinder head gasket
Before installing the gasket and cylinder head, it is necessary to thoroughly clean the contact areas of the block and head from dirt and remnants of the old gasket. If this is not done, channels may form in places of contamination through which exhaust gases, oil or antifreeze will leak. It is also worth carefully inspecting the cylinder head. If it needs repair or replacement, this should be done before installing it on the vehicle.
Installation begins by laying a new gasket and centering it using a pair of guides. The head should be installed on top.
Rest
For other threaded connections, the tightening torques are as follows:
- M6 - 10 Nm;
- M8 - 25 Nm;
- M10 - 50 Nm;
- M12 - 105 Nm;
- M14 - 180 Nm.
Let us remind you that we previously published a collection of technological instructions for Lada Vesta. With it you can repair your car yourself.
Keywords: Lada Vesta engine | Lada Vesta clutch | gearbox Lada Vesta | front suspension of Lada Vesta | rear suspension of Lada Vesta | steering mechanism Lada Vesta | Lada Vesta brakes
5
Found an error? Select it and press Ctrl+Enter..
- Coronavirus has an impact on AvtoVAZ, new details
- How to remove and disassemble the rear view mirror on a Lada Vesta
- Pros and cons of Lada Granta Cross
- Comparative test of Lada XRAY Cross, Lada Vesta SW Cross and Chevrolet Niva