Replacing the exhaust manifold and gasket on a VAZ 2114
The exhaust manifold is a unit that is responsible for ride quality, without which comfort is impossible. This is silence and the absence of exhaust smell under the hood, which can be drawn into the cabin through the hole in the cabin filter. Fixing a leak in the exhaust manifold of a VAZ 2114 is a necessary repair. Fortunately, it is not urgent; you can prepare in advance and choose a convenient moment.
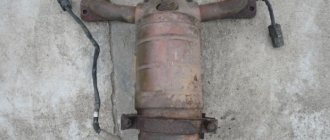
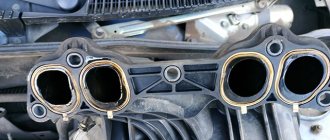
Exhaust manifold for VAZ 2114
When is it necessary to replace and remove the exhaust manifold on a VAZ-2114
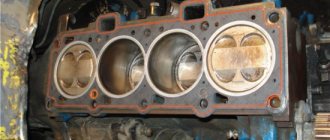
Huge temperature changes are the main problem faced by the exhaust manifold and the gasket, for which it is removed. The collector itself is made of a special grade of cast iron; it can withstand high temperatures (up to 800-900 degrees) , however, these are critical values, after which the collector may warp or crack.
Exhaust manifold VAZ-2114
Its main task is to collect exhaust gases and distribute them into the exhaust pipe of the muffler.
Replacing or dismantling the VAZ-2114 exhaust manifold is necessary in the following cases:
- Mechanical damage to the collector.
- Warping and loss of tightness at the junction with the cylinder head.
- Burnout of the gasket between the head and the manifold.
- The appearance of cracks as a result of engine overheating.
- Replacing the collector with a device of a different configuration, adapted to a more severe operating mode.
In the event that we are not going to participate in high-speed races for the prize of the head of the regional traffic police, replacing or dismantling the collector may be necessary in a number of cases.
Tools and materials for dismantling
There are a number of symptoms that will indicate that you need to prepare to remove the exhaust manifold:
- increased noise level in the engine compartment , the engine produces a characteristic, loud sound in any operating mode;
- breakthrough of exhaust gases into the engine compartment and sometimes into the cabin;
- reduction in engine power due to a mismatch between the exhaust gas outlets in the cylinder head and in the manifold.
Many people decide to replace the standard manifold with a “tuning” one, made of stainless steel and having a different configuration, thereby wanting to increase engine power and reduce the resistance that the standard manifold provides to exhaust gases. As a rule, the most common reason for dismantling a unit is gasket burnout .
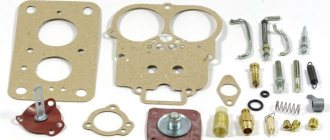
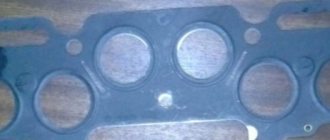
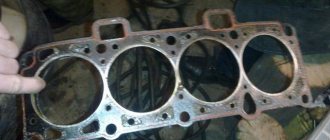
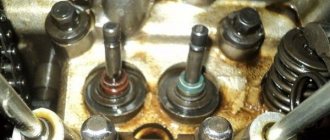
Exhaust manifold gasket
The manifold gasket on the VAZ-2114 is made of pressed reinforced asbestos and is designed to ensure a tight connection between the block head and the manifold flanges. Asbestos is used to correct the coefficient of thermal expansion of the aluminum alloy from which the head is cast and the cast iron from which the manifold is cast. At high speeds and under prolonged loads, the gasket may burn out. Then its replacement and dismantling of the collector are inevitable.
To dismantle the manifold, you will need a standard set of tools, a set of sockets with extensions, and WD-40 penetrating lubricant or its equivalent. In case of broken studs, a stud extractor, drill, drill bits and a set of taps will be useful. A day or two before dismantling the collector, it is worth moistening all the fasteners several times, this will significantly simplify the removal procedure .
How to remove the exhaust manifold
- Video
Many VAZ car owners repair and maintain their vehicles themselves.
One of the most common problems when operating a car in heavy conditions is burnout of the gasket between the exhaust manifold and the cylinder head, clogging of the catalyst, and deposition of combustion products on the walls of the exhaust system. All these problems negatively affect the removal of exhaust gases from the combustion chamber. The removal of gases from the combustion chamber is an important point; their return into the chamber reduces the quality of the fuel-air mixture, which means a decrease in vehicle power will be observed. In addition, if the gasket burns out, burning gases will escape into the engine compartment, which can cause a fire in the engine compartment. The sound during such work will be quite loud and annoying to others. Elimination of all of the above malfunctions will involve disassembling the exhaust gas removal system. How to remove the exhaust manifold and whether it is possible to do this in a garage without contacting a service center is of interest to many VAZ Priora owners who have not encountered such work.
Replacing the exhaust manifold with your own hands will require work to remove additional elements, after which it will be possible to get to the fastening elements of the exhaust system. If the repair work is not related to the burnout of the gasket, then it still needs to be replaced with a new one.
Tools
For work you will need the following tools:
- open-end or socket wrench for 8, 10, 13.
- the head is 13 deep.
- cardan and extension for the head.
- ratchet.
- slotted screwdriver.
- WD liquid.
Removal of the exhaust manifold should be carried out with the engine cool to avoid burns. The car must be placed above the pit so that there is free access to the engine compartment from below. For safe work, remove the battery terminal.
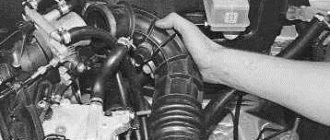
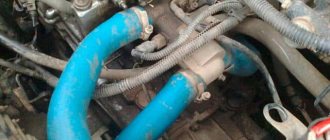
Disconnect the air pipe.
It is more convenient to remove the exhaust manifold from above. To do this, it is necessary to remove the components and parts that prevent free access to it:
- The engine is protected from above by the screen. To remove it, you must first release the clamp of the wire block, which secures them to the canister purge valve. Using a screwdriver, pry up the valve along with the hoses and move it to the side. The oil cap is unscrewed. The protective cover is removed by moving upwards from the clamps.
- Disconnect the air pipe. It can be easily removed after loosening the clamps and disconnecting the crankcase ventilation hose.
- Disconnect the additional muffler pipe from the catalytic collector. This work must be carried out under the car. Use a screwdriver to bend the edges of the plates to gain access to the pipe fastening nuts. Using a 13mm socket with an extension, unscrew the three nuts. The collector thermal shield is removed. The lower nut of the clamp connecting the main and additional muffler pipes is loosened, and the upper one is completely unscrewed. The clamp is completely removed and the additional and main mufflers are separated. Don't forget to remove the rubber seal. The pipe flange of the additional muffler and the sealing gasket are pulled off the studs of the catenary collector.
- Disconnect the ignition module. Use a wrench to unscrew the module mounting nuts. Before removing the module, it is necessary to disconnect the high-voltage wires and wire blocks.
- Disconnect the wire connectors from the oxygen concentration sensor and the control sensor. We press out the antennae of the wire holders for the sensors and disconnect the wires from the heat shield of the steering mechanism.
- Remove the throttle assembly. To do this, you will need plugs to plug the hoses from which coolant may leak. We release the clamps of the throttle position sensor and idle air control. Loosen the clamps on the hoses going to the throttle assembly and remove them. Disconnect the throttle valve drive cable and unscrew the two bolts securing the assembly to the intake manifold studs.
- Remove the intake manifold. To do this, disconnect the wiring harnesses of the ignition coil and injectors. Unscrew the front and rear brackets. Loosen the clamps of the crankcase ventilation system pipes and disconnect the hoses. Unscrew the fastening of the oil indicator guide bracket and remove it. Unscrew the nuts and bolts securing the inlet manifold and remove it.
- Remove the heat-insulating shield of the steering mechanism by first unscrewing the three nuts.
- Remove the exhaust manifold. First, disconnect the bracket for the water pump supply pipe by unscrewing the two fastening nuts. We unscrew the bolts securing the catalytic collector to its mounting bracket. Unscrew the eight nuts securing the manifold to the cylinder head. The collector is removed by pulling it off the studs.
Then you should disconnect the additional muffler from the catalytic collector.
Now oxygen concentration sensors
Removing the exhaust manifold bracket Removing the exhaust manifold Dismantling the exhaust manifold
Read our other articles:
Video
See how the exhaust manifold is removed on a VAZ 2110:
Types of exhaust manifolds
All exhaust manifolds can be divided into solid and tubular. A one-piece exhaust manifold is typically a single piece cast from cast iron. The tubular manifold is made of welded pipes, steel and flanged connections to mate with the engine block.
When is it necessary to replace and remove the exhaust manifold on a VAZ-2114
Huge temperature changes are the main problem faced by the exhaust manifold and the gasket, for which it is removed. The collector itself is made of a special grade of cast iron; it can withstand high temperatures (up to 800-900 degrees) , however, these are critical values, after which the collector may warp or crack.
Exhaust manifold VAZ-2114
Its main task is to collect exhaust gases and distribute them into the exhaust pipe of the muffler.
Replacing or dismantling the VAZ-2114 exhaust manifold is necessary in the following cases:
- Mechanical damage to the collector.
- Warping and loss of tightness at the junction with the cylinder head.
- Burnout of the gasket between the head and the manifold.
- The appearance of cracks as a result of engine overheating.
- Replacing the collector with a device of a different configuration, adapted to a more severe operating mode.
How to remove the exhaust manifold
Typically, manifolds are removed to replace gaskets, as well as when repairing the cylinder head and engine.
We prepare the car for the task
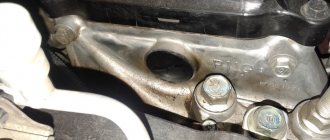
Apply penetrating lubricant, such as WD-40, to the manifold mounting nuts
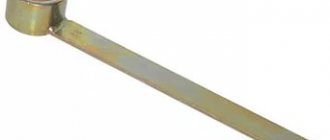
Using two 17mm wrenches, unscrew the locknut of the axle lever
Remove the lever from the roller
Using pliers, remove the cotter pin from the axis of the intermediate lever
Removing the intermediate lever
Using a 12mm wrench, unscrew the axis of the intermediate lever
We remove the axle and cable sheath bracket
Unscrew the nut securing the bracket for the coolant drain valve handle from the cylinder block
Remove the brake booster hose
Unscrew and remove the exhaust pipe from the exhaust manifold
Using a 14mm socket, unscrew the nuts securing the intake manifold and exhaust manifold
Remove the washers from the studs. When assembling, it must be taken into account that the long upper and both lower studs have thicker washers.
Remove the intake manifold and exhaust manifold
Using a 13mm wrench, unscrew the four nuts connecting the manifold and pipeline
Disconnect the manifold and intake pipe, remove the gasket
Using a 10mm wrench, loosen the nut of the damper position indicator flag and check the mobility of the damper
Install the exhaust manifold and intake pipe in reverse order
Before installation, it is advisable to apply graphite lubricant type CV joint-4 to the studs
Replacing the ramp on a VAZ 2110
The ramp is always removed together with the fuel pressure regulator:
- Disconnect the vacuum hose from the regulator.
- When unscrewing the fitting on the fuel supply pipe, use an open-end wrench size 17.
- Remove the ramp voltage connector.
- Also unscrew the screw securing the gasoline supply pipes and then disconnect it.
- Then, using a hexagon, unscrew several screws from the ramp mounting.
- The ramp is removed along the direction axis of the nozzle and removed from its usual place.
- Then the substitute is removed, you need to unscrew the fastening on the left side of the intake manifold and slightly loosen the lower bolt.
- Remove the bracket itself.
- Now you should remove the right bracket in the same way.
- Unscrew several eye nuts from the stud.
I plan to replace the exhaust manifold, because the old one has been cracked for a long time, I don’t want to cook it - half measures.
I'll buy a manifold and a gasket for it. Tell me, who did it, what pitfalls are there when replacing?
Will the old fasteners from the old manifold work? Or do I need to buy additional manifold studs and bolts for attaching the screens?
If possible, point your nose at the photo report, or at least at the forum thread where this is described in detail