I want to say right away that I will not describe in detail all the repair procedures for this device, but I will give the main ones that VAZ 2107 owners quite often have to perform. I’ll start with the necessary tools that will be needed to repair and disassemble the generator on the “classic”:
- Wrench size 19 - the ring one is more convenient
- Socket heads for 8 and 10
- Extension
- Hammer
Now below I will describe in more detail the disassembly procedure, and I will also analyze the dismantling of each part separately.
Complete disassembly into parts
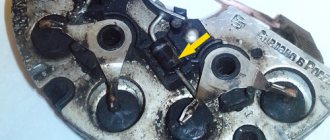
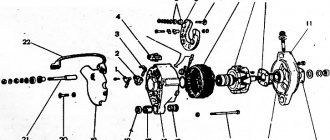
First, unscrew the 4 nuts that are located on the back cover of the device, and in the bottom photo they are very clearly visible:
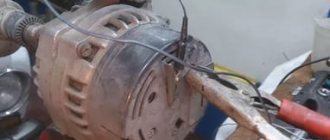
Then we try to unscrew the pulley mounting nut with a 19mm wrench. Usually, it is very tightly tightened and it is quite problematic to do this with the generator removed, unless you clamp it in a vice. But there is a way out of the situation - you can press on the bolts from the reverse side, where we unscrewed the nuts, so that they rest against the impeller blades, thereby fixing it in a stationary state. Next, you can try to unscrew this nut, holding the generator stationary.
Now we take a hammer and, with light tapping, try to separate the generator into two parts, as is clearly demonstrated in the photo below:
As a result, it should look something like this:
As you can see for yourself, there will be a rotor on one part, and a stator (winding) on the other.
Disassembling the VAZ 2107 generator
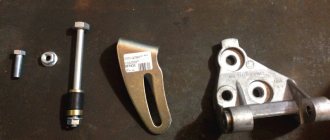
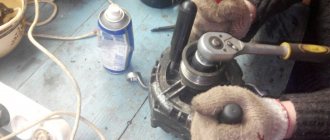
For a comprehensive repair, you need a puller to remove the bearing from the shaft, a mandrel for pressing and knocking out the bearing in the generator cover.
- unscrew the nut securing the pulley and impeller using a socket wrench, holding the rotor with a screwdriver so that it does not turn;
- dismantle the pulley and impeller, remove the key, remove the washers from the shaft;
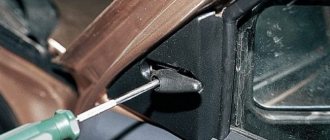
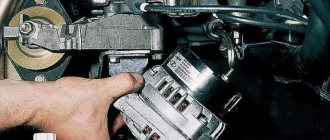
- unscrew the screws securing the voltage regulator relay and remove it, having first disconnected the wire block;
- remove the regulator relay along with the brush assembly;
- unscrew the nuts and remove the bolts securing the generator cover;
- knock down the front cover by hitting the shaft with a rubber hammer (the cover must be rested against a wooden block);
- remove the spacer sleeve from the shaft;
- check the condition of the bearing in the front cover;
Removing and Replacing the Rotor
It is very easy to remove; first we remove the pulley, removing it from the shaft:
Then remove the key:
And now you can easily remove the rotor of the VAZ 2107 generator, since it is easily released from the housing:
Now you can move on.
How to disassemble a generator in a VAZ-2107
To quickly disassemble the VAZ-2107 device you will need the following set of tools:
- open-end or socket wrench designed for 19;
- ratchet equipped with an extension;
- heads size 8 and 10;
- hammer.
You need to disassemble the generator with your own hands, starting with unscrewing the 4 fixing nuts securing the roof located at the rear.
After they are unscrewed, follow these step-by-step instructions:
- Turn the unit over and lightly press the ends of the bolts. Your task is to ensure that the fastener heads penetrate between the pulley blades; this is the only way to secure it in a stationary state.
- Armed with wrench 19, unscrew the pulley fixing nut, securing the VAZ-2107 generator well in a stationary position.
- Next, separate the 2 parts of the device; this is easy to do if you tap the ear of the fastener with a hammer. You should have two parts left in your hands: the rotor and pulley, as well as the stator and winding.
- There is a pulley in the rotor that needs to be removed by pulling it towards you.
- Be vigilant - after removing the pulley, the key is no longer fixed and may get lost, so remove it carefully and set it aside for now.
- Pull out the rotor with bearing. If you need to replace the old rotor with a new one, now is the time to do it. A new device costs 350 rubles in auto stores. If you need to replace the winding and stator, then you will have to pay a little more - 400 rubles.
Removing the winding (stator)
To do this, you need to unscrew the three nuts from the inside with a head, as shown in the picture:
And after this, the stator can be removed without any problems, since it is disconnected from the diode bridge:
If it needs to be replaced and you need to remove it completely, then of course you will need to disconnect the plug with the wiring, which is visible in the top photo.
Disassembling the VAZ 2107 generator
For a comprehensive repair, you need a puller to remove the bearing from the shaft, a mandrel for pressing and knocking out the bearing in the generator cover.
- unscrew the nut securing the pulley and impeller using a socket wrench, holding the rotor with a screwdriver so that it does not turn;
- dismantle the pulley and impeller, remove the key, remove the washers from the shaft;
- unscrew the screws securing the voltage regulator relay and remove it, having first disconnected the wire block;
- remove the regulator relay along with the brush assembly;
- unscrew the nuts and remove the bolts securing the generator cover;
- knock down the front cover by hitting the shaft with a rubber hammer (the cover must be rested against a wooden block);
- remove the spacer sleeve from the shaft;
- check the condition of the bearing in the front cover;
Tip: To check the bearing, you need to rock the inner race of the bearing while holding the cap. If there is play, the bearing must be replaced.
- if necessary, unscrew the bearing mounting nuts;
Attention: if the nuts do not unscrew, you should cut off the ends of the fastening bolts. During assembly, it is necessary to install new bolts and, after tightening the nuts, rivet their ends with a core.
- knock the bearing out of the cover using a drift (mandrel);
- rest the back cover against a pair of wooden blocks and knock out the rotor using a soft metal drift and a hammer;
- check the condition of the rear bearing (similar to the front);
- if necessary, replace the bearing by pulling it from the rotor with a puller;
- unscrew the nuts holding the VAZ 2107 diode bridge and the winding terminals;
- remove the bolts;
- remove the stator winding;
- visually check the condition of the winding;
- if the winding has breaks or has turned black from overheating, replace it;
- remove the generator output nut and insulating washer;
- dismantle the diode bridge;
- remove the capacitor by unscrewing the fastening screw;
- remove the bolt securing the rectifier unit;
- check the rotor and stator windings with a test lamp;
- check the diode bridge of the VAZ 2107 generator for broken diodes.
About replacing the diode bridge (rectifier unit)
Since after removing the winding, the diode bridge is practically free, there is almost nothing to say about replacing it. The only thing you need to do is push the bolts from the inside so that they pop out from the outside:
And the diode bridge has been completely removed and you can replace it:
After carrying out the required repairs to your generator, we reassemble it in the reverse order and do not forget to connect all the winding wires correctly.
Assembling a VAZ 2107 generator
Before assembling the generator, it is necessary to clean the parts from contamination. It is better to wash metal parts with gasoline, and wash windings and other complex parts with air from a compressor.
The new bearing is pressed onto the rotor using a mandrel. You can use a head or tube with a diameter that matches the size of the inner ring of the bearing.
Before installing the rear and front covers, it is necessary to check the condition of the bearing seats. They must not be damaged or scratched.
If there are cracks in the cover, they must be replaced with new ones. Bolts and nuts of poor quality must also be replaced.
The sequence of assembling the generator corresponds to the procedure for disassembling it.
After installing and connecting the generator, it is necessary to tighten the belt with the necessary force. If it is overtightened, the bearings will fail; if it is loose, the generator will slip under load and will not produce the required charging current.
Generator repair
In this manual we will look in detail at the VAZ 2107 - generator repair. For repairs, you will need a bearing puller, a mandrel for pressing and knocking out bearings in the generator cover. So let's get started:
- Using a socket wrench, unscrew the nut securing the pulley and impeller, and use a screwdriver to hold the rotor from turning;
Unscrew the impeller fastening nut
- We pull the pulley off the shaft, then the fan impeller, take out the key, take out the spacer washers;
We remove the pulley, impeller and spacers
- We unhook the voltage regulator relay, first unscrew the fastening screws, and disconnect the wire block;
Unscrew the screws securing the relay
- We take out the voltage regulator along with the brush assembly from the housing;
We take out the regulator and brushes
- We unscrew the nuts securing the generator cover with a 10-mm socket and a ratchet, and remove the bolts;
Unscrew the nuts securing the cover
- We rest the cover against a block of wood, helping by hitting the shaft with a rubber hammer, knocking down the front cover;
Removing the front cover
- Remove the cover and take out the spacer bushing;
- Check the condition of the front ball bearing. To do this, hold the cover tightly, turn and rock the bearing itself (the inner ring of the ball bearing) with your fingers. If excessive play is detected or the bearing is broken, it should be replaced with a new one;
- To replace a faulty ball bearing, use a size 8 wrench to unscrew the nuts securing it;
Unscrew the nuts to remove the ball bearing
Attention: If the nuts do not unscrew, then it is necessary to cut off the riveted ends of the bolts. During assembly, we install new bolts, tighten their ends, then rivet them with a core.
- We take out the mounting bolts and washers securing the bearing;
We take out the bolts and washers
- We select a suitable mandrel (punch) and knock out the bearing;
- We take two wooden blocks, rest the edges of the back cover against them, and use a drift made of soft metal to knock out the rotor. If the surfaces of the lids are suddenly damaged, treat them with an abrasive wheel;
In what situations is replacement necessary?
Wear of the element is characterized by such manifestations as cracks or tears in the canvas, worn teeth and uneven edges. If you ignore such a deplorable state of a very important element, it will come back to haunt you with overheating and boiling of the engine, independent operation of the battery, which will lead to its rapid discharge.
If the belt is severely worn, it also shows signs of noise to the owner - it begins to whistle, especially at low speeds. The next reason for a whistling belt may be water getting on its surface, which occurs due to worn-out pipes of the cooling system - antifreeze begins to leak.
Some belts - oak ones - whistle when the car starts in frosty weather, and after warming up the sound is lost. A weak tension is expressed by a whistle, but in this case it is quite easy to overtighten.
how to remove the generator
from a
VAZ
of the traditional model range.
More details: 2107
.html Subscribe!
How to check the generator
An initial performance check is carried out if the battery charging indicator light on the dashboard lights up while the engine is running. First check the belt tension. When pressing on the middle part of the belt sag with your thumb with force, the belt displacement should be in the range from 1.0 to 1.5 centimeters. With a larger displacement, the belt may slip and the dynamo will not provide the required charging current. Too much belt tension (less than 0.5 cm) leads to premature wear of the bearings. If the belt is very worn, it should be replaced.
Next, with the engine running, use a multimeter to measure the voltage on the battery. The multimeter probes are connected to the battery terminals. The voltage should be between 13.5 and 14.5 Volts. On a weak battery, the voltage can rise to 15 Volts, but no more. If the voltage is outside these limits, then repair is necessary. Before making this decision, you should check the voltages supplied to the generator terminals.
The terminal to which the thick wire comes is constantly supplied with +12 Volts from the battery. The thin wire connector receives positive voltage when the ignition is on. If the voltages do not correspond to the correct values, you should check its connection diagram.
Removing the generator
The instructions for repair and operation of VAZ 2107 vehicles provide a routine sequence of work on how to remove the generator on a VAZ 2107:
- The car is placed on an overpass or lift;
- Remove the battery;
- Using a socket wrench (preferably with a cardan) 17 (model 3701) or 13 (model 9412.3701) the tensioner nut is unscrewed.
- The engine mud protection is removed;
- The belt is dismantled;
- The wires from terminal 30 are disconnected;
- Using a 19mm spanner, remove the fixing bolt;
- The generator is removed from the bottom of the engine.
It is possible to remove the generator on a VAZ 2107 without a pit or a lift without any problems. To do this, you just have to lay down a bedding and, if desired, jack up the front of the car under the beam so that it is slightly higher, although you can remove the protection this way.
Generator faults
- The generator generates current at a very low voltage.
- The generator has stopped producing electricity.
- The dashboard lamp indicates a generator breakdown.
- The generator generates current above the optimal rate.
- Extraneous noise arose when the generator was operating.
Before you begin repairing the generator, check the condition of the generator drive belt for wear and belt tension (the check is carried out by pressing on it, the belt should not bend more than 2 mm). If the belt is not very worn, the tension can be corrected by tightening it a little. Check the tension roller of the generator; it should turn easily and not make unnecessary sounds (if the roller does not scroll well and makes unnecessary sounds, it should be replaced). Then you should remove and disassemble the generator to check the technical condition of the generator.
Generator diagnostics
In the future, you will need the following measuring instruments to check the technical condition of the generator :
- ammeter;
- voltmeter;
- rheostat.
The rotation speed of the generator rotor can tell us a lot, which we can check using the tachometer on the instrument panel. Normal tachometer readings with a working generator should be in the range from 2000 to 5000 rpm.
Causes of generator malfunction and repair, possible causes of generator failure:
If during testing you find that the generator does not produce a charge, this may be due to the following reasons:
- Contacts or fuse are burnt out.
- Damage or wear of the generator brushes.
- Regulator relay malfunction.
- A break in the stator or rotor circuit due to a short circuit in the winding.
Elimination of the above listed generator malfunctions is solved by replacing worn parts.
How to remove and disassemble the generator. Do-it-yourself generator disassembly.
- Remove the brush holder with the voltage regulator, having first unscrewed all the fasteners.
- Remove the tension bolts and the cover with the stator.
- Disconnect the phase windings from the output wires of the rectifier unit, and then remove the cover from the stator.
- Remove the pulley from the generator shaft and the front cover using a puller.
Generator repair
If the generator winding is shorted or the winding is broken, it is necessary to replace the wires with new ones. Usually the winding breaks in close proximity to the slip rings. Pay attention to the ends of the winding to see if any desoldering has occurred. To eliminate this malfunction, it is enough to unwind the turn in the area of the break back from the rotor winding. Remove the broken end of the winding from the slip ring and solder the unwound wire.
If you find that the alternator is generating a weak or excessive charge , this is a sign of a bad alternator relay. The breakdown can be eliminated by replacing the generator relay. If the generator is working properly and the light is blinking, this indicates a breakdown of the light bulb power diode in the indicator. Such a breakdown can be eliminated by replacing the diode in the generator.
Extraneous noises during generator operation indicate wear of the rotor bearing. The generator should be disassembled, the bearing removed, and inspected for defects. If the alternator bearing is worn, replace it.
To assemble the generator, carry out all steps in the reverse order. You can repair the generator yourself, in your garage, the main thing is to follow safety precautions, be careful with electrical appliances, carefully remember the sequence of disassembling the generator, so as not to sit for a long time on its assembly.
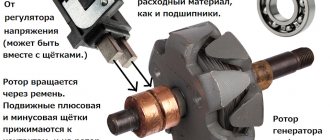
Generator device VAZ 2101, VAZ 2102, VAZ 2104, VAZ 2105, VAZ 2106, VAZ 2107, VAZ 2108, VAZ 2109, VAZ 2110
1 – “negative” brush; 2 – brush holder; 3 – “positive” brush; 4 – neutral wire plug block; 5 – insulating bushings of the contact bolt; 6 – rectifier block; 7 – contact bolt; 8 – stator; 9 – rotor; 10 – inner bearing mounting washer; 11 – drive side cover; 12 – fan assembly with pulley; 13 – outer bearing mounting washer; 14 – front rotor bearing; 15 – spacer ring; 16 – coupling bolt; 17 – clamping sleeve; 18 – cover from the side of the slip rings; 19 – buffer sleeve; 20 – bushing