Exhaust system functions and parts replacement intervals
Despite its apparent simplicity, the exhaust system performs several important functions:
- removal of fuel combustion products;
- reduction of noise level from the exhaust;
- maintaining air balance in intake and exhaust systems;
- ensuring ventilation and cleaning of cylinders;
- reduction of CO content (in the presence of a catalyst).
Exposure to high temperatures, moisture, fuel and oil combustion products leads to through corrosion of exhaust system parts. This is aggravated by the external influence of gravel, sand and salt solutions that are used to treat roads in winter. Therefore, parts of the system have to be changed. The frequency of replacement depends on the following factors:
- car use activity;
- frequency of machine operation in bad weather (rain, snow);
- fuel quality;
- quality of exhaust system parts.
Tip: You can extend the life of the exhaust system by treating the installed parts with graphite lubricant. All that remains is to start the engine and warm up the exhaust system. The parts will heat up and the lubricant will burn out, leaving a thin layer of film that reliably protects against corrosion. Another option is to purchase an aluminum, rather than steel, resonator, muffler and “pants” of the VAZ 2107. They will cost more, but aluminum is less susceptible to corrosion and will last much longer.
Overhaul of VAZ 2107
In some cases, major repairs of the VAZ 2107 power unit can be partially carried out without dismantling it. Before starting work, thoroughly rinse the engine and engine compartment with running water and dry. Without removing the motor you can replace:
- crankcase seal;
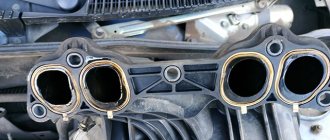
- cuffs of both collectors;
- crankshaft oil seals;
- pump;
- generator;
- gasoline pump;
- carburetor.
The cylinder head is also easily removed from the engine without dismantling.
A major overhaul involves the restoration of engine elements, as a result of which the technical parameters will correspond to the parameters of the new engine. For this:
- the entire piston group is changed;
- cylinders are bored;
- the crankshaft is ground;
- liners are changed.
I remember how I got into the first major engine overhaul due to my own stupidity. I went out onto the field. There was a ravine ahead, so I drove in my “seven”. I couldn’t go further up the hill, and I couldn’t go back either. Basically, the car is stuck and skidding. Then an acquaintance came up, he was collecting something there - flowers or plants of some kind. He says: “You’re doing it wrong, you need to give it back, and then sharply forward. Let me sit down, and you push me when he moves forward.” Well, I agreed like a fool. The car skidded for about half an hour, no use. I called a tractor, which I wanted to do before. They pulled out the car. I sat down and drove back home. A few meters later the check flashed. It turns out, as I later found out, all the oil leaked while the car was slipping. It’s good that the tractor didn’t go far. I had to take the car for a major overhaul, replacing the piston and boring the shaft.
The need for major repairs is determined by the condition of the cylinder block and piston group. If most of the elements are well preserved, you can limit yourself to replacing individual parts. If even slight block wear is detected, cylinder honing will be required.
Sometimes VAZ 2107 owners buy a repair kit, which includes a reground crankshaft and a piston set. It is also recommended to purchase an incomplete cylinder block for major repairs. Since in this case the gaps are not misaligned, replacing the block will be quite simple. However, most often you have to buy a complete cylinder block, including an oil pump, pan, cylinder head, bell-shaped couplings, etc.
It is recommended to disassemble the internal combustion engine on a professional stand, after first removing the flywheel and clutch assembly. If there is no such stand, the dismantled engine is firmly fixed and only then its repair begins.
Typically, a major overhaul of a VAZ-2107 engine involves:
- disassembling the cylinder head, followed by cleaning and checking;
- inspection of rocker arms and valves;
- valve repair or grinding;
- dismantling pistons and connecting rods;
- dismantling the crankshaft;
- checking the condition of the cylinder block and cleaning it;
- checking the camshaft;
- inspection of bearings and checking them for play;
- removal and installation of rings;
- checking clearances;
- inspection of seals and their replacement.
Thus, almost any repair of the VAZ-2107 can be carried out independently. To do this, you need to have certain skills and a set of repair tools, as well as follow step-by-step instructions from specialists.
Carburetor repair VAZ 2107
Repairing a carburetor is considered a rather complicated procedure. Any operation requires care and precision. Moreover, to avoid contamination from entering the carburetor, all work must be carried out under virtually sterile conditions.
For self-repair, you will need a repair kit - a factory-prepared set of materials and parts necessary for the work. There are two types of standard repair kit:
- Full. Includes absolutely all possible elements that may be required to replace failed parts. It is usually purchased during major repairs or other serious faults.
- Incomplete. Allows you to carry out only one repair operation (for example, replacing jets).
It is more profitable to buy incomplete repair kits, since you can select only those kits that are really needed.
When repairing a VAZ 2107 carburetor, you will need a standard set of tools and a carburetor cleaner, which can be purchased at any auto store.
Carburetors become dirty quickly. In a relatively short time, jets, channels and other small elements can become clogged with dust and impurities in the fuel. The moving parts of the device wear out quickly during aggressive driving. This primarily concerns sealing gaskets.
Typically, the carburetor repair process consists of disassembling, washing all parts, replacing worn and damaged elements, and reassembling.
Recommendations before repair
Before starting repair work, you should pay attention to the following points.
- Work should be carried out on a cold engine to avoid the possibility of burns.
- You need to make sure that there is little fuel left in the system. Otherwise, most of the gasoline must be drained.
- Repairs must be carried out outside in dry weather or in a well-ventilated area (gasoline fumes can cause nausea and dizziness).
- You should prepare a clean place in advance for disassembling the carburetor and a container for washing it.
Depending on the symptoms of the malfunction, you should pay attention to individual parts and components of the carburetor:
- If the engine idles unsteadily or stalls, then the economizer valve needle is most likely worn out.
- If during disassembly water is found in the cavity, then the carburetor has lost its seal. It is recommended to check all hoses and connections.
- The appearance of a flame under the hood indicates a fuel leak. A thorough inspection of all carburetor elements and a search for gaps or holes will be required.
- If, when independently adjusting the quality and quantity screws, the engine does not react in any way to the turns of the screws, you should remove them and check whether the threads are broken.
- If the carburetor starts to “shoot”, you need to check all wires and terminals for short circuits.
Removing the carburetor
Any repair begins with removing the carburetor mechanism from the car. Dismantling the device is carried out strictly according to the following scheme:
- Disconnect power from the battery.
- Remove the air filter housing (it prevents access to the carburetor).
- Disconnect all fuel and air supply hoses from the carburetor.
- Unscrew the bolts securing the carburetor to the body. If the bolts do not come out, you can apply WD-40 water repellent to them.
- Place the removed carburetor on a flat surface and clean it of dirt and gasoline stains.
Video: how to quickly remove a carburetor from a car
The procedure for repairing a VAZ 2107 carburetor
To repair a particular carburetor component, you will need to disassemble the entire device, thoroughly wash all parts, dry them, inspect them and decide on replacement or adjustment. First, place the removed carburetor on a clean, level surface. Next you need to perform the steps in the following order.
- Remove the return spring.
- Using a Phillips screwdriver, remove the screw securing the three-arm lever.
At this point, disassembling the carburetor is considered complete. Metal parts are washed from carbon deposits and dirt with acetone or a special liquid for cleaning carburetors and dried with a stream of compressed air. Gaskets and other rubber elements are replaced with new ones.
All components will need to be checked for integrity - there should be no visible signs of wear or mechanical damage . Installation of new parts is carried out in the reverse order of disassembly. In any case, the following must be replaced:
- accelerator pump diaphragms;
- return springs;
- fuel valve mechanism;
- all rubber seals;
- most paronite gaskets.
Video: DIY carburetor repair
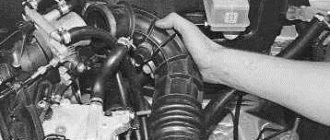
Tips for replacing the intake manifold
Also, do not neglect the procedures for repairing and cleaning the intake manifold. The stability of the VK is very important for the normal functioning of the car. A certain vacuum is formed in the intake manifold, which is the source of drive force for many systems: cruise control, windshield wipers, vacuum brake booster. In the event of a collector malfunction, this threatens the failure of one or more of the above systems.
To avoid the appearance of cracks and distortions, you must use a torque wrench to tighten the nuts on the manifold and follow the tightening order of 20.9-25.8 (2.13-2.63) N_m (kgf_m). As a rule, it is recommended to start tightening the nuts from the center and gradually move towards the periphery, alternately tightening the nut on one side or the other.
When installing the receiver, it is necessary to replace the sealing gasket.
To work on removing and replacing the VAZ 2114 intake manifold on an 8-valve engine, we will need:
- keys “for 8”, “for 10”, “for 13”, “for 17”;
- “cardan” type nozzle and socket heads “17”, “19”;
- magnetic screwdriver;
- screwdrivers, pliers;
- new intake manifold.
By the way, the price for an intake manifold from a VAZ (article 21110100801420) will be 1,350 rubles.
The price is indicated for spring 2021 in Moscow and the region.
1
Loosen the clamp and disconnect the crankcase ventilation hose.
2
Drain the coolant. Remove the hose from the cylinder head cover pipe.
3
We remove the air filter housing from the car by disconnecting the mass air flow sensor.
4
Remove the supply hose to the vacuum fuel pressure regulator.
5
Unscrew the two nuts securing the fuel pipe bracket to the receiver and remove the bracket.
6
Disconnect the vacuum booster hose from the receiver.
7
In order not to confuse the connection of the fuel pipes, we mark one of the fuel lines with a marker.
8
Using two 17mm wrenches, unscrew the fuel line fittings.
9
We unscrew the six nuts securing the receiver to the intake manifold and the stud on the receiver, and then remove the receiver itself.
10
Disconnect the wiring harness connector from the crankshaft position sensor.
11
Unscrew the two bolts and remove the fuel rail.
12
We unscrew the seven nuts in front securing the manifold to the thermal shield...
13
... and one at the back.
14
Unscrew the two nuts securing the thrust rods, first on the left side...
15
...then on the right side.
16
To avoid losing the washers from the manifold studs, remove them using a magnetic screwdriver.
17
Let's remove the intake manifold and replace it with a new one. We assemble everything in reverse order.
Replacing the gasket of the intake pipe and exhaust manifold of VAZ-2107-20
For ease of operation, remove the battery from the car.
We remove the windshield washer reservoir from the bracket without disconnecting the wire tips from the electric pump terminals, and the hose from the pump connection.
We move the tank to the side, placing it on the platform under the battery.
Remove the receiver and fuel rail
Using a 13mm wrench, unscrew the bolt securing the front support bracket to the inlet pipe.
Using the same tool, loosen the nut securing the front support bracket to the stud of the right power unit support bracket.
Remove the front support bracket.
Using a 13mm wrench, unscrew the bolt securing the rear support bracket to the intake pipe.
Loosen the top starter mounting bolt.
remove the rear support bracket from the intake pipe.
Disconnect the exhaust pipe from the exhaust manifold.
Using the “13” head, unscrew the nut securing the “mass” wire and the front eye of the power unit.
We remove the tip of the “mass” wire and the eye from the cylinder head stud.
Using a “13” wrench, unscrew the two nuts of the upper fastening of the intake pipe (1) and the two nuts of the common upper fastening of the intake pipe and exhaust manifold (2).
Using a high “13” socket with an extension, unscrew the two nuts of the lower common fastening of the intake pipe and exhaust manifold.
We unscrew the two nuts and the bolt securing the starter shield and remove the shield from the exhaust manifold studs.
Carefully bending it with a screwdriver, remove the coolant drain pipe bracket from the exhaust manifold stud.
Using a high socket “13”, unscrew the nut of the front fastening of the exhaust manifold
Using a 13" socket with a cardan joint, unscrew the nut for the rear fastening of the exhaust manifold
Remove ten washers from the mounting studs.
In the four joints between the intake pipe and the exhaust manifold, thick washers are installed on studs.
Moving the exhaust manifold away from the cylinder head, remove the intake pipe from the cylinder head studs.
Remove the exhaust manifold and the sealing gasket of the intake pipe and exhaust manifold
Holes for the studs for the general fastening of the intake pipe and exhaust manifold
Before installation, we clean the mating surfaces of the cylinder head, intake pipe and exhaust manifold from the remains of the old gasket and carbon deposits.
Having replaced the gasket with a new one, we carry out the installation in the reverse order.
Apply graphite lubricant to the cylinder head studs.
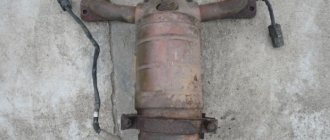
Replacing the VAZ 2107 resonator
The VAZ 2107 resonator does not have fastening parts to the car body, so it is necessary to hold it when replacing it. Otherwise the exhaust pipe will be bent.
The replacement work consists of the following steps:
- tap clamps and pipe connections with a hammer;
- loosen the bolts of the clamps and move the clamps fastening to the “pants” and the muffler;
- disconnect the resonator from the muffler by undocking the pipes;
- disconnect the resonator from the receiving pipe (“pants”);
- install the new resonator in the correct position;
- connect the parts and tighten the fastening clamps.
Note: the resonator tank must be parallel to the ground, otherwise the part will knock on the bottom of the car and cling to uneven road surfaces.
Location of the VAZ 2107 resonator
The exhaust system of carburetor VAZ 2107 consists of three sections:
- double exhaust pipe connected to the exhaust manifold flange;
- resonator;
- main muffler.
A similar system was installed on the first seven with an injector that complied with Euro 0 standards. Later, injection modifications of the VAZ 2107 appeared, produced in accordance with the requirements of Euro 2 and Euro 3, in which the exhaust tract was supplemented with a fourth section - a catalytic converter located between the exhaust and resonator pipes .
VAZ 2107 injection models that meet Euro 2 and Euro 3 environmental requirements were equipped with a catalytic converter
The resonator, connected at the front to the exhaust pipe or catalyst, starts under the gearbox and ends in front of the rear axle beam. The resonator tank is located to the right (in the direction of travel) of the propeller shaft. The connecting pipe coming out of the body is bent upward and docked with the main muffler pipe that goes around the rear axle. The entire structure is supported by the engine exhaust manifold flange, a metal bracket and rubber hangers attached to the bottom of the car.
Step-by-step instructions for replacing manifold gaskets on a VAZ 2107
1. Remove the exhaust manifold and fuel drive. To do this, remove the air filter housing from the studs. Before this, unscrew the 4 nuts securing the carburetor, disassemble the air filter housing, removing it from the studs.
2. After unscrewing the fastening nuts, also remove the exhaust manifold exhaust pipe from the studs.
5. Unscrew the fastening nuts and remove the heat-shielding brush with the starter.
7. It is necessary to unscrew the 2 nuts securing the coolant supply pipe to the pump near the bypass pipe under the manifold. There is a sealing gasket between the pipe and the pump. Remove the nuts with a 10mm wrench.
Sources
- https://avtolyubiteli.com/zamena-prokladok-vpusknogo-i-vyipusknogo-kollektorov-vaz-2107/
- https://carfrance.ru/zamena-prokladki-vpusknogo-kollektora-vaz-2114-inzhektor/
- https://semerkavaz.ru/sistema-pitaniya/zamena-prokladki-vpusknogo-kollektora-vaz-2107/
Replacing the gasket of the intake pipe and exhaust manifold of VAZ-2107-20
For ease of operation, remove the battery from the car.
We remove the windshield washer reservoir from the bracket without disconnecting the wire tips from the electric pump terminals and the hose from the pump connection.
We move the tank to the side, placing it on the platform under the battery.
We remove the receiver (see Removing the receiver) and the fuel rail (see Removing the fuel rail and injectors, checking the injectors).
Using a 13mm wrench, unscrew the bolt securing the front support bracket to the inlet pipe.
Using the same tool, loosen the nut securing the front support bracket to the stud of the right power unit support bracket.
Remove the front support bracket.
Using a 13mm wrench, unscrew the bolt securing the rear support bracket to the intake pipe
Loosen the upper starter mounting bolt and remove the rear support bracket from the intake pipe.
Disconnect the exhaust pipe from the exhaust manifold
Using the “13” head, unscrew the nut securing the “mass” wire and the front eye of the power unit.
Remove the tip of the “mass” wire from the cylinder head stud
Removing the eye
Using a “13” wrench, unscrew the two nuts of the upper fastening of the intake pipe (1) and the two nuts of the common upper fastening of the intake pipe and exhaust manifold (2)
Using a high “13” socket with an extension, unscrew the two nuts of the lower common fastening of the intake pipe and exhaust manifold.
Unscrew the two nuts and bolt securing the starter shield and remove the shield from the exhaust manifold studs
Carefully bending it with a screwdriver, remove the coolant drain pipe bracket from the exhaust manifold stud.
Using a high “13” head, unscrew the nut of the front fastening of the exhaust manifold.
Using a 13mm socket with a cardan joint, unscrew the rear mounting nut of the exhaust manifold.
Remove ten washers from the mounting studs.
Thickened washers are installed on the studs at the four joints between the intake pipe and the exhaust manifold.
Moving the exhaust manifold away from the cylinder head, remove the intake pipe from the cylinder head studs
Removing the exhaust manifold
We remove the sealing gasket of the intake pipe and exhaust manifold
Holes for the studs for the general fastening of the intake pipe and exhaust manifold
Before installation, we clean the mating surfaces of the cylinder head, intake pipe and exhaust manifold from the remains of the old gasket and carbon deposits.
Having replaced the gasket with a new one, we carry out the installation in the reverse order.
Apply graphite lubricant to the cylinder head studs.
Replacing the exhaust pipe (“pants”) of a VAZ 2107
When replacing the exhaust pipe, be sure to replace the gasket between it and the exhaust manifold. It is also better to change the nuts securing the “pants” to the manifold. The procedure is as follows:
- loosen the clamp and disconnect the pants from the resonator;
- unscrew the four nuts securing the exhaust pipe to the manifold;
Important: unscrew the nuts carefully so as not to twist the fastening studs. Otherwise you will have to drill out and replace the studs
- remove the “pants” (exhaust pipe) and gasket;
- install a new gasket;
- install a new exhaust pipe;
- connect the exhaust pipe to the resonator, tighten the fastening clamp;
- tighten the nuts securing the “pants” to the manifold.
If, after installing a new exhaust pipe, the exhaust system sags or hits the bottom, the following options are possible:
- the resonator or exhaust pipe is fixed at the wrong angles;
- engine mounts sagged.
In the first case, it is enough to loosen the clamps and install the parts correctly. In the second case, the engine mounts will have to be replaced.
VESKO-TRANS.RU
For convenience, remove the battery from the car battery.
Remove the windshield washer reservoir from the bracket without disconnecting the ends of the wires from the electric pump terminals and the hose from the pump nozzle.
We move the tank to the side, placing it on a platform under the battery.
Remove the receiver (see Removing the receiver) and the fuel rail (see Removing the fuel rail and injectors, checking the injectors).
Use the “13” key to unscrew the bolt securing the front crossmember to the inlet pipe.
Using the same equipment, unscrew the clamping nut of the front support bracket to the stud of the right block support bracket.
Remove the front bracket.
Use the “13” wrench to unscrew the rear support bracket bolt to the intake pipe.
Unscrew the top trigger bolt.
. Remove the rear support bracket from the intake pipe.
Disconnect the exhaust pipe from the exhaust manifold.
Using a "13" socket, remove the ground wire nut and the front eye of the device.
Remove the wire end from the cylinder head studs.
Using a "13" wrench, unscrew the two mounting nuts (1) of the upper intake pipe, as well as the two common mounting pipes of the upper intake pipe and the exhaust manifold (5).
Lada 2107 Marine › Logbook › Surprises, surprises... (replacing manifold gaskets)
Having completed the plumbing work, I decided to check the condition of the inlet pipe and exhaust manifold. Several reasons prompted me to do this: - engine tripping when warming up; - a gradual drop in engine speed when warming up (rarely - up to a complete stop) and then a spontaneous sharp increase in speed; - steam from the exhaust pipe when warming up (perhaps this is condensation, and I have paranoia :)) - engine shaking when starting - almost unnoticeable when cold and intensifying as it warms up (as with a crooked clutch disc); - excessive heating of the carburetor body; - traces of either oil or coolant with soot on the junction of the intake pipe and the block head.
In general, a number of symptoms could indicate a burnout of the head gasket, but at the same time: - there are no traces of oil in the expansion tank and the antifreeze is clear, like new; - there are no bubbles in the expansion tank either during or after warming up the engine; - there is no emulsion on the MZG cover, on the dipstick; - the oil is simply dark, with no signs of coolant getting into it.
Therefore, I decided to check these gaskets first, buying 2 pieces for 54 rubles. Moreover, the operation as a whole is simple. I unscrewed the starter shield mounting nut and the M6 bolt of the shield from the exhaust manifold studs (it’s inconvenient to turn, especially when putting everything back together). The heater tube was not yet screwed to the water pump and manifold after replacing the pump. I removed the air filter housing, disconnected all the hoses from the intake pipe and carburetor and crawled under the car to unscrew the clamp securing the exhaust pipe to the gearbox bracket. The first surprise awaited me there:
The speedometer drive seal no longer holds
Okay, we'll deal with this problem later...
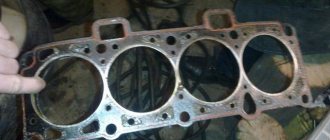
I disconnected the exhaust pipe from the exhaust manifold flange and removed the old gasket. More precisely, there were 2 gaskets there. Apparently, last time I put together an issue this way due to inattention - here’s another surprise
There's nothing wrong with the seal here.
Unscrewing the manifold nuts - 7 pieces - a pair of nuts that were closer to the engine shield moved very easily, almost by hand. First I removed the intake pipe with the carburetor on it:
And I discovered this “gift”:
Who is there?
Something similar to the remains of a pad and some kind of wool
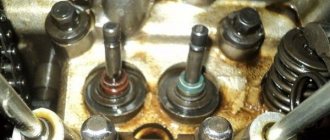
I carefully removed this nasty thing. It seems that the channel in the head remained clean. Then I removed the exhaust manifold. Oops:
I wonder how it was possible to install the gasket like that?! Well, here’s the mark on the manifold flange:
You can see where the gases were breaking through
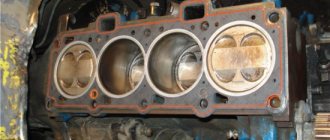
And finally, evidence that the valve seals of the 2nd cylinder are not doing their job:
Black brittle carbon deposits on the walls of the exhaust channel of the cylinder head of the second cylinder
The carbon deposits were fairly easily chipped off with a slotted screwdriver, and were cleaned off both in the cylinder head and in the manifold. I ran the blade of a utility knife along the flanges of the pipe and the manifold to clean off any remaining gasket, rust and carbon deposits, and wiped it with a degreaser. No matter how I applied the new gasket, it was impossible to achieve precise alignment of the holes with the manifold.
I found a position in which the displacement is minimal and the metal edging of the gasket holes does not protrude beyond the edges. Before installation, I lubricated the gasket with CV joint super-4ML lubricant with (graphite) and let it sit for about 30 minutes.
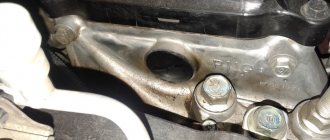
During assembly, I replaced 4 studs of the exhaust pipe flange (this is recommended to be done at every opportunity, since the metal in this place is very thermally loaded), as well as all the studs for fastening the manifolds (this is more for peace of mind). By the way, from the catalogs it is not entirely clear which studs for the intake pipe and manifold should be screwed in where. And there are 4 different sizes! Here is the arrangement of the studs in order, starting from the engine shield to the front, maybe it will be useful to someone: No. 1.5 - 13543621 Stud M8x30 No. 2,6,7 - Stud 2101-1008082 No. 3 - 13543521 Stud M8x25 No. 4 - 13544621 Stud M8x80
I replaced the washers for fastening the intake pipe and manifold with thicker and stronger ones - I used washers for fastening the camshaft bearing housing of the VAZ 2108 engine (2108-1006036) measuring 8.0x16.0x3.5mm:
I recommend using the same ones to mount the carburetor, especially for Solex models
And, of course, there are no better nuts for fastening the “pants” flange than brass nuts for 2108
Replacing the cylinder head gasket on a VAZ 2107 with a carburetor engine
We remove the cylinder head from the VAZ 2107 car engine without disconnecting the carburetor, intake manifold and exhaust manifold from the cylinder head.
To carry out the work of replacing the cylinder head gasket on a VAZ 2107, you will need a torque wrench. Removing the cylinder block gasket from a VAZ 2107 car engine
1. We install the VAZ 2107 car on an inspection hole or overpass (Preparation of the VAZ 2107 car for maintenance and repair). 2. For the convenience of replacing the cylinder head gasket, remove the battery from the VAZ 2107 car (see “VAZ 2107 battery - removal and installation”). 3. Drain the coolant from the VAZ 2107 car (see “Coolant - checking the level and replacing”). 4. Disconnect the wire tip from the coolant temperature indicator sensor (see “Coolant temperature indicator sensor - replacement”). 5. Remove the exhaust pipe from the exhaust manifold studs (see “Reception pipe - removal and installation”). 6. Remove the air filter housing (see “Air filter housing VAZ 2107 - removal and installation”). 7. Disconnect from the carburetor the air damper drive rod, the fuel hose, the EPHH hose, the crankcase ventilation, the vacuum ignition timing regulator and the wire block (see “Carburetor VAZ 2107 - removal and installation”). 8. On the VAZ 2107 car engine, install the piston of the 4th cylinder in the TDC position of the compression stroke (see “The gap between the valve levers and the camshaft cams - adjustment”). 9. Remove the housing assembly with the camshaft. We mark the position of the valve drive levers and remove the levers with springs (see “Camshaft and valve levers - replacement”). 10. We tie the timing chain with a wire and pass it through the window in the cylinder head.
11. Remove the ignition distributor from the VAZ 2107 car (see “Ignition distributor VAZ 2107 - removal and installation”) with high-voltage wires. 12. We unscrew the spark plugs from the cylinder head of the VAZ 2107 (see “Spark plugs of the VAZ 2107 - checking the condition and replacing”). 13. Remove the warm air intake (see “Gaskets of the intake pipe and exhaust manifold of a carburetor engine - replacement”). 14. Unscrew the nut of the upper fastening of the starter heat shield (see “Starter of a VAZ 2107 car - removal, installation”). 15. Remove the tip of the “mass” wire from the exhaust manifold stud (see “Gaskets of the intake pipeline and exhaust manifold of a carburetor engine - replacement”). 16. Disconnect the heating hose from the fitting of the intake manifold of the pipeline.
17. Disconnect the hoses of the vacuum brake booster and the forced idle economizer (ISP) from the fittings of the intake manifold of the pipeline.
18. Having loosened the clamps, remove the thermostat bypass pipe and the supply pipe to the radiator of the VAZ 2107 car.
19. Having loosened the clamp, remove the hose for supplying coolant to the VAZ 2107 heater radiator from the pipe.
20. Using a 12 mm socket wrench with an extension, unscrew the ten bolts of the internal fastening of the head to the cylinder block of the VAZ 2107 engine.
21. Using a 13 mm socket wrench, unscrew the bolt externally securing the head to the cylinder block of the VAZ 2107 engine.
22. Remove the cylinder head of the VAZ 2107 along with the intake manifold of the pipeline, exhaust manifold and carburetor.
23. Remove the cylinder head gasket from the two centering bushings of the cylinder block.
Installing a cylinder head gasket on a carburetor engine of a VAZ 2107 1. Install a new gasket and cylinder head on the engine of a VAZ 2107 in the reverse order, passing a wire with a timing chain through their windows. 2. We check the coincidence of the previously applied marks. 3. Before installing the cylinder head, it is necessary to lubricate its mounting bolts with engine oil in advance and allow excess oil to drain, allowing the bolts to soak for at least 30 minutes.
ATTENTION The cylinder head bolts may only be reused if they have been extended to a length of no more than 115.5 mm. If the length is longer, the bolt must be replaced.
4. Tighten the cylinder head mounting bolts in four steps: — first tighten ten bolts of the internal head mounting to a torque of 20 Nm; — tighten the cylinder head bolts to a torque of 69.4-85.7 Nm. — turn the bolts 90°; — turn the bolts again by 90°. Lastly, tighten the external mounting cylinder head bolt (11) to a torque of 30.6-39.1 Nm.
Tightening procedure for cylinder head bolts
5. Install the housing with the camshaft on the studs of the cylinder head and tighten the fastening nuts evenly (see “Camshaft and valve levers - replacement”). 6. Untie the wire, install the sprocket with the timing chain on the camshaft, tighten the fastening bolt and lock it by bending the tab of the lock washer. 7. “Charge” the timing chain tensioner and, having installed it in its original place, “discharge” (see “Timing chain tensioner - replacement”) and adjust the chain tension (see “Timing chain - adjustment”). 8. Adjust the gap between the levers and camshaft valve cams (see “Gap between the valve levers and camshaft cams - adjustment”). 9. We adjust the tension of the generator drive belt on the VAZ 2107 car (see “VAZ 2107 generator drive belt - tension adjustment and replacement”). 10. We install the ignition distributor on the VAZ 2107 car, directing the contact of the slider to the high-voltage terminal of the 4th cylinder (see “Ignition distributor VAZ 2107 - removal and installation”). We check and, if necessary, adjust the ignition timing on the VAZ 2107 car (see “Ignition timing - checking and adjustment”). 11. Installation of all removed parts on a VAZ 2107 car is carried out in the reverse order. 12. Fill the system with coolant (see “Coolant - checking the level and replacing”).
Main malfunctions of the fuel injection system and their symptoms
Before moving on to malfunctions of the “Seven” fuel system, let’s consider what symptoms may accompany them. Signs of a system malfunction include:
- difficult starting of a cold power unit;
- Unstable engine operation at idle speed;
- “floating” engine speed;
- loss of engine power;
- increased fuel consumption.
Naturally, similar symptoms can occur with other engine malfunctions, especially those related to the ignition system. In addition, each of them can simultaneously indicate several types of breakdowns. Therefore, when conducting diagnostics, an integrated approach is important here.
Difficulty starting when cold
Problems with starting a cold unit can occur when:
- fuel pump malfunction;
- reducing the throughput of the secondary filter;
- clogged injectors;
- failure of the lambda probe.
Unstable motor operation without load
Irregular engine operation at idle may indicate:
- malfunction of the XX regulator;
- fuel pump failure;
- clogged injectors.
"Floating" speed
Slow movement of the tachometer needle, first in one direction, then in the other, may be a sign of:
- malfunction of the idle speed sensor;
- failure of the air flow sensor or throttle position sensor;
- malfunctions in the fuel pressure regulator.
Power Loss
The power unit of the injection “seven” becomes significantly weaker, especially under load, with:
- malfunctions in the operation of the injectors (when fuel is not injected into the manifold, but flows, as a result of which the mixture becomes too rich, and the engine “chokes” when the gas pedal is sharply pressed);
- failure of the throttle position sensor;
- interruptions in the operation of the fuel pump.
All of the above malfunctions are accompanied by an increase in fuel consumption.
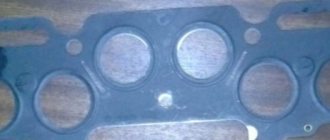
Gasket replacement process
Design diagram of the intake and exhaust manifolds
Since the gasket is located on the manifold studs, to replace it the unit will have to be completely dismantled. Of course, this operation will take a lot of time and effort.
Before the car enthusiast proceeds directly to the replacement process, it is necessary to collect the tools that will be needed. So, the tools without which replacement is impossible: ratchet and sockets for 17, 19; screwdrivers with flat and Phillips tips; a set of keys and the gasket itself.
The tools are assembled, now you can go directly to performing all kinds of operations. Before removing the manifold, you need to spray the bolts with WD-40, which will remove corrosion and allow you to remove the part without any problems.
Step-by-step instructions for replacing the intake manifold gasket (with photo)
Let's look at step-by-step instructions for replacing the gasket:
- Remove the negative terminal from the battery.
- We remove the throttle cable.
- We are dismantling the fuel pipes. More precisely, they need to be disconnected and taken to the side.
- Disconnect the throttle position sensor connector.
- Disconnect the idle air control wire connector.
- Unscrew the crankcase ventilation pipes and brake booster.
- We are dismantling the receiver.
- Remove the wires of the injection control unit (injectors).
- We dismantle the fuel rail without dismantling the injectors.
- Remove the thermal shield from the manifold.
- Disconnect the exhaust pipe.
- Remove the exhaust manifold.
- After unscrewing the fastening nuts, remove the intake manifold.
- We are replacing the gasket.
- We carry out the assembly in the reverse order.
As you can see, the replacement of the intake and exhaust manifold gaskets takes place simultaneously and, by and large, is the same gasket material.
Part selection
21083-1008081 – original catalog number of the gasket for the intake and exhaust manifold. It consists of two parts or, on newer models, one. This part is produced at the AvtoVAZ plant. The average cost is 250 rubles per piece (if there are two of them) or 450 rubles (for a whole one).
In addition to the fact that there is an original part, you can also find a number of analogues that are recommended for installation. Let's consider which gaskets can be installed under the VAZ-2114 manifolds:
- Trialli GZ 102 0013 is a well-known Russian manufacturer that produces a wide range of analog parts for domestically produced cars. The cost of the gasket is 200 rubles per piece.
- AJUSA 13065200 is another domestic manufacturer that has won consumers over the quality of its products. The cost of the product is 450 rubles.
- Ukrainian also produces and supplies this gasket. But, if you look at it, the quality of the product leaves much to be desired, since the resource is designed for only 20,000 km.
Causes of malfunction
After we have considered the process of replacing and selecting a part, it is necessary to consider the main reasons for the failure of the spare part:
Wear
During operation, the car emits hot gases that destroy the surface of the gasket, as a result of which it can tear or delaminate. Since there is only one gasket for the intake and exhaust manifolds, gasoline entering through the first channel can get on the gasket, which also affects the integrity and structure of the material from which it is made.
The quality of the part is not always high, even original, so when choosing, you should pay special attention to this.
Replacing the Exhaust Manifold Gasket VAZ 2107 Injector
replacement
gaskets
exhaust manifold
VAZ 2107 injector
Removing the intake and exhaust manifold shaft gasket 2107
1. Place the VAZ 2107 car in a pit or overpass (preparing the VAZ 2107 car for maintenance and repair).
2. To make it easier to replace the manifold gasket, remove the battery (see “VAZ 2107. Remove and install the battery”). 3. Drain the coolant from the cooling system of the VAZ 2107 (see “Checking and replacing the coolant level”). 4. Remove the fuel rail (see “Vases for cars 2107. Removing, installing and checking the injector”). 5. Unscrew the two nuts and the starter cover mounting bolt and remove the starter cover from the exhaust manifold pins (see “Starter vas”). car 2107
. remove, install "). 6. Remove the upper mounting bolts of the front and rear segments of the VAZ 2107 intake manifold using a 13 mm screw wrench.
7. Loosen the lower extension nut of the front extension on the right power block bracket stud and we will move the rod to the side.
8. Unscrew the bolt of the upper fastening of the starter (see “Starter for VAZ 2107 cars. Removal, installation”), and set aside the rear tension. 9. Using a 13 mm extension wrench, unscrew the end of the mass and disconnect it.
READ Replacing the Priora License Plate Light Lamp
10. Using the same tool, loosen the front frame frame mounting nut and remove the eye bolt.
Removing intake and exhaust manifolds VAZ 2107 part 1
This video was edited by YouTube Video Editor ()
Replacing the exhaust gasket and intake manifold on a VAZ 2107
How to remove a collector
for
VAZ 2107
.
11. Using a 13 mm socket wrench, remove the two nuts A from the intake manifold to exhaust manifold connector and the two nuts in the intake manifold.
12. Using the same tool, remove the two nuts A of the manifold intake manifold and the exhaust manifold B of the manifold.
13. Turn on the car engine using VAZ 2107 using the bolt that secures the exhaust pipe clamp to the bracket on the gearbox, and remove the exhaust pipe from the exhaust studs. collector
(See “Muffler ventilation. Removal and installation”). 14. Unscrew the front exhaust manifold mounting nut using a 13mm wrench.
15. Tighten the rear exhaust manifold lock nut with a 13mm wrench or a ball wrench.
READ VAZ 2110 Injector Doesn't Start In Frost
16. Remove the washers from the studs. Under the intake manifold joint installation nuts, piping and gradation washers of increased thickness are installed on the manifolds. 17. When removing the exhaust manifold from the cylinder head, we remove the intake manifold from the studs.
18. Remove the intake manifold pipe and exhaust manifold seal. Replace the manifold gasket with a new one.
installation
We install the injection engine on the VAZ 2107 with all the removed parts in the reverse order. And fill the VAZ 2107 with the car’s cooling system.
Exhaust system design of VAZ 2107
Like most passenger cars, the VAZ 2107 has an exhaust system consisting of three main parts:
- a receiving pipe into which gases enter from the exhaust manifolds;
- VAZ 2107 resonator (additional muffler), where gases are directed from the exhaust pipe and where the exhaust sound is partially reduced;
- muffler, which absorbs most of the engine exhaust noise.
In addition to the above parts, the exhaust system includes:
- muffler mounting pad;
- pillow bolt;
- muffler suspension belt;
- clamp bolt and clamp securing the muffler to the resonator;
- clamp bolt and clamp securing the resonator to the exhaust pipe;
- clamp bolt and clamp securing the exhaust pipe to the body;
- nuts securing the exhaust pipe to the manifold;
- pad;
- locking plate;
Removal
1. Place the car on an inspection hole or overpass (see “Preparing the car for maintenance and repair”).
3. Remove the exhaust pipe from the exhaust manifold studs (see “Reception pipe - removal and installation”).
5. Disconnect the choke drive rod and the throttle drive cross rod from the carburetor (see “Carburetor - removal and installation”).
6. For ease of work, remove the battery (see “Battery - removal and installation”).
7. Using a 13 mm socket wrench, unscrew the nut of the lower air intake mounting.
8. Using the same tool, unscrew the nut of the upper fastening of the air intake and remove it.
9. Unscrew the nut of the upper fastening of the starter heat shield (see “Starter - removal and installation”)
10. Using a 13 mm socket wrench, unscrew the nut securing the eye and remove it.
11. Using the same tool, unscrew the nut securing the “mass” wire and remove it from the stud (for clarity, the chain tensioner has been removed).
12. Using a 10 mm wrench, unscrew the two nuts securing the coolant supply tube to the pump and disconnect the tube. A sealing gasket is installed at the connection point.
13. Using a 13 mm socket wrench with an extension, unscrew the seven nuts securing the intake manifold and exhaust manifold. Under the nuts of the joint fastening of the intake manifold and exhaust manifold, washers of increased thickness are installed.
Intake manifold mounting points
and exhaust manifold
14. Remove the intake pipe from the cylinder head studs and move it to the side.
15. Remove the manifold from the cylinder head studs.
16. Remove the gaskets from the studs.
Intake manifold VAZ 2107
The VAZ 2107 intake manifold in car power plants is designed to perform very important tasks. First of all, it is designed to supply an air-fuel mixture into the combustion chambers of the power unit cylinders, at the same time, it heats this mixture to the required operating temperature, since the process of fuel injection is accompanied by the formation of a vacuum, which, in turn, creates cold fumes.
In addition, the intake manifold of the VAZ 2107 is in close interaction with the vehicle’s cooling system, so rubber pipes for this system are connected to the side. Every motorist needs to monitor the technical condition of the VAZ intake manifold, and also keep under control the tightness of the connections between the rubber hoses of the cooling system and the fittings of the intake unit, which is ensured by metal clamps. If the tightness of the connection is broken, as well as if the rubber pipes connected to the VAZ intake manifold are damaged, these parts must be replaced immediately.
The most vulnerable part of the VAZ 2107 intake manifold is the gasket, which is located between the engine block head and the manifold itself. As a rule, problems with it arise due to its incorrect installation. Also, although this happens extremely rarely, if air gets into the manifold, a corrosion center may occur, which will disrupt the adequate operation of the VAZ power unit in various modes. In such a situation, the VAZ intake manifold needs to be replaced, fortunately, in our time this is not a problem.
If you listen to the opinion of experts, you can come to the conclusion that the VAZ intake manifold is one of the very durable components of the automobile intake system and it is often enough, with high-quality and timely maintenance, of course, for the entire life of the vehicle, with the exception of replacing fittings, to which the rubber pipes of the cooling system are supplied.
Self-replacement of the intake manifold on a VAZ 2107
To be honest, in my practice I have never encountered such cases when the intake manifold of a VAZ 2107 needed to be replaced. Since the part is made of aluminum alloy, it is actually very reliable and lasts almost the entire life of the car. But this manual will help you if you are disassembling the engine, that is, it will clearly show the process of removing the manifold. Below is a list of the necessary tools you will need to complete this repair:
- Pliers
- Ratchet handle
- Socket heads for 13: regular and deep
- Small to medium extension cord
- Vorotok
Before you begin this procedure, you must first remove the carburetor. Once you have dealt with this, you can move on.
The first step is to disconnect two hoses: the coolant supply and from the vacuum brake booster, this is clearly shown in the photo below:
Now you can unscrew the two nuts securing the intake manifold from above, shown schematically in the photo below:
The most convenient way to do this is with a ratchet and a medium extension:
Then unscrew the three nuts from the bottom, which are visible in the picture below (the central one is not visible):
We also use a ratchet handle to do this quite quickly and conveniently:
After this, you can begin to remove the collector. Pull it slightly to the side and remove it from the studs:
If it is necessary to replace this part on a VAZ 2107, we buy a new one at a price of about 1,500 rubles (500 rubles for a used one) and install it in the reverse order.
Manufacturers of resonators for VAZ 2107
In the post-Soviet space you can purchase resonators from many manufacturers. The production devices in greatest demand are:
- OJSC AvtoVAZagregat (manufacturer of original parts);
- OJSC Togliatti Plant of Technological Equipment;
- LLC "Izhora Silencer";
- TRANSMASTER UNIVERSAL (manufacturer of exhaust systems made of regular and stainless steel).
There are no big differences between the products of these brands. The service life of resonators made of refractory steel is approximately the same and amounts to 20-30 thousand kilometers. The service life of stainless steel products is approximately twice as long, but the price is one and a half times higher than the price of analogues made of ferrous metal.
Stainless steel resonators last much longer than conventional ones, but they also cost significantly more.
Choosing a resonator for VAZ 2107
Four types of resonators are installed on the VAZ 2107:
- Long section with one tank. Installed on all classic carburetor VAZ 2101-2107 with an engine capacity of no more than 1.3 liters. Catalog number - 2101–1202005.
- Long section with two tanks. Installed on carburetor and injection VAZ 2106-07, complying with Euro 0 standards, with an engine capacity of 1.5-1.6 liters. Catalog number - 2103–1202005.
- A shortened pipe with one tank and a front mounting flange with two mounting bolts. Installed on injection VAZ 2106-07, meeting Euro 2 requirements. Catalog number - 21073-1200020.
- Short section with one barrel and a front flange with three mounting bolts. Installed on injection VAZ 2106-07, meeting Euro 3 requirements. Catalog number - 21074-1200020.
The resonator section of the VAZ 2107 Euro 3 is several centimeters shorter than the resonator of the VAZ 2107 Euro 2.
The choice of resonator depends on the specific modification of the VAZ 2107. When purchasing, you should keep in mind the following recommendations:
- On the carburetor version with a 1.3 liter engine, you can easily install a long section with one (VAZ 2101-07) or two (VAZ 2106-07) tanks. In the second case, the sound of the running engine will become quieter, but the power will drop by about 3-5 hp. With. Shortened resonators will not work.
- Both long resonators are suitable for carburetor and injection VAZ 2107, corresponding to Euro 0. When installing a part with one tank, the exhaust noise will increase and the engine power will increase slightly. Short pipes cannot be installed.
- The exhaust system for Euro 2 is equipped not only with a catalyst, but also with an oxygen sensor (lambda probe) mounted in the exhaust pipe. For such cars, the original shortened resonator with a two-bolt flange or any long section is suitable. However, such a resonator is not suitable for the VAZ 2107 Euro - it is connected to another catalyst and differs in length.
- The exhaust system of the VAZ 2107, manufactured in accordance with Euro 3 standards, has two oxygen sensors. On the VAZ 21074 you can install the original short resonator or a long one, but with some modifications.
Once it was possible to modernize a 1.3 liter engine by increasing the displacement to 1.7 liters by replacing the crankshaft and boring the cylinders to size 82 mm. After which it was necessary to replace the “native” resonator with one barrel, because with an increase in engine power, the exhaust pipe began to roar more strongly, especially at speeds above 2500 rpm.
If desired, the resonator tank can be made by hand
Installing long sections on the VAZ 2101-07 that comply with Euro 2 and 3 standards is advisable in cases where it is necessary to discard a failed catalyst. The latter is quite expensive, and not every car owner is ready to make a full replacement. In this case, after installing a long resonator pipe, you will have to install a snag instead of the second lambda probe or reprogram (reflash) the engine control controller.