Symptoms of air leaks in the intake manifold of a VAZ 2114
All car engines, regardless of their type (with an injector or carburetor), operate on a mixture of fuel and air.
The ratio of these components in the mixture is precisely calculated and regulated either electronically or mechanically. But, sometimes it happens that additional air leaks occur, the mixture is “diluted” and the motorist can observe a serious loss of power in his car (which is especially noticeable at low speeds). We’ll talk about why this happens and how to correct this situation in today’s article.
Air leaks and its symptoms
The phenomenon of suction is associated with the penetration of air into the fuel tract of the machine. It leads to a lean mixture and, as a result, greatly affects the operation of the engine, reducing its power and causing interruptions in operation.
If air leaks occur in the intake manifold, the symptoms of the VAZ 2114 may be as follows:
- unstable idle speed;
- engine tripping;
- “sagging” during acceleration;
- increased gasoline consumption;
- difficult starting even at high air temperatures;
- a sharp drop in power (especially at speeds below 3,000 min-1).
If the engine stalls very often, this may also indicate that there is an air leak in the VAZ 2114. You can additionally verify the presence of this problem by using a car scanner. The presence of suction may be indicated by errors P0171 (very lean mixture) and P300 (misfire observed).
Stable engine operation at high speeds does not at all indicate the absence of suction, since it is most clearly manifested at low speeds. It is worth remembering this so as not to be misled and start looking for other causes of problems.
As soon as you notice that there are signs of air leaks, you should immediately begin searching for a possible place where it has entered the system.
Places of possible suction
There are quite a few places through which air can get inside the fuel system, and during the test you will have to examine them all (we’ll talk about how to detect them a little lower).
For now, let's say that you have to check:
- The intake manifold gasket (its destruction or burnout in the vast majority of cases is the cause of suction).
- Hoses and pipes suitable for the manifold.
- Injector seals.
- Throttle gaskets.
- Plugs placed on the manifold.
- Bushings.
- Vacuum brake boosters.
If symptoms of air leaks appear in the VAZ 2114 injector, all these elements will have to be checked.
You should also check and, if necessary, replace the idle speed sensor. Very often they are of poor workmanship and are not sealed, leading to air entering the manifold.
How to find the leak location
There are 3 main methods by which you can find a leaky area:
- by monitoring the rarefaction of air in the line;
- using a smoke generator;
- using a volatile flammable liquid.
We will omit the first method, since it requires special equipment, which is not available at all service stations. But the second method deserves a lot of attention, since it is quite simple to implement and at the same time very accurate. It will require a compressor, a blow gun and cigarettes (the latter will serve as a source of smoke).
Before checking the air intake of the VAZ 2114, you will need to assemble the entire installation, namely, connect the gun to the compressor receiver, and insert a cigarette into the nozzle of the gun. After this, a pressure of about 0.8 atmospheres is built up and the smoke is directed into the collector using a gun.
The smoke itself created by such an installation is quite thick and quickly fills the entire system. All that remains for the motorist is to carefully monitor the place where the smoke is coming out, and after detecting it, carry out repair work.
In some cases, the leak can be found without additional means - the damaged area can be easily detected by the characteristic whistle or hiss that is produced by the intake air when the engine is running. True, this only happens if there are serious cracks and breaks.
If the proposed method using a smoke generator is not suitable (for example, there is no compressor available), then the test can also be performed using volatile flammable liquids packaged in pressurized cans. As such, you can use ethyl ether (although it is almost impossible to get it in its pure form now), a means for winter starting diesel engines (the main component of which is the same ether), as well as special cleaning products based on hydrocarbons.
In order to find the location of the leak, you need to start the car engine and, while idling, begin to spray all possible components, joints, plugs and hoses that relate to the manifold and may cause air penetration.
This should be done with pauses - after spraying one place, you should wait a few seconds. If you notice that the engine speed has increased sharply after the procedure, then the detected area should be thickly sprayed again. If after this the revolutions quickly go up again, then the leak point has been successfully found.
Replacing the intake manifold gasket on an injection VAZ-2114 with your own hands
Replacing the intake manifold gasket on a VAZ-2114 car, as well as replacing the exhaust manifold gasket, is a very complex procedure and requires certain knowledge and experience. Of course, you will have to do a colossal amount of work and spend a lot of time, but this will save 4-5 thousand rubles on replacement at a car service center.
The video below will tell you about replacing the receiver and manifold. During the replacement process, the intake manifold gasket is also changed:
The video will tell you how to properly replace the intake manifold gasket, and also tell you about some of the subtleties and nuances of the process.
Replacement of intake manifold gaskets VAZ 2114 8 cl (Kalina, 2110)
21.03.2019
15749
Repair
It is recommended to replace the gaskets on the VAZ intake manifold after each removal. But I had to do this prematurely, as I discovered a significant air leak, which mainly manifested itself on a cold engine. Every cold start was accompanied by a terrible tripping.
In addition to the tripping when cold, there was a slight drop in speed when sharply pressing the gas pedal. This applies to both a cold and a hot engine.
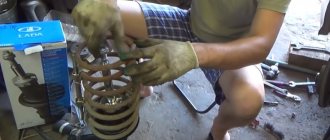
A homemade smoke generator made from a cigarette helped me detect the air leak. A very simple and primitive contraption that has helped me out more than once.
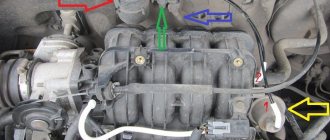
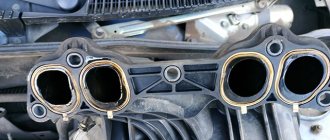
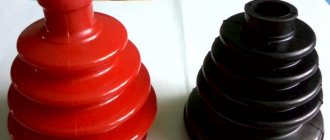
My car (Kalina 1.6 8 valves) has a plastic intake manifold (receiver). The same will be installed on all VAZ family cars with an 8-valve 1.6-liter engine (2114, 2110, etc.). 4 rubber rings act as gaskets. According to reviews, black rings last much longer than white ones. And I was convinced of this personally - these gaskets lasted for about six months and began to let air through. They felt like plastic to the touch. Unfortunately, I didn’t find black ones, so I’ll install white ones again. I hope these last longer.
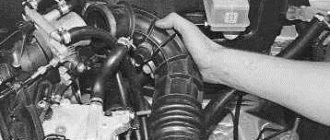
To remove the intake manifold (receiver), you must first unscrew the corrugation from the air filter, the throttle cable, and the small crankcase ventilation hoses. I will not remove the throttle and its heating.
The intake manifold is attached to 5 studs - one in the center, two on the sides. To unscrew them you will need a 13mm socket. After unscrewing the nuts, you need to remove the receiver itself from the studs and move it to the side. Remove the old gaskets and wipe the seats from oil and dirt. You also need to wipe the seat on the engine.
The manifold has special grooves for guides on the gaskets. The gaskets must be installed with the higher side in the plastic manifold. It is the guide that will prevent you from making mistakes.
I additionally coated the areas near the guides with sealant on the outside of the gasket. Because it felt like that was where the ring entered the groove the deepest. In addition, there was a place for air leaks on the old gaskets.
After all procedures, the intake manifold can be installed back. I couldn't find any information on how tightly to tighten the mounting nuts. I delayed it at my own peril and risk. The main thing is not to overtighten, as the manifold is plastic and can crack.
This is how I replaced the old intake manifold gaskets on my Kalina with new ones. There is no more air leakage, the engine stopped stalling when cold and began to behave much better when warm.
Replacing the exhaust manifold and gasket on a VAZ 2114
The exhaust manifold is a unit that is responsible for ride quality, without which comfort is impossible. This is silence and the absence of exhaust smell under the hood, which can be drawn into the cabin through the hole in the cabin filter. Fixing a leak in the exhaust manifold of a VAZ 2114 is a necessary repair. Fortunately, it is not urgent; you can prepare in advance and choose a convenient moment.
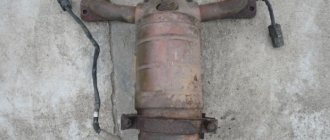
Exhaust manifold for VAZ 2114
When is it necessary to replace and remove the exhaust manifold on a VAZ-2114
Huge temperature changes are the main problem faced by the exhaust manifold and the gasket, for which it is removed. The collector itself is made of a special grade of cast iron; it can withstand high temperatures (up to 800-900 degrees) , however, these are critical values, after which the collector may warp or crack.
Exhaust manifold VAZ-2114
Its main task is to collect exhaust gases and distribute them into the exhaust pipe of the muffler.
Replacing or dismantling the VAZ-2114 exhaust manifold is necessary in the following cases:
- Mechanical damage to the collector.
- Warping and loss of tightness at the junction with the cylinder head.
- Burnout of the gasket between the head and the manifold.
- The appearance of cracks as a result of engine overheating.
- Replacing the collector with a device of a different configuration, adapted to a more severe operating mode.
In the event that we are not going to participate in high-speed races for the prize of the head of the regional traffic police, replacing or dismantling the collector may be necessary in a number of cases.
Tools and materials for dismantling
There are a number of symptoms that will indicate that you need to prepare to remove the exhaust manifold:
- increased noise level in the engine compartment , the engine produces a characteristic, loud sound in any operating mode;
- breakthrough of exhaust gases into the engine compartment and sometimes into the cabin;
- reduction in engine power due to a mismatch between the exhaust gas outlets in the cylinder head and in the manifold.
Many people decide to replace the standard manifold with a “tuning” one, made of stainless steel and having a different configuration, thereby wanting to increase engine power and reduce the resistance that the standard manifold provides to exhaust gases. As a rule, the most common reason for dismantling a unit is gasket burnout .
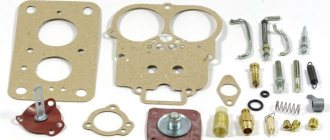
Exhaust manifold gasket
The manifold gasket on the VAZ-2114 is made of pressed reinforced asbestos and is designed to ensure a tight connection between the block head and the manifold flanges. Asbestos is used to correct the coefficient of thermal expansion of the aluminum alloy from which the head is cast and the cast iron from which the manifold is cast. At high speeds and under prolonged loads, the gasket may burn out. Then its replacement and dismantling of the collector are inevitable.
To dismantle the manifold, you will need a standard set of tools, a set of sockets with extensions, and WD-40 penetrating lubricant or its equivalent. In case of broken studs, a stud extractor, drill, drill bits and a set of taps will be useful. A day or two before dismantling the collector, it is worth moistening all the fasteners several times, this will significantly simplify the removal procedure .
Causes of malfunctions
The key factor that causes 90% of exhaust manifold malfunctions on VAZ 2114 cars is high temperature and poor quality materials from which the parts are made. During operation, the steel repeatedly heats up and cools down, which leads to the appearance of cracks in the body. This is a common occurrence for VAZ cars older than 7-8 years.
Auto repair shops offer crack welding services using argon welding. However, for a number of reasons, this activity is useless for cars older than 7 years.
1) Just removing and installing the exhaust manifold will cost about 2.5 thousand rubles. Taking into account the work of the welder and other actions, the cost of repairs can be 4-5 thousand rubles. If you do the work yourself, buying a new part will cost less.
2) Welding, even argon welding, disrupts the structure of “tired” metal. A boiled part rarely lasts longer than a year, after which new holes appear. The older the car, the faster the problem returns, and the collector has to be removed again.
If the car is older than 8 years and there are problems with cracks in the manifold, it is better to remove the part and replace it with a new one.
Exhaust manifold VAZ 2114: faults and their elimination
An element such as the exhaust manifold is a very important part of the exhaust system of a car. It is responsible for the removal of exhaust gases, the absence of exhaust and gasoline odors in the cabin, and also indirectly affects the correct operation of the engine. Today we will tell you how it works, as well as how to correctly replace the VAZ 2114 manifold.
The key factor that causes 90% of exhaust manifold malfunctions on VAZ 2114 cars is high temperature and poor quality materials from which the parts are made. During operation, the steel repeatedly heats up and cools down, which leads to the appearance of cracks in the body. This is a common occurrence for VAZ cars older than 7-8 years.
Auto repair shops offer crack welding services using argon welding. However, for a number of reasons, this activity is useless for cars older than 7 years.
1) Just removing and installing the exhaust manifold will cost about 2.5 thousand rubles. Taking into account the work of the welder and other actions, the cost of repairs can be 4-5 thousand rubles. If you do the work yourself, buying a new part will cost less.
2) Welding, even argon welding, disrupts the structure of “tired” metal. A boiled part rarely lasts longer than a year, after which new holes appear. The older the car, the faster the problem returns, and the collector has to be removed again.
If the car is older than 8 years and there are problems with cracks in the manifold, it is better to remove the part and replace it with a new one.
Signs of trouble
Exhaust manifold gasket
One of the main signs of a leak in the system is a “sporty” growling sound when the engine speed increases. This may be a symptom of various exhaust system problems. To check, it is better to take an assistant and go to a garage with a pit or to an overpass. Most often, you can determine by eye whether the problem lies in the muffler, resonator or exhaust.
Gasket wear may become apparent during planting. Open the hood and start the car - white or grayish smoke rising from the manifold during warm-up indicates a leak for this reason. VAZ car owners usually encounter this problem once every 3-4 years. When using low-quality spare parts and before. The solution may be to manufacture a custom-made steel gasket. It can last as long as the entire collector.
Service specialists, when attracting clients, like to tell scary stories about the explosion of the exhaust manifold on VAZ 2114 cars due to cracks. In reality this is nothing more than a myth. But the real problems are no less serious, so there is no point in putting off repairs.
A cracked exhaust manifold or worn gasket can cause your engine to run rough.
1) A lambda probe is installed in the exhaust manifold, which affects the operation of the injection system. Strong air suction disrupts the oxygen mass content in the exhaust; the lambda incorrectly adjusts the quality of the mixture, causing tripping, uneven idling, loss of power, and “black” spark plugs.
2) Another function is crankcase ventilation. Impaired air circulation causes disturbances in the operation of the gas distribution mechanism, increased wear of valves, the formation of carbon deposits on the pistons and other “joys”.
If increased noise and unpleasant odors during engine operation are combined with dirty work, the car needs urgent repairs.
How to remove the manifold on a VAZ 2114
How to remove the exhaust manifold
Many VAZ car owners repair and maintain their cars without outside help. One of the most common problems when a car operates in slow mode is the combustion of the gasket between the exhaust manifold and the cylinder head, blocking of the catalyst, and deposition of combustion products on the walls of the exhaust system. All these obstacles negatively affect the removal of exhaust gases from the combustion chamber. Removing gases from the combustion chamber is the main point; their return to the chamber reduces the quality of the fuel-air consistency, which means a decrease in vehicle power will occur. In addition, burning the gaskets releases flammable gases into the engine compartment, which can cause a fire in the engine compartment. The sound during such work will be quite loud and annoying to others.
Elimination of all of the above defects will be associated with an analysis of the exhaust system. How to remove the exhaust manifold and whether this can be done in a garage without contacting a service department is of interest to many VAZ Priora owners who have not encountered such work.
Tools and necessary parts
To remove the exhaust manifold on a VAZ 2114 in order to replace the gasket or entire part, you will need the following tool:
- open-end and ring wrenches for 8, 10, 13, 17;
- wrench with heads 17, 19;
- screwdrivers, pliers.
It is also a good idea to have tools such as a Dremel, nut saw or nut pick on hand. As a rule, the fasteners on the exhaust system parts stick tightly.
A few days before your planned repair, begin treating accessible nuts with WD-40 or another penetrating lubricant. Repeat the operation 2-3 times. This will make the task of removing the manifold a little easier .
The question often arises: is it worth using a sealant after removing and replacing the gasket? Experts believe that if you apply sealant to the gasket, it should only be high-quality silicone. A bad sealant can bring a lot of trouble to a VAZ 2114 engine: when it burns out, it turns into “pellets” that are pulled into the crankcase. And this is unnecessary contamination of the piston system.
Tips for replacing the intake manifold
Also, do not neglect the procedures for repairing and cleaning the intake manifold. The stability of the VK is very important for the normal functioning of the car. A certain vacuum is formed in the intake manifold, which is the source of drive force for many systems: cruise control, windshield wipers, vacuum brake booster. In the event of a collector malfunction, this threatens the failure of one or more of the above systems.
To avoid the appearance of cracks and distortions, you must use a torque wrench to tighten the nuts on the manifold and follow the tightening order of 20.9-25.8 (2.13-2.63) N_m (kgf_m). As a rule, it is recommended to start tightening the nuts from the center and gradually move towards the periphery, alternately tightening the nut on one side or the other.
To work on removing and replacing the VAZ 2114 intake manifold on an 8-valve engine, we will need:
- keys “for 8”, “for 10”, “for 13”, “for 17”;
- “cardan” type nozzle and socket heads “17”, “19”;
- magnetic screwdriver;
- screwdrivers, pliers;
- new intake manifold.
By the way, the price for an intake manifold from a VAZ (article 21110100801420) will be 1,350 rubles.
The price is indicated for spring 2021 in Moscow and the region.
Loosen the clamp and disconnect the crankcase ventilation hose.
Source: etlib.ru
Exhaust manifold removal procedure
Before removing the exhaust manifold yourself, think 7 times. Having this work done by a service center is not cheap, but the inaccessibility and difficulty of unscrewing some nuts can be a serious problem.
Unscrew the bolt securing the intake pipe
It is important to drain the coolant before removal, as antifreeze may enter the cylinders during the process. The sequence of actions for cars with an injector is as follows:
- Disconnect the battery, release the throttle cable from the throttle valve.
- Disconnect the fuel line pipes.
- Disconnect the wires from the TPS and idle speed control.
- Release the crankcase ventilation, vacuum, and brake booster hoses.
- Remove the receiver, remove the injector block wires and remove the injector fuel rail.
- Remove the bracket and thermal shield.
- After this, you can disconnect the exhaust pipe, exhaust and intake manifolds from the manifold.
After disassembly, all gaskets are replaced with new ones. Please note when purchasing that the exhaust manifold gaskets for 8-valve and 16-valve VAZ 2114 are different. Select the parts carefully and you can avoid wasting time and money.
Replacing the exhaust manifold gasket
5 days have passed since November 14, 2014. The sound of the engine has become simply unbearable.
At 0:00 I arrived at the garage to solve this problem. First, it was necessary to accurately diagnose the site of the cutting. If it was a burnout of metal, I planned to somehow crawl up and weld this place without taking anything apart. To determine the location of the burnout, I built myself a sensor from a piece of wire and several threads. I drove the car into the garage into a pit. I took the sensor and, armed with a flashlight, went from below to examine the running car. I brought the sensor to the expected burnout zone in the area of \u200b\u200bthe connection between the cylinder block and the exhaust manifold. The sensor almost had its head blown off. Exhaust gases escaping through the burnt gasket blew away the threads of my sensor. I quickly went online and looked at information on replacing pants. It was a big mistake. Because the exhaust manifold and the pants are two different things. Having looked at how everything was there, I simply began to disassemble the collector from below. I will not describe the work procedure; I will only describe the problems that I personally encountered. The most detailed instructions, which I should have read before disassembling, are located at https://autorambler.ru/bz/remont/211_eng_12/. Well, or you can type in a search engine the request “Replacing exhaust manifold gaskets on a VA3 2114 (VAZ 2114, because when asking for a VAZ 2109, a carburetor engine comes up, but I need an injector). I started to disassemble everything from below, and after seemingly finishing the work, I discovered that despite the bolts being unscrewed, the manifold could not be removed. It was held in place by a bolt that sits on top of the intake manifold. I was panicking that I would have to remove the intake. But there’s nowhere to go. I started to take it apart. When removing the receiver, I noticed that the gas injector fitting did not sit tightly in its “working place”. I thought the fitting had come loose, started tightening, everything was going as usual. And then there was a click and the threaded part of the fitting broke off and remained in the manifold. My gas workers are far away, and it was not working hours. I found a way out of the situation. The solution is here. When removing the intake, I discovered that the antifreeze had to be drained from the system. I had to collect it in a canister under the car. There were no more surprises. By four o'clock the exhaust manifold was removed. And I, having examined the burnt gasket, satisfied that the diagnosis was correct, went home (on the second faithful iron horse - a bicycle). Here is a photo of the gasket.
At about 16-00 I went to the garage, on the way I bought gaskets for the manifold, they cost 50 rubles each, they consist of two identical halves for a total of 100 rubles.
Well, we started assembling slowly from the bottom. Before installing a new gasket, you need to clean the installation sites from remnants of the old gasket and carbon deposits. The carbon deposits were cleaned with solvent. The remaining gasket was scraped off with a spatula. You need to be very careful here. Under no circumstances should you pick with the sharp tip of a knife. Aluminum is a very soft metal and if you make a deep scratch on it, the gasket will not be able to compensate for the gap and exhaust gases will continue to flow into the engine compartment, making corresponding sounds. I took a spatula and flattened the dirt. Wipe off any remaining solvent with a rag. Now you can install new gaskets. Carefully place the exhaust manifold (assembled with pants since I did not disconnect them from the manifold) into place. And to prevent it from falling, I immediately attached the pants to the mounting bracket to the cylinder block. Before assembly, I lubricate all bolts and studs with lubricant (such as lithol) in order to minimize the number of stuck threads during subsequent disassembly. Then everything goes according to the instructions, in the reverse order of removal. I will continue about surprises. When tightening the exhaust manifold stud closest to the burnout. It turned out that the threads in the block were broken. Perhaps this was the reason for the burnout of the gasket, because... the collector was not pressed against the block at this edge. The mood plummeted. Because To drill this thread and cut another, larger diameter, it was necessary to remove the engine. (You obviously can’t get there with a drill) It was decided to look for alternative options: Restore the torn threads in the block by cold welding, Restore the torn threads in the block with an anchor. It took about 12 hours for all the work, including three problems Tags:
How to remove the intake manifold on a VAZ 2114 8 valve injector
Replacing the exhaust manifold gasket on a VAZ-2114 with your own hands
- Preparation stages
- Dismantling of collectors
The exhaust manifold is a component of the exhaust system that carries out the process of removing exhaust gases from the cylinders of the power unit into the exhaust pipe.
If the collector malfunctions, the culprit may be either the element itself or its gasket. Replacing the exhaust manifold (exhaust manifold) gasket is a common procedure when repairing a VAZ 2109.
Appearance of the unit
Useful video
You can find additional interesting information on this issue in the video below:
The collector (resonator, “pants”) is an engine attachment; it is a closed reservoir of complex shape with a common chamber (receiver) and outlet pipes. Depending on the nature of the functions performed in a car, there are two types of manifolds - exhaust and intake.
The main task of the intake manifold is to supply air from the distribution system, mix it with fuel and transform it into an air-fuel mixture of the desired consistency, followed by a uniform supply to the combustion chamber of the cylinders. Therefore, the main task of the exhaust manifold is to collect exhaust gases from the engine cylinders into a single pipe.
Causes of malfunctions
The key factor that causes 90% of exhaust manifold malfunctions on VAZ 2114 cars is high temperature and poor quality materials from which the parts are made. During operation, the steel repeatedly heats up and cools down, which leads to the appearance of cracks in the body. This is a common occurrence for VAZ cars older than 7-8 years.
Auto repair shops offer crack welding services using argon welding. However, for a number of reasons, this activity is useless for cars older than 7 years.
1) Just removing and installing the exhaust manifold will cost about 2.5 thousand rubles. Taking into account the work of the welder and other actions, the cost of repairs can be 4-5 thousand rubles. If you do the work yourself, buying a new part will cost less.
2) Welding, even argon welding, disrupts the structure of “tired” metal. A boiled part rarely lasts longer than a year, after which new holes appear. The older the car, the faster the problem returns, and the collector has to be removed again.
If the car is older than 8 years and there are problems with cracks in the manifold, it is better to remove the part and replace it with a new one.
Preparation stages
To replace the manifold or its gasket, in any case you will have to dismantle the VK. But before you get to the element you are looking for, you will first need to go through some preparatory steps. Namely, tighten the fasteners, and then remove the air filter and carburetor if the first stage does not help.
Stage of work
Your actions
Often, loose manifold fastenings caused the entry of contaminants, which disrupted the performance of the exhaust system. If the tightening did not give any result, then the gasket is definitely burned out or the collector itself is damaged, which is less likely
Removing the air filter
Removing the carburetor is carried out in the following sequence:
- Disconnect the coolant supply hose to the engine starting device from the fitting. To do this, unscrew the clamps;
- Be sure to drain the coolant into a prepared container;
- Disconnect the exhaust pipe that comes from the exhaust manifold and the BC bracket;
- Disconnect the throttle cable bracket. To do this, you need to remove one end of the spring from the damper control rod, and then remove the entire spring. Now loosen the nut on the bracket, which will allow you to remove the cable from the engagement;
- Disconnect the EPH sensor from the power plug;
- Disconnect the vacuum tube and a pair of hoses from the carburetor heating unit;
- Remove the engine crankcase ventilation hose;
- Remove the four mounting nuts holding the carburetor and intake manifold;
- Remove the carburetor carefully without yanking. It must be gradually removed from the studs.
All dismantling work must be carried out only on a cold engine. To make it easy to unscrew all fasteners, you can pre-treat them with WD40, several hours or even a day before the repair begins.
Removing the carburetor and intake manifold
You need to have the following tool on hand:
- Flathead and Phillips screwdrivers.
- 8" socket or tubular wrench.
- Open-end or socket wrench set to “13”.
- Ratchet (if necessary).
To remove the VAZ 2109 manifold (carburetor), you must first dismantle the injection system. The disassembly process looks like this:
- Disconnect the hose that supplies antifreeze from the cooling system to the carburetor starter. To do this, loosen the clamps and carefully drain the liquid. Work must be carried out on a cold engine.
- Remove the exhaust pipe. To do this, unbend the fixing plate and unscrew the nuts with a “13” wrench. Using the same wrench, unscrew the nuts that secure the pipe to the bracket.
- Remove the throttle valve drive cable mounting bracket. Remove the spring and loosen the nut, disengaging the cable.
- Disconnect the idle air solenoid valve.
- Disconnect the vacuum tube and carburetor heating hoses.
- Remove the crankcase ventilation pipe.
- Unscrew all four nuts that secure the carburetor body to the intake manifold.
- Carefully lift the carburetor body, being careful not to damage the studs.
Exhaust manifold removal procedure
Before removing the exhaust manifold yourself, think 7 times. Having this work done by a service center is not cheap, but the inaccessibility and difficulty of unscrewing some nuts can be a serious problem.
Unscrew the bolt securing the intake pipe
It is important to drain the coolant before removal, as antifreeze may enter the cylinders during the process. The sequence of actions for cars with an injector is as follows:
- Disconnect the battery, release the throttle cable from the throttle valve.
- Disconnect the fuel line pipes.
- Disconnect the wires from the TPS and idle speed control.
- Release the crankcase ventilation, vacuum, and brake booster hoses.
- Remove the receiver, remove the injector block wires and remove the injector fuel rail.
- Remove the bracket and thermal shield.
- After this, you can disconnect the exhaust pipe, exhaust and intake manifolds from the manifold.
After disassembly, all gaskets are replaced with new ones. Please note when purchasing that the exhaust manifold for 8-valve and 16-valve VAZ 2114 are different. Select the parts carefully and you can avoid wasting time and money.