It all started with the fact that I had an urge to fill the thresholds with workings so that they would not rot www.drive2.ru/l/6872347/. Further, as a result, there was a strong smell of oil in the car. I thought that at first it was nothing special, since it should have weathered at least a little. But I began to notice that even after a week, the smell did not decrease at all. Then, while taking out a bottle of drinking water from under the passenger seat (I always carry it with me just in case, not just for drinking), I discovered traces of oil on it. Somehow I didn’t pay much attention, I just wiped it off and put it back. But it happened again - the bottle was covered in oil again. It was then that the decision was made to identify the cause of such a strong smell of oil in the cabin, which started to give me a headache after long trips.
Immediately after passing the first of four exams, upon returning home, I began disassembling the interior on the passenger side. Suspicion was raised by the wet oil mat...
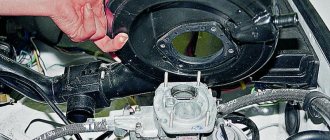
Next, he took out the chair, unscrewed the plastic trim on the threshold and began to lift the carpet. I was a little shocked by what I saw)
Systematic washing and polishing of a car body, as is known, helps to reliably protect its outer surface from corrosion. The exception to the rule is the bottom and internal cavities. The bottom, although treated at the car plant with the most resistant to mechanical and chemical agents, does not withstand more than 2-3 years of merging aggressive salt-sand mixtures, “bombardment” of road crushed stone, temperature changes, gradually deteriorating and opening up more and more new areas for corrosion.
The situation is similar with the wings, especially those areas in the lower part where there are pockets in which dirt and moisture collect and accumulate. Therefore, even on a new, just purchased car, it is necessary to inspect such areas and eliminate the deficiencies of the factory experts in anti-corrosion treatment (you can be sure that there are such deficiencies).
The cavities of body elements such as sills, B-pillars and side members are also affected. Their situation is significantly aggravated when the drainage holes designed to drain the water that gets inside these elements are clogged.
Of course, it is not difficult to carry out additional anti-corrosion treatment on a new car. It is much more difficult to perform this operation on a machine that has been operated for a long time without intermediate treatments. Under such conditions, the main effort, as well as time, will be spent on preparation. To carry out the work successfully, for do-it-yourself anti-corrosion treatment of a car, the materials must be in sufficient quantities so that the process is not interrupted.
Causes of corrosion of VAZ 2107 thresholds
- Untimely treatment with anti-corrosion agents. On classics you need to carry out anti-corrosion treatments once a season and preferably before winter.
- Damage to the threshold and poor quality repairs. In this case, through corrosion may develop after 2-3 years.
- Damage to external anti-corrosion protection by stones.
- Drainage holes in thresholds clogged with debris. The drainage holes throughout the body need to be cleaned once a year.
- Operating a car in winter on roads where reagents are used. Salts and sand settle on the thresholds of the car and after a while “pierce” the anti-corrosion coating. If you operate your car on roads where reagents are used, you should wash it at least once a month and preferably with warm water.
Do-it-yourself anti-corrosion treatment of car thresholds
Car thresholds need protection, since they are located in the lower part of the car and are subject to the negative effects of external factors (temperature changes, salt reagents, negative temperatures, high humidity).
Often small stones, sand, crushed stone and gravel can leave minor damage on the outside of the threshold. They often become hotbeds of future corrosion processes.
The choice of anti-corrosion treatment for car thresholds is wide and varied. You can find cheap or expensive products. All of them received the general name “anti-gravel for thresholds”. Can be sold in cans or metal cans.
If it is not possible to use a lift to process the thresholds, then it is better to postpone the work to the summer. During the summer months, you can drive onto the overpass and work outdoors. It is impossible to carry out work on threshold treatment in winter or autumn.
The process of treating car thresholds can be divided into several stages:
1. Preparation of materials and workwear.
- work clothes that cover all areas of the skin;
- latex gloves;
- protective glasses;
- respirator;
- metal brush;
- sandpaper;
- pure water;
- means for anti-corrosion treatment of thresholds;
- White Spirit for degreasing
- rust converter;
- rags;
- construction hairdryer
Selection of spare parts
The threshold on the VAZ 2107 consists of three parts:
- Faceplate.
- Amplifier inside.
- Connector.
Thresholds corrode differently for everyone, but, as a rule, if through holes appear, then all three parts need to be replaced.
- Right threshold 21010-5401060-00;
- Left threshold 21010-5401061-00;
- Amplifier 21010-5401100-00;
- Connector 21010-5101068/69.
A cheap way to ensure that your car's sills never start to rot.
The subject of our conversation today will be car thresholds. More precisely, their safety from corrosion. All motorists, without exception, know that thresholds are subject to serious tests.
This part of the body often becomes covered with rust and, without proper treatment, simply turns first into a sieve, and then into rotten rot.
To protect the thresholds from a similar fate, it is imperative to protect the metal. By the way, even galvanized bodies suffer in this case.
Nothing lasts forever and even metal can be damaged. And car thresholds take on a serious load. Metal suffers not only from moisture and reagents, but also from impacts from stones of various sizes.
Which leads to dents and chips of the paintwork, that is, the protective coating. This leads to the onset of corrosion.
It is possible and of course necessary to protect the thresholds. There are many different ways. They differ, perhaps, only in funding and time spent. Otherwise, the same effect is achieved - good protection.
Thresholds are part of the car body that cannot be easily replaced. If they become unusable, then welding is indispensable. After all, the thresholds are a fragment of the power structure of the car.
I was very lucky at the time. Experienced motorists taught how to properly, simply and cheaply care for the thresholds of their iron horse. This is what I have been doing for a long time with all the cars that have passed through my hands.
So, the method is quite simple and really cheap. Although no, it’s better to say that such processing costs nothing at all, if so desired. And you need to do the following manipulations.
Car sills have technical holes that are closed with plugs. Every car has such things, regardless of the brand and year of production.
You will need to open them and pour the required liquid into the threshold. And then return the plugs to their place. After the procedure, you should drive a short distance, no more than 3 km, while slowing down more often.
The liquid will properly spread over the entire inner surface, where the corrosion process begins.
Well, now about the liquid that needs to be poured into the technical holes. This is ordinary used machine oil.
It is advisable to do the procedure when the oil is still warm. I make a mixture of waste and pushsal at a ratio of one to one.
This simple way will keep your car's sills intact for a couple of years. And then the processing can be repeated.
If our information was useful to you, please give it a thumbs up and subscribe to the channel!
Source
Tools and materials for work
To repair thresholds on a VAZ 2107, you will need a lot of different tools and processing materials. Below is a list of tools and materials without which it is impossible to make a high-quality replacement of thresholds.
- Semi-automatic welding machine with accessories;
- Power tools (grinder, drill and accessories);
- A set of keys and sockets (for disassembling the interior);
- Ratchet driver;
- Hammer;
- Knife for chopping metal;
- Kerner;
- Marker;
- Compressor;
- Pneumatic gun for applying anti-corrosion agents;
- Several body pliers;
- Spray gun;
- Epoxy primer;
- Degreaser;
- Putty (with fiberglass and finishing);
- Red scotch-brite;
- Solvent;
- Sealant for welds;
- External anti-corrosion agent for application with an air gun (for example, Teroson RB2000, Body 951);
- Internal anti-corrosion agent for application with an air gun (e.g. APP-F400, Dinitrol ML, TecTyl 210R).
Step-by-step replacement process
- Start by completely disassembling the interior, removing seats, upholstery, and carpets.
- For ease of operation, dismantle the doors.
- Protect your car windows from sparks when welding and using an angle grinder.
- Disconnect the battery terminals and place the vehicle on a pit or tipper.
- Take the new threshold and place it on top of the old one. Next, use a marker to mark the lines along which you will cut the old threshold. From the factory, the edges of the threshold go under the front and rear fenders and are welded with an overlap.
- After drilling, use a knife to separate the threshold from the body along the resistance welding line.
- Drill out the resistance welding points and separate the amplifier from the body.
- Assess the condition of the connector and replace it in whole or in part.
- After welding the connector, clean off any minor rust with a grinder and prime everything with epoxy primer.
- Prepare the amplifier for welding, cut and prime where necessary.
- Drill holes at the resistance welding points at the top and bottom. Next, clean the soil in the weld areas and weld the amplifier.
- After welding, clean everything and prime with epoxy primer.
- Prepare the threshold for welding, cut it to size and drill holes at the resistance welding points.
- Clean the transport primer from inside the threshold and prime the threshold with epoxy.
- Install the threshold on the body and secure it with body pliers.
- Make “pot mitts” and slowly scald the threshold around it. In our case, in addition to the threshold, the pillar between the doors was also damaged, so two patches were welded onto it.
Clean the weld seams and clear the transport soil from the threshold.
- Prime the threshold with epoxy primer and let it dry thoroughly.
- “Stuff” the groove on the ground with Scotch Brite and apply sealant to the welded seams in the right places.
- If necessary, fill the face welds.
- Apply external corrosion protection using an air gun.
- After all work has been completed, apply an anti-corrosion compound to hidden cavities.
The process of replacing VAZ 2107 thresholds is clearly shown in this video:
Corrosion protection
Many motorists believe that only the outer part of the body requires rust protection. But few people know that the threshold cavities begin to rust from the inside. And no matter how efficiently and well they are processed, without proper periodic processing they can rot; of course, this is a matter of more than one year. It is quite easy to carry out anti-corrosion treatment yourself, but if this is your first time encountering this, it is better to contact a specialist.
Protection from the inside
There is a huge selection of products for treating internal hidden cavities. It's fairly easy to do the anti-corrosion treatment yourself. Before you start processing the threshold, you need to wash it thoroughly. The procedure is quite easy; the plugs are removed from both sides and the thresholds are washed with plenty of water. To do this, it is better to use a shower or hose. After completing the procedure, leave them for several days until completely dry. Next, the anticorrosive agent is applied using a special spray can.
Protection from outside
Carrying out protective manipulations on the outside is not particularly different from those carried out on the inside of the body. Anticorrosive is also used; before applying it you need to know the basic rules, namely:
- It is necessary to ensure that the layer of product is applied evenly along the entire length;
- Periodically dry the painted area with a hairdryer;
- For optimal results, the number of layers should be at least three;
- There must be a dwell time between phases of at least 5 minutes;
Read, it may come in handy: How to replace a broken headlight glass
After two hours the car is ready for use.
Important: if you are using mastic-based anti-corrosion mixtures, you cannot use a hair dryer.
Traditional methods
By folk methods of combating corrosion we mean combining special products with oils or with each other. Let's look at some of them:
- “Cannon lard” and “Cordon” mastic are mixed together in equal proportions. Using a brush, apply an even layer to the surface;
- “Gun lard” is mixed with K-15 conservation oil, with the obligatory addition of “dry fuel”. It is applied with a brush, and driven into hidden cavities using large medical syringes.
Tips for replacing thresholds and protecting them during operation
- Instead of paint, you can use a Gravitex-type anti-corrosion coating.
- After replacing the thresholds, they must be subjected to anti-corrosion treatment by “blowing out” the inner surface of the boxes with Movil. If this is not done, the thresholds will have to be replaced again in the near future.
- The lower part of the thresholds (including the bottom of the car) should be treated with anti-corrosion bitumen mastic, which prevents corrosion and improves the protection of the paintwork from damage.
Now you know how to replace the thresholds of a VAZ 2107 yourself. If you do not have the necessary qualifications as a welder or do not have a welding machine, you will not be able to replace the thresholds. In this case, it is better to seek help from professionals who will replace the thresholds quickly and efficiently.
If you find an error, please select a piece of text and press Ctrl+Enter.
Choosing a product for treating car thresholds with your own hands
Despite the abundance of various means of protecting thresholds from corrosion, many car enthusiasts are wondering: how to treat thresholds? We will give a complete and comprehensive answer to this question. It will help the car enthusiast make the right choice.
1. Anti-corrosion spray BODY-950, capacity 400 ml
Anti-gravel, created on the basis of special resins. Has high adhesion and is resistant to damage. Application requires the use of a special gun. Dries quickly. Cost 4-6$.
Anti-gravel aerosol ELTRANS, capacity from 400 to 1000 ml.
Inexpensive but effective remedy. Does not require the use of a special gun. Consumption of one layer is 400 grams per 1 m². It is recommended to apply in 2-3 layers. Cost for 400 ml. 2-3$.
Replacing thresholds on a VAZ 2107 - instructions and tips
The corrosion resistance of a car body is very rare. VAZ 2107 belongs to the category of cars that will soon need threshold repairs. The reason for the repair is corrosion damage. If these body parts are treated with anti-corrosion substances upon purchase, then corrosion will appear no sooner than in ten years. If the procedure is not completed in a timely manner, then in five years the thresholds for the VAZ 2107 may need to be replaced.
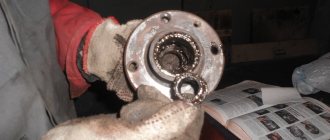
Strengthening thresholds
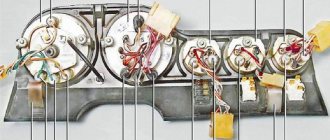
When purchasing thresholds for the “seven”, the driver also receives a pair of amplifiers. This is a pair of long rectangular plates installed under the thresholds. There is a row of holes in the center of each plate. The diameter of each of them is about 2 cm (sometimes it is more). The thickness of the amplifier itself rarely exceeds 5 mm. It is clear that such a structure cannot be called durable. It is for this reason that many car enthusiasts prefer, when replacing rotten thresholds, to install new, homemade amplifiers that are more consistent with their name. In this case, any available material is used. The most commonly used are rectangular steel tubes. That is, the narrow edges of two identical pipe sections are welded, resulting in the structure shown in the photo below.
Threshold reinforcement welded from two parallel rectangular pipes
This pair of pipes is welded to the body instead of a standard amplifier, after which the thresholds are installed according to the standard method outlined above.
Reasons for replacing thresholds
Rotten thresholds on the VAZ 2107 are a matter of time. To extend the life of these body elements, you need to know the reasons why such an unpleasant problem as corrosion destruction occurs. The reasons why the threshold on the VAZ 2107 rotted are as follows:
- Corrosion - the underbody and sills are exposed to maximum moisture, which is the cause of damage to body elements. Moisture that gets inside the space of a part cannot evaporate for a long time, so a process such as corrosion occurs. The element deteriorates at an accelerated rate when it is exposed to water and reagents that are sprinkled on roads during icy conditions. The first thing that occurs is pinpoint corrosion, which is also called “saffron milk caps”. They are the first harbingers that you will soon need to resort to repairs.
- Mechanical impacts - damage to the car body can accelerate the process of rotting. This type of damage includes impacts from rocks, curbs or vehicles. When the device is deformed, the geometry of the body is disrupted. Mechanical damage causes damage to the paintwork, allowing moisture to enter and destroy the metal surface of the body.
If one of the above reasons is observed, then the driver will soon need to have the devices repaired. Repair most often involves replacing them. When replacing, you need to weld the thresholds, so you will need a welding machine.
What is needed for replacement
Replacing thresholds on a VAZ 2107 is a rather labor-intensive procedure, but almost every car owner can do it with his own hands. To repair thresholds, you will need to first prepare tools and materials. These include:
- Power tools - drill, grinder and welding machine.
- Primer and paint.
- Clamps - at least 4 pieces.
- Special joint sealant.
- New elements that will be installed to replace old ones.
These are the basic tools and materials. Additionally, you will need hand tools and supplies. During the work, it may be necessary to replace the amplifier if it is rotten. You can determine its serviceability after removing the old thresholds on a VAZ 2107 car. In this case, corrosion spots or holes will be detected on the amplifier. Let's look at how to remove and replace car body parts below.
Procedure for replacing thresholds on the seven
How to replace thresholds on a VAZ 2107 is described in detail in the material. We begin to carry out work, for which the following sequence is observed:
- Old rotten thresholds must be removed using a grinder. To do this, it is recommended to first remove the front and rear doors and drive the car onto a one-way overpass.
- After this, the condition of the threshold amplifier is checked. The amplifier looks like a steel plate with holes. If this plate shows signs of corrosion damage, then it is necessary to replace the entire amplifier or weld the damaged part.
- Using a grinder and special wheels, you will need to clean the surfaces for welding work. To do this, you will need to remove all unevenness and dirt.
- If amplifiers are being replaced, they must first be tried on and adjusted to the installation location. To do this, corresponding holes with a diameter of 4-6 mm are drilled every 50-70 mm.
- The amplifier is welded to the car body. The joints must be cleaned, and then the entire surface of the element must be treated with an anti-corrosion agent.
- After this, you can begin installing new thresholds on the VAZ 2107. The new element is tried on, after which it is fixed using clamps or clamping pliers.
- Holes are drilled through which the welding connection will be made. Any type of welding is suitable for the job, but it is better to use a semi-automatic welding machine, since the thickness of the metal thresholds does not exceed 1 mm.
- Next, welding is applied. First, we weld the part in the drilled holes around the perimeter, and then you need to weld the part to the car pillar. It all depends on the experience of the welder. The neater the seam, the less work will need to be done after welding.
- After the part is welded, you can begin cleaning the seams. After cleaning, you need to coat the joints with a special joint sealant.
- Now you need to putty the joints. Putty is needed to level the surface of the thresholds with the surface of the car body.
- At the final stage, the part is painted. It is important to take your time here and adhere to all technologically recommended deadlines. After painting, you must also wait until the paint is completely dry.
Plastic thresholds
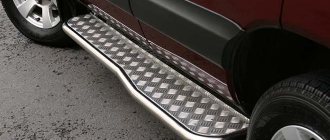
The VAZ 2107 is a rather old car, which is no longer in production at the moment. Nevertheless, the “seven” is still popular in our country to this day, and many drivers want to somehow make their car stand out from the crowd. Very often, a so-called body kit is used for this, which includes plastic sills (sometimes these parts are called sill moldings, sometimes plastic overlays, it’s all the same thing). The function of plastic thresholds is purely decorative; these details do not solve any practical problem.
A set of factory plastic thresholds for the VAZ 2107, which can be purchased at any tuning spare parts store
Particularly advanced drivers make plastic thresholds themselves. But for this you need to have special equipment for working with polymer material, plus you need to get the industrial polymer itself somewhere, which is not so easy. Therefore, car owners take the easier route and simply buy plastic thresholds; fortunately, there is no shortage of them now. But when choosing pads in a store, you should consider several nuances:
- In addition to purely aesthetic qualities, attention must also be paid to the mechanical properties of the thresholds. The linings purchased should not be too hard, because such products quickly crack, especially if the machine is operated in cold regions of the country. For this reason, fiberglass overlays should be abandoned;
- The best choice for the “seven” would be plastic linings with the addition of synthetic resins. These linings are flexible and do not crack due to temperature changes or exposure to road chemicals.
As you might guess, plastic thresholds are installed on top of standard steel thresholds. Here's what you need to install them:
- paint matched to the color of the car;
- black primer for plastic;
- electric drill;
- set of self-tapping screws;
- marker;
- set of plastic thresholds.
Sequencing
The most important point: at the initial stage, accurate markings for the screws are extremely important. The success of the entire installation of overlays depends on it.
- The trim is applied to the standard threshold, and the holes for the screws are marked using a marker. It is necessary to ensure that the overlay is pressed tightly against the standard threshold during the marking process. The help of a partner will be very helpful. If you don't have a partner, you can secure the pad with several clamps for the tightest possible fit.
Before installation, the overlay should be carefully tried on and assessed for any cracks or distortions. - After marking, the trim is removed, and holes for self-tapping screws are drilled in the standard threshold.
- The standard threshold is carefully cleaned of old paint. A layer of new primer is applied to the cleaned surface. After the soil dries, the threshold is painted.
- When the paint has dried, the plastic trim is screwed to the standard threshold with self-tapping screws.
- If the paint on the surface of the standard thresholds is not damaged, then you can do without stripping them and subsequent repainting. Simply drill the designated holes and then prime them.
The plastic door sill is carefully fitted and mounted on self-tapping screws - Before screwing the trim to the threshold, some drivers apply a thin layer of lithol to it. This helps prevent rust from forming under the trim and maintains the integrity of the paint finish. The same lithol is applied to the screws before screwing them into the thresholds.
Procedure for replacing thresholds on a VAZ 2107
Old rotten thresholds have to be cut off with a grinder. To provide access to the entire surface of the threshold, the doors must be removed. If the body is decrepit, spacers must be installed before removing the sills. Further operations are performed in the following sequence:
- Cut off the outer parts of the thresholds with a grinder (you can use a chisel or a metal saw).
- Check the condition of the threshold amplifier (a wide steel plate with holes around the perimeter).
- If the amplifier is rotten, cut it off with a grinder.
- Remove the remains of the thresholds and reinforcement from the seams of the body.
- Clean the surface for welding, removing any unevenness and dirt that would interfere with a quality connection.
- If the old threshold amplifiers had to be dismantled, try on new ones and adjust them to the seat. Drill holes with a diameter of 4-6 mm at intervals of 50-7 mm around the perimeter of the amplifiers.
- Weld the amplifiers, having previously secured them with clamps. Start welding from the middle pillar, welding the upper and lower parts in parallel to the body.
- Try on the thresholds. Cut off all excess from them and bend them, giving the desired shape.
- Remove primer and paint from parts of the threshold in the places where the welding seam will be.
- Pre-fix the thresholds with self-tapping screws.
- Install the doors, check the correct fit of the thresholds, paying special attention to the gap between the doors and the thresholds.
- Weld the sills, starting welding from the B-pillar. It is necessary to weld the lower and upper edges of the threshold in parallel. This is a critical operation that determines the rigidity of the car body. Therefore, you need to pay special attention to the quality of welding seams.
- Clean weld seams and threshold surfaces.
- Fill traces of welding seams.
- Prime the outer surface of the thresholds and allow the primer to dry.
- Paint the sills.
How to treat thresholds from the inside
In 2021, there are several effective techniques to protect box structures from rotting.
- Gravitex - the product is usually sold in spray form with an additional nozzle. The product is fed through drainage holes into the cavity, where it covers the metals and hardens. The factory version is stably sealed for up to 5 years and is easy to use at home.
- Movil - a similar product is splashed into the cavity where it settles and protects the metal.
- Filling the waste with gun fat/paraffin. The classic method of protection from garage specialists is to pour a heated mixture of waste material with wax or gun fat into the technological holes. Some people recommend using clean oil. In theory, the product covers all surfaces with a greasy film and prevents the penetration of water and, as a result, the oxidation of metals.
If everything is clear with the first two points, the third should be examined in more detail.
Tips for replacing thresholds and protecting them during operation
- Instead of paint, you can use a Gravitex-type anti-corrosion coating.
- After replacing the thresholds, they must be subjected to anti-corrosion treatment by “blowing out” the inner surface of the boxes with Movil. If this is not done, the thresholds will have to be replaced again in the near future.
- The lower part of the thresholds (including the bottom of the car) should be treated with anti-corrosion bitumen mastic, which prevents corrosion and improves the protection of the paintwork from damage.
Types of anti-gravel for car thresholds
The number of anti-corrosion treatment agents for car sills is large. By and large, they are not much different from each other.
Means for protecting car thresholds from rust can be divided into several groups:
1. Period of use.
- permanent protection;
- temporary protection;
2.Packaging.
- aerosol can ready for use;
- aerosol can for a special gun;
- metal cans;
- plastic containers.
Do-it-yourself replacement of VAZ 2106 thresholds - detailed instructions
The issue of replacing thresholds is especially relevant for “our” VAZ cars. This is explained by the low quality of the body metal, insufficient anti-corrosion treatment, as well as the harmful environment in which our cars have to live. By harmful environment, I mean road chemicals that are used to treat roads in winter, high humidity and bad roads.
Today I want to talk in detail about how to replace VAZ 2106 thresholds with your own hands. Thanks to this photo report, you can repeat the repair of thresholds at home; in any case, I think this guide will be useful to someone.
Preparatory work
Anti-corrosion treatment of the bottom, as well as the inner sides of the wings, begins with the removal of used damaged coating, pockets of rust and corrosion, dirt and grease deposits. Proper adhesion of anti-corrosion mastic to body elements is only possible on a well-cleaned and degreased surface.
Old peeling treatment can be removed with a metal brush and scraper. They also remove loose layers of rust. After this rough treatment, the body elements should be cleaned with sandpaper and degreased with white spirit.
Next, the cleaned and degreased surface is processed...
a rust converter that turns the top layer of metal into a chemically inactive compound. It is advisable to use a high-speed converter.
Now you can treat with anti-corrosion mastic or paste; the possibility of using one or another tool - a brush or just a mitten worn on the hand - depends on its viscosity. The treatment should be carried out so that the anticorrosion layer has approximately the same thickness, without large sagging or missing areas of treatment.
For do-it-yourself anti-corrosion treatment, bitumen-based mastics are best suited. They have proven themselves to withstand the effects of water and salts, but are not very resistant to sand and road gravel.
In severe frosts, bitumen mastic becomes brittle and can crack or even fall off from impacts.
Most susceptible to corrosion...
Hidden cavities, which are almost impossible to clean well, are treated with a liquid anti-corrosion preparation such as Movil or Resistin. The use of these materials is allowed even on surfaces damaged by corrosion or previously coated with oil.
Step-by-step instructions for replacing the VAZ 2106 threshold
First of all, you need to take care of the tool; I will list only some of the most important of them:
- Welding machine;
- Electric drill;
- Bulgarian;
- New thresholds;
- Primer;
- Dye.
A few words about the welding machine. The fact is that it is advisable for you to cook the thresholds semi-automatically in a carbon dioxide environment.
- I started by repairing the door hinges, I won’t describe how to do this, because the article is about how to replace thresholds, especially since yours may be in perfect order. Someone will ask what does the door hinge have to do with the threshold? The fact is that for proper operation you need to constantly monitor how the door will fit and what the gap between the door and the threshold will be. Sagging doors can be misleading.
- After repairing the doors, you can remove them and begin cutting out the unnecessary rotten part of the threshold. In my case, replacing the thresholds requires the mandatory dismantling of the wings, since I decided to replace them at the same time.
- If the car body is “decrepit” or rotten, install stretch marks in the interior.
- Now you need to cut off the outer part of the threshold; to do this, use a grinder or a metal file; a chisel is also an option.
- Having removed the outer part, proceed to remove the threshold amplifier (a wide metal plate with round holes around the entire perimeter).
6. In my case, there was no amplifier inside the threshold; most likely it was removed by the previous owner of my car.
- When all the rotten parts of the threshold have been removed, all that remains is to remove their remains that remain on the seams.
- After this, you need to properly clean the surface for subsequent welding work.
- Try on the new threshold amplifier and trim it if necessary.
- The holes drilled for welding are clearly visible in the photo.
- Weld the threshold reinforcement into place using the holes in the threshold reinforcement itself. You can make such holes using a 4-6 mm drill, approximately every 5-7 cm.
- For convenience, you can use clamps; with their help you can quickly and firmly secure the amplifier. Before installing the amplifier and starting welding work, you need to carefully prepare the surface of the body and all other irregularities that may interfere with a good connection.
13. Check again that the threshold is set correctly. When you decide that it is in its place, start welding the threshold amplifier. Personally, I used the parallel welding method, that is, simultaneously tack both the bottom and the top, starting from the central post. When the amplifier is welded, it is necessary to clean up the weld marks. You should get a perfectly smooth and even surface. Remember that the sill reinforcement must be welded to: B-pillar, A-pillar, etc.
14. When the amplifier is welded, you need to try on the outer part of the threshold. Is that all here too? Any excess is cut off or folded.
15. Now prepare the outer part of the threshold for installation. Your task is to remove transport primer, paint, etc. from the surface as thoroughly as possible.
16. Using self-tapping screws, you need to secure the outer part of the threshold. After this, you need to hang the doors and “figure out” whether everything fits together. Pay attention to the gap, it should be even and the same everywhere. Also pay special attention to the gap between the threshold and the door; nothing should protrude or stick out.
17. Welding is done from the middle post. You need to slowly move in both directions, that is, boil the bottom and top, going towards the front fender, as well as the bottom and top towards the rear fender. It should be remembered that the outer part of the threshold also needs to be welded to the middle A-pillar. Pay special attention to these two places, as they form the rigidity of the VAZ 2101 body.
When everything is installed and welded, start cleaning the surface, then everything needs to be primed and painted.
As they say, that's all for me! The replacement of the VAZ 2101 thresholds has been completed; if necessary, this work can be repeated in another place that needs repair.
Report on the restoration of a rotting body
Theme Options
Search by topic
In Lada cars in the USSR, men poured waste into the thresholds, then drove them on bad roads so that the oil would splash in the threshold. They drained it. The thresholds turned out to be eternal
.
as I understand it, the eternal rapids made cannon fat,
When I read about detention, I had the same doubts, thank you, Vasily, you confirmed my fears.
as I understand it, the eternal rapids made cannon fat,
In our family there was a VAZ 2103 produced in 1975. the thresholds were intact, my grandfather regularly poured a couple of liters of waste there once a year, there were simply no problems with the thresholds! I drove it myself until 2008. those. For 33 years they have done nothing!
Yes, I agree there isn’t much space there, but there are those 2 holes, at the beginning of the threshold and at the end! If you remove the wheels, you can barely push the nose of a Karcher in there! You can, of course, drill 2 large holes under the trims on the sills and slam through them, but of course you wouldn’t want to make extra holes! I considered the option of filling it all with a large amount of waste so that all the dirt would be saturated with it and in the end it would look like a “sponge” soaked in oil, although if water gets under this sponge.
for cavities you need a product that has the penetrating abilities of Movil and wax products are good while they are fresh. Ideally, they should not dry out or crack. what they can't offer about time
If only everything were that simple.
for cavities you need a product that has the penetrating abilities of Movil and wax products are good while they are fresh. Ideally, they should not dry out or crack. what they can't offer about time
From Soviet poverty. Tell me that Zhigulevskoye oil was poured into the engine because of poverty.
Well, I have a Soviet transmission NOT WORKING 3 liters, I can put it in there too! Only I don’t think this will change anything!
I don’t see the difference between used oil and fresh oil when its purpose is to lubricate the threshold from the inside.
washing (chemical), cleaning (mechanical), air blowing, rust converter, washing, drying, Movil. I think this recipe will work.
By the way, for a penetrating effect, you can add kerosene to the process; it impregnates rust well!
a kerosene molecule will penetrate, but an oil molecule will not. and where is the result? the oil gives a very thin film on the verticals, it has very weak adhesion to the metal, which in turn, if moisture (water) gets in, will wash away the oil (since water is heavier) can you still trust Movil? its properties are better than those developed.
I completely agree with you about Movil, but I want to get confused!
Or maybe make your own Movil? All components are available! The only question remains about inhibitory additives.
Why change the oil in the internal combustion engine?
There are many factors, the main ones are the accumulation of soot in the oil, the destruction of the structures of additive molecules as a result of loss of viscosity and all that, many reasons! But I wrote that the purpose of the oil is to lubricate the surface, and this task can be accomplished in the same way, both used and fresh engine oil! Yes, after all, I change the oil every 6 thousand, it’s not even maintenance, it’s just a little dirty!