Cylinder head gasket - replacement
We remove the cylinder head without disconnecting the carburetor, intake manifold and exhaust manifold from it.
To do the job you will need a torque wrench.
1. Place the car on an inspection hole or overpass (see “Preparing the car for maintenance and repair”).
2. For ease of work, remove the battery (see “Battery - removal and installation”).
3. Drain the coolant (see “Coolant - checking the level and replacing”).
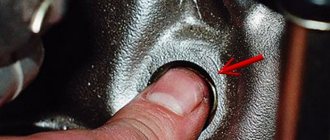
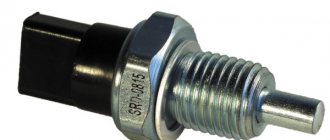
4. Disconnect the wire tip from the coolant temperature indicator sensor (see “Coolant temperature indicator sensor - replacement”).
5. Remove the exhaust pipe from the exhaust manifold studs (see “Reception pipe - removal and installation”).
6. Remove the air filter housing (see “Air filter housing - removal and installation”).
7. Disconnect the air damper drive rod, the fuel hose, the crankcase ventilation hoses, the vacuum ignition timing regulator and the wire block from the solenoid valve from the carburetor (see “Carburetor - removal and installation”).
8. Set the piston of the 4th cylinder to the BMT position of the compression stroke (see “Gap between valve levers and camshaft cams - adjustment”).
9. Remove the housing assembly with the camshaft. We mark the position of the valve drive levers and remove the levers with springs (see “Camshaft and valve levers - replacement”).
10. We tie a chain with wire and pass it through the window in the cylinder head.
11. Remove the ignition distributor (see “Ignition distributor - removal and installation”) with high-voltage wires.
12. We unscrew the spark plugs from the cylinder head (see “Spark plugs - checking condition and replacing”).
13. Remove the warm air intake (see “Intake pipe and exhaust manifold gaskets - replacement”).
14. Unscrew the nut of the upper fastening of the starter heat shield (see “Starter - removal and installation”).
15. Remove the tip of the “mass” wire from the exhaust manifold stud (see “Intake pipe and exhaust manifold gaskets - replacement”).
16. Disconnect the heating hose from the fitting of the inlet pipe.
17. Disconnect the brake booster hose from the intake manifold fitting.
18. After loosening the clamps, remove the thermostat bypass hose and the radiator supply hose.
19. Having loosened the clamp, remove the coolant supply hose to the heater radiator from the pipe.
12 mm socket wrench
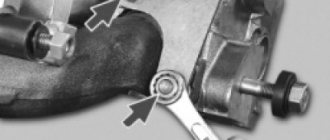
Using an extension, unscrew the ten bolts of the internal fastening of the head to the cylinder block.
13 mm socket wrench
unscrew the bolt externally securing the head to the cylinder block.
22. Remove the cylinder head along with the intake manifold, exhaust manifold and carburetor.
23. Remove the gasket from the two centering bushings of the cylinder block.
1. Install a new gasket and cylinder head in the reverse order, passing a wire and chain through their windows.
2. We check the coincidence of the previously applied marks.
3. Before installing the cylinder head, it is necessary to lubricate its mounting bolts with engine oil in advance and allow excess oil to drain, allowing the bolts to soak for at least 30 minutes.
The cylinder head bolts may only be reused if they have been extended to a length of no more than 115.5 mm. If the length is longer, the bolt must be replaced.
4. Tighten the cylinder head bolts in four steps:
— pre-tighten the ten bolts of the internal head fastening to a torque of 20 Nm;
- tighten them with a torque of 69.4-85.7 Nm.
— turn the bolts 90°;
— turn the bolts again by 90°.
Lastly, tighten the external fastening bolt (11) to a torque of 30.6-39.1 Nm.
Tightening procedure for cylinder head bolts
5. Install the housing with the camshaft on the studs of the cylinder head and tighten the fastening nuts evenly (see “Camshaft and valve levers - replacement”).
6. Untie the wire, install the sprocket with the chain on the camshaft, tighten the fastening bolt and lock it by bending the petal of the lock washer.
7. “Charge” the chain tensioner and, having installed it in its original place, “discharge” (see “Timing chain tensioner - replacement”) and adjust the chain tension (see “Timing chain - replacement”).
8. Adjust the gap between the levers and the camshaft cams (see “The gap between the valve levers and the camshaft cams - adjustment”).
9. Adjust the tension of the generator drive belt (see “Generator drive belt - tension adjustment and replacement”).
10. Install the ignition distributor by directing the contact of the slider to the high-voltage terminal of the 4th cylinder (see “Ignition distributor - removal and installation”). We check and, if necessary, adjust the ignition timing (see “Ignition timing - checking and adjustment”).
11. Installation of the removed parts is carried out in the reverse order.
12. Fill the system with coolant (see “Coolant - checking the level and replacing”).
Malfunctions when removal and installation of the cylinder head are required
There are a number of malfunctions due to which the cylinder head of the VAZ “six” has to be removed from the car for further diagnostics or repairs. Let's look at them in more detail.
Gasket burnt out
The following signs indicate that the cylinder head gasket has failed (burnt out or was punctured):
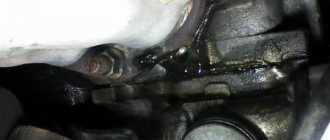
- the appearance of leaks or gas breakthrough at the junction between the engine block and the head. With this phenomenon, extraneous noise appears in the operation of the power plant. If the outer shell of the seal ruptures, traces of lubricant or coolant may appear;
- formation of an emulsion in motor oil. This happens when coolant gets into the oil through the gasket or when a crack forms in the BC;
The formation of an emulsion indicates that coolant has entered the oil. - the appearance of white smoke from the exhaust system. White exhaust occurs when coolant enters the combustion chamber of the engine. In such a situation, the liquid level in the expansion tank gradually decreases. Untimely repairs can lead to water hammer. Water hammer is a malfunction that is caused by a sharp increase in pressure in the sub-piston space;
If the gasket is damaged and coolant is leaking into the cylinders, thick white smoke will come out of the exhaust pipe. - entry of lubricant and/or exhaust gases into the engine cooling system. You can detect whether lubricant has entered the coolant by the presence of oil stains on the surface of the liquid in the expansion tank. In addition, when the seal of the gasket is broken, bubbles may appear in the tank, indicating that exhaust gases have entered the cooling system.
The appearance of air bubbles in the expansion tank indicates exhaust gases entering the cooling system
Video: Damage to the cylinder head gasket
Damage to the cylinder head mating plane
The following reasons can lead to the formation of defects in the mating surface of the block head:
- long-term operation of the power unit;
- motor overheating;
- poor quality coolant.
Defects of this kind are eliminated by processing the plane, with preliminary dismantling of the head.
Damage to the mating plane using the example of the Kalina cylinder head
Cracks in the block head
The main reasons that lead to the appearance of cracks in the cylinder head are overheating of the engine, as well as improper tightening of the mounting bolts during installation. Depending on the nature of the damage, the head can be repaired using argon welding. In case of serious defects, the cylinder head will have to be replaced.
Overheating of the engine can lead to a crack in the cylinder head.
Wear of guide bushings
With a high mileage of the engine or the use of low-quality engine oil, the valve guides wear out, which leads to a violation of the tightness between the seat and the valve plate. The main sign of such a malfunction is increased oil consumption, as well as the appearance of bluish smoke from the exhaust pipe. The problem is resolved by replacing the guide bushings.
Valve seat wear
Valve seats can wear out for several reasons:
- use of low quality fuel;
- long engine mileage;
- Incorrect ignition setting.
The malfunction can be solved by straightening or replacing the saddles. In addition, the ignition system must be checked.
Seat defects lead to a loose valve fit and loss of combustion chamber tightness.
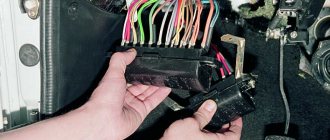
Broken spark plug
Quite rarely, but it happens that as a result of over-tightening the spark plug, a part breaks off on the thread in the spark plug hole. To remove the remains of the cylinder head spark plug element, you need to dismantle the threaded part and unscrew it using available tools.
CPG malfunctions
If there is a problem with the cylinder-piston group of the engine, the cylinder head also has to be removed. The most common failures of the CPG include:
- increased wear of cylinders, rings and pistons;
- piston damage;
- occurrence of rings.
If the cylinders are worn excessively, the engine is completely disassembled to replace the piston group, as well as to bore the internal cavity of the cylinders on a machine. As for the damage to the pistons themselves, although they rarely burn out. All this leads to the need to dismantle the cylinder head and replace faulty parts. If the rings are stuck, normal operation of the cylinder and the engine as a whole becomes impossible.
If the rings are stuck, normal engine operation is disrupted
Ring sticking - rings are stuck in the piston grooves due to the accumulation of combustion products in them. As a result, compression and power are reduced, oil consumption increases and uneven cylinder wear occurs.
cylinder head VAZ 2106
The cylinder head is made of an aluminum alloy containing a certain percentage of copper and tin in order to give it softness and elasticity. With these properties, it is pressed tightly against the gasket, preventing gas breakthrough.
The entire head is attached to the cylinder block with eleven bolts, ten large and one small, which are tightened with a certain sequence and force.
Replacing the gasket
1. Remove the cylinder head from the engine complete with intake and exhaust manifolds.
2. Disconnect the wire from the negative terminal of the battery. Drain the coolant.
3. Remove the carburetor.
4. Remove the ignition distributor with high-voltage wires.
5. Remove the block head cover.
6. Remove the camshaft assembly with the bearing housing. Disconnect the exhaust system from the exhaust manifold and remove the coolant drain pipe from the heater radiator.
7. Remove the chain from the camshaft sprocket.
Video “Replacing the cylinder head gasket on a classic VAZ”
The cylinder head gasket is located between the cylinder head and the cylinders and performs several functions:
Thus, it separates three systems: gas distribution, cooling and lubrication. Experiencing heavy loads, it wears out quickly.
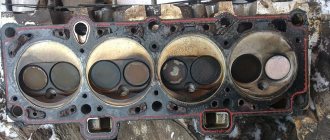
Gasket with traces of breakdowns
The following are signs that may indicate the need for replacement:
- insufficient pressure in one or more cylinders;
- foaming of the coolant, a drop in its level in the absence of an external leak, occurs due to gases entering the cooling system;
- emulsion on the oil dipstick, an increase in the oil level in the pan, the reason for this is the presence of antifreeze in the lubrication system;
- the appearance of oil stains on the surface of the coolant and the radiator neck indicates a broken gasket in the area of the oil channel;
- white smoke in the exhaust gases, while the coolant level drops;
- squeezing out the coolant fluid from the expansion tank in the form of foam indicates a violation of the tightness of one of the cylinders;
- The coolant level drops and the engine boils.
The video describes the signs of gasket burnout.
Damage to the gasket may be caused by:
- low-quality consumables;
- overheating of the power unit;
- improper tightening of cylinder head bolts;
- insufficient coolant level;
- Incorrect installation of the cylinder head.
This video demonstrates replacing the cylinder head gasket on a classic VAZ.
The cylinder head gasket is located between the cylinder head and the cylinder and serves several functions:
- Seals the place where the head adjoins the cylinder block;
- prevents oil leakage and coolant (OJ) from entering the cylinders;
- suppresses internal pressure and heat.
Thus, it separates three systems: gas distribution, cooling and lubrication. Experiencing heavy loads, it wears out quickly.
See:
Gasket with traces of breakdown
Below are signs that can help you determine the need for replacement:
- insufficient pressure in one or more cylinders;
- foaming of the refrigerant, a drop in its level in the absence of an external leak, occurs due to gases entering the cooling system;
- emulsion on the oil dipstick, an increase in the oil level in the pan, the reason for this is the presence of antifreeze in the lubrication system;
- the appearance of oil stains on the surface of the coolant and the radiator neck indicates a broken gasket in the oil channel area;
- white smoke in the exhaust gases and the coolant level drops;
- extrusion of coolant from the expansion tank, since foam indicates a leak in one of the cylinders;
- The coolant level drops and the engine boils.
The video talks about the signs of gasket burnout.
- low-quality consumables;
- overheating of the power unit;
- improper tightening of cylinder head bolts;
- insufficient coolant level;
- Incorrect installation of the cylinder head.
How to replace the head gasket in the cylinder block of a VAZ 2106
Over time, the head gasket has to be replaced. Following the instructions, this will not be difficult to do. If the gasket in your VAZ 2106 car is worn out, repairs cannot be avoided. This requires replacement. For repair work you will need a wrench with sizes 8,10,13,17, a screwdriver, a torque wrench and pliers. Before starting the repair, you will need to dismantle some parts that may interfere with the completion of tasks.
- First of all, you will need to remove the head cover. You can read more about this process in the article VAZ 2106: replacing the cover gasket.
- After successfully removing the cap, drain the cooling system fluid into a prepared container.
- In order to de-energize the car, you will need to disconnect the battery, as well as the ground wire bolted to the cylinder block.
- After this, loosen the fastening clamps of the cooling system pipes and carefully remove them.
- Remove the radiator hose and thermostat bypass hose by first loosening them.
Please note that during repair work, the ignition distributor cap may also cause you some inconvenience. Therefore, it must be removed along with the spark plug wires. In addition, you can remove the distributor itself, since it may be damaged, because the cover will be removed. After this, disconnect the heating hose and the vacuum regulator hose from the carburetor. The air intake must be removed as well as the throttle linkages. Don't forget about the temperature control sensor. It must be removed from the cylinder head by moving the rubber cap, then the wire, and only then unscrew the sensor without any hindrance.
- Next, you should align the marks on the timing shaft drive sprocket with the mark on the camshaft bearing housing. This must be done so that during assembly you do not need to re-install the valve timing. Thus, aligning the marks, straighten the edges of the lock washer and unscrew the fastening bolt. The star itself should not be removed. Remember this.
- The chain tension nut should be loosened by about half a turn. By pressing the “tensioner” shoe with a screwdriver, the chain will loosen, after which you can easily tighten the nut again.
- After completing the procedures, you can safely unscrew the sprocket mounting bolt and remove it. Be sure to secure the chain to prevent it from falling.
- Remove the camshaft bearing housing by unscrewing all nine nuts. Try not to drop or lose the pucks.
- Ten cylinder head bolts will open in front of you, and another one will be located on the outside.
After you remove all these mounting bolts, lift the block head itself in order to remove the fluid drain pipes from the studs. Then remove the head itself and replace the old gasket with a new one. After successful replacement, you should carefully carry out all assembly procedures in the reverse order. Use a torque wrench to tighten the head bolts. Once all the parts are assembled, don't forget to adjust the valves.
How to replace the head gasket in the cylinder block of a VAZ 2106
Over time, the head gasket has to be replaced. Following the instructions, this will not be difficult to do. If the gasket in your VAZ 2106 car is worn out, repairs cannot be avoided. This requires replacement. For repair work you will need a wrench with sizes 8,10,13,17, a screwdriver, a torque wrench and pliers. Before starting the repair, you will need to dismantle some parts that may interfere with the completion of tasks.
- First of all, you will need to remove the head cover. You can read more about this process in the article VAZ 2106: replacing the cover gasket.
- After successfully removing the cap, drain the cooling system fluid into a prepared container.
- In order to de-energize the car, you will need to disconnect the battery, as well as the ground wire bolted to the cylinder block.
- After this, loosen the fastening clamps of the cooling system pipes and carefully remove them.
- Remove the radiator hose and thermostat bypass hose by first loosening them.
Replacing the cylinder head gasket for a VAZ 2106
If the head gasket wears out on a VAZ 2106 car, it will be necessary to make repairs, namely, replace the cylinder head gasket. To carry out repair work, we will need wrenches “8” “10” “13” “17”, a screwdriver, pliers and a torque wrench (to control the tightening force of the bolts). To replace the gasket, it is necessary to dismantle the following parts that will interfere with our work:
- First of all, it is worth freeing yourself from the cylinder head cover; more details about this were written in the article about replacing the cylinder head cover gasket.
- Carefully drain all liquid from the cooling system into a prepared container.
- De-energize your car by disconnecting the battery, as well as the ground wire that is bolted to the cylinder block.
- After which you should loosen the clamps securing the cooling system pipes and remove them. At the same time, loosen and remove the thermostat bypass hose and the radiator supply hose.
- During the repair work, you will be hampered by the ignition distributor cap, which must be removed along with the spark plug wires; you can even remove the entire distributor, since without a cover it will be more susceptible to damage.
- Disconnect the ignition distributor vacuum regulator hose and the heating hose from the carburetor.
- Remove the air intake, move all the throttle rods to the side so that they do not cause inconvenience during work. You also need to remove the temperature control sensor from the cylinder head, move away the rubber cap, disconnect the wire and unscrew the sensor.
- The next step in replacing the cylinder head gasket is to align the marks on the camshaft drive sprocket with the mark on the camshaft bearing housing. This action must be performed to eliminate the need to re-install the valve timing during reassembly. Having done this operation, straighten the edges of the lock washer securing the sprocket and unscrew the bolt. fastening without removing the sprocket itself.
- Loosen the chain tensioner nut about half a turn, take a screwdriver and use it to press the tensioner shoe, after which the chain will loosen and you can now tighten the tensioner nut back.
- Now you can completely unscrew the sprocket mounting bolt and remove it; secure the chain so that it does not fall.
- In the next step you need to remove the camshaft bearing housing, to do this you need to unscrew nine nuts, do not drop the washers when removing.
- You will see ten cylinder head bolts and the eleventh is located on the outside.
After removing the cylinder head mounting bolts, lift it slightly to remove the fluid drain tube from the stud, then remove the cylinder head.
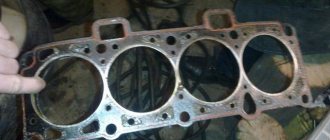
Remove the old gasket and replace it with a new one. Reassemble in the reverse order, tighten the head bolts with a torque wrench with a pressure force (3.4-4.2 kgf*m) in two passes. The correct tightening sequence for the camshaft head and camshaft bearing housing bolts is shown in the figure below. After assembling all the parts, adjust the valves.
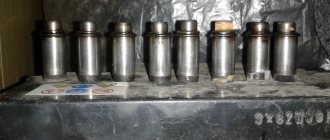
Installing rings on the piston
Once again, to what was said above, I repeat - this instruction implies that replacing the piston rings of a VAZ 2101 is done only with your own hands, in a private garage. Therefore, by default, we do not have any “sophisticated” tools and use available materials to install the rings on the piston and the entire piston with rings into the cylinder. In our case, this is... a tin can.
We cut out metal strips from a tin can and install them around the entire circumference, at even intervals;
Advice! One strip should be under the “lock” of the ring to prevent scratches.
- We move the desired ring along the metal strips to the bottom until it is opposite its seat;
- We lift the strips up, while the rings fall into the groove;
- The operation is then repeated for all rings.
Of course, you can perform this action with your bare hands, but the risk of breaking the rings and scratching the piston is too great.
Installing a piston into an engine cylinder
Lubricate the piston rings with oil, insert them into the cylinder block from above and, using a homemade mandrel, insert the piston into the cylinder.
Attention! During this procedure, make sure that each piston fits exactly into the cylinder from which it was taken and is in the same position as before. The cylinder markings must be on the lower connecting rod heads.
Assembly process
Next we assemble in reverse order:
We install the oil pump;
- We install a new pan gasket and the pan itself;
- We lower the engine into place and fasten the left support;
- Having previously lubricated it with graphite grease, install a new cylinder head gasket, guiding it along the center bushings;
- When installing the cylinder head, following the manufacturer’s instructions, tighten the cylinder head mounting bolts in a certain order and with the indicated force, in four steps:
- In the established order, we tighten the bolts with a torque of 20 N/m (about half the force);
- The same, but with more force, with a torque of 70 N/m;
- In the same order, all bolts are tightened;
- And once again we stretch it to .
- Using the marks, we establish the position of the crankshaft and, aligning the marks with the help of an asterisk, mount the camshaft bed;
- We put the sprocket itself in place with the chain on it and tighten the bolt securing it;
- We tighten the chain and turn the engine a couple of revolutions to make sure that the crankshaft and chain tension marks are installed correctly;
- In the final part, we install all the “attached” equipment in place, install a new oil filter, fill in coolant and oil, install the battery terminal and start the engine.
I hope that in this article I have clearly outlined how to replace piston rings on a VAZ 2110 with your own hands. In conclusion, I would like to give one last piece of advice regarding running in the engine after repairs.
Since we have the same diagnosis - we are the owners of domestic Zhiguli cars, the selection of spare parts must be approached with special attention. No one is immune from purchasing low-quality components
Therefore, to prevent possible deviations (shrinkage, foreign inclusions in the metal structure, temperature deformation), it is recommended to drive the first thousand kilometers with a load of no more than 50% of the nominal load, after which the oil should be changed.
Attention! It is the load, not the engine speed! Of course, the revolutions should also not be raised by more than half of the maximum permissible, but you must admit that the engine can be fully loaded even at two thousand if the gas pedal is pressed to the floor.
And those who are especially suspicious are allowed to extend the break-in period to five thousand, with oil changes at the first and fifth thousand kilometers.
Sources
- https://avtobrands.ru/chto-nuzhno-znat-o-porshnevyh-koltsah-vaz/
- https://masteravaza.ru/dvigatel/porshni/vaz-2101-zamena-porshnevyh-kolec-91