Tools:
- Torque wrench
- Phillips screwdriver
- Flat screwdriver
- Pliers
- Key for 8
- Key for 10
- Socket wrench 13
- Open-end wrench 17 2pcs
- Socket wrench 17
- Socket wrench 22
- Socket wrench
- Socket wrench extension
- Head for socket wrench 8
- Head for socket wrench 10
- Head for socket wrench 13
- Head for socket wrench 17
- Socket for 13 E-Torx socket wrench
- Ratchet wrench scraper
Parts and consumables:
- Engine head gasket
- Engine valve cover gasket
- Chain tensioner gasket
- Sealant
- Coolant for topping up
- Camshaft lock washer Sandpaper 180-240
Note: The cylinder head gasket is replaced if it is damaged.
The main signs of damage to the head gasket:
– insufficient compression (below 1 MPa (10 kgf/cm2)) in one or more cylinders;
– breakthrough of gases into the cooling system (seething, foaming of liquid in the radiator, rapid drop in the liquid level in the expansion tank in the absence of external leaks);
– coolant entering the lubrication system (emulsion on the oil level indicator, stratification of oil drained from the crankcase - especially noticeable in a transparent container);
– oil getting into the cooling system (oil film on the surface of the liquid in the expansion tank).
1. Remove the cylinder head cover as described here.
2. Drain the engine cooling system as described here.
3. Reduce the pressure in the supply system as described here.
4. Disconnect the throttle drive cable from the throttle assembly and receiver.
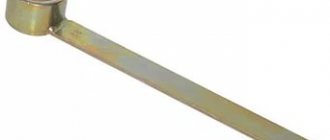
5. Remove the bearing housing together with the camshaft from the cylinder head studs, first making marks with a ratchet wrench and removing the camshaft sprocket as described here.
Ratchet key.
6. Remove the valve drive levers, unscrew all the hydraulic mounts of the levers from the holes in the cylinder head.
7. Remove the oil supply ramp to the hydraulic mounts.
8. Disconnect the wiring harness connector from the throttle position sensor.
9. Disconnect the wiring harness connector from the sensor, idle air control.
10. Disconnect the wiring harness connector from the engine coolant temperature sensor.
11. Disconnect the injector wiring harness connector.
12. Disconnect the wiring harness from the knock sensor.
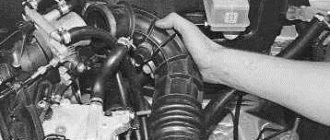
13. Move the engine harness to the side.
14. Disconnect the wires from the spark plugs.
15. Slide the protective cap and disconnect the wire from the coolant temperature gauge sensor.
16. Disconnect the exhaust pipe from the exhaust manifold.
17. Unscrew the upper bolt securing the intake pipe strut and, loosening the lower bolt securing the strut, move it to the side.
18. Loosen the fastening clamp and disconnect the adsorber purge hose from the throttle assembly.
19. Loosen the fastening clamps and disconnect the radiator hoses of the cooling system from the cylinder head pipe.
20. Loosen the fastening clamp and disconnect the hose of the lower thermostat pipe.
21. Loosen the fastening clamp and disconnect the hose of the thermostat side pipe.
22.Loosen the fastening clamp and disconnect the fluid supply hose to the heater radiator from the cylinder head pipe.
23. Unscrew the nuts of the fuel pipes and disconnect the fuel supply and drain lines.
24. Remove the upper bolt securing the rear intake pipe strut, loosen the lower bolt of the strut and move it to the side.
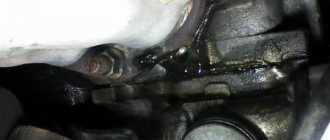
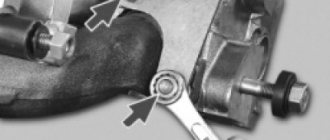
25. Remove the two nuts securing the starter heat shield.
This is where the nuts for securing the heat shield are located.
26. Move the shield to the side.
27. Remove the chain tensioner.
28. Disconnect the power steering pump bracket from the engine and move it to the side along with the pump.
29. Remove the chain from the camshaft sprocket.
30. Carefully place it on the tensioner shoe.
Make sure that the chain does not disengage with the oil pump drive shaft sprocket. It is best to tie the chain with wire.
31. Remove the ten cylinder head bolts. The bolt heads are made with an “E-Torx” wrench, but if necessary, you can use a “13” head.
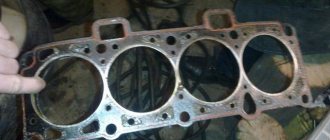
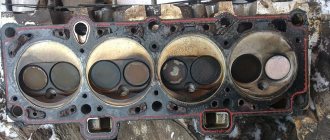
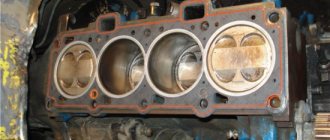
The cylinder head device in a Chevrolet Niva car
The Chevrolet Niva engine traces its origins to the 1.7 liter VAZ 21213 engine . It has the same cylinder diameter of 82 mm and a piston stroke of 80 mm. The differences lie in the design of the cylinder head (cylinder head). Hydraulic compensators and a single-row chain with a hydraulic tensioner appeared. The cylinder head itself is cast from aluminum alloy and is designed to attach the gas distribution mechanism, valves, spark plugs and form an optimal combustion chamber in the cylinders. This head received the index 21214, it has been produced since 2003.
Important! The cylinder head, camshaft, tensioner mechanism in VAZ 21214 engines differ from modifications 21213 and 2121 and are not interchangeable.
The gasket between the head and the engine block performs the following functions:
- sealing of engine cooling channels;
- sealing the oil supply channel to the block head;
- creating optimal gas pressure in the combustion chambers and preventing them from escaping into the block.
To ensure reliable connection, the cylinder head gasket is made of a composite with a metal base or all-metal. The mating surfaces must be smooth, without scratches or cavities; surface curvature of no more than 0.1 mm is allowed.
cylinder head NIVA-VAZ-2121-21213-21214-2131
Replacing the cylinder head gasket NIVA-VAZ-2121-21213-21214-2131
The block is assembled and installed under the hood on supports, which means the whole thing can be ceremoniously covered with the cylinder head. I pick up the gasket that I bought back in the fall, according to the assurances of the seller (and they don’t give a damn why bother you there, as long as they buy it and leave) and a weighty doubt creeps into my soul that the gasket is some kind of worthless! I didn’t take any risks, but went to the store to see what was on sale there. And indeed, in the stores where I visited, there are two types of gaskets on sale, one is a conveyor type, the one I bought is Egoryevskaya, a little more expensive, but looks much better. I also bought it, 150 rubles is not a pity for such a thing. I brought it to the garage and compared it with the one I bought earlier.
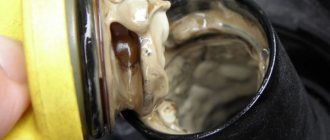
At first, the only thing that catches your eye is that the material of the gaskets is strikingly different, that the “conveyor” one is loose, and the Yegoryevskaya one is dense. Then we turn the gaskets over and see
That on the jumper between the cylinders in the “conveyor” one there is not a single rolling of tin, but in the Egoryevskaya one there is only one! This somehow bothered me, and I decided to order an imported cylinder head gasket from the Exist. The choice fell on the gasket from the Spanish company Ajusa, article number 10002400, the price tag for it is 530 rubles! Ordered. A week later I received it and realized that it was worth the money, here it is next to the previously purchased ones
It is even denser than the Egoryevsk gasket, it has a rolled-up jumper between the cylinders, although on the other side, on the side of the block, and not the cylinder head,
which, in my opinion, has its own logic - the jumper does not deform the plane of the aluminum cylinder head. This is how the review of cylinder head gaskets turned out. I also purchased timing belt parts.
Stars LADA-IMAGE Baltic chain DITTON (aka Daugavplis)
Assembled the timing drive on the block
Tightened the sprocket bolts to the specified torque of 50 kN/m
I took the magical, long-suffering cylinder head
And a good gasket
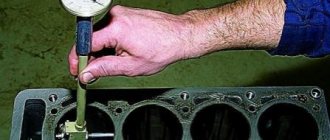
And screwed the cylinder head to the block,
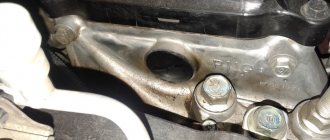
using a torque wrench, as described in the manual in four steps - the first bolts 1-10 in order with a force of 20 N*m, the second step all bolts with a torque of 70 N*m and the eleventh with a torque of 35 N*m, then tighten 10 bolts in order by 90 degrees and, following the advice of experienced people, the last step of turning it by 90 degrees was performed after a break of an hour and a half. I passed the chain into the cylinder head and paid attention to the damper
It is somehow obliquely positioned relative to the chain. I corrected it with editing and it became noticeably better, but of course not perfect
Here are the new parts from the “Three Whales” original spare parts store. The gap between the cylinder head and the engine shield has now become completely minimal due to noise.
Probably, it will sometimes rustle against the noise of the cylinder head, but I don’t want to do anything here, let it rub itself into the necessary groove and that’s it. Then I tightened the camshaft
and a split star,
on which the valve overlap mark was already set. I didn’t check the TDC on the block with an indicator, due to the lack of one