Why do you need to modify spark plugs?
Let's start with the fact that owners of old gasoline cars, mainly carburetor ones, should modify new spark plugs for good economy and increased power.
As a rule, it is on such a dosing system that the issue of gasoline consumption is most acute. In parallel with this, modifications can have a positive effect on the injector. At the same time, high-tech modern spark plugs with an extended service life (platinum, iridium) should not be modified. It turns out that changes and modifications are most relevant only in relation to ordinary candles. Now let's take a look at the practical benefits of upgrading candles.
- First of all, ease of starting and, as a result, less risk of flooding the spark plugs. This is especially true in winter, when fuel evaporates less easily in a cold engine, the battery charge naturally drops, the oil becomes sticky and the starter turns the engine weaker.
- Another advantage that “tuning” spark plugs promises is stable operation of the internal combustion engine in different modes, (especially at maximum loads and high speeds), even taking into account that the composition of the fuel-air mixture will not be optimal, that is, the working mixture is too lean or enriched.
- Note that under conditions of high pressure on modified spark plugs, less impact is exerted on the spark, which is simply blown away on a standard spark plug. As a result, the power unit not only starts well, but also burns the fuel charge more fully, delivering more power. This reduces fuel consumption and results in savings.
What's the result?
As practice shows, after tuning the spark plugs, engine power, on average, increases by 5-6 hp. These figures were obtained by car owners after testing on a dynamometer. At the same time, the torque increases. Taking into account the simplicity and accessibility of the method, such an increase can be considered quite significant.
We also note that many motorists actively practice this solution. There have been cases where a set of the simplest old spark plugs with a mileage of about 25 thousand km. on bad fuel, after unscrewing from the engine, they were thoroughly cleaned, and then modified using the method described above. After modernization, these spark plugs continued to work normally for at least another 10 thousand km.
We also recommend reading the article on how to select spark plugs based on the make and model of your car. From this article you will learn about the features and criteria for the correct selection of spark plugs for a specific engine.
Finally, we would like to add that some drivers are skeptical about modernization. The main argument is that candle manufacturers themselves cannot but know about such a simple method of improvement, but still do not introduce it into mass production for some reason. Please note that we will not try to refute this statement.
Perhaps laboratory tests in factory conditions reveal something that ordinary car enthusiasts do not know. As for possible harm to the engine, practical operation on CIS roads did not reveal any noticeable problems with engines after driving with modified spark plugs.
It will be useful: Why the tachometer on the VAZ 2107 carburetor and injector does not work and the arrow jumps: repair and diagram
At the same time, for owners of old cars, it is more important to change spark plugs as rarely as possible, while simultaneously achieving fuel savings, than to monitor a worn-out internal combustion engine with the utmost attention.
Why and when do you need to replace spark plugs?
Spark plug heat number
Spark plugs in a car are responsible for creating a spark, thereby igniting the fuel mixture in the cylinder. The power and starting of the engine and fuel consumption depend on their condition and serviceability. That is why it is necessary to know after what period it is necessary to replace spark plugs with your own hands, as well as how to do it.
The service life of spark plugs is given in the vehicle operating instructions. They are replaced as they wear out, and usually this is 50-60 thousand km. But in reality everything turns out a little differently. The service life of spark plugs also depends on the quality of the fuel supplied, the health of the engine, regular maintenance and many other factors.
The quality of the fuel greatly affects the life of the spark plugs. Therefore, in our reality, spark plugs are replaced at intervals of 25-30 thousand km.
Spark plugs are an important part of any gasoline engine, however, like any other part, they are also subject to wear.
- Poor engine starting.
- Increased fuel consumption.
- Reduced engine power.
- Unstable engine operation.
However, it is worth remembering that the above malfunctions can indicate not only a problem in the spark plugs, but also about breakdowns in other systems. To do this, you need to remove them and inspect them. Let's look at how to replace spark plugs with your own hands.
For this procedure, you will need a special spark plug wrench, a torque wrench, an extension socket, a ratchet, and a socket the size of your spark plug.
Before you begin removing the spark plugs, remove any sand or dirt that may have accumulated around them. It is done quite simply, using a regular brush. A compressor is also great for these purposes. Clean spark plug wells thoroughly.
This should not be neglected, because... sand can get through the spark plug hole into the cylinder.
The procedure for replacing spark plugs does not require special skills and does not take much time.
To replace, follow these steps:
1. First, disconnect the negative terminal on the battery. In addition, the engine must be cold to avoid possible burns from the spark plug.
2. If a plastic cover is installed on the engine, it must be removed. And determine where the spark plugs are. Easily, via high-voltage wires that are connected to the spark plug.
3. The next step is to disconnect the wires. Grasp the cap directly, do not pull the wires, as you may break them.
In order not to make mistakes in the wires, we recommend making them in order, one spark plug at a time. Or mark the wires with a marker.
4. Insert the spark plug wrench into the spark plug and unscrew it.
If necessary, use an extension cord if the spark plug is in a recess.
After unscrewing the spark plug, inspect it.
The fact that it is a little dark is quite normal. If it's in oil, then you have problems with the engine.
5. Take a new spark plug and insert it into the spark plug hole.
We recommend making the first couple of turns by hand, making sure you don't miss the thread.
When tightening, care must be taken; it must follow the thread; it must be tightened firmly, but without maximum force. Broken threads promise expensive repairs
It is best to use a torque wrench to tighten.
If you tighten it too much, you may damage the spark plug or threads. A weak one results in a loose spark plug.
Remember, do not lubricate the candle threads under any circumstances!
6. Put on the spark plug cap with the high-voltage wire.
The wire must be inserted exactly into the spark plug that it was in previously.
7. Start the engine. Listen to the sound to see if all cylinders are firing.
Replacing spark plugs yourself Mitsubishi:
Do-it-yourself replacement of spark plugs for Hyundai Solaris:
Constant maintenance of the car and timely replacement of spark plugs with your own hands contributes to long-term operation of the engine, extending its service life. Replace spark plugs as they wear out, or every 30 thousand km. Replacing spark plugs yourself will not only save money spent at a service station, but will also help keep the car in good condition.
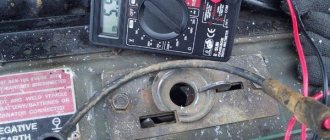
Manufacturing a compression tester
Many car owners encounter problems with engine operation and insufficient pressure in the cylinders. This is often observed on worn-out engines, and the repair consists of a complete restoration of the engine. It is difficult to determine the pressure yourself without using special equipment. As a result, you have to take the car to a service center and perform expensive diagnostics.
At the same time, car owners can easily make simple devices for checking compression from a regular old spark plug. This will allow you to independently diagnose the engine in the future, saving on contacting specialists. For this work you will need a metal saw or grinder, a wheel nipple, plastic tubes, clamps, sealant and a pressure gauge.
Using a file or grinder, cut off the rolling of the core and the metal tongue. Using a grinder, the surface is processed so that later a nipple can be inserted into the candle. On the reverse side, a plastic tube is placed on the candle, the length of which is about 20 centimeters. It should be seated on a sealant; additional clamps are also used to ensure complete tightness and the ability to withstand high pressure.
A pressure gauge is placed on the spark plug through a tube, which can be purchased at any specialized stores. Such a pressure monitoring device will be quite accurate, so it can be used to easily measure compression in a car engine. At the same time, it will cost much less than ready-made devices, without losing at all to them in the quality and accuracy of the data obtained.
The most popular way to improve the performance of a car, with the help of which car enthusiasts prefer to improve their personal vehicles, is to add sound insulation to the car.
This work, like everything else, must be carried out with great responsibility and caution. In the next video, you will be told about the features of the VAZ 2110 after tuning.
This work should be divided into five stages:
- Prepare the car for the entire operation, select and calculate the necessary material for tuning.
- You definitely need to disassemble the trunk.
- Process the trunk and prepare it for the entire operation.
- Carry out all the work and soundproof the car.
- And the last stage is, of course, to assemble the trunk and bring it to its original condition.
Well, before you start disassembling the trunk, you should be well prepared for tuning. First of all, you should select a method and material for noise insulation.
Choosing a good and high-quality material for noise insulation is not an easy task, but the further result of the work depends on it. Select all the necessary tools to perform soundproofing structures.
It is also advisable to carry out this work not in winter, but in the warm season. Well, and most importantly, free yourself the whole day and devote yourself to the car. There are five materials that absorb noise:
- Vibration absorption material;
- Sound absorption material;
- Sound insulation material;
- Thermal insulation material;
- Material that prevents squeaking.
Car sound insulation diagram
Of course, all these materials are completely different in price, so you should choose the material that suits you in terms of money. For a real car enthusiast, disassembling the trunk will not be difficult.
To remove the casing, you just need to remove the fasteners or screws and ultimately only metal should remain. It is worth knowing that the body is treated with a special substance that kills corrosion; it will need to be removed. You don’t have to worry, the metal won’t start to rot, since the material for covering the soundproofing will not allow moisture to reach the metal.
Assembling the trunk will be a little more difficult than disassembling it, but it’s okay, you can handle it. With a radical change to the VAZ 2110, you should pay attention to the headlights. After all, the headlights that were produced at the factory do not fit into the beauty of this car.
It will be much more beautiful if these headlights are tinted in a dark color. One of the standard tinting methods is to simply paint the headlights. To do this, you need to carefully remove the headlight, disconnect the glass from the sealant; undoubtedly, its sharp edges will need to be processed.
To paint the headlights, you should use low-grease paint; you can find it in any building materials store. A great video from which you will learn how you can transform a VAZ 2110 beyond recognition. Go for it!
When painting headlights with this type of paint, the illumination of the road will not change at all. Any car enthusiast can modernize headlights, the main thing in this matter is desire. You can also change the electric lamps in the headlight, since many negative responses to car manufacturers are caused by uncomfortable and unattractive lighting of the lamps.
At the moment, there are three replacements for electric lamps for this type of car:
- Halogen electric lamps . One of the main advantages of this type of lamp is the many different types of sizes;
- Xenon electric lamps . Despite the fact that this type of lamp is quite popular and is considered the best, it also has a number of disadvantages. First of all, this is the high cost of production;
- "GT" type lamps . For the VAZ 2110, this type of lamp is the most relevant, since most of the advantages in these lamps are adjusted for tuning the lamps of this type of car. And also an excellent combination of price and quality.
Spark plug
Selection of Denso iridium spark plugs by car
A spark plug is a device for igniting the fuel-air mixture in a wide variety of heat engines. There are spark, arc, incandescent, catalytic, semiconductor surface discharge, plasma igniters, etc.
Gasoline internal combustion engines use spark plugs. The fuel-air mixture is ignited by an electrical discharge with a voltage of several thousand or tens of thousands of volts that occurs between the electrodes of the spark plug. The spark plug fires every cycle, at a certain point in engine operation.
In rocket engines, the spark plug ignites the fuel mixture with an electrical discharge only at the moment of launch. Most often, during operation the candle is destroyed and is not suitable for reuse.
In gas turbine engines, the spark plug ignites the stream of fuel emerging from the fuel injector at startup with a series of powerful arc discharges. After this, the combustion of the fuel torch is maintained independently. As a rule, surface discharge spark plugs are used, powered by high-frequency high-voltage current from the ignition unit. There are most often two spark plugs (for reliability), each installed in an igniter with a special starting nozzle that works only when starting, which protects the spark plug from burning when the engine is running.
Glow and at the same time catalytic spark plugs are used in model internal combustion engines. The fuel mixture of engines specifically contains components that are easily ignited at the beginning of operation from the hot spark plug wire. Subsequently, the filament heat is maintained by the catalytic oxidation of alcohol vapor included in the mixture.
Story
The first spark plug in its modern form was developed by the German engineer and scientist Robert Bosch in 1902. For the first time, the spark plug was used with a high voltage magneto, also developed in the BOSCH workshop. BOSCH spark plugs began to be used in Karl Benz's internal combustion engines, replacing the open-flame glow tubes used at that time. From then to the present, almost all spark plugs use the same principle of operation and structure as in 1902; the evolution of this unit has been mainly along the path of improving the materials used (for insulators, conductors, etc.) and manufacturing technology ( cheaper).
Spark plug device
The spark plug consists of a metal body, an insulator and a center conductor. Modern spark plugs may have a built-in resistor between the contact terminal and the central electrode.
Contact pin
The contact terminal located at the top of the spark plug is designed to connect the spark plug to the high-voltage wires of the ignition system or directly to an individual high-voltage ignition coil. Several slightly different designs may occur. Most often the wire to the spark plug has a snap contact that
Fills spark plugs on a VAZ 2109 carburetor. You are not alone. The problem is solvable
What resistance should be on the spark plugs, how to make a tester for SZ with your own hands
- Hot: the insulator area is much larger than that of a cold one, so it is heated by gases in the combustion chamber. The transition zone to the outer shell is minimal;
- Cold: they have an elongated area for heat removal; accordingly, the working surface heats up much less.
- A combustible mixture in the form of gasoline and air enters the combustion chamber in the ratio through the passage channels of the valves;
- The valves opened due to the rotation of the starter;
- The spark plug supplies a spark that was supplied by the ignition coil through high-voltage wires;
- At this second, a micro explosion occurs in each cylinder in turn, which sets the engine in motion.
What will be achieved during modernization?
After cutting off part of the electrode, the spark front will increase, so the flame will go straight into the combustion chamber. As a result, we should expect complete combustion of gasoline, a small but increase in vehicle power.
- The second way to improve spark plugs with your own hands is to carefully bend the electrode, simply forcibly increasing the distance between the components of the spark plug. Many people resort to this method, but due to lack of skill, the spark plug can be damaged. And remember that you cannot remove a faulty spark plug from the system; it will be very difficult to foresee the consequences.
Thus, you can determine several answers to the question of how to improve your own spark plugs, and they will be polar. Firstly, if changes are introduced into the system, the calculations must be verified. Secondly, you should not push the car beyond its capabilities, because by increasing its power by force, you can actually reduce its service life.
We would like to know how many car enthusiasts are in favor of improving the spark plug, and who definitely says “no” to such an idea. State your position in the comments, we will be grateful for it.
I tore off the thread for the candle and what should I do now?
That's what, but I never thought about this, and no one warned me - that you can break the thread for a candle. But one day this happened to me, and I realized that the situation was practically unsolvable. Well, I was faced with two problems: how to get to the service center and how to actually fix it.
Warm summer day. We gathered with our comrades in a garage cooperative to trick our swallows. One of them had a compression gauge with him and we set out to measure the compression of my car. They measured the compression and I started screwing the spark plugs back in. Three of the most awkward twists (I try to twist everything from the most difficult to the simplest).
When I removed the key (a special head with a rubber dome), take this very dome, but it gets caught on a spark plug and falls under the car. I was too lazy to get it out and I decided to screw in the last candle without this dome - what a fool! I started to tighten it, it seemed to go on easily, only the candle had a worn thread and was stuck at an angle, since there was no holding dome. As a result, the candle went on, but it was kind of tight. I thought it was time to put on the ratchet and call it a day. And the circus began.
I twist the candle, but she doesn’t even think about resisting. I'm trying to unscrew it - it's too easy. Well, that’s the end, I thought, and I was absolutely right. I took out the spark plug and saw that there were remnants of threads from the cylinder head on it. Moreover, these remains represented 80 percent of what used to be carvings. The thread on the candle was almost undamaged. The cooperative is located on the other side of the city and I need to somehow drag the car at least to the parking lot. First we tried sealing the threads with foil, but it didn't work. Then I found a spark plug with an excellent high thread in my trunk and we screwed it in. Without fanaticism and tension.
Let me back up a little - you can’t do this. Half a year later, a candle with a worn thread shot out in exactly this way. It turned out like a bullet that had not completely passed through the hood, that is, a dent and a small hole - it’s good that it hasn’t hit anyone in the eye yet.
As a result, I went home with a candle “on the snot”. I tried to turn the engine as low as possible so as not to shoot. I'm lucky. I drove home like this, and then to the service center.
Repairing threads in a spark plug well
I myself did not take on this work, because the cost of a mistake is quite high, but at least you can ask the service for something. Repairing threads in the cylinder head is as follows:
- A special thread tap is inserted into the well, 2mm larger than the former thread
- The tap is generously lubricated with grease so that all the resulting chips do not fly into the combustion chamber (this metal will not burn and is guaranteed to cause scuffing on the cylinder walls if it gets into the space between the piston and the cylinder wall), but remains on the grease.
- a new one, but of a larger size, is stamped on top of the old thread
- Further options are possible: either a spiral or a barrel, called a futor, is screwed in
- Both sit on a special thread locker
This repair cost me 1200 rubles. On the downside, the barrel constantly tried to get out of the way, but when I overhauled the motor, this issue was resolved by flattening the barrel on the reverse side.
Not all motors can be repaired, and even on one motor you can access part of the spark plug wells with a tap, but not part of it. I was also lucky in that if I had torn off the threads not on the first, but on the second cylinder, I would not have been able to repair the threads without removing the head.
Well, the method of repairing threads by removing the block head is applicable in most cases. However, it is worth remembering that when removing the head, it is necessary to change the cylinder head bolts and cylinder head gasket.
In general, be careful when unscrewing and tightening spark plugs. Don’t forget to read my article on this topic about the intricacies of replacing spark plugs.
Do-it-yourself modification of spark plugs. What and how to do for a good result
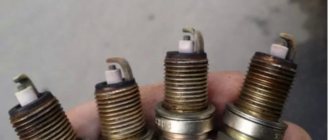
- In order for the spark plug to become effective again, we need to use a simple tool to make the electrode on the side shorter, and then start adjusting the gap. Moreover, the shortening must be done so that the central electrode does not overlap with the side one;
- We unscrew the candle on which you plan to perform these actions from its location (or, as an option, take a new one);
- Using a glass marker, mark on the desired candle the length to which the side electrode needs to be cut.
- We fix the spark plug in a small vice (the main thing is not to overtighten);
- Take a grinder (Dremel or any other company) with a cutting disc installed. Carefully shorten the electrode, which is located on the side. The result should be a smooth, parallel cut, not slanting to the sides;
- We clean the place of the cut with a file to remove burrs and irregularities;
- Next, set the specified gap. It is different on different brands of cars and trucks, domestic and foreign, turbocharged and not. So, in this case, it is better to navigate through a book or look on the Internet;
- A similar procedure must be performed with each candle separately. Then we screw them into place and try to start. I think you should like the effect produced.
Signs of faulty spark plugs. List
- 1. The starter turns for a very long time, but the engine does not start or starts, but after a long time;
- 2. Unpleasant noise made by the engine when the car warms up or during idling;
- 3. Increased gasoline consumption during vehicle operation;
- 4. The number of harmful substances from the exhaust pipe has increased;
- 5. Spark plugs are wet or filled with fuel;
- 6. Weakening of the car’s traction, lack of power and failure to gain the required speed.
- 1. Open the hood and secure it with a stand;
- 2. Blow compressed air through the engine to clear it of road dust. To do this, you can use a regular home vacuum cleaner, only by turning it on to “exhale” air, and not to suck it in;
- 3. Remove high-voltage wires or ignition coils, depending on the type of engine, to get to the spark plug wells;
- 4. Using a spark plug wrench, unscrew all the spark plugs and remove them using wires or a special head;
- 5. Check for the presence of oil and foreign objects in the wells using a flashlight, so as not to provoke rapid failure of new spark plugs;
- 6. Insert and tighten new spark plugs, connect the high-voltage wires and you can start the car engine;
- 7. After starting the engine, check for detonation, which may occur due to the installation of low-quality spark plugs.
Do-it-yourself modification of spark plugs
The modernization is based on the task of bringing simple spark plugs closer in a number of parameters to the so-called sports spark plugs. Such products are offered by many well-known manufacturers, but they are significantly more expensive.
Sports spark plugs allow you to increase power and reduce consumption; the declared service life of such elements is 70-90 thousand km. mileage However, in practice, the efficiency of their work decreases, on average, after 15 thousand km, and such spark plugs do not last the entire stated period. Taking into account the high cost, buy these elements every 30-35 thousand km. it turns out to be expensive.
It is for this reason that many drivers do not strive to immediately change a set of spark plugs, since there are ways to extend the life of existing ones. The best way to solve the problem is to modify conventional or sports spark plugs.
The procedure is not complicated, so even beginners can handle it:
- to make the spark plug work as efficiently as possible, you will need to shorten the side electrode;
- the next step is to correctly adjust the gap on the spark plug;
Now let's take a closer look. Regarding the first point, shortening must be done in such a way that the central electrode is not blocked by the side electrode.
The whole process looks like this:
Used spark plugs are unscrewed from the engine or prepared in advance (you can work with new elements); Next, using a marker or another method (for example, a notch is made), a special mark is applied to the side electrode, which will indicate to what length the electrode should then be shortened. Next, the spark plug is carefully clamped in a vice (preferably with rubber “lips.”) It is important not to overtighten the vice so as not to damage the element. After this, you will need to take a grinding machine and install a cutting disc; Use a tool to shorten the side electrode. In this case, it is important to ensure that the cut is smooth, without bevel. Then the cut site is cleaned with a needle file, nicks are removed, edges are leveled, burrs and other defects are removed. Now you can start setting the desired gap
The value will depend on the type and model of the internal combustion engine. In this case, it is best to use the manual, get the necessary information on specialized automotive forums, etc. Shortening the electrode and setting the gap on the spark plugs must be done with each spark plug, and be sure to maintain the highest possible accuracy (how much is cut off from the electrode and what gap is set). After installing the modified spark plugs on the engine, it is necessary to perform a test run. As a rule, starting should be easier than with conventional spark plugs. Then you can take a trip, appreciating the stability of operation and improved throttle response of the internal combustion engine, as well as better traction at high speeds.
You can also visually evaluate the performance of the candles. To do this, it will be enough to make a test stand right in the garage. For manufacturing you need to have a distributor, a coil and a power source.
Next, the usual spark test is performed, which will demonstrate an increase in spark formation, a change in the color of the spark to a bright blue-red, etc. It is optimal to carry out the check in the form of a comparative analysis, that is, compare the spark, its power and color before starting work (on standard spark plugs) and after (on modernized spark plugs).
If we talk about the modification itself, the simple manipulations described above make it possible to expand and significantly increase the front of the electric spark. In other words, the spark, after removing part of the electrode, is not sandwiched between two electrodes (side and central), but is immediately directed into the combustion chamber.
As a result, the ignition efficiency of the fuel and air mixture in the engine cylinders improves, and subsequent charge combustion becomes more complete. The dependence of ignition on the quality and intensity of spark formation on the spark plug in relation to the composition of the working mixture is also reduced.
In other words, a more powerful spark more easily ignites a rich or lean mixture to varying degrees, which has a positive effect on the overall performance of the engine under load and in other modes. If the mixture is better ignited by a spark, then the flame front spreads more evenly and freely, gasoline burns fully in the cylinders, power increases, and fuel consumption decreases.
Ways to clean candles at home
Candles that have lost their functional qualities are restored at home:
Physical
- Manual method with cleaning the electrodes with sandpaper and a file . Preferably in unexpected traffic situations. It is advisable to clean with a fine metal, nylon or toothbrush, which will remove dirt from the bottom of the grounding electrode.
It is not recommended to clean spark plugs with sandpaper or other hard materials.
It is recommended to avoid damaging the surface of the insulator, since even minor scratches lead to the formation of carbon deposits.
- Sandblasting is a way to remove dirt and plaque . The electrodes are subjected to air pressure with fine-grained sand. Garage conditions allow the use of reverse drills with double-sided scrolling of the spark plug in an environment of fine sand.
Cleaning spark plugs with a sandblasting machine is the most effective way.
Video on cleaning spark plugs using a DIY sandblasting machine
Thermal
You can ignite the candles on a gas stove until they turn red.
It is carried out by calcining (burning) the part. Recommended if the electrodes are flooded . Warm up (dry) with a blowtorch, gas burner or on the stove until red. Finishes by cleaning the surface with a soft copper brush.
Chemical
- Household chemicals also clean carbon deposits, dirt, and plaque. Rust removers, acetone, and vinegar are helpful. Positive results are obtained after placing the part in a solution with silyte, after which it is cleaned with a toothbrush.
To clean spark plugs, you can use carburetor cleaner, Fairy, acetone, rust remover, vinegar, Sprite and Coca-Cola.
The candle is moistened with acid and heated continuously for one minute. Then it is dipped in acid and dried. The process is repeated for each candle many times (depending on the thickness of the coating). The effect is worth using.
Having previously degreased the working surfaces, for example, with gasoline, carbon deposits, and various deposits can be cleaned with vinegar or ammonium acid. The parts are placed in a vessel with a 20% ammonium solution, kept for 0.5 hours. The procedure is effective if the environment is at least 90°C.
Video on chemical cleaning of spark plugs
Ultrasound
It is used more often at service stations, with a satisfactory result.