Replacing valve seals on a VAZ 2106 is an important and not too complicated procedure, which is necessary in cases where increased oil consumption is noticed or bluish smoke is detected. These signs are harbingers that it is time to repair your car engine. Timely replacement of oil seals guarantees normal operation of the machine.
The purpose of this type of VAZ 2106 valve seal is as follows: they help remove excess oil that can get into the valve stems. They are designed to remove excess grease, since some of the oil must get into the bushing. They can be called one of the types of cuffs; oil seals must seal between car parts. Before replacing seals, you need to find out whether they are suitable for use. If this structural component fails, then the signs of failure are:
- the appearance of lubricating fluid on the threads of spark plugs;
- the appearance of increased exhaust smoke when the engine is cold;
- increased oil consumption;
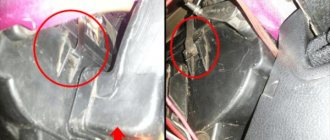
- the appearance of dark lines in the camshaft area near the cap;
- frequent failure of spark plugs.
To determine the reasons for increased oil consumption, you can use a compression meter, which will help you find out the compression of the cylinders. In cases where the pressure of each cylinder is below normal, the oil scraper rings need to be replaced.
Replacing seals on valves and other structural elements of a VAZ 2106
Replacing valve seals on a VAZ 2106 is an important and not too complicated procedure, which is necessary in cases where increased oil consumption is noticed or bluish smoke is detected. These signs are harbingers that it is time to repair your car engine. Timely replacement of oil seals guarantees normal operation of the machine.
The purpose of this type of VAZ 2106 valve seal is as follows: they help remove excess oil that can get into the valve stems. They are designed to remove excess grease, since some of the oil must get into the bushing. They can be called one of the types of cuffs; oil seals must seal between car parts. Before replacing seals, you need to find out whether they are suitable for use. If this structural component fails, then the signs of failure are:
- the appearance of lubricating fluid on the threads of spark plugs;
- the appearance of increased exhaust smoke when the engine is cold;
- increased oil consumption;
- the appearance of dark lines in the camshaft area near the cap;
- frequent failure of spark plugs.
To determine the reasons for increased oil consumption, you can use a compression meter, which will help you find out the compression of the cylinders. In cases where the pressure of each cylinder is below normal, the oil scraper rings need to be replaced.
Useful tips
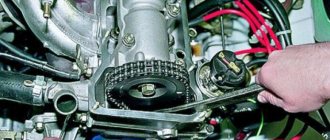
Particular attention should be paid to the timing chain before adjusting the valves. The chain must be installed correctly.
Traffic warning signs. You can find out what these signs are on our website.
This article contains a rating of DVRs with two cameras.
Here you can read how to make panel tuning for a VAZ 2114.
The degree of tension should be carefully monitored.
An uneven knocking sound in the area of the upper part of the valve cover is evidence that the thermal clearances of the valves are increased and their adjustment is necessary. To adjust and measure the gap, it is necessary to use special feeler gauges aimed at adjusting classic VAZ engines.
These probes are wider. Standard feeler gauges are quite narrow and are not able to cover the entire width of the gap in the area of the pressure arms and camshaft cams. This makes it impossible to determine the correct gap size.
In most cases, the cover accompanying the dipstick contains a valve adjustment diagram. It is presented and designed in the form of a table. A well-tuned engine on a VAZ model 2106 is a fairly reliable design.
Adjusted valves reduce engine noise, ensure maximum performance and fuel efficiency. To achieve and maintain the maximum performance indicators specified by the manufacturer, adjustments must be made at a preferable frequency of 15 thousand kilometers traveled.
A huge advantage of the Russian automobile industry is the ability not only to replace, but also to fully repair all components and assemblies of cars. Quite often, car owners carry out a complete disassembly of VAZ 2106 and VAZ 2109 engines and change all its components, including valve guides.
Valve seal replacement process
To carry out this action, it is necessary to prepare a new set of valve stem seals in advance. You will need a flat-head screwdriver, keys, an 8 mm tin rod, tweezers, pliers, equipment for loosening the valves and a mandrel that is needed to press in the seals. First you need to remove the terminals from the battery after opening the hood.
Then you need to unscrew all three nuts that hold the air supply filter. The lid itself and the element that performs the filtration must be removed. The 4 nuts on the carburetor must be unscrewed to be able to remove the air filter housing. Now you need to remove the nuts that secure the valve covers to the block. After disconnecting the rod from the carburetor, you can remove this cover.
Next, you need to very carefully remove the camshaft, which is located in the block. To do this, change the position of the shaft pulley. Then the bolts that connect it to the gear are unscrewed from the camshaft. After this, the gear can be removed. It is better to hang the chain to make it easier to remove the camshaft later. After these steps, all the candles are unscrewed.
Next you will need to use a desiccant. After desiccation, it will be possible to remove the seal from the valve sleeve. It must be lubricated with engine oil in advance. After this, it can be removed by tapping with a hammer. Assembly is carried out in reverse order.
Preparation and preliminary disassembly
To adjust the timing, the carburetor classic is first disassembled using the following tools:
- screwdriver;
- head for 10 with a knob;
- pliers;
- key to 8.
To set up the VAZ 2106 valve mechanism with your own hands, you will need 2 open-end wrenches measuring 13 and 17 mm, as well as a special key for rotating the crankshaft ratchet. The gap size is measured with a wide feeler gauge 0.15 mm thick. As a rule, there is a table on the plastic handle of the dipstick showing in what order to adjust the valves. The table looks like this:
| Cylinder no. | Adjustable valve no. | The angle at which the crankshaft is rotated, degrees. | Camshaft rotation angle, degrees. |
| 4, 3 | 8, 6 | 0 (mark alignment) | |
| 2, 4 | 4, 7 | 180 (half turn) | 90 |
| 1, 2 | 1, 3 | 360 (1 revolution) | 180 |
| 3, 1 | 5, 2 | 540 (1.5 turns) | 270 |
It is not recommended to use standard narrow feeler gauges when working, since the camshaft journals and working parts of the rockers are quite wide and the gap must be measured over the entire width.
The purpose of preliminary disassembly is to remove the valve cover of the power unit, for which you need to perform the following steps:
- Place the car in any convenient place, secure it with the handbrake and allow the engine to cool to ambient temperature. In winter - approximately to human body temperature.
- Disconnect the hoses going to the carburetor and crankcase (breather) from the air filter housing.
- Unscrew and remove the filter cover, and then the housing.
- Disconnect from the carburetor and move the choke cable to the side.
- Remove the accelerator rods attached to the carburetor.
Upon completion of disassembly, the head unscrews 10 nuts securing the valve cover, after which it is carefully removed from the studs by the oil neck and the front edge. Bundles of wires that interfere with removal are moved to the side; there is no need to disconnect them.
Procedure for replacing axle shaft, crankshaft and tail seals
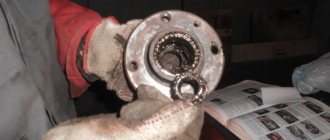
Before you begin the process of replacing the cuffs, you need to remove the VAZ 2106 axle shaft. This requires a mounting blade, which is inserted inside, and the axle shaft is pryed off. After removing the cuff, a new oil seal is installed in the empty space. To do this, you need to lightly tap it to press it into place. After replacing the seal, the axle shaft is put back in its place. Once stopped, replacing the axle seal is complete.
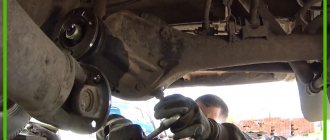
The front and rear seals on the crankshaft must be replaced. In order to replace the front crankshaft oil seal, certain manipulations must be performed in strict sequence. First, the nut is unscrewed, with which the pulley is secured. The pulley is removed using a mounting blade. Next, the gasket and drive cover are removed. The damaged seal is carefully knocked out from the crankshaft.
The new oil seal that will be installed in this place must be lubricated with oil in advance. During the installation process, a hammer is used to shrink and seal the seal. To replace the rear seal, you need to remove the bolts that secure the holder. Release the holder together with the lining. Using a screwdriver, remove the old seal and install a new one. When assembling, all steps are performed in reverse order. After all operations have been completed, the replacement of VAZ 2106 crankshaft oil seals is complete.
Replacing shank seals
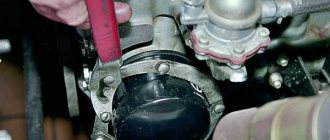
To replace the oil seal in a structural element such as a shank, you must correctly install the machine on an overpass or pit. Then the hexagon is unscrewed from the gearbox and all the oil is poured out. The rear gearbox flange must be separated from the driveshaft. After removing the flange, the oil seal itself is pryed off and removed.
In its place, a new one treated with oil is installed, which must be additionally pressed. The unit is reassembled in the reverse order. After assembly is completed, the replacement of the shank oil seal can be considered completed. After installing a new oil seal, you need to change the oil in the gearbox and check the operation of the device.
Replacing valve stem seals for VAZ 2106
Seeing bluish smoke from the exhaust pipe of a VAZ 2106, the owner automatically begins to remember the last time he changed the oil scraper rings and rebuilt the piston. Then the budget for major repairs is automatically calculated, which always comes unexpectedly, like snow in January. But there is no need to rush. Most likely, the reason is different - in the valve stem seals.
How does valve seal wear manifest?
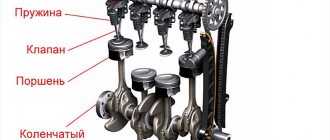
Valve seals, or valve stem seals, are designed to ensure that the oil that lubricates the gas distribution mechanism does not enter the combustion chamber. Valve bushings cannot ensure tightness on their own, so they are fitted with seals made of high-quality soft rubber with an oil scraper edge, which prevent oil from penetrating the valve stem into the cylinder.
Oil entering the combustion chamber in large quantities causes characteristic blue smoke from the exhaust pipe. Oil scraper rings may also be to blame for this, but if the engine smokes during a cold start, and the smoke disappears when warmed up, then we can say with one hundred percent certainty that the valve seals have outlived their usefulness.
Another sign of oil seal failure is increased oil consumption and greasy deposits on the spark plugs.
Causes of parts failure and their consequences
A characteristic feature of the guide elements is that they do not fail at once, but wear out gradually. The lifespan of parts on budget cars ranges from 180 to 300 thousand km, and on more expensive foreign cars it can reach 1 million km. The wear process is influenced by several factors that can accelerate it:
- the quality of the motor oil used and the timeliness of its replacement;
- temperature conditions of the power unit, the more often the engine overheats, the faster the rubbing surfaces wear out;
- the quality of the fuel and combustible mixture, whose vapors penetrate into any leaks and contribute to the process of slow destruction of parts.
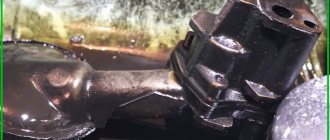
Carbon deposits on the rod destroy the bushing quite quickly
A worn part is characterized by a “broken” internal hole, as a result of which the valve stem begins to move too freely in it, and then play appears. The rod warps during operation, and the plate does not fit well with the seat, the tightness of the interface is gradually lost. Gases escape from the combustion chamber into the mechanism, and oil enters from above, resulting in the formation of carbon deposits. It also accelerates wear, quickly rendering the part completely unusable.
Replacing valve stem seals on a VAZ 2106
The valve stem seals on the VAZ 2106 are replaced after approximately 30,000 kilometers. If it is not there, then it is still better to replace it after 2-3 years, because the caps dry out from old age. Find out how to replace the caps on 2106 in the article.
At the moment, in stores you can find silicone valve stem seals, which in terms of their characteristics are much better than rubber ones. Nobody talks about their durability, it's all about the elasticity of silicone. This is very important in Russian winter conditions, especially if the engine is not equipped with a pre-heater.
Signs that adjustment is needed
Adjusting the valves on the VAZ 2106 must be done regularly due to wear of all rubbing timing parts, cams, rockers and the upper part of the valve stem. This is usually done every 40–50 thousand km. However, it happens that there will be a need for adjustment in the early stages. The reason for this will be the use of low-quality materials or violation of the heat treatment regime during their manufacture. An increase in the thermal gap leads to the appearance of a characteristic metallic knock in the upper part of the engine, associated with the impact of the cam on the rocker when pressed. This is especially noticeable when the engine is running cold.
Incorrectly adjusted valves can cause serious consequences
| An excessively large gap gives: | A small thermal gap manifests itself: |
| valve timing shift, | reduction of compression in the working cylinders, |
| engine tuning, | loss of power |
| difficulty starting, | increased gasoline consumption, |
| increased fuel consumption, | poor pickup, |
| decrease in dynamics during acceleration. | At the same time, the engine does not rattle, but is unstable. |
If one of these faults occurs, it is advisable not to delay checking the clearances until the next maintenance.
When to change valve stem seals on 2106
Of course, there are car enthusiasts who carefully monitor their iron horse and carry out many procedures according to schedule. However, there are very few of them, so we will pay attention to external signs.
First of all, oil consumption. Before we talk about liters, it’s worth paying attention to this. Over time, when the oil seal wears out, it turns into a filler neck, and the valve stem turns into a piston that pushes this oil. Imagine that the engine is running at 1600 rpm. This means that 800 strokes are performed per minute in one cylinder, which means the valve moves back and forth 400 times. What if there are eight such valves? In general, a lot of oil can leak through the valve stem seals.
Further - increased smoke, reduced engine power. You need to remember one simple truth - engine oil does not burn, it cokes. Only the additives burn. We all know motorcycles in which oil is mixed with gasoline. We all remember how much smoke they make. But there the fuel is diluted with oil in proportions of 1:200. Here they are much larger. That is, if you see blue smoke from the exhaust pipe, then you should think about replacing the valve stem seals. Of course, with such a mixture the engine will not develop full power, as with pure gasoline.
Tools for replacing valve stem seals 2106
First of all, you need to immediately stock up on a sufficient set of tools so that later, when the engine has already been disassembled, you don’t have to rush around looking for them. So here's a short list.
- Key for turning the crankshaft;
- Rassukhaka;
- Set of flat blade screwdrivers, different widths;
- Set of keys and sockets;
- Tweezers;
- Valve cover gasket;
- If you plan to adjust the valves, then a feeler gauge with a thickness of 0.15 mm is required;
- Tin rod about 1 cm thick;
- Puller for valve stem seals.
Preparation for replacing valve stem seals of VAZ 2106
We will consider replacing valve stem seals on a VAZ 2106 without removing the head, so it will be both easier and more difficult. The simplicity lies in the fact that there is no need to dismantle the head. And the difficulty, which is also logical, is not to drop the valve into the cylinder.
First, unscrew the chain tensioner, then you will need to tighten it. This is necessary so that you can remove the camshaft gear without any obstacles. Next, remove the valve cover and mark the position of the gear on the chain. This is necessary in order not to set marks later. In principle, you don’t have to do this, but it’s easier this way.
How to install new caps
On VAZ-2106 cars, the valve stem seals are replaced independently using a simple plastic device. It must be placed on the top of the valve stem to cover the recesses on it. In this case, you will not have to remove the springs from the valve seals. The work is carried out according to the following algorithm:
- Install the plastic bushing on the valve.
- Lubricate the auxiliary bushing and valve stem with engine oil.
- Push the oil seal on until it stops.
- Remove the plastic sleeve.
- Using a “10” tubular wrench or a large mandrel, you need to hammer in the cap.
- Install the support washer, spring and plate.
- Install the valve depressurizer and compress the spring.
- Put the crackers in place, and then release the desiccant.
Replacing valve stem seals on a VAZ 2106
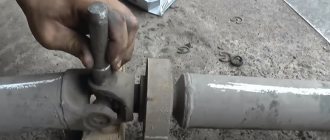
Now we install the sealant on any valve of the first or fourth cylinders, then insert a tin rod into the spark plug hole and clamp it, pressing on the sealant. This is done so that the valve does not punch a hole in the piston bottom. Now we jerkly press on the cracker so that the spring compresses, carefully remove the crackers with tweezers. It is important not to lose them, otherwise you will have to run to the store.
Then use a puller to remove the old cap and press on a new one. Now we compress the spring again and install the crackers. We do this with each valve in the first and fourth cylinders.
Now we rotate the crankshaft 180 degrees and set the pistons of the second and third cylinders to top dead center. We carry out the same operations with valves. Then we install the camshaft and housing in place. The procedure for tightening the camshaft housing bolts is shown in the figure. Now we combine the marks on the camshaft gear and the chain; if adjustment of the valves is required, then we carry it out. Then we put all the parts in place.
Video: replacing caps on a VAZ 2106
Performing setup
The valves are checked and adjusted from the spark plug side.
The numbering of cylinders and valves comes from the front, from the cooling radiator. Remember to set the gear lever to neutral.
To correctly adjust the mechanism, you need to use a ratchet wrench to align the mark on the crankshaft pulley with mark I on the motor housing. Make sure that the piston in cylinder 4 is at the very top (TDC) by inserting a screwdriver into the spark plug well. If it fails, then the piston of cylinder 1 is in the TDC position, not the 4th, and you need to make a full revolution of the crankshaft. Then proceed according to the following algorithm:
- Insert the dipstick between the lever and the camshaft journal on valve No. 6 of cylinder 3. Ideally, the probe should enter the lumen with little effort.
- A slight movement of the probe or the inability to insert it indicates that the valve is too loose or tightened and needs to be readjusted.
- Use a 17 wrench to loosen the fixing nut, and use the adjusting nut to increase or decrease the gap. This nut is rotated with a 13mm wrench.
- After making sure that the dipstick moves tightly in the gap, tighten the fixing nut. Please note that when tightening the gap decreases and you need to make a small adjustment.
- In the same way, adjust valve No. 8 of cylinder No. 4.
During further work, the same scheme is repeated, and the adjustment procedure is shown in the table. Each time you need to turn the crankshaft 180° clockwise and adjust the corresponding valve numbers. The accuracy of rotation will be determined by a round mark on the camshaft gear.
Assembly is carried out in reverse order. But first, check the condition of the chain, the damper pad and the tensioner shoe. If necessary, tighten the chain. It also doesn’t hurt to check the valve cover gasket: it should remain flexible and not leak oil. After assembly, start the engine and evaluate its operation by ear. To be sure, it is worth measuring the pressure in the cylinders.
VAZ 2106: replacing valve seals at home
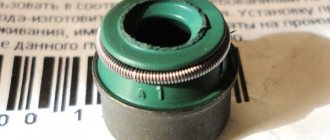
Valve seals (valve seals) VAZ 2106
You will need to replace valve seals on the VAZ 2106 when you notice an increase in oil consumption, and the appearance of periodic or constant bluish smoke (occurs when the cap ruptures or is severely worn). Blue (grey) smoke from the exhaust pipe is a very bad sign, which means that the car needs engine repair. Our instructions will help you replace the oil seals yourself.
Disassembling the cylinder head, lapping valves
Disassembling the cylinder head, lapping valves VAZ 2106
Remove the cylinder head from the engine (see Replacing the cylinder head gasket).
We unscrew the seven nuts securing the manifolds to the block head and remove them (see Replacing the gaskets of the intake and exhaust manifolds).
Using a 10mm wrench, unscrew the two nuts securing the pipe.
. and remove the pipe.
Using a 13mm wrench, unscrew the two nuts securing the double pipe.
. and remove it from the block head. Sealing gaskets are installed between the pipes and the head.
We place an improvised stop (a nut, but preferably a wooden block) under the valve.
We dry out the valve (see Replacing the oil seals of the gas distribution mechanism).
We remove the valve from the guide sleeve.
Apply lapping paste to the valve plate.
We install the valve in place. We put a lapping device on the valve stem.
Pressing the valve plate against the seat, we turn it alternately in one direction or the other.
If necessary, for easy access to the outer valves, use a 13mm wrench to unscrew the two outer studs, having previously locked two nuts on them.
We continue grinding the valve until a smooth matte rim appears on the seat and chamfer of the valve plate.
After thoroughly washing, we install the valve in place, replacing the oil seal cap (see Replacing the oil seal caps of the gas distribution mechanism).
Use a 12mm socket to unscrew the bushing.
. and remove it along with the adjusting bolt and locknut. If necessary, we replace them.
Use a metal ruler to check the mating plane of the cylinder head. The permissible gap is 0.15 mm.
Video about “Disassembling the cylinder head, lapping valves” for VAZ 2106
Grinding in valves of the cylinder head of a VAZ 2106 Replacing Seals and Grinding in Valves (Part 2)
Purpose of oil seals
Valve seals are designed to remove excess oil that gets onto the valve stems. It is the excess, a certain amount of it that should wash the sleeve with the valve. If the valve seals (for some reason) stopped working (became unusable) and oil began to get into the combustion chambers, you need to replace the valve seals on the VAZ 2106.
Signs that the seals have become unusable
In addition to smoke from the exhaust pipe, there are a number of signs:
- Appearance of grease on the spark plug threads
- The car smokes when the engine is cold (this is very noticeable when starting the engine in the morning)
- Dark stripes appear on the camshaft bed in the area of the passing cap
- Increased oil consumption
- Frequent failures of one or more spark plugs
Do not rush to make major repairs right away, knowing that smoking and increased oil consumption may occur due to failure of the piston rings (see Replacing piston rings on your own), and some others. First, let's identify the problem so that the cost of the issue becomes clear:
- To distinguish a malfunction of valve seals from other malfunctions with similar symptoms, use a useful device - a compression meter.
- By measuring the compression in each cylinder, you will know exactly what needs to be repaired.
- Since worn valve caps have virtually no effect on the compression readings (if the compression in all cylinders is within the normal range, it means that the valve stem seals have failed; if the compression is weak in some cylinder, get ready for a major engine overhaul)
Valve seals become unusable during operation for the following reasons:
- Natural production of materials
- Engine overheating
- Use of valve seals made from low-quality materials
- Increased clearance in the valve bushings themselves
- Initially incorrect installation of oil seals
Professionals say that for the VAZ 2106, replacement of valve seals is necessary every 18 - 25 thousand kilometers
Very useful recommendations
We recommend not pouring diesel oil (as amateurs advise) into a gasoline engine; a thick sediment will appear in it, which will lead to blockage of all oil channels of the engine. This work requires some skills from you, if you are already familiar with the structure of the motor and the tools, and are not afraid to disassemble the engine yourself, then strictly following our useful tips, you will be able to replace the valve seals with your own hands. To replace, you will need a new set of valve stem seals (see VAZ 2106: replacing valve stem seals on your own), which we recommend ordering from a store specializing in spare parts or purchasing immediately; the caps are in stock. Ask: Why in a specialty store? Because, having experience, we have made the following conclusion - a specialized store is interested in a good reputation and, in principle, will not sell “inappropriate” or obviously low-quality goods. In any auto market, the choice of caps is much wider, sometimes sellers have no idea who the manufacturer of the product is, so don’t expect any guarantee of quality in this case. It is reliably known that the bulk of cheap spare parts on the auto market today are imported from China. In a specialized spare parts store, the seller can determine by computer, by entering the code in your data sheet, the engine model, based on this data, and select the necessary (suitable) valve seals.
Tools
- a set of keys
- round tin rod 8mm in diameter
- flat screwdriver
- tweezers
- oil seal puller or pliers
- valve depressurizer tool
- mandrel for pressing oil seals
- set of new seals
Let's move on to replacement
To replace valve seals on a car, you still need to get to them. Replacing valve seals on a VAZ 2106 starts with:
- Raise the hood and remove the terminals from the battery
- Using a 10mm wrench, unscrew the nuts (there are three of them) securing the air filter cover
- Remove the cover and filter element
- Unscrew the four nuts located on the carburetor and remove the air filter housing from it
- Using a 10mm wrench, unscrew the nuts securing the valve cover to the cylinder head
- Remove the cover after disconnecting the accelerator rod from the carburetor
- We disconnect the transverse roller located on the front shield in the engine compartment
- We bring the crankshaft pulley to the mark corresponding to the top dead center, both in the first and fourth cylinders
- From the camshaft, using a 17mm wrench, unscrew the bolt securing the drive gear
- Then we remove the gear and hang the chain on a piece of wire, the end of which can be conveniently secured to the hood locking bracket
- Now we remove the camshaft itself with the bed assembly
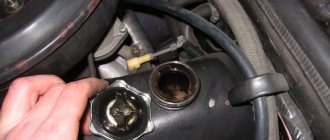
- Unscrew and remove all spark plugs
- Remember the position of the slider in the distributor
- To avoid the valves falling out into the cylinder, we change the valve seals on the cylinders where the pistons are in the TDC position
- Then bring the pistons of the next cylinders to TDC and change the seals on them (first we start replacing the seals in cylinders 1 and 4, then rotate the crankshaft 180° and change the seals in cylinders 2 and 3).
- To do this, through the spark plug hole we insert a prepared rod of tin (or other soft metal) with a diameter of approximately 8 millimeters or a screwdriver as an option between the valve and the piston (on which we replace the oil seal)
- We screw the nut onto the stud to secure the camshaft bed and place the desiccant grip under it
Machining a new seat
The newly installed seat must be chamfered. It is best to do this on a specialized machine, so it can be processed most accurately. This is achieved thanks to rigid centering of the cutter, which cannot be achieved using hand cutters.
But if there is no such equipment in your area, roller cutters are all you can count on. If there is a metalworking shop nearby, you can try processing the valves on a milling machine, the result will be fine.
On the seat you need to cut three edges - the outer, the inner and on top of them the central, narrowest one, along which the seat will come into contact with the valve.
The need to replace the valve seat may arise in the following cases.
1. The saddle is worn. While countersinking the valve seat for lapping, you discover that there is no seat material for further refinement. The valve sits so deep that the gap cannot be adjusted. The only solution can be to replace the saddle.2. The seat and valve are burnt out. And what's the reason? You never know the reasons! The seat and valve were poorly ground or the clearance in the valve drive was insufficient
It doesn't matter anymore. It is important that when you remove the blackness on the valve seat with a countersink, you discover that there is not enough material
And then point 1. 3. The fit of the saddle in the head has weakened. Corrosion is noticeable on the outer diameter.4. A crack was found in the valve seat.5. When tuning the head, you change the valves to larger ones. Accordingly, larger saddles are needed. Check first to see if you can use the saddles you have. Replacing seats is not a very difficult job, but in case of an error you will have to go to a car dealer or for recycling.
How to Remove an Old Valve Seat
The easiest and most convenient way on the machine. When the seat is bored, its thickness and strength decrease, and then at one point the cutting force exceeds the friction force in the joint. The remainder of the seat is rotated and can then be removed with pliers. If you are going to install larger diameter saddles, then you will need to bore the seat next.
If you just need to replace the stock saddle, use another method. Clamp a small abrasive wheel into the chuck of an electric drill. Turn on the drill and cut into the saddle material. At some point the tension on the seat will loosen and it will be possible to remove it. It is advisable for this to happen before the wheel cuts into the head material.
Another way. The old valve is inserted into the head. The one who was here. And they weld it to the saddle at 3...4 points. And then the seat is knocked out with a hammer on the valve.
New saddle
The material of valve seats is quite varied. Bronze, steel, stainless steel, metal ceramics, cast iron. Cast iron is used for valve seats manufactured at AVTOVAZ. Such saddles can be easily processed with hand tools. But valve seats made of hardened steel can only be ground. For this you need a specialized machine.
Beryllium bronze valve seats have the advantage of dissipating heat away from the valves. This material is often used for racing cars. But for daily city driving you don’t need to rev the engine to 8,000 rpm. Therefore, beryllium bronze seats are not needed.
A modern and promising material is metal ceramics. Seats made of this material can successfully combine such contradictory properties as wear resistance and good machinability. And at the same time the price is not very high. Blanks for the ZMZ engine can cost from 30 rubles apiece.
To simplify repairs, it is advisable to find ready-made, purchased parts. But here a surprise awaits us: ready-made saddles for Lada are extremely difficult to find. And these will be tuning saddles. This is a good sign, which means they are needed extremely rarely. But, if necessary, you will have to order the saddles from a familiar turner. The above-mentioned blanks for ZMZ are not used immediately. These are the blanks. They are modified according to the actual dimensions of the saddle socket.
Saddle installation
The saddles are installed with interference. Having measured the actual dimensions, the saddles are modified. Provide a guaranteed interference of 0.1...0.15mm. The prepared head is heated to a temperature of 100...200 degrees. To do this, use a stove or electric stove. But a gas torch or blowtorch will produce uneven heating. The seat on the other hand is cooled with dry ice or liquid nitrogen, and then pressed into the head using a mandrel and a hammer.
When the head cools down slowly, you can move on to the next stage of repair - countersinking the seats and grinding the valves.
How to replace valve stem seals on a VAZ-2106
If you are here, then you are the proud owner of a VAZ-2106 car that has some problems. Perhaps you enjoy watching persistent foreign cars trail behind your “six” and swallow the gray exhaust, but small, unnoticeable caps, like a candle that burned Moscow, can lead to the death of the entire engine, and therefore turn your iron horse into a modest example of real estate. The decision to fix the car was absolutely correct, and with some skill you will quickly deal with the problem.
Before work
The combustion chamber of the engine must be protected from foreign substances, so the cylinders need protection from oil. This is where valve stem seals, or oil seals, come into play, protecting the combustion chamber as the valve stems move. Over time, they lose elasticity and the quality of their work decreases. Nothing prevents oil from getting where it shouldn't be.
If you notice that the exhaust has become bluish and thick, soot or even soot has appeared on the spark plugs, and your VAZ-2106 eats oil like gasoline, then it is very likely that the problem with the seals has affected you too. You need to have the courage to open the hood and examine the problem. Perhaps the entire gas distribution mechanism needs to be replaced, but for now we will only talk about the caps: if we really strain ourselves, then do it systematically.
The design of valve stem seals is not very complicated, although there are both high-quality samples and short-lived ones. They consist of the following parts:
- Frame. Steel bushing that guarantees the strength of the seal.
- A spring that applies pressure to the valve stem and ensures a tight seal.
- The cap itself removes any remaining lubricant from the rod. Made from elastic materials such as rubber or fluoroplastic. It is this part of the structure that hardens.
To prepare to replace the valve stem seals, you will need to find some tools. If you wish, you can do the work without them, trying to use available analogues, but who needs to hammer a nail with a cigarette lighter when a hammer has been invented. You will need:
- puller, tweezers or pliers for removing old caps;
- valve depressurizer for compressing springs;
- mandrel for installing oil seals;
- a rod or tube of soft metal to keep valves from falling.
If you are sure that you will earn more in the time it takes to tinker with the car, you can entrust the VAZ-2106 to professional auto mechanics. But, perhaps, if you are here, therefore, you are determined to change the caps yourself.
Repair procedure
- First of all, you need to get to the valve stem seals. We unscrew the cover nuts from the block head, do not forget to put the washers in a separate place so as not to lose them.
- We turn the crankshaft and carefully watch when the marks on the cover coincide with the marks on the camshaft sprocket. This position will ensure the safety of the valves after removing the crackers.
- Unscrew the camshaft bearings. Fixing the sprocket and chain can save you from a lot of problems, because they love to fall into the engine crankcase and ruin the rest of the day.
- The piston in the first cylinder has reached top dead center. Now is the time to dismantle the spark plug and remove the spring. After this, move the lever to the side.
- The adjusting bolt must be loosened, then a spring puller must be installed.
- We insert a rod or tube made of soft metal into the hole of the candle, this will protect the valves from falling.
- We take out the cracker and press the spring until the crackers appear. Sometimes they get stuck and need to be released by lightly tapping them.
- Remove the springs, valve plates and washers.
- We fix the valve with a clamp and remove the obsolete oil seal. You can help the process by lightly tapping the hammer.
- Before the procedure, lubricate the new valve stem seal with engine oil. We put protective caps on all new oil seals, which should be included in the kit. This will protect the valve surface from scratches during the pressing process. Pressing is done with the same desiccant, only on the other side.
- Repeat the same steps on the remaining valves. It is important to remember to crank the crankshaft before working on the second and third cylinders.
After installing the new, elastic and sealed valve stem seals, reassemble everything in the reverse order. If everything worked out correctly, you can be happy with yourself! The repair has been completed.
Sources:
https://expertvaz.ru/2106/zamena-salnikov-klapanov.html https://avtoshef.com/zamena-maslosemnykh-kolpachkov-vaz-2106/ https://fastmb.ru/autoremont/856-zamena-maslosemnyh -kolpachkov-na-vaz-2106.html https://masteravaza.ru/dvigatel/obsluzhivanie-dvigatelya/vaz-2106-zamena-salniki-klapanov-304 https://ladaprofi.ru/vaz-2106/kak-osushhestvit -zamenu-maslosemnyh-kolpachkov-na-vaz-2106.html
Technical requirements
You can quickly and easily remove the valve seat insert using a soldering iron for soldering microwires in an inert gas environment - MIG (microware inert gas) welder. With the valve removed, apply a bead of solder along the edge of the insert seat adjacent to the wall of the seat. When the seam cools, it will shrink and the insert can be easily removed from the cylinder head.
In the case of cracked and severely burned inline seats, the cylinder head can often be repaired by replacing them with push-in seats. All cracks in the head must be repaired before the integral seat is bored. First, you must select a repair insert seat that has the required internal and external diameters, as well as the required thickness. Manufacturers of seat repair kits provide tables to help you select the appropriate seat repair insert. When replacing an insert seat, the new seat must be of the same or higher grade of material than the old one. The operating temperatures of inserted exhaust valve seats are 100°-150°F (56°-183°C) higher than the operating temperatures of integral seats, which reach up to 900°F (480°C). In order for the service life of repair seats and valves to be no less than that of the parts being replaced, some must be made of higher quality materials.
Manufactured valve seat repair inserts are made from a variety of materials, including:
- cast iron
- of stainless steel
- nickel-cobalt alloy
- powder metal
The cutting tool for making the seat is selected according to the outer diameter of the repair insert. The diameter of the bore of the seat must be less than the outer diameter of the insert seat. The tool holder is mounted on a guide rod selected to fit the hole in the valve guide. The tool holder feed drive is screwed in so that there are enough threads left to properly feed the cutter into the head being machined. The assembled assembly is installed in the valve guide so that the cutting tool rests on the seat being bored.
A seat repair insert is inserted between the support jig and the retaining ring. The locking ring is adjusted along the seat repair insert so that the cutter feed stops when the bore of the seat reaches a depth equal to the thickness of the new insert. The boring tool is rotated manually or using a gear motor. Boring continues until the retaining ring reaches the support jig. After this, the support jig and tool holder are removed. An appropriately sized mandrel and guide rod are secured to the impact head. It is best to cool the repair insert in solid carbon dioxide before installation so that it decreases in diameter.
With a strong blow of a heavy hammer, the repair insert is driven into the seat. First, the repair insert is pressed into the socket with strong blows of a hammer, and then with light blows it sinks until it fits into it all the way. Do not hit the impact head after the saddle is fully seated in the seat. The installed repair seat is caulked along the outer edge along the perimeter of the seat - in this case, the metal along the edge of the insert is slightly riveted, strengthening its adhesion to the seat. The seat in the repair insert is processed using the already described machining technology used to restore valve seats.
Repair inserts must remain in carbon dioxide until installed. This will significantly reduce the likelihood of metal being cut off from the walls of the mounting socket when installing a repair insert. Cut pieces of metal may get under the repair insert, preventing it from seating correctly. The cooled insert seat is placed on the seat.