As I said earlier, at the opening of the hunt a weak unit appeared in my SUV :( The most annoying thing is that it was almost out of the blue.
Due to a breakdown at the very beginning of the season, the NIV had to be restored in the shortest possible time
.
Therefore, the most rational option was no longer needed
- installing a steel RPM housing.
If it weren’t for the great desire to hunt
, then I
would have gone the route of installing a steel body
and unlinking the bridge.
However, we should not forget that if I had not had a passion for hunting, I would not have had a NIV at all
!
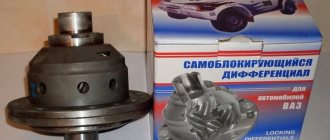
So, in their city of Novomichurinsk they couldn’t find a used front axle, so they had to go the route of installing the RPM in a new building
.
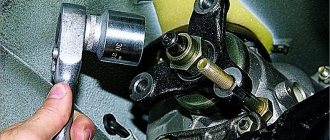
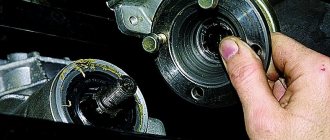
First of all, it was necessary to remove the old bridge
.
Fortunately,
has an inspection hole
in the garage
where the NIVA was parked .
Arriving at lunch on April 17th at the garage, I began to disassemble it, in 4 hours alone
I managed to unscrew everything to pull out the bridge.
But it’s very difficult to extract it alone, so a friend came to the rescue and together we quickly extracted the “patient”
.
The sequence for removing the bridge is as follows
: 0) drain the oil from the RPM; 1) unscrew the lower ball joints to move the steering knuckles to the side, do not forget to jack up the levers so that the spring does not tighten; 2) remove the axle shafts from the fists; 3) unscrew the CV joint from the bridge; 4) unscrew the bridge from the internal combustion engine; 5) use a chisel to mark how the cardan was screwed to the bridge; 6) jack up the bridge; 7) unscrew the front cardan from the axle; With the help of a partner, we pull out the bridge.
The next day, the search began for the necessary spare parts: RPM crankcase - 2121-2302015
- 1 PC.
— 3,020 rub.
Set of gaskets RPM -
2121-2301015/70/308
- 1 pc.
— 40 rub.
Studs
M12x1.25x30
- 2 pcs.
— 80 rub.
Studs
M6x12
- 8 pcs.
— 24 rub.
Studs
M8x20
- 3 pcs.
— 15 rub.
Studs
M8x25
- 3 pcs.
— 18 rub.
Breather -
2101-1700020
- 1 pc.
— 60 rub.
shank nut
M16x1.5
- 1 pc.
— 35 rub.
Spacer sleeve -
2101-2402029-01
- 1 pc.
— 140 rub.
Bearing -
2101-2402025
- 1 pc.
— 397 rub.
Bearing -
2101-2403036
- 2 pcs.
— 840 rub.
Shank oil seal -
2121-2302052
- 1 pc.
— 100 rub.
Flange mounting bolt -
2101-2201107
- 4 pcs.
— 20 rub.
M8
nut - 4 pcs.
— 24 rub.
Adjusting the front axle of a Niva is one of the key operations that ensures comfortable and accident-free movement on roads of any quality.
Device
The unit parts are housed in a durable metal case that protects the mechanism from damage. Gear oil is used to lubricate rotating parts.
The force of the propeller shaft, screwed to the flange on the shank of the unit, is transmitted to the drive gear. Next, through the satellites, the torque is distributed between the axle gears (left and right).
The gearbox mechanism also includes bearings, nuts, gaskets, and adjusting rings. Plugs are provided for filling oil and removing waste into the housing. The drive gear, like the axle shafts, is equipped with oil seals that prevent transmission leakage while the vehicle is moving. The figure shows the gearbox design in detail:
Assembly
The main thing that needs to be said about the Niva gearbox bearings is that their life directly depends on the build quality of the gearbox itself. How the adjusting washers are selected in the “carrot”, how the preload of the drive gear is made, how the drive and driven gears are brought together - this cannot be done right away from a book, this is what is called experience and instinct. I can only say one thing, the person I trust in St. Petersburg to assemble the gearbox makes two, maximum three of them in a whole working day. Draw conclusions about how labor-intensive this process is. Therefore, there can be no advice or recommendations in this area.
Symptoms of a problem
Mechanism breakdowns most often manifest themselves in the form of extraneous noise or oil leakage. Let's look at the most common problems that arise with the front axle gearbox and how to fix them.
Increased noise while driving occurs in the following cases:
- The inner joint or differential bearings are worn.
- Gears are damaged.
- There is not enough transmission oil in the crankcase.
- The differential gears or bearings are not adjusted correctly.
To eliminate the malfunction, you need to check the transmission level and, if necessary, top it up.
You should also adjust the bearings and gears, as well as set the correct clearances and tightening torques. Worn and damaged parts must be replaced.
Noise during engine braking or acceleration occurs due to loose flange nuts or improper adjustment of bearings and gears. This problem can be eliminated by adjusting the gaps and tightening torque.
Also, noise during engine acceleration and braking appears as a result of wear of one or more bearings. Then they need to be noticed.
A knocking sound when starting to move is a consequence of wear on the holes for attaching the axles. It will disappear after replacing the differential box. Sometimes you have to change the gear axes at the same time.
Oil leakage is evidence of worn oil seal seals, loose crankcase cover or damaged seals. If a leak is observed from under the gasket, you need to replace it and tighten the threaded connections. Transmission oil leakage in the shank area is eliminated by replacing the oil seal.
Chevrolet Niva front gearboxes
The main function of the Chevrolet Niva front axle gearbox is to transmit torque to the front wheels of the car. Coming from the transfer case, the required amount of force is supplied first to the driveshaft and then sent to the gearbox. There is a decrease in angular velocity and an increase in torque, as well as its subsequent distribution between the wheels.
Device
This unit is a durable metal case, inside of which there are parts, and the mechanism itself is thus protected from external influences. For efficient rotation, the parts are lubricated with gear oil. The drive gear receives the force transmitted by the cardan shaft located on the shank of the unit. The subsequent distribution of torque, after passing through the satellites, occurs between the semi-axial gears.
The Chevrolet Niva front axle gearbox includes, among other things, nuts, bearings, adjusting rings and gaskets. Plugs are also provided to fill the oil and remove the used composition. There are seals on the axle shafts and drive gear to prevent transmission leakage while the vehicle is moving.
The following signs indicate a malfunction of the VAZ 2123 RPM
A breakdown is usually indicated by extraneous sounds or oil leakage. But there are a number of common problems that can arise with the Chevrolet Niva front axle gearbox. Among them is the appearance of increased noise during movement, which can occur due to the fact that the differential or spherical bearings are worn out, damage to the gears, low oil volume in the crankcase, incorrectly adjusted gears, etc.
Debugg
First of all, to fix the problem, you need to check the transmission fluid level and top up. Gears and bearings must be adjusted, checking and setting all clearances and tightness. Elements that have become unusable due to wear or damage must be replaced. The appearance of noise when a car owner brakes or accelerates can be caused by a loose flange nut or poorly adjusted gears and bearings. The gaps and tightening should be adjusted. Similar signs may appear when one or more bearings are worn out, which, in this case, must be replaced. If a knocking noise appears when starting off, it indicates wear on the holes in which the axles are mounted, and entails replacing the differential box. It may also be necessary to replace the gear axles at the same time.
An oil leak indicates that the oil seal seals are worn out; it may also indicate that the crankcase cover is not tightly tightened or the seals are damaged. If you find any leaks in the gasket, you should change it and tighten the threads tighter. If transmission fluid leaks in the shank area, then it is worth replacing the oil seal.
What to do when you need to replace the front axle gearbox of a Chevrolet Niva
If there is a global malfunction of the mechanism, then it is more advisable to install an unused one instead. Then it’s worth purchasing a new Chevrolet Niva front gearbox and preparing a number of tools that will be required: a jack, a wheel wrench, a chisel and a hammer, a 12 hex wrench, 13, 17 and 27 socket wrenches, a container for “working off”, a syringe to fill oil. To repair or replace the front axle gearbox of a Chevrolet Niva, you cannot do without an overpass, a lift, or an inspection pit.
How to change?
If the mechanism is seriously damaged, it makes sense to replace it with a new one. To do this you will need a new gearbox and a small set of tools:
- wheel wrench;
- jack (if the work is done in an inspection hole);
- chisel:
- hammer;
- hex wrench 12;
- ring or open-end wrenches for 13, 17 and 27;
- syringe for filling transmission oil;
- container for processing.
Important: replacement or repair of the gearbox cannot be performed without a lift, inspection ditch or overpass.
Operating procedure
- Place a waste container under the gearbox.
- Unscrew the drain plug, then the filler plug.
- Wait until the entire transmission flows out of the gearbox.
- Unscrew and remove the front wheels.
- Unscrew the cardan shaft from the flange on the shank.
- Undocking and hanging the cardan.
- Unscrew the fastening of the right cover from the suspension cross member.
- Unscrew the fastening nuts and disconnect the shock absorbers from the front control arms.
- Unscrew the threaded connections holding the wheel drive bearing caps.
- Unscrew the nuts securing the brackets holding the gearbox.
- Unscrew the nut securing the left gearbox cover to the cross member.
- Remove the hub cap and unscrew the right wheel hub nut.
- Remove the centering sleeve.
- Compress the suspension spring and unscrew the ball joints.
- Move the steering knuckle to the side.
- Disconnect the exhaust pipe from the exhaust manifold.
- Pull the gearbox back.
- Remove the right wheel drive.
- Remove the gearbox from the machine
To install the new unit in place, you must perform the operations in reverse order.
Important: after installing the gearbox, do not forget to fill it with transmission oil. Otherwise, you will soon have to change it again with another one
Replacing the front axle oil seal on a Chevrolet Niva
Hi all! Most Chevy owners independently maintain the unpretentious units of this popular car. With heavy use, consumable parts need to be replaced frequently, especially in the chassis. I’ll tell you about this type of service, such as replacing the front axle seal of a NIVA Chevrolet. The replacement operation is performed when oil leaks from the axle housing. A connected breather causes oil to be squeezed out.
If the grease leaks immediately after stopping (while the transmission is hot) and then the leak stops, the breather must be cleaned. When it becomes clogged with dirt, heated air is not released during movement. Under pressure, the working fluid of the gearbox will be squeezed out even through serviceable gaskets and seals.
If the breather is fine and oil is still leaking, you will need to replace the damaged cover gaskets or O-rings. There are three of them on the front axle, and they are different:
The oil seal that seals the gear shaft is located behind the bridge where the front driveshaft is attached. Right and left drive oil seals (internal connection of the axle shaft).
WARNING! The left and right seals are not the same, they have a direction of rotation. This must be taken into account when purchasing. The direction of rotation of the wheel when moving forward is indicated by an arrow. If the oil is not installed correctly, the removable recesses will force the grease out.
To understand the device, here is a diagram of the front axle:
The oil seal is replaced without removing the front axle. If the work is carried out independently, and it is not possible to use an elevator, the machine is placed on an inspection pit or overpass. Tighten the handbrake and place supports under the rear wheels. Transmission and gear shift levers in neutral. The front part is lifted with a jack and fixed on stops.
We clean the bridge from dirt and drops of technical fluids. Unscrew the crankcase drain plug and drain the oil from the gearbox. Tighten the plug in place.
- Keys 13, 17 and 24 Hex 12 Assembly knife (hanging) Wooden block; Hammer; Flat screwdriver; The puller is universal, two-legged or three-legged; Retaining ring for removal; A piece of pipe according to the diameter of the seals; Washing liquid (kerosene, Carbcleaner, Vince, Laurel); Brush with stiff bristles; Lint-free rags.
- Disconnect the driveshaft from the gearbox by unscrewing the bolts to the flange.
- The internal CV joint housings are separated from the drive gears.
- Using a dynamometer, determine the moment when the drive gear begins to rotate freely. To do this, before turning the gear, turn the flange mounting nut. We capture the value of the moment.
- Tighten the bolts in two adjacent flange holes (to secure).
- Insert the mounting knife between the bolts, preventing the flange from turning, and unscrew the mounting nut.
- Remove the washer and flange from the plug connection. If it is not possible to remove it manually, we use a universal puller.
READ Hyundai Accent Front Hub Replacement
7. Remove the oil seal using a flathead screwdriver. 8. Wash and dry the replacement thoroughly. 9. Replacement
Front axle drive gear seals are produced only using original Chevrolet spare parts. To facilitate pressing, any oil (litol, oil) is applied to the sealing ring. 10. Press the ring with a suitable diameter tube. 11. Place the flange on the spline connection and put on the washer. 12. Tighten the nut to the specified torque when unscrewing. 13. Lock the cardan shaft.
- We remove both disks (or the one that needs to be replaced)
- Remove the retaining ring and spring washer;
- Carefully tap out the bearing with a hammer. If difficult to remove, treat with a penetrating oil such as WD-40.
- Remove the bearing cover with the old seal.
- Using a pipe, knock the oil seal out of the cover;
- Lubricate the new spare part with any lubricant and press the o-ring into the cover.
7. Assembling the unit. Fill the gearbox with oil according to the maintenance instructions, test drive it, and check for oil leaks.
[hint] As you can see, replacing the front axle oil seal. This is not an operation that requires a car service. However, you should work carefully and carefully. For convenience, take a photo of each action when removing the assembly. This will help avoid mistakes during construction. [/tip]
Replacing the seal of the internal CV joint of the front axle on the Niva. VAZ 21213.
To unload the cargo, raise the lower control arm.
Most Chevrolet Niva owners, due to the simplicity of the design, can repair their car themselves.
Remove the seal using a flat blade screwdriver. After this, the crankcase plug is unscrewed, and the gearbox oil is drained into a special container.
The rear wheels must be secured with spacers.
The gearshift levers and transmission must be set to neutral. When using a jack, it is better to hang the front part on special supports.
Repair
It is not necessary to buy a new unit. You can replace the oil seals or gears yourself, and then adjust the mechanism. It makes sense to repair the mechanism if most of the parts are not worn out. Otherwise, it’s worth overpaying and installing a unit that is known to work, so as not to return to repairs.
To repair and adjust the front axle gearbox you will need:
- mark;
- hammer;
- spanners for 10 and 17;
- knob with extension;
- end attachments at 10, 17,19;
- punch;
- bearing puller;
- mounting blade;
- caliper;
- pliers;
- dynamometer;
- flat probe;
- level;
- vice.
You will also need new gaskets for the covers.
Front axle repair
Tools:
- 10 mm wrench
- 17 mm spanner
- Kern
- Small hammer
- Beard
- Collar for fastening to the face
- Socket wrench extension
- 10mm wrench attachment
- 17mm wrench attachment
- 19 mm wrench attachment
- Bearing puller
- Soft metal drift
- Adaptation from old gear
- Level
- Flat stylus
- Wrench
- Assembly knife
- Dynamometer
- Pliers
- Vernier caliper
- More
READ Replacing the Gear Selector Seal for Ford Focus
Parts and consumables:
- Strong thread
- Differential bearings
- Transition bridges
- driven gear
- Transfer shaft
- Bevel gear shaft bearing
- Spacer
- Cuff
- Flange nut
- Kerosene
- Duds
- Adjustment ring
- Installing the front cover on the gearbox housing.
- Front axle lower cover gasket.
Note:
Before disassembling, clean the gearbox from dirt, preventing it from getting inside the gearbox.
1. Using a 10 mm wrench, unscrew the eight nuts that secure the front cover to the transmission housing.
2. Remove the cover.
3. Remove the gasket.
4. Using 10 sockets, unscrew the bolt securing the left differential case bearing cover mounting plate and remove the plate.
5. Also remove the right cover lock plate.
6. Using 19 sockets, remove the four nuts that secure the differential bearing caps.
7. Remove the washers from the studs.
8. Tear it off with a screwdriver.
9. Remove the left differential case bearing cover.
10. Pull out the bolt and remove the cover.
11. Remove the adjusting nuts.
12. Remove the differential box assembly with the main drive driven gear.
13. Removing the driven gear and disassembling the front axle differential is similar to the corresponding work described here. Remove the main gear oil seal from the gear case as described here.
14. Remove the oil deflector from the drive gear shaft.
15. Remove the inner race of the rear bearing of the drive gear with the race and rollers.
16. Remove the drive gear with inner ring, race, bushing and spacer rollers.
17. Remove the ring.
18. In the same way, remove the outer race of the rear bearing. If there is an oil leak from under the lower cover of the front axle gearbox.
19. Using a 13 key, unscrew the eight bolts securing it.
20. Remove the cover.
21. The connection is sealed with sealant. Check the technical condition of the parts, see Section “Disassembly and assembly of the rear axle gearbox”. Additionally, we check the condition of the ball bearings of the internal hinges of the actuators. The bearings must not have damage to the tracks, cages and balls, as well as cracks and chips on the rings. The radial clearance of the bearings should not exceed 0.05 mm. There should be no cracks or signs of wear on the gearbox seats. We replace worn and damaged parts with new ones.
22. New pinion bearing outer races, press in a piece of pipe or tool head of the appropriate size.
23. Assembly and adjustment of the front axle gearbox are similar to the operations described here. When installing a new pair of main gears, make sure that their gear ratio (marked on gears 2106) is equal to the gear ratio of the main pair of rear axle gears.
Notes:
To preload the differential case bearings, tighten both bearing adjusting nuts sequentially and evenly to increase the distance between the caps by 0.08–0.11 mm. We clean the connecting surfaces of the covers and gearbox housing from residual sealant and oil. We replace the gasket of the front cover of the gearbox housing with a new one. The lower cover of the gearbox housing is mounted with sealant.
Without article:
- Photo of the instrument
- Photos of parts and consumables
- High-quality photos of repairs
Source: Chevrolet Niva design, operation, maintenance and repair. Publishing house "Behind the Wheel".
Adjustment
It will not be possible to adjust the drive gear without a torque wrench and mandrel A.70184 . You will also need:
- level;
- calipers;
- flat feelers for measuring gaps;
- adjusting rings with a pitch of 0.05 mm;
- perfectly straight metal rod.
The drive gear is adjusted as follows:
- Align the crankcase mating plane horizontally (you will need a level);
- Install a metal rod onto the bearing bed.
- Place the adjusting rings and measure the distance from the rod to the mandrel.
- Install the adjusting ring. Its thickness is calculated as the difference between the actual clearance and the deflection value indicated on the new gear.
- Install the shaft and related parts in place, secure the drive gear flange.
- Using a torque wrench, tighten the nut with a force of 12 kgf.
- Using a dynamometer, check the moment at which the drive gear shaft begins to rotate. If this value does not correspond to 7.6 to 9.5 kgf, the nut needs to be tightened.
Important: the tightening torque should not exceed 26 kgf. If it is not enough, the spacer sleeve must be replaced.
Adjusting the gap between the parts of the main pair is carried out in several stages:
- Tighten the nut located on the driven gear side to completely eliminate the gap.
- Using a caliper, measure the distance between both covers.
- Tighten the second nut.
- Check the distance between the two covers. It should grow by 0.1 mm.
- By rotating the first nut, achieve a gap between the gears in the range of 0.08-0.13.
Replacing the shank oil seal Niva Chevrolet front axle
If an oil leak is detected, the oil seal must be replaced with a new one; to replace it you will need a 13, 24 wrench, a screwdriver, a torque wrench and a hammer. Before replacing the oil seal in the front gearbox shank on a Niva, disengage the gear and turn off the engine, drain the oil from the front axle crankcase and disconnect the Chevy front propeller shaft from the front axle drive gear flange. Disconnect the housings of the internal circuits of the front wheel drives from the gear shafts of the front axle reducer axle. Determine the moment of resistance to rotation of the gear flange nut and replace the oil seal. Install the removed components and parts in the reverse order of removal and fill the gearbox with oil.
READ Replacing the Throttle Cable on a VAZ 2109 Carburetor
Video about the difference between RPM Shniva and VAZ 2121:
Tools:
- Straight box spanner 10 mm
- Straight box spanner 17 mm
- Kern
- Small hammer
- Beard
- Driver for socket attachment
- Extension for socket wrench
- Knob attachment 10 mm
- Knob attachment 17 mm
- Knob attachment 19 mm
- Bearing puller
- Soft metal drift
- Device made from an old drive gear
- Level
- Flat feeler gauge
- Torque wrench
- Mounting blade
- Dynamometer
- Pliers
- Calipers
- Vise
Parts and consumables:
- Strong thread
- Differential bearings
- Axle gears
- driven gear
- Pinion shaft
- Tapered pinion shaft bearing
- Spacer
- Cuff
- Flange nut
- Kerosene
- Rags
- Adjustment ring
- Gasket for the front cover to the gearbox housing.
- Gasket for the lower cover of the front axle gearbox.
Note:
Before disassembling, clean the gearbox from dirt, preventing it from getting inside the gearbox.
1. Using a 10mm spanner, unscrew the eight nuts securing the front cover to the gearbox housing.
2. Remove the cover.
3. We remove the gasket.
4. Using a 10mm socket, unscrew the bolt securing the locking plate of the left differential box bearing cover and remove the plate.
5. Similarly, remove the locking plate of the right cover.
6. Using a 19mm socket, unscrew the four nuts securing the bearing caps of the differential box.
7. Remove the washers from the studs.
8. Prying it with a screwdriver.
9. Remove the left differential box bearing cover.
10. By pulling the bolt, remove the cover.
11. We take out the adjusting nuts.
12. Remove the differential box assembly with the driven gear of the main gear.
13. Removing the driven gear and disassembling the front axle gear differential are similar to the corresponding work described here. We remove the main gear drive gear oil seal from the gearbox housing socket, as described here.
14. Remove the oil deflector from the drive gear shank.
15. We take out the inner ring of the rear bearing of the drive gear with the separator and rollers.
16. We take out the drive gear with the inner ring, cage, spacer sleeve and front bearing rollers.
17. We take out the ring.
18. Similarly, remove the outer ring of the rear bearing. When oil leaks from under the lower cover of the front axle gearbox housing.
19. Using a 13mm wrench, unscrew the eight bolts securing it.
20. Remove the cover.
21. The connection is sealed with sealant. To check the technical condition of the parts, see the section “Disassembly and assembly of the rear axle gearbox”. In addition, we check the condition of the ball bearings of the internal drive joint housings. Bearings must not have damage to the raceways of the rings, cages and balls, as well as cracks and chips on the rings. The radial clearance of the bearings should not exceed 0.05 mm. There should be no cracks or signs of wear on the gearbox housing seats. We replace worn and damaged parts with new ones.
22. We press in new outer rings of the drive gear bearings with a piece of pipe or a tool head of a suitable size.
23. Assembly and adjustment of the front axle gearbox are similar to the operations described here. When installing a new pair of final drive gears, you must make sure that their gear ratio (marking on the gears is 2106) is equal to the gear ratio of the main pair of the rear axle gearbox.
Notes:
To set the preload of the differential box bearings, we consistently and evenly tighten both bearing adjusting nuts so that the distance between the covers increases by 0.08-0.11 mm. We clean the mating surfaces of the covers and gearbox housing from residual sealant and oil. We replace the sealing gasket of the front cover of the gearbox housing with a new one. We install the lower cover of the gearbox housing with sealant.
The article is missing:
- Photo of the instrument
- Photos of parts and consumables
- High-quality photos of repairs
Source: Chevrolet niva device, operation, maintenance and repair. Publishing house "Behind the Wheel".
Unpretentiousness to road conditions is the main advantage of the modern Niva series SUV. But even the highest quality parts wear out from time to time and require repair or replacement. Replacing bearings on a Chevrolet Niva is often difficult, especially for novice car enthusiasts. Let's look at ways to replace Niva bearings, which most often fail.
Front axle backlash
Bearings must not have damage to the raceways of the rings, cages and balls, as well as cracks and chips on the rings. The radial clearance of the bearings should not exceed 0.05 mm. There should be no cracks or signs of wear on the gearbox housing seats. The main thing left is a cunning gadget for adjusting the gap in the meshing of the teeth of the main pair of gears.
Moreover, in many books there are pictures of it, but in stores you won’t find it. To do this, for little money I purchased such a device with an arrow. But such an indicator still needs to be somehow secured to the gearbox. I made a tripod from two rods from old shock absorbers, modifying them a little and cutting the threads. I welded together a thick washer and a bushing from 08 Amma, drilled holes in them and cut threads for the locking bolts. Assembled the bird. The indicator has an eyelet on the back, screwed it to a tripod. Tried it on to the gearbox. The box from the radio socket fit very well under the new tool. Well, here it is I just summarized the information from the forums on setting up the gearbox.
What signs indicate bearing failure?
The Niva's radial and axial loads are taken by the rear shaft axle bearing. Other parts have their own problems, but the symptoms of a malfunction remain approximately the same in almost all situations:
- Extraneous noises, metallic knocks;
- The appearance of backlashes. It is easy to check when the wheels swing perpendicular to the bearing axis;
- Vibration while driving inside the cabin;
As soon as the driver hears one of the characteristic sounds of bearing wear, it is recommended to immediately go for repairs. Most often, Chevrolet Niva wheel bearings fail. An SUV is more likely to experience axle loads.
Procedure for replacing the front wheel bearing
The owner of a Chevy Niva will need to acquire several types of tools, including:
- Press;
- Suitable type of lubricant;
- Puller;
- Retaining ring remover;
- Mandrel for pressing;
- Hammer;
- Torque wrench;
- Hex head size 30;
- Screwdriver with a flat surface “minus”;
- Wrenches with standard sizes 17 and 19 .
Front wheel bearing replacement process
- In the first step, the car is placed on a level surface. It is best if it is a lift or a pit.
The wheel rim needs to loosen the nuts and bolts that secure it. Hanging is done first for the front part.
Replacing the wheel bearing of a Niva Chevrolet is very simple. The wheel rim along with the hub nut cover must be removed.
The next step is to install the opposite wheel in its place. The car is lowered using a jack until the second wheel is firmly hooked onto the support.
Communities › Chevrolet Niva › Blog › Chevy Niva front gearbox – assembly and adjustment
...So, we assemble the front gearbox. We pressed the outer rings of the bearings into the crankcase - now we measure the base of the crankcase. We install the VPZ bearings with metal cages.
We selected an adjusting ring of the required thickness, pressed the bearing onto the drive gear, put the spacer sleeve into the crankcase, the front bearing onto the shank, the oil slinger, pressed the oil seal in.
the oil seal is in place, now the flange, washer, and tighten the flange nut, set the preload of the drive gear bearings, check...
ready. Our main pair 2101.10/43, 4.3 was found from a thrifty grandfather (May the Kingdom of Heaven be upon him) - in Soviet times, people stocked up on spare parts for future use.
We assembled the differential - all the satellites, axle gears, the satellite axle - everything is new, new bearings too
press on the differential bearings
If there is no mandrel, you can use an old spacer sleeve.
All that remains is to install the differential and adjust the gearbox. From my subjective experience I have developed the following algorithm of actions. First, I take the yoke nuts and tighten them without caps until the end of the thread on the seats of the crankcase bearings
Then I unscrew it evenly until the differential can be inserted.
I install the differential and tighten the nuts by hand - I loosen one, tighten the other - to set approximately the required gap in the engagement of the drive and driven gears. After this, I put on the diff bearing caps and tighten them only slightly. I take a special wrench and check how the adjusting nuts rotate, whether they are normal rotate along the thread
Now we move on to adjusting the gearbox - we set the gap in the engagement of the main pair and the preload of the differential bearings. Unlike the rear gearbox, on the front gearbox the divergence of the covers should be within 0.08-0.11 mm.
Well, everything is ready, the gearbox is assembled and adjusted. The rear one, of course, is easier to assemble...
Replacing the rear bearing
Replacing the rear wheel bearing of a Niva Chevrolet is impossible without the following tools:
- Pullers;
- Flat screwdriver;
- Pliers;
- Socket head with size 24 .
The work involves several preparatory stages:
- The wheel and brake drum are removed;
- The axle shaft is dismantled;
- The axle shaft is disconnected from the bearing and ring.
This sequence is used when removing a bearing with a ring with your own hands:
- The second jack is used to raise the second part of the bridge. This prevents oil leakage;
- The four fastening nuts are unscrewed;
- The ring and bearing are pressed off the axle shaft.
The condition of the oil seal deserves special attention. A screwdriver and hammer are used to remove the oil seal from the housing.
Then you can proceed to the procedure with the shank bearing itself:
- First you need to make sure that there is enough lubricant. If not, then add it if necessary.
- The appropriate mandrel size is the main element when pressing a bearing onto an axle shaft. You can use a pipe with a suitable diameter, at least half the length of the axle shaft itself.
- The retaining ring is installed next. It is recommended to preheat this part to at least 200 degrees. Then it is connected to the axle shaft. The operation does not cause problems if there are pipes or mandrels of the appropriate size.
- The installation of the axle shaft follows the reverse algorithm.
Removing the bearing, dismantling the bridge from the assembly
The procedure is largely similar to what was described in the previous paragraphs.
- First remove the wheel;
- To dismantle the brake drum mechanism, unscrew the bolts securing it;
- The bearing assembly is checked for play. The axle shaft moves;
- The four axle bolts are unscrewed using a 17mm wrench;
- Before unscrewing the axle itself, it is better to place a special stop under the bridge. This protects the gearbox from transmission oil leaks;
- Two plates or wide keys are installed under the flange. Two bolts M2 and M10 are evenly screwed into special holes;
- We observe the gradual detachment of the bearing from the seat;
- The axle is clamped in a vice to remove the lock washer. The locking element is being dismantled. A chisel and hammer are indispensable tools during this process. But such a simple option is not always feasible due to the fact that the parts stick;
- The element needs to be heated if it cannot be dismantled by other means;
- It is acceptable to use a grinder with small discs. It is also suitable for the steering shaft bearing.
After disassembly, a new bearing is installed in place. Assembly involves performing the steps in reverse order.
Below, watch a video review of breakdowns and malfunctions of the Niva axle shaft, as well as how to replace the rear bearing on a Niva.
Replacing oil seals
To change the drive seals, in addition to the listed tools, you will need:
- mount;
- flat screwdriver;
- wooden block;
- hammer;
- hex wrench 12;
- puller (two- or three-legged);
- mandrel (a piece of pipe whose diameter corresponds to the size of the seals);
- circlip puller;
- dynamometer.
Before replacing the seals, the drives will have to be removed.
To replace the drive gear seal, you must perform the following steps:
- Using a dynamometer, measure the starting torque of the drive gear.
- Fix the flange: screw a couple of bolts into its holes and insert a pry bar into them.
- Unscrew the fastening nut.
- Remove the washer and flange from the splines (here you will have to use a puller).
- Using a flathead screwdriver, remove the oil seal from the mounting hole.
Replacing the drive oil seal is done as follows:
- Remove the retaining ring and spring washer.
- Using a hammer, knock the bearing out of its seat.
- Remove the cover together with the oil seal
- Knock out the old part using a pipe.
- Lubricate the new oil seal with grease and press it into the cover.
- Assemble the knot.
Release bearing: replacement recommendations
Removing the gearbox is a mandatory step for those who are interested in replacing a Chevrolet Niva release bearing that has failed. The work is labor-intensive, because you have to remove the drive shaft. It's good to have an assistant.
The following procedure is relevant when replacing the clutch mechanism:
- Installing the car on the inspection hole and removing parts;
- Removing the gearbox;
- If it is necessary to replace the bearing, the part is pulled out. Its base must be disengaged from the fork. The plug is removed from the structure, then the part is easy to remove.
The main difficulties are associated with removing the gearbox. Replacing a bearing is an operation that takes no more than 10 minutes. Before installing a new part, it is recommended to lubricate it thoroughly. The quality of the material used determines how durable the structure will be in the future.
When is replacement required?
The replacement operation is carried out when oil leaks from the axle housing. A clogged breather causes lubricant to squeeze out.
If grease drips immediately after stopping (while the gearbox is hot), and then the flow stops, the breather must be cleaned. When it is clogged with dirt, the heated air is not released outside during movement. Under pressure, the working fluid of the gearbox will be squeezed out even through serviceable gaskets and seals.
If the breather is in order, but oil still leaks, you will have to replace damaged cover gaskets or O-rings. of them in the front axle, and they are different:
The oil seal that seals the drive gear axis is located at the rear of the axle, at the location where the front propeller shaft is attached. Oil seals for the right and left drive (inner axle joint).
Attention! The left and right oil seals are not the same; they have a direction of rotation. This must be taken into account when purchasing.
Important! The left and right oil seals are not the same; they have a direction of rotation. This must be taken into account when purchasing.
The direction of rotation of the wheel when moving forward is indicated by the arrow. If the oil is installed incorrectly, the removable notches will drive the lubricant out. To understand the device, here is the layout of the front axle:
The oil seal is replaced without removing the front axle. If the work is carried out independently, and it is not possible to use a lift, the car is placed on an inspection hole or overpass . We tighten the hand brake and install supports under the rear wheels. Gearbox and transfer case levers in the “Neutral” position. The front part is lifted with a jack and fixed on stops.
Attention! It is dangerous to work under a car that is only supported by a jack!
We clean the bridge from dirt and leaks of technical fluids. Unscrew the crankcase drain plug and drain the oil from the gearbox. Screw the plug into place.
This is interesting: How to carry out the XX valve training procedure after replacing the ECM or disconnecting the battery?
Generator bearing: replacement recommendations
The following recommendations are given for replacing the Niva Chevrolet generator bearing:
- The first step is to remove the generator itself. First, the generator mounts are loosened, then the adjustment bolt is released. The next steps are to remove the belt and disconnect the ground from the battery. We are talking about the negative terminal. It is also necessary to disconnect the wires from the generator itself. The structure is removed through the lower part. Why does the mount itself unscrew?
- After this, the master begins to disassemble the generator. The first step is to remove the pulley. The owner will need a screwdriver to lock the rotor. The main thing is a careful approach to work. The pulley is unscrewed with the appropriate key. You will need to pull back the latches to remove the cover. The part is pulled towards itself. All connections with bolts are additionally processed. Then it will be easier to unscrew them.
- The next steps are to unscrew the screws and remove the voltage regulator unit. You also need to get rid of brushes for a while. The generator cover is disconnected from the starter, otherwise it will not be possible to gain access to the bearings themselves. The main thing is not to damage the winding during such work.
- After complete disassembly of the generator, access to the bearings becomes available. It remains to check the parts for any defects that have appeared, including cracks and chips. Do the parts rotate easily? Is there any play between them? The seats may suffer from wear, so they also need to be inspected.
- Next, you need to knock the bearing out of its seat. To do this, tap the surface with a small hammer. The blows must be strong, but careful, otherwise the result will not be achieved. A piece of pipe of the appropriate size will make an excellent stand. Removing the rear bearings is impossible unless a special puller is used.
- The properties of old and new parts must remain similar. The same attachment is used when pressing into the body. The anchor is where the rear bearing is installed.
- When reassembling, proceed in reverse order.
Below watch a video on how to disassemble and repair a Niva generator.
Disassembly and assembly of the Chevrolet Niva front axle gearbox
Tools:
- Straight box spanner 10 mm
- Straight box spanner 17 mm
- Kern
- Small hammer
- Beard
- Driver for socket attachment
- Extension for socket wrench
- Knob attachment 10 mm
- Knob attachment 17 mm
- Knob attachment 19 mm
- Bearing puller
- Soft metal drift
- Device made from an old drive gear
- Level
- Flat feeler gauge
- Torque wrench
- Mounting blade
- Dynamometer
- Pliers
- Calipers
- Vise
Parts and consumables:
- Strong thread
- Differential bearings
- Axle gears
- driven gear
- Pinion shaft
- Tapered pinion shaft bearing
- Spacer
- Cuff
- Flange nut
- Kerosene
- Rags
- Adjustment ring
- Gasket for the front cover to the gearbox housing.
- Gasket for the lower cover of the front axle gearbox.
Note:
Before disassembling, clean the gearbox from dirt, preventing it from getting inside the gearbox.
1. Using a 10mm spanner, unscrew the eight nuts securing the front cover to the gearbox housing.
2. Remove the cover.
3. We remove the gasket.
4. Using a 10mm socket, unscrew the bolt securing the locking plate of the left differential box bearing cover and remove the plate.
5. Similarly, remove the locking plate of the right cover.
6. Using a 19mm socket, unscrew the four nuts securing the bearing caps of the differential box.
7. Remove the washers from the studs.
8. Prying it with a screwdriver.
9. Remove the left differential box bearing cover.
10. By pulling the bolt, remove the cover.
11. We take out the adjusting nuts.
12. Remove the differential box assembly with the driven gear of the main gear.
13. Removing the driven gear and disassembling the front axle gear differential are similar to the corresponding work described here. We remove the main gear drive gear oil seal from the gearbox housing socket, as described here.
14. Remove the oil deflector from the drive gear shank.
15. We take out the inner ring of the rear bearing of the drive gear with the separator and rollers.
16. We take out the drive gear with the inner ring, cage, spacer sleeve and front bearing rollers.
17. We take out the ring.
18. Similarly, remove the outer ring of the rear bearing. When oil leaks from under the lower cover of the front axle gearbox housing.
19. Using a 13mm wrench, unscrew the eight bolts securing it.
20. Remove the cover.
21. The connection is sealed with sealant. To check the technical condition of the parts, see the section “Disassembly and assembly of the rear axle gearbox”. In addition, we check the condition of the ball bearings of the internal drive joint housings. Bearings must not have damage to the raceways of the rings, cages and balls, as well as cracks and chips on the rings. The radial clearance of the bearings should not exceed 0.05 mm. There should be no cracks or signs of wear on the gearbox housing seats. We replace worn and damaged parts with new ones.
22. We press in new outer rings of the drive gear bearings with a piece of pipe or a tool head of a suitable size.
Bearing selection by manufacturer
Experienced car mechanics know that it is better to choose a bearing that is completely identical to what was before. It would be good if it was an item with the original box and logo. Such parts often correspond to their counterparts that were originally supplied to the assembly line. The price of the bearing is not always affordable, because they are produced in a limited batch for a batch of cars.
But there are other bearing models whose characteristics are in no way inferior to the original ones. And the cost of non-original bearings is lower only due to the use of a different brand. Here are just a few bearing suppliers that have become popular in today's automotive market.
- SNR – French company;
- SKF is one of the largest manufacturers in the world;
- FAG is a German manufacturer, one of the largest companies;
- NSK - from Japan;
- NTN is another representative of the Land of the Rising Sun.
Manufacturers from Japan often deliver their parts directly to the assembly line. Therefore, practically nothing is known about them on the regular spare parts market. You can ignore the country of origin in the case of the companies mentioned above. It often lists one of many offices and branches around the world.
If a bearing manufacturer is allowed onto the assembly line, this is already confirmation that a strict selection process has been passed in the first stages. This means that the quality system meets the stringent requirements for manufacturers and their parts.
The most common and popular part numbers of Chevrolet Niva bearings
- The part number of the front wheel bearing is 2007108 (catalog number: 2121-3103020-10 , foreign equivalent: 32008 );
- The part number of the rear wheel bearing is 2403080 (catalog number: 6-180508AK2US9 , foreign equivalent: 62208.2RS );
- Clutch release bearing number - 21230160118000;
- The part number of the gearbox input shaft bearing is 50706 (foreign equivalent: 750706 );
- The generator bearing part number is 180201
(foreign equivalent:
6201-2RS
).