Despite the fact that VAZs can hardly be called ideal cars, their popularity is growing every year. One of the obvious disadvantages of the VAZ-2101 is the stove. It slowly warms up the interior, causing the windows to remain foggy for a long time. It is uncomfortable and cold to be in the car at this time. But if there is a desire, this drawback can be, if not eliminated, then minimized. Modification of the VAZ-2101 stove with your own hands can be done in at least three ways.
VAZ-2101 is one of the most popular domestic cars in our country
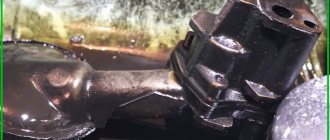
Replacing the heater radiator Lada 2101 (VAZ 2101)
Removing the heater radiator on a VAZ 2101-2107 and those models between (2102, 2103, 2104, 2105 and 2106) is not as difficult as it might seem at first glance, the only thing you need is to stock up on antifreeze or antifreeze, depending on what is filled.
I removed the heater radiator for the first time for a trivial reason: the heater tap was leaking. Replacing it involves removing the radiator completely.
Also, the reasons for removing the radiator may be due to the fact that the stove does not heat well, as was the case for me.
And it is possible that the radiator itself may leak, as my friend had, then you will have to buy a new radiator (preferably copper).
And these are the main reasons when it is necessary to remove the heater radiator on a VAZ classic.
Now let’s look at how to remove the heater radiator using the example of VAZ 2105 and 2107 (on other VAZ cars, the process is similar).
Refinement using a new snail
To radically change the airflow of the stove and make it quieter, you can install a snail from the VAZ-2108 on the VAZ-2101.
What to buy
To do this you will need:
- New airflow mode switch.
- Resistance from a VAZ-2108 car.
- Snail from VAZ-2108.
- Wires, bolts, nuts, aluminum or any other corners.
- Thick plexiglass for the box.
- Industrial hair dryer to bend plexiglass.
Work step by step
As a result, we will get an improvement in all heating indicators - the cabin will be warm, and the most pleasant thing is that the noise will be significantly reduced.
- We make a housing for attaching the “snail” from plexiglass. That is, we cut it, bend it with a hair dryer, getting the desired shape. To reduce the size of the case, you can cut off the snail plugs.
- The side walls can be made of duralumin (1.5 mm thick). If cracks or crevices appear in the joints during work, they should be sealed with silicone sealant.
- We make collapsible air channels through which the flow will go to the air duct openings.
- Turns must be made smoothly to reduce air resistance in the flow and direct the air straight.
- If you want to bring airflow to your feet, make slots with flaps in the right places. If desired, you can install a variable resistor for adjusting the speed of the cochlea instead of the backlight brightness resistor.
If you do everything correctly, you will get a stove that operates almost silently, especially at low speeds. Despite the large number of bends in the design, the air flows will be sufficient to quickly heat the interior, and the second and third speeds can be turned on only in emergency cases - when you need to heat the interior very quickly.
Therefore, if you are not satisfied with something in the VAZ heating system, try to modify it. And you will succeed!
Source: remam.ru
Signs of a malfunction of the VAZ 2107 heater radiator
A malfunction of the heater radiator can be due to two reasons:
- Coolant leakage from the radiator.
- Clogged internal channels.
It is necessary to remove the radiator of the VAZ 2107 cooling system; if any of these problems are detected, after dismantling it is repaired or replaced with a new one. The replacement process itself is not very complicated; you need to be careful and careful. To replace the heater radiator you will need the following tools:
- Key to 7;
- Key for 10;
- Crosshead screwdriver;
- Rags;
- Coolant;
- two new rubber gaskets.
The stove doesn't heat
If the engine is warm, the heater valve is open, but cold air is coming from the heating system, then most likely the radiator is clogged or there is a low level of antifreeze in the cooling system. To check the coolant level, just look at the level in the expansion tank or unscrew the main radiator cap with the engine off. If there are no problems with the level, then you need to deal with the heat exchanger, you may have to flush it or the entire cooling system. To avoid possible clogging of the heater radiator, you should not add various additives that eliminate small leaks. Such products can easily clog the stove tubes.
Cold air flow from the heating system can also be caused by air in the system. In this case, you will need to remove the air plug and add coolant.
Airing is the appearance of an air lock in the cooling system during repair work or when replacing the coolant.
In addition, the problem is possible with the tap itself, which over time can become clogged or scale may form if water is used instead of antifreeze. If there is a problem with the tap, the part is disassembled and cleaned or simply replaced. Another, although rare, but possible cause of a cold stove, may be pump failure. In this case, the engine warms up, but the pipes going to the heater radiator remain cold. In this case, the water pump must be repaired immediately. Warm air may also not enter the cabin due to problems with the heater fan. The problem may be with the motor itself or its power circuit, for example, if a fuse blows.
Self service
Using the diagram, it is easy to ring the wiring and identify the cause of the breakdown:
The technical manual supplied with the car clearly shows:
Conclusions: the VAZ 2103 car turned out to be not only beautiful and elegant, but also technically more advanced. And the care of car owners and independent maintenance had a positive impact on its longevity. Watch the video that VAZ 2103 owners boast about and you will see for yourself.
Sources
- https://avtovx.ru/elektrooborudovanie/vaz-2106-shema-provodki-151/
- https://avtoelektrik-info.ru/vaz/32-shema-elektroprovodki-vaz-2103
How to change the stove in a VAZ 2107
Having found out that the heater needs repair, it will require complete or partial dismantling. If there is a problem with the motor, then it is enough to remove the lower part of the assembly. If there is a problem with the radiator, you must first drain the coolant from the engine cooling system. To carry out repair work you will need the following tools:
- Phillips and flathead screwdrivers;
- set of open-end and socket wrenches.
To replace the stove you will need a set of keys and screwdrivers
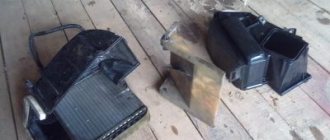
Heater removal
After the coolant has drained and the necessary tools have been prepared, you can begin disassembly. It is carried out in the following order:
- Remove the negative terminal from the battery.
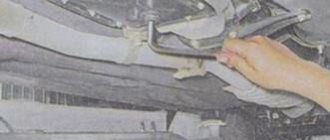
- In the engine compartment, loosen the two clamps that secure the hoses to the heater pipes. When the hoses are pulled together, a small amount of antifreeze will leak out.
Unscrew the clamps and pull the hoses off the radiator tubes - Unscrew the screws and remove the rubber seal.
Unscrew the screws and remove the rubber seal - We move into the cabin, unscrew the fastening of the shelf under the glove compartment and remove it.
To remove the shelf located under the glove compartment, unscrew the fasteners in the form of screws - Remove the panel with the clock and cigarette lighter by unscrewing the screws on the right, left and bottom.
To remove the panel with the clock and cigarette lighter, you will need to unscrew the corresponding screws - Disconnect the wires from the cigarette lighter and the clock, and then move the panel to the side.
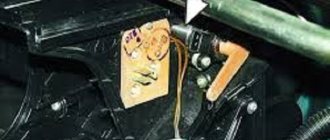
Disconnect the wires from the cigarette lighter and clock - We dismantle the internal cavity of the glove compartment in order to move the right air duct aside and provide access to the heater valve. The left air duct is also dismantled (when the stove is completely removed).
It is necessary to disconnect the right and left air ducts from the heater - Using a 7 key, unscrew the bolt that secures the crane control cable.
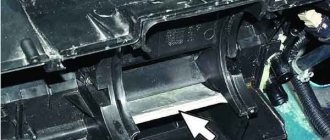
Using a 7 key, unscrew the cable fastener - To partially disassemble the stove, you will need to dismantle the lower part of the housing. To do this, use a screwdriver to pry up the metal latches (2 on the right and 2 on the left).
To remove the lower part of the heater you will need to pry off 4 latches with a screwdriver - After removing the latches, pull the lower part towards you and gain access to the motor. If repair or replacement work is required for this unit, we will carry it out.
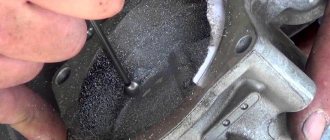
After dismantling the lower part, access to the heater fan opens - To dismantle the radiator, we take it out of the housing along with the tap.
To remove the radiator, simply pull it towards you. - To completely dismantle the stove, remove the upper part of the body, which is secured with four 10mm wrench bolts.
To completely remove the stove, you need to unscrew 4 10mm wrench bolts. - We unscrew the 2 bolts securing the heater control bracket and loosen the screws that hold the rod mounting brackets.
- We remove the remaining part of the stove.
When the fasteners are unscrewed, remove the upper part of the stove body
Instructions for dismantling the instrument scale
- In the glove compartment, unscrew several nuts on the outermost fastening of the instrument panel and the bolts located under the instrument cluster.
- Carefully, using a screwdriver, remove the plate from the receiver casing with auxiliary adjustment units, inside which there are several bolts securing the radio panel. It is advisable to remove them, while supporting the mounting bar and preventing it from falling. Remove the receiver panel.
- Move the fastening nuts and remove the decorative elements of the steering column.
- Taking care not to damage anything, use a screwdriver to move the clock in the panel. It is advisable to mark and disassemble the wiring, remove the backlight from the clock and remove it.
- Separate the wire from the light box illumination lamp.
- Unscrew the mounting bolts and remove the work shelf.
- Remove the fastening bolts at the bottom of the panel.
- Remove the switch for the electric interior heating fan, mark the connection points with a marker and remove the switch. Using a screwdriver, remove the handles of the heating shutters.
- Remove the instrument panel. Using a screwdriver, lift it up at the fixing points and pull it forward. Unhook the cable from the speedometer. Be sure to mark the packages of electrical wires so as not to get confused during installation. Unplug the electrical wiring and remove the instrument panel.
- Remove both side decorative trims from the windshield frame by removing the three fastening screws.
- Release the radio panel by removing the side fasteners.
- Lift and remove the panel from the VAZ 2106.
Simple rules that, if followed, will extend the life of the heater radiator
In order for the radiator to last a long time, you need to follow a number of rules:
- When purchasing, you should not save money and buy a low-quality unit. You should pay attention to the material of manufacture and the manufacturer.
- Only high-quality liquids should be poured into the system. Do not pour water and mix antifreeze with antifreeze. No lubricant or fuel should enter the system.
- When idle during the warm season, when the heater is not in use, you need to open the heater tap at least twice a month so that liquid enters the radiator. Thus, the unit will not dry out and the heater tap will not stick.
If you carefully operate the heating system and fill it with high-quality antifreeze or antifreeze, then its components will last for many years.
Self-tuning of the dashboard
Once released, the dashboard is covered with flock or faux leather. This will make her more attractive. It is carefully cleaned, coated with Moment glue, onto which the leatherette is attached, the material is smoothed, after which the panel is left for a while to allow the glue to dry.
Using a felt circle cut out for the edging of the dials will give the LED backlight a vibrant look. Holes are cut in the panel for the measuring sensors, all excess is removed, then the sensors are inserted and connected to the existing wires.
Replacement procedure
You can buy a new heater radiator for a VAZ 2107 at any auto store; an aluminum one will cost about 1 thousand rubles, and a copper one will cost a little more, but it can be soldered, which, however, is only a temporary measure. The kit should include spare parts necessary for installation.
First you need to disconnect the battery terminal so as not to damage the car's electrical system during operation. Radiator installation begins with draining the coolant. To do this, use a 13mm head to unscrew the drain plug, which is located on the cylinder block; there is no need to drain the cooling system radiator.