Hello, dear car enthusiasts! Without a doubt, one of the most important attributes for safe driving is the steering. Attempts to find another way to give the machine the required direction of movement do not stop.
But in the coming decades, automakers are not going to change their traditions of putting steering wheels in cars. The steering is very reliable, durable, and informative. The steering system does not have many parts, and it is not difficult to understand.
As a rule, almost no attention is paid to such a part of the steering as the steering gear, mistakenly believing that a piece of metal rod cannot create problems.
Despite its structural simplicity, the steering column also wears out and can give the driver many “surprises”. A heart-rending squeak when turning the steering wheel is the most harmless nuisance that a steering column can cause.
The rotation of the steering wheel seems much more frightening when the car does not change the direction of its movement due to such actions. Such a breakdown can cost the life of the driver, passengers and other road users. The steering column must be monitored and kept in good condition.
Steering column VAZ 2106 – 2107. Design and purpose of elements
Bumpy steering column VAZ 2101-07
Despite all the unity and similarity of the structure of the elements of classic VAZ models, there are still differences between them. This also applies to the steering column. Any car enthusiast knows that the steering column or steering wheel shaft is designed to transmit rotational motion from the steering wheel to the steering worm shaft.
The column itself is held on the body using a special bracket, as well as a rigid clutch to the steering mechanism. The steering column of the VAZ 2106 is an all-metal shaft, which in the upper part has an external spline connection and thread for attaching the steering wheel, as well as an internal spline connection for attaching the worm shaft to the upper part.
The steering column of the VAZ 2107 has a more complex structure: it includes two “cardanic joints” - hinges that allow the shaft to fold. Thanks to this device, the steering column is called injury-proof.
In the event of an accident and a blow to the front left side of the car, the steering shaft folds in hinges and does not injure the driver. In addition, the upper shaft of the “seven” has 2 needle bearings, which greatly facilitates control.
Typical steering column problems
Given the simple design of the steering column, there may not be many breakdowns. It is important not to ignore “signals” from the steering column itself about a malfunction and carry out repairs in a timely manner.
Among the main signs of a faulty steering column, the following should be highlighted:
- creaking in the steering column, which can be caused by wear of elements, deformation of facing panels and trim, malfunction of parts of the steering column switch unit;
- play in the steering column is a more serious symptom. Play in the plane of the steering wheel may indicate wear or weakening of the bracket elements, and axial play indicates weakening of the spline joints.
Provided that all parts are installed properly, the steering column will serve for a very long time. Loosening the bolts and nuts of spline joints leads to free play and gradual wear of the splines.
As a result, this leads to the fact that the column rotates and becomes unusable, since the connection without splines can no longer perform its function.
DIY steering column replacement
Considering that the spline joints in the steering column cannot be restored, provided that the steering wheel and steering mechanism are in good condition, the steering column simply needs to be replaced.
The column itself is quite easy to remove; much more time is required for the preparatory procedures.
The steering column is replaced as follows:
- the battery is turned off;
- the steering wheel and steering shaft casing are removed;
- the steering column control system (switch) and ignition switch are removed;
- the steering bracket bolts are unscrewed (some of them will have to be drilled out);
- the coupling bolt of the splined connection with the steering mechanism is unscrewed;
- the lower shaft seal is unscrewed and it is removed inside the cabin.
When starting to repair a car, you should make a rule of putting the removed parts one by one. This will make reassembly much easier. This will make your work easier, and there will be significantly fewer stupid questions on car Internet forums.
How to replace the steering shaft of a VAZ 2101, VAZ 2102, VAZ 2103, VAZ 2106?
Removal: 1) First, de-energize the battery; to do this, remove the “Negative” terminal from it. (For information on how to remove the terminal, see the article: “Replacing the battery” in paragraph “1”)
2) Next, remove the steering wheel from the car. (For information on how to remove the steering wheel on a VAZ 2106, see the article: “Replacing the steering wheel on a VAZ”)
Note! On other cars such as VAZ 2101, VAZ 2102, etc. The steering wheel can be removed following the example of removing the steering wheel on a VAZ 2106!
3) Now remove the casing from the steering column by unscrewing all the lower screws that secure it.
Note! For more information on how to remove the casing, read the article entitled: “Replacing the instrument panel”, in paragraphs “1-2”!
4) Next, find three blocks that are connected to three wire connectors, and after finding them, disconnect them from each other.
5) Then loosen the bolt that secures the clamp of the switch (Turn, light, etc.), and after unscrewing the bolt, carefully remove the switch by sliding it toward you along the shaft.
6) Next, remove the two screws that secure the ignition switch.
7) And after that, insert the key into the lock and turn it to position “0”, and then carefully insert a thin screwdriver into the hole and press the latch, and then remove the lock by pulling it by the key that is inserted in this lock.
Now you should use a marker and thereby make marks on the wires relative to the ignition switch so that when reinstalling the wires they do not get mixed up.
9) Next, unscrew the two bolts and two nuts that secure the steering shaft bracket to the car body.
10) Next, loosen the bolt that tightens the terminal connection of the steering shaft to the steering shaft by 2-3 turns.
Note! After the bolt is loosened, loosen the terminal connection as far as you can using a screwdriver!
We recommend: DIY door trim for VAZ-2107
11) Next, without removing the screwdriver from your hands, loosen the bolt that tightens the clamp securing the tube of the upper shaft support by 2-3 turns.
Note! After loosening the bolt, slide the tube up the shaft and remove it. Following the tube, slide and thereby remove the shaft bracket indicated by the arrow!
12) Finally, pull the shaft towards you and thereby remove it from the car.
Installation: 1) Installation is carried out in the reverse order of removal.
Note! Before you start installing the new steering shaft in its place, pick up the shaft mounting bracket and loosen the two nuts that secure it!
And all the nuts and bolts need to be tightened only after the shaft and all the removed parts are finally installed in their places!
Hello, dear car enthusiasts! Without a doubt, one of the most important attributes for safe driving is the steering. Attempts to find another way to give the machine the required direction of movement do not stop.
But in the coming decades, automakers are not going to change their traditions of putting steering wheels in cars. The steering is very reliable, durable, and informative. The steering system does not have many parts, and it is not difficult to understand.
As a rule, almost no attention is paid to such a part of the steering system as the steering column, mistakenly believing that a piece of metal rod cannot create problems.
Despite its structural simplicity, the steering column also wears out and can give the driver many “surprises”. A heart-rending squeak when turning the steering wheel is the most harmless nuisance that a steering column can cause.
The rotation of the steering wheel seems much more frightening when the car does not change the direction of its movement due to such actions. Such a breakdown can cost the life of the driver, passengers and other road users. The steering column must be monitored and kept in good condition.
Steering column VAZ 2106 – 2107. Design and purpose of elements
Despite all the unity and similarity of the structure of the elements of classic VAZ models, there are still differences between them. This also applies to the steering column. Any car enthusiast knows that the steering column or steering wheel shaft is designed to transmit rotational motion from the steering wheel to the steering worm shaft.
The column itself is held on the body using a special bracket, as well as a rigid clutch to the steering mechanism. The steering column of the VAZ 2106 is an all-metal shaft, which in the upper part has an external spline connection and thread for attaching the steering wheel, as well as an internal spline connection for attaching the worm shaft to the upper part.
The steering column of the VAZ 2107 has a more complex structure: it includes two “cardanic joints” - hinges that allow the shaft to fold. Thanks to this device, the steering column is called injury-proof.
In the event of an accident and a blow to the front left side of the car, the steering shaft folds in hinges and does not injure the driver. In addition, the upper shaft of the “seven” has 2 needle bearings, which greatly facilitates control.
Typical steering column problems
Given the simple design of the steering column, there may not be many breakdowns. It is important not to ignore “signals” from the steering column itself about a malfunction and carry out repairs in a timely manner.
Among the main signs of a faulty steering column, the following should be highlighted:
- creaking in the steering column, which can be caused by wear of elements, deformation of facing panels and trim, malfunction of parts of the steering column switch unit;
- play in the steering column is a more serious symptom. Play in the plane of the steering wheel may indicate wear or weakening of the bracket elements, and axial play indicates weakening of the spline joints.
Provided that all parts are installed properly, the steering column will serve for a very long time. Loosening the bolts and nuts of spline joints leads to free play and gradual wear of the splines.
As a result, this leads to the fact that the column rotates and becomes unusable, since the connection without splines can no longer perform its function.
DIY steering column replacement
Considering that the spline joints in the steering column cannot be restored, provided that the steering wheel and steering mechanism are in good condition, the steering column simply needs to be replaced.
The column itself is quite easy to remove; much more time is required for the preparatory procedures.
The steering column is replaced as follows:
- the battery is turned off;
- the steering wheel and steering shaft casing are removed;
- the steering column control system (switch) and ignition switch are removed;
- the steering bracket bolts are unscrewed (some of them will have to be drilled out);
- the coupling bolt of the splined connection with the steering mechanism is unscrewed;
- the lower shaft seal is unscrewed and it is removed inside the cabin.
When starting to repair a car, you should make a rule of putting the removed parts one by one. This will make reassembly much easier. This will make your work easier, and there will be significantly fewer stupid questions on car Internet forums.
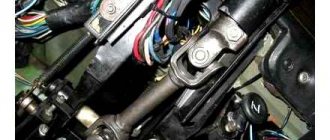
Device
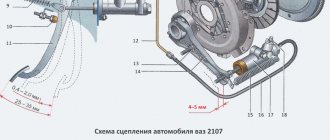
As you know, the cardan or intermediate steering shaft, as it is also called, consists of two parts. These are components that are connected to each other by a special universal joint.
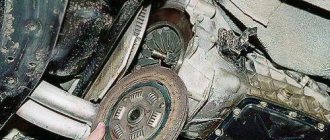
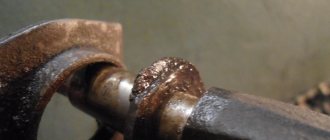
The steering cardan is connected to the drive gear using a special fastener, indicated by the number 9, but this is from the bottom side. But on the top side the cardan rotates in the bracket pipe on ball bearings (there are two of them). As for the main shaft mounts, they are connected to the welded bracket in four places. The front part of the cardan is attached through two plates with special shear heads. And the rear part of the cardan is connected using welded bolts and nuts that have spring washers or, often, self-locking nuts, but without washers.
Note. It is important to know that depending on the year of manufacture, the steering rack comes in two types. In one case, it is not necessary to disassemble the entire steering rack, but this is mainly for the VAZ 2108 and similar models. As for the steering wheel on the VAZ 2110, to replace the cardan it will need to be disassembled.
To disassemble the rack you need to do the following:
- the protective corrugation is removed;
- the nut located in the middle is unscrewed;
- the rail is disassembled into two parts.
Steering column device
In the VAZ sixth model, the steering column arrangement is similar to many other vehicles. The purpose of this vehicle control unit is to transmit the muscular efforts of the driver turning the steering wheel to the worm-type steering column shaft with subsequent transmission of the rotational force to the wheelset. The steering column itself is attached to the car body with three powerful bolted connections using a special fastener element and has a rigid connection with the steering mechanism.
There is an installation bolt in the top of the cover, which is used to adjust the steering column if necessary. This need arises if increased play is detected in the steering column, which in its projection represents a shaft made of a solid metal pipe, equipped at the top with splines and an external threaded connection for fastening the steering wheel, as well as splines on the inside for fastening the worm shaft in the upper position.
Taking into account the simplified design of the steering column of the VAZ 2106, the defects of such a unit are few. In such a situation, the main thing is to literally listen to the operation of the steering column, to the sounds that it makes during operation. Timely diagnosis and adjustment of the steering column is of great importance, which can be carried out without the involvement of specialist car repair specialists.
Typical steering column defects include:
- creaking in the steering column caused by increased wear of components, temporary changes in the lining, defects in the elements of the switch system located under the steering wheel;
- play in the steering column, which is regarded as a more serious sign of a malfunction of the steering mechanism. Such play in the steering column ultimately leads to increased wear of components or their sagging. At the same time, the play of the steering column along the projection of the axis of the product indicates a weakening of the spline connections, which can provoke a situation where the splines begin to wear out.
We recommend: Installing front disc brakes on GAZ-24
To eliminate deficiencies in the functionality of the steering column during repairs, it is necessary to use a steering column repair kit, which can be used to eliminate any malfunctions that have arisen.
Column malfunctions and replacement
Six steering wheel repair
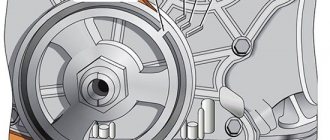
The basis of the steering column is a gearbox with two gears, one of which is a worm type. You can feel a steering malfunction at a very early stage, so the main thing is not to miss the first “bell” and carry out repairs on time.
Main signs of failure.
- Creaks directly in the column, caused by excessive wear of various elements, as well as malfunction of the steering column switches.
- The presence of backlashes is the most dangerous sign. Moreover, the backlash can be of two types - axial and longitudinal. The first indicates a malfunction of the gearbox or spline connection, the second indicates excessive wear of the bracket.
The first step is to check the tightness of all threaded connections. If you operate a VAZ 2106 car for a long time with worn splines on the shaft, this will lead to free rotation of the steering wheel. Over time, the slots simply wear out. Moreover, the splines on the steering gear can become unusable, and its price is quite high, and no adjustment of the VAZ steering column can help.
How to reduce backlash?
The gearbox does not require special care during operation; the main thing is to prevent oil leakage and maintain its level at normal levels. If play appears in the gearbox, the wheels turn only after the steering wheel reaches a certain angle of rotation. This creates inconvenience in driving a VAZ 2106.
You can reduce the backlash yourself; for this you will need an assistant, a 19-mm wrench and a flat-head screwdriver:
- Unscrew the nut on the adjusting bolt;
- Have an assistant turn the steering wheel a quarter turn in both directions;
- At the same time, screw in the screw until you are sure that the play has disappeared;
- Tighten the nut firmly.
After these manipulations, the steering movement will become tighter.
Replacing the steering column of a VAZ 2106
It is no secret that not only the controllability and stability of the car, but also the safety of the people in it depends on the serviceability of the steering system. When you first suspect a breakdown, you must quickly diagnose and fix the problem. But what is the right way to proceed? In fact, everything is simple - just know the design features of the unit, possible faults and methods for eliminating them. And in this article we will focus on one of the most important elements of the system - the steering column.
Purpose, device and features
The steering column is the connecting link between the steering wheel in the cabin and the wheels of the car. Its task is to transmit commands from the driver turning the steering wheel to the worm of the steering mechanism. Many car enthusiasts underestimate the importance of this unit. But in vain. Ignoring seemingly insignificant problems can lead to the destruction of mechanical elements and, as a result, loss of vehicle controllability. It's scary to imagine how this could end when driving on the highway.
Among the structural elements of the column, it is worth highlighting the shaft itself (essentially the same steering column), the bracket on which the steering wheel is attached, the bearing, the crosspiece (some models have it) and the steering wheel. Please note that even in classic models of AvtoVAZ products, the design of the steering columns may vary. For example, in the “six” it is a solid shaft made entirely of metal. On top there is a spline connection and a special thread for mounting the steering wheel. On the other side of the column there is an internal connection intended for fastening to the worm gear. In the same “seven” the design of the mechanism is more sophisticated. It includes a pair of small hinges that allow the steering column to fold in the event of a powerful frontal impact. Thanks to this property, this type of design is called “injury-proof”.
Signs and causes of failure
Signs of a faulty steering column are as follows: 1. A knocking sound appears in the rack. If nothing is done, the sound will increase (especially with frequent trips on uneven roads). Over time, strong feedback will appear in the steering wheel, which in itself is very dangerous. The longer you ignore the problem, the worse the controllability will be, and the greater the likelihood of complete failure of the unit. 2. The occurrence of backlash. The appearance of play in the axle is often caused by loose spline connections, and in the plane - by problems with the bracket elements (wear or weakening of the structure is also possible here). 3. Creaking in the steering column is often caused by bending of facing panels or trim, or failure of the steering column switch unit. With high-quality installation and timely care, the steering column can last a very long time. But most car enthusiasts don’t even look under the car. With such operation, after just a few thousand kilometers, nuts and bolts may become loose, play may appear, and the splines may wear out. Over time, the unit becomes completely unusable.
Replacement features
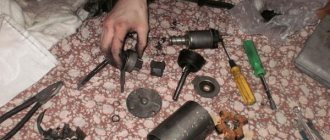
I would like to note that replacing the steering column is a very complex process that will require some patience and knowledge from you. But armed with the necessary tools and tips from the article, you will definitely cope with the task. As an “experimental” we use one of the most popular domestic cars - VAZ-2106.
So, let's get started: 1. Drive the car onto a pit or overpass. If this is not possible, raise one of the sides with a jack and secure it with a wooden stand. 2. Prepare the necessary tools. You will need a wrench with a head at “30” and at “17”, a wrench (it is important that it is long and powerful), a hammer, a pry bar, a handle with a ratchet and one open-end wrench at “17”. 3. Immediately find the steering column - for the “six” it is located in the lower left corner. 4. Remove the steering shaft (without this, further work will be impossible). 5. Unscrew the nut holding the column to the steering rods. This is where big problems can arise. To make your task easier, treat the threads thoroughly with WD-40 and stock up on a long lever (two powerful wrenches will be just right). Be prepared to use a lot of force.
Some car enthusiasts do not unscrew this nut at all - they simply dismantle the column and steering ends assemblies (here it all depends on your tasks). If you still decide to unscrew the nut, then be prepared for another very unpleasant job - knocking the column off the splines. 6. Unscrew the bolts securing the column and spar. Getting access to them is a very difficult task, so remove the front left wheel (the work will be much easier). 7. Take the knob at “17” and unscrew the three fixing bolts one by one. To prevent turning on the other side, hold the nut with an open-end wrench. Please note that there is very little space there, so the key will have to be inserted and held from the end. 8. Once you have managed to remove all the bolts from their “established” positions, finish the job using a more convenient ratchet. 9. After removing all bolts, remove the column. And here the nuance that we discussed in point 5 “pops up”. If the tips are disconnected, you can safely remove the assembly. Have you decided to unscrew the big nut? “Then you’ll have to work extra hard to knock it off the slots.”
10. Now install the new steering rack and reassemble the unit in reverse order.
We recommend: How to change the battery in Volkswagen keys
In principle, if you have the necessary tools at hand and minimal technical talent, this work can be completed in 1-2 hours at a leisurely pace and with smoke breaks.
Conclusion
A good driver will never cause a fault and will detect the defect at an early stage. Follow this principle too. When you first suspect that the pad is failing, inspect it and, if necessary, replace the unit. Why put yourself and your loved ones in danger if you can spend only 1-2 hours of personal time, solve the problem and calmly go on a trip. Good luck.
Replacing the steering column
The need to replace the steering column arises if the splines in the connecting pair are worn out, and this connection cannot be restored. To do this, you need to dismantle this mechanism. For this purpose, it is necessary to disassemble the “Shohi” steering column, which even novice motorists can do. The procedure for removing the steering column is not particularly difficult technologically, but preventive measures take a lot of time.
Information for car enthusiasts: when replacing the steering column of the “six”, a slight modernization of this unit is allowed. It is possible to install a steering column from a VAZ 2107, the design of which is complicated by two small cardan shafts, increasing the degree of safety of the mechanism. In addition, additional equipment of the system with needle-type bearings will allow significantly less effort to be applied to the rotation of the steering wheel.
The required replacement of the steering column is carried out in the following sequence:
- We de-energize the battery and carefully remove it from the car and put it aside so that it does not interfere with work.
- We dismantle the steering wheel and the protective coating of the steering column shaft.
- We turn off the steering column control complex and the ignition switch.
- We dismantle the bracket fasteners, and it is possible that individual fastener components will have to be removed using a drill.
- Unscrew the tie bolt connecting the splines to the steering mechanism.
- We dismantle the sealing mount of the steering column shaft, and it is pulled out into the interior room.
Additional information: after completing the repair of the steering column, it is necessary to adjust the wheel alignment of the wheel pair to restore the required conditions of the chassis. It is almost impossible to install the wheelset at the optimal angle yourself without special adjustment equipment and stands.
Important: long-term operation of the “six” with splined joints, subject to increased wear, can ultimately create an emergency situation that is dangerous to the health and life of the driver and passengers. The steering wheel may turn completely uncontrollably, and this can happen at high speed. This is very life-threatening!
Step-by-step replacement of the steering column
Having decided to replace the steering column on a VAZ-2106 yourself, you need to stock up on free time and patience, and experts recommend performing this step in stages:
- The steering shaft, which is clamped in the column, should be carefully removed.
- Using a size 30 wrench and a long wrench, you should try to rip off the connecting nut that secures the steering column. It is not always possible to remove the fasteners the first time, but since this stage is mandatory, you have to return to it several times.
- The three fasteners that connect the column to the car body are unscrewed. It is most convenient to use a so-called ratchet for this process, since the bolts are not so easy to get to with a regular wrench.
- After unscrewing all the fasteners, you need to free the column from the tie rod splines, which continue to hold the assembly. To do this, you should pry the structure with a pry bar and try to knock it down with sharp jerks.
- After dismantling the unit, it is necessary to check the condition of the boot and oil seal; if even minor damage is detected during a visual inspection, these components must be replaced. By installing a new boot, the life of the bearing and shaft will be extended, and the new oil seal will not allow automotive lubricant to leak out of the steering column.
If all components are installed correctly, the car owner will replace the failed elements with high-quality and reliable ones, and the steering column will have a long service life.
The final stage of the replacement is to install a new steering column and assemble all components in the reverse order.
To simplify the assembly process, experts recommend putting all the removed elements from the car in strict sequence, so that when assembling the structure, you don’t confuse anything and repeat the whole process again.
Removing the steering column from a car
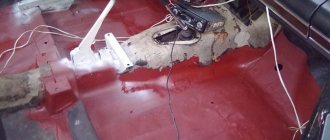
To replace the driveshaft, you need to remove the steering column from the car.
Begin:
- de-energize the battery;
- after that, the cover plate of the signal switch is removed (to do this, pry it off with a screwdriver);
- remove the cover from the steering wheel;
- Now we are faced with two self-tapping screws, which should be unscrewed with a curly screwdriver;
- after this the lid is completely removed;
- now you need to use the same figured screwdriver to unscrew the three screws that secure the contact of the sound signal;
- disconnect the wire and remove the contact;
- now you will need to take the key for 24;
- use it to unscrew the nut that secures the steering wheel (this should not be done completely, leaving the nut mounted on the shaft);
- remove the steering wheel by pulling it towards you.
Note. The steering wheel should be removed not by jerking, but by rocking the left and right sides and at the same time pulling the part towards you. The nut is not completely removed due to the fact that the steering wheel can come out of the shaft abruptly, thus injuring the face. After removing the steering wheel from the splines, the nut is completely unscrewed.
Advice. If you cannot remove the steering wheel alone, you need to use the help of an assistant who will pull the steering wheel up while the repairman strikes the shaft through a drift.
- dismantle the steering column switch assembly;
- We also remove the ignition switch;
- take a 13mm wrench and unscrew the bolt securing the elastic coupling (located under the pedals);
- Unscrew the bolts securing the steering shaft at the front.
Note. These fasteners are fixed with bolts with shear heads, which eliminates the possibility of standard unscrewing. To do this, you need to strike with a chisel in a tangential direction.
- now unscrew the nuts securing the steering at the rear, using a 13mm wrench;
- dismantle .