This work is not particularly difficult and is quite feasible for the average car enthusiast.
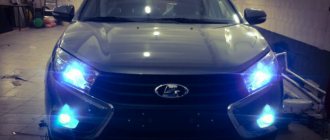
Those who thought that today we will install “little blue light bulbs” that glow coolly, I will say that this is not so, no pseudo-xenon. We will install original full xenon lamps. I won’t delve into the history of the origin of xenon lamps; there are search engines for that; whoever needs it will find it. Today we will talk about how to install this miracle of technology on our VAZ 2110.
Tuning and repair of VAZ 2110
Very often, dozens of owners are not satisfied with the standard headlights.
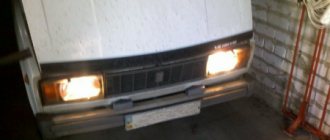
Firstly, it does not illuminate the road well enough, and secondly, visually it gives off a yellowish tint, which does not look very nice. Therefore, in this article I will tell you how to install xenon in a VAZ 2110. Moreover, we will not consider here ordinary light bulbs that simply shine white (a kind of pseudo-xenon), but we will install real xenon with ignition units.
I’ll note right away that this type of modification is not complicated, so almost any car owner can do this kind of tuning of the VAZ 2110 optics.
conclusions
Installing xenon fog lights on the VAZ-2114 is quite easy and simple. A more difficult task remains the choice of product, since the market for automobile spare parts is saturated with them, and therefore it is possible to find the most suitable option for any motorist.
Very often, dozens of owners are not satisfied with the standard headlights. Firstly, it does not illuminate the road well enough, and secondly, visually it gives off a yellowish tint, which does not look very nice.
Therefore, in this article I will tell you how to install xenon in a VAZ 2110. Moreover, we will not consider here ordinary light bulbs that simply shine white (a kind of pseudo-xenon), but we will install real xenon with ignition units.
Which xenon to choose?
In this section I will not advertise any companies. As they say, there is no comrade according to taste. Here I want to talk about the glow temperature: 4300 K, 5000 K, 6000 K and so on. How are they different? Xenon lamps with a glow temperature of 4300 K and 5000 K appear bright white. 6000 K - blue tint. 8000 K - pinkish tint. Initially, many are mistaken that the higher the temperature, the better the visibility - this is not true, especially in rain or fog. Xenon light with a high combustion temperature is very strongly reflected from wet asphalt and from fog. Therefore, my advice to you is to use xenon at 5000 K. This is the best option.
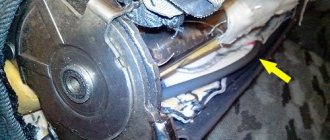
Preparation. I'll remove the headlights.
- At the very beginning of this modification, you need to remove the headlight, for this:
- Remove the negative from the battery.
- Disconnect power from the headlight. (disconnecting the chip from the wires)
- We unscrew a couple of bolts on top of the headlight, which secure it to the body.
- Now you need to remove the plastic radiator grille, as it covers another bolt.
- Using a screwdriver, pry the decorative trim towards the center and pull it out.
- Here it is, the nut that secures the headlight to the bracket. Using a key set to “10”, unscrew it.
- Now turn off the hydraulic corrector. Using a screwdriver, pry up the retainer, turn the corrector and remove it from the headlight.
- At this stage you need to remove the turn signal; this is done simply by unscrewing a couple of bolts.
Preparations for installing xenon are completed, now we begin the process itself.
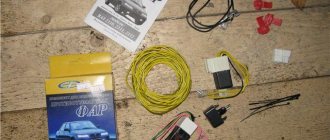
It is advisable to purchase 4 “mothers” (at the ends of the wires) for ease of connection, so as not to make twists.
Xenon bulbs for VAZ 2110: their advantages and installation
Xenon for VAZ 2110
As you know, xenon bulbs are being installed on the VAZ 2110 more and more often lately. And there are many reasons for such love for these light sources. Xenon lamps in the VAZ 2110 can significantly improve the light characteristics of the headlights and the driver will be able to see the road at night, almost as well as during the day. You don’t need to know any outstanding knowledge or secrets to install these lamps on your car. This article will provide step-by-step instructions on how to quickly do this.
Installing xenon in PTF on VAZ-2110
The popularity of xenon lamps today is simply off the charts. Many car enthusiasts decide to undertake very expensive car modifications in order to obtain brighter and better quality light. In this case, installation is often carried out not only in headlights, but also in PTF. But how justified is such a change? Is it possible to install xenon fog lights, and how to do it correctly?
Decide on a goal
Before making changes to the standard system, you must clearly define your goals. If the goal is to improve the illumination of the road in fog, then it is better to adhere to a number of rules (we will talk about them below). In cases where the only goal is to amaze your friends and provide a visual effect, then it is better to use regular running lights. At the same time, it is almost impossible to combine these two tasks, because what will look impressive and beautiful will definitely go against existing traffic rules.
Xenon Features
The special properties and capabilities of xenon lamps have been known for a long time. The operating principle of the lighting device lies in the passage of an electric arc through an inert gas. At the same time, a xenon lamp cannot work on its own - it requires an ignition unit (high voltage source). The light temperature of xenon may vary. The most popular range is from 4,000 to 6,000 K. Bulbs with an H 11 SHO-ME base are most suitable for installation in PTFs. But there are options here too.
The undeniable advantages of xenon include a long service life (at least three years), low heating temperature (moisture on the light bulb does not damage it), excellent lighting quality, high brightness and efficiency. There are also disadvantages - the complexity of installation and the need to control the angle of illumination of the headlights (otherwise it may blind oncoming motorists). In this case, the machine must be provided with appropriate adjustment.
Does it make sense to install a xenon lamp in the PTF?
As practice shows, this is more a whim of car enthusiasts than a necessity. However, opinions differ regarding the effectiveness of such alterations. Some argue that xenon light “pierces” fog much better than conventional halogen lights, while others are against such modifications due to the high likelihood of blinding oncoming drivers.
The main task of the PTF is to illuminate the road in fog, that is, in fact, to shine “under it.” At the same time, it is important not to blind oncoming motorists and to ensure maximum lighting efficiency. To achieve maximum results, it is, of course, better to install a yellow light - it disperses fog better and marks the car on the road even in poor visibility.
As for traffic regulations, there is no direct ban on installing xenon in PTF. The main thing is that a number of basic requirements are met. Firstly, the upper limit of light and shadow should be sharp. Secondly, the dispersion angles in the horizontal and vertical planes should be 5 and 60 degrees, respectively.
Features of installing xenon in PTF on a VAZ-2110
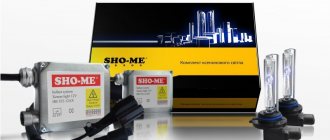
As for the options for installing xenon in PTF, there are several of them. The best method is when a corresponding lamp (in our case, xenon) is installed in an already mounted PTF, for example, Sho-Me products (we have already mentioned it). In order not to redo anything, you can install light bulbs with an H3 base. But how to do this job correctly?
So, first you need to secure the ignition blocks. The optimal place for installation is immediately behind the bumper. For such installation, you will have to jack up the car, tighten the bolts on the front wheels and remove them. After this, it is necessary to dismantle the fender liners and perform installation work. By the way, in PTF Kirzhach there is usually enough space for installing H1 lamps.
What do we end up with? It is almost impossible to achieve perfect focusing of the headlights - the light blinds oncoming drivers and causes a storm of negative emotions in them. But that's not all. The use of xenon becomes useless in fog - the light is refracted and reflected from water droplets.
Some information about xenon
Xenon lamps for car VAZ 2110
Where did xenon come from and what is it? This question might be asked by a person who has never heard of xenon lamps, but such people have become fewer and fewer lately. The first xenon lamp was invented back in 1940, and was presented to the public after the war. Xenon lamps became very popular after that, as they first found their application in the film industry, where they managed to retire the antediluvian carbon arc lamps. A characteristic feature of xenon lamps is their light - bluish-white and very bright. Today, xenon lamps have found application not only in the film industry, but also in automotive production. Without them, it is impossible to talk about progress or modernization of the automotive industry. Almost half of our domestic cars produced after the 90s are not equipped with xenon lamps. Owners often carry out this installation themselves when tuning the car. The result always exceeds expectations.
Principle of operation
Xenon lamps for VAZ 2110
Why does a xenon lamp shine brighter than a regular incandescent lamp? It turns out that the main flow of light is emitted in this case directly near the cathode. In addition, the luminous area of the light bulb is made in a cone shape, which has its own effect. As you move exponentially away from the cathode, the glow intensity decreases. It is for these reasons that the light of xenon lamps is similar to daylight and practically no different from it.
Xenon on a VAZ 2110: do-it-yourself installation in a standard headlight
It is no secret that the quality of vehicle lighting has a direct impact on the level of safety. Both for the motorist and his passengers, and for other sections of the road.
Many believe that xenon on the VAZ 2110 is installed illegally, and any inspector can fine you a tidy sum of money. Today we will talk about the legality of xenon and the features of its installation on the domestic “ten”.
Question of law
Legal equipment
Therefore, to install xenon as fog lights and main headlights, you will need to purchase a set of legal equipment. There must be an inscription in the form of the letter D on the headlight glass. It indicates that bi-xenon lights are connected to these headlights. Consequently, everything is legal, and therefore there is no need to fear the traffic police post.
Benefits and Potential Problems
Bi-xenon does an excellent job of illuminating the roadway and adjacent areas. This applies to both headlights and fog lights. A characteristic feature of xenon is that it emits bright white light with a blue tint.
Xenon in headlights and PTF
Fog lights from Bosch, which are installed on the VAZ 2110, do not have lenses. Instead, reflectors are provided here. This makes the beam of light not low enough.
Therefore, when installing xenon, it is very important to install focusing lenses so that the bi-xenon behaves appropriately. That is, it illuminated the road efficiently and did not blind oncoming cars.
how to connect xenon to fog lights on a VAZ 2110
A popular method is when a xenon kit is installed in a standard fog light, for example, from the S-Me company or other brands. Let's look at an example of installing xenon with H3 lamps (these lamps are installed in the fog lamp without modifications). In order to secure the ignition modules, it is necessary to remove the front wheels and fender liners. For example, we place them in a VAZ 2110 inside behind the bumper. By the way, the Kirzhach fog lamps have enough space to install H1 lamps, but the Bosch fog lamps are not suitable in length. What will we get when installing PTF? The focusing of the headlight is disrupted; the xenon lamp does not have a fixed light.
Because the headlight was designed for a certain type of lamp, it will no longer cope with new light sources. Repeated reflections and refractions appear in the reflector, which gives blurred cut-off boundaries and ultimately blinds oncoming and passing drivers. In addition, fog lights lose their ability to provide visibility and illumination of the road in bad weather. The H1 bulbs were first installed in a bottle cap, and then in a headlight using sealant. Very often you can find cars in the auto market in which xenon is installed in the main headlights of Kirzhach and Bosch. And if the beam of light has even boundaries, this makes it possible to even legalize xenon when registering a car.
Secondly, when the absence of a lens in the Bosch headlights (only a reflector) demonstrated glare beyond the permissible limits and led to blinding of other road users. Lenses, fog lights and xenon Some xenon advocates have this position: the advantages of xenon light best appear with a focusing lens that ensures the correct distribution of the light beam. Lensed PTFs with xenon light do not dazzle and make the fog function better. Installing xenon today is as popular as upgrading all other optics.
Car owners will aim to use xenon lights as noticeably as possible. The only pity is that not all of them follow the simplest rules of care. And they consist, first of all, in maintaining the cleanliness of optical glasses. Otherwise, such an untidy car owner will be greeted with an unkind word by many blinded drivers of oncoming cars. The blinding light that many people are familiar with today is a consequence of dirty xenon headlights. If you decide to upgrade your optics to xenon, immediately decide what you want. If you want to change both high and low beams, then keep in mind that such bi-xenon lamps are quite long and will not fit into every headlight.
Our everyday life #86 — INSTALLING XENON IN THE FOGS!
As for installing xenon in foglights, please note that some foglights have a special cap that covers the direct light of the lamp. It may interfere with installation. If you purchase fog lights, make sure that the H3 lamp will fit there. If you already have them with a cap, then try removing it. When choosing fog lights, give preference to serious manufacturers; do not buy into the tempting prices of small painted Chinese fog lights.
Another point that you may encounter during installation: the xenon lamp has a long base and bulb, so it may happen that you will not be able to close the fog lamp, since the lamp will rest against the back cover. That is why, if you purchase, then choose a copy with a plastic case so that you can make a hole for the lamp. Then it can be covered with the rubber cap supplied with the xenon for the wiring. Xenon bulbs are actually worth it. There is a lot of light. You may have to position the lamp. Before: After installation (needs to be lifted): After lifting:
Removal
Kit
Of course, without dismantling the old headlights it will be impossible to install xenon devices. Dismantling is performed as follows.
- The vehicle is deprived of power by removing the negative terminal from the battery.
- The connectors going to the headlights are disconnected. All without exception.
- The fasteners are removed from the top mount. The bolts are located there.
- The radiator grille is dismantled.
- The bolt that holds the headlight unit in its lower part is removed. He's there alone.
- Next, pry up the cover using a flat-head screwdriver and remove it.
- Now take a 10 mm wrench and use it to remove the fixing nut to the bracket.
- All that remains is to remove the headlight unit.
- Do not forget to pry the hydraulic correction cylinder retainer using the same flat-head screwdriver to remove the unit.
- The direction indicators are removed. To do this, simply unscrew a couple of bolts.
Module installation
If you want the installation of xenon on a VAZ 2110 to be carried out within the law, buy a new approved module.
Kirzhach in analysis
Just be sure to take into account the fact that the “Bavarian” Hella Lens G2 . This is a second generation module with wider lenses. The first generation is not suitable for us.
Of course, the cars are structurally different, so the installation will have to be slightly adjusted.
To get started, purchase the necessary materials. Just two pieces:
- Ignitor;
- Ignition unit;
- Hella lenses;
- Bi-xenon lights.
If you take used lenses rather than new ones, purchasing the entire set will cost you about 3.5 thousand rubles. Since you will install them yourself, there should be no additional financial costs.
The revision process looks like this.
- Measure the size of the seat where the standard Kirzhach module is mounted. Now the Hella module will be located there. The place should be prepared in advance.
- The standard wiring is connected to the wiring from the bi-xenon optics. There are no problems here, since everything matches perfectly.
- Now the new bi-xenon module is put in place.
- You can fix the ignition unit in any way convenient for you, since there is more than enough space for installation in the VAZ 2110.
Legal xenon VAZ 2110
Content
In the recent past, it was possible to install xenon on a VAZ 2110 absolutely free and was allowed to anyone who wanted it. Today there are certain requirements that must be met, unless the driver, of course, wants to lose his driver’s license.
Even previously installed xenon VAZ 2110 must be modernized in a certain way so that the installation of the device is considered official and permitted.
Legal xenon VAZ 2110
However, if these gas-discharge lighting sources were made in production, you probably won’t have to worry. Since they are already certified and, accordingly, meet all standards and regulations (including the relevant GOST, which talks about uniform requirements regarding the legal approval of automobile headlights with gas-discharge lighting sources).
But if we talk about xenon VAZ 2110, here the situation turns out to be more complicated. If you install the lenses inside the headlights yourself, this is considered to be making certain changes to the car design. It turns out that the changes made require official confirmation.
Official requirements
First, you should consider certain requirements for xenons (more complete information can be found in government decree dated September 10, 2010, number 706, which concerns changes to technical regulations on vehicle safety).
Headlights responsible for low beam and being gas-discharge lamps must be equipped with a special headlight cleaner, as well as a functional automatic device that corrects the angle of inclination.
In the countries that are part of the European Union, a headlight washer is considered a mandatory attribute of xenon. It is needed due to the fact that dirty glass makes the headlights very unclear and oncoming traffic participants have to be dazzled.
Light autocorrectors
The automatic leveling device maintains a regularly inclined beam of light emitted by the headlights directed towards the road, regardless of how loaded the vehicle is. As you initially adjust, everything will remain so.
The following devices are recommended for installation on the VAZ 2110:
— Auto-corrector made by the foreign company Hella (costs approximately 10,000 rubles). — Auto-corrector made by the domestic company Silich (costs approximately 3,200 rubles).
You can separately purchase transparent glass that is installed in front of the lens. It can be made of acrylic or simply polished.
Drawing up an application
To officially register the xenon VAZ 2110, it is necessary to draw up a corresponding application, which is subsequently submitted to the traffic police (where the vehicle is registered). By the way, there is a prescribed form for this application. Once compiled, it refers to the head of the registration department of the traffic police. There this application is considered and a certain decision is made.
In essence, the law obliges the traffic police to accept the changes made, as it describes the necessary procedure for registration and subsequent issuance of an official conclusion.
Obtaining a conclusion
To receive the conclusion made, you should contact NAMI-PTIA-FUND. Copies of the application written for the traffic police, the resolution, the car passport, and the registration certificate are sent separately by email. A description of the work and several photographs that prove it are also sent.
When the conclusion is received, the planned changes can be made (conversion procedures are often ordered from a certified service). Then you should fill out an application about what kind of changes were made to the VAZ 2110 xenon (if qualified craftsmen worked on the changes, they are the ones who must fill out the above application). By the way, making changes independently is allowed only to those owners who have a diploma in auto mechanics.
Checking technical condition
The next step will be to check the technical condition of the car for compliance with accepted standards regarding safe driving on the road. Such procedures are carried out at special government stations that carry out technical inspection of the machine. And also at points where technical inspection is carried out. After this, the owner receives a diagnostic card along with an official certificate stating that the car complies with the standards for the operation of VAZ 2110 xenon equipment.
Already, traffic police officers are issuing new and final documentation indicating that all changes were made legally.
All procedures will cost approximately 4.5 thousand rubles. Of which 3,000 rubles will need to be paid for the conclusion. Another 500 rubles for consideration of an application related to re-equipment. And a little more than 1000 rubles are due for a technical inspection, registration certificate, and a mark in the PTS.
Installation in a standard headlight unit
Preparing the wiring
This can be done by following a certain sequence of actions:
- The first step is to disconnect the negative cable from the battery;
- Prepare the wiring. The plus goes to a yellow wire, the minus goes to a brown wire. Two minuses and the same number of pluses are crimped one by one, after which they must be carefully insulated;
- Process the holes for the lamps with a simple handy tool - a file. Check periodically to see if the bulbs are included. If you overdo it with sharpening, it will be more difficult to return the sawn material to its place;
- Now install bi-xenon optics;
- The wiring from the light bulbs is pulled through the protective cover. You will have to drill a hole first. Therefore, having a drill at hand is a must;
- After installing the headlight in the base, fix it. Just don’t get too clever with polarity;
- Along with the lamp, instructions for connecting the ignition unit are provided. Follow it, there is nothing complicated in this scheme;
- Replace the headlights;
- Connect the negative terminal back to the battery;
- If the headlights function and turn on as expected, then the work can be considered completed early. There remains the last, but very important stage - adjustment.
As you can see, xenon on a VAZ 2110 is quite real. But to avoid any problems with the law, we advise you to spend a little more money and purchase a full-fledged legal module rather than risk driving past every traffic police post.
Installing xenon on a VAZ 2110 at home - instructions + photo report
Author: ides · Published 07/12/2016 · Updated 07/12/2016
Today's article will be devoted to the head light. I will tell you how to install xenon on a VAZ 2110 with your own hands. That is, thanks to this photo report you will be able to pump up the headlights of your “ten” yourself.
This work is not particularly difficult and is quite feasible for the average car enthusiast.
Those who thought that today we will install “little blue light bulbs” that glow coolly, I will say that this is not so, no pseudo-xenon. We will install original full xenon lamps. I won’t delve into the history of the origin of xenon lamps; there are search engines for that; whoever needs it will find it. Today we will talk about how to install this miracle of technology on our VAZ 2110.
Installing xenon on a VAZ 2110 - step-by-step instructions. Removing the headlight
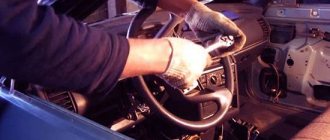
1. First of all, you need to remove the headlight. To do this you need:
- Disconnect the car from power; to do this, remove the negative terminal from the battery.
- After this, disconnect the power connector of the headlight unit.
- Using a wrench, unscrew the two upper headlight mounting bolts.
- Remove the decorative radiator grille and unscrew the lower mounting bolt.
- Using a screwdriver, pry up the decorative trim, move it closer to the middle, then pull it out completely so that it does not interfere.
- Using the socket at “10”, unscrew the nut securing the headlight to the bracket, then remove the headlight itself.
- Using a screwdriver, pry the hydraulic corrector cylinder lock, turn it, and then remove it from the headlight housing.
- Remove the “turn”; to do this you need to unscrew two bolts.
- Now that nothing is stopping you, you can take out the lamp and install xenon on VAZ 2110.
Installation requires some parts, for example, you will need 4 female connectors (2 with simple fastening, 2 with fasteners for thick wire).How to install xenon on a VAZ 2110 - installation and connection
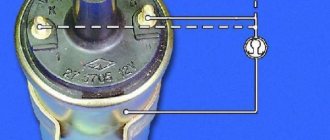
1. With the headlight removed and the bulb removed, cut off the yellow and brown wires with a knife. The yellow wire is “plus”, the brown wire is “minus”. You need to use a knife or pliers to strip these wires.
2. Using pliers you need to crimp two brown wires and the “mother” under the thick wire, then insulate everything properly.
3. Repeat the same steps for the yellow wires. Only now you will need a “mother” for a thin wire.
4. I installed my xenon in the Kirzhach headlights, they came on without any problems. If you have Boshovsky installed, you will have to suffer. Using available materials and tools, you will need to widen the hole to accommodate a xenon lamp. Be careful, a hole that is too large can ruin everything.
How to install xenon on a VAZ 2110 - installation and connection
1. With the headlight removed and the bulb removed, cut off the yellow and brown wires with a knife. The yellow wire is “plus”, the brown wire is “minus”. You need to use a knife or pliers to strip these wires.
2. Using pliers you need to crimp two brown wires and the “mother” under the thick wire, then insulate everything properly.
3. Repeat the same steps for the yellow wires. Only now you will need a “mother” for a thin wire.
4. I installed my xenon in the Kirzhach headlights, they came on without any problems. If you have Boshovsky installed, you will have to suffer. Using available materials and tools, you will need to widen the hole to accommodate a xenon lamp. Be careful, a hole that is too large can ruin everything.
5. Use a drill to drill a hole with a diameter of ~23 mm, then pull the wiring through it.
6. Install the xenon lamp in the base, in the hole prepared for this. Then secure the lamp itself.
7. Connect the “mothers”. Be vigilant and extremely careful, if you confuse “plus” with “minus”, you can damage xenon lamps, as well as ignition units.
8. It’s not enough to install xenon lamps; you also need to connect them to the ignition unit. Detailed instructions are located in the photo below.
9. Now you can connect the “negative” terminal and check how your “homemade” xenon works.
I don’t know about you, but for me personally everything went like clockwork. Turning on the low beam, I saw the long-awaited bright blue light. The joy knew no bounds, I hope everything worked out for you too.
When the xenon installation is completed, repeat all the above steps for the second headlight. Assembly is carried out in reverse order. Secure the ignition units in a dry and clean place.
Attention!!! After you install xenon lamps, BE SURE to adjust the headlights, as described here. Respect other road users who may be blinded by bright, blinding lights that are shining directly into their eyes rather than onto the road. Remember, blindness can cause a serious accident.
Content
Quite often you can notice that VAZ 2114 owners prefer to install xenon on their car. Xenon on the VAZ 2114 is the best solution for those who often drive in the dark. Which xenon headlights should I install on a VAZ 2114 and how should they be mounted?
Xenon for VAZ 2114
Self-installation of xenon on a VAZ 2110
In my article today, I will tell you how to upgrade standard VAZ optics, in other words, how to install xenon on a VAZ 2110 at home. For those who immediately thought about the difficulties associated with performing this work, I will say that there is nothing supernatural in this, you will not need an electrical diploma or some kind of engineering education, it is enough to have a little free time, a little understanding of what xenon is and straight arms, preferably growing from the shoulders.
For those who only know about xenon that it is an expensive light bulb that glows blue - a little history and theory.
The invention of the xenon lamp belongs to the German company Osram, which in the 1940s invented a completely new light source, and already in 1951 introduced it to the world. Xenon gained enormous popularity and was widely used in the cinema and, later, the automotive industry. The xenon lamp retired the less efficient carbon arc lamps, which had served greatly for the benefit of mankind. A characteristic feature of xenon is its bright white, blinding light, which may have a bluish tint. All modern film equipment without exception. as well as modern film projectors are equipped with powerful xenon lamps, from 900 W to 12 kW.
A few words about what xenon is and “what it is eaten with.”
The xenon lamp was created by the German company Osram in the 1940s and presented to the public in 1951. Xenon became very popular and found widespread use in the auto and film industries, and managed to retire carbon arc lamps. A characteristic feature of xenon lamps is their bright, almost white light with a bluish tint. Almost all modern film projectors, both film and digital, are equipped with xenon lamps, the power of which varies from 900 W to 12 kW.
Relevant: What is the difference between xenon and bi-xenon?
How does xenon work?
The principle of operation of a xenon lamp is as follows: the plasma emits the main stream of light, which is located immediately near the cathode, the luminous area has a cone-shaped shape. As you move away from the cathode exponentially, the saturation of the glow decreases. The light spectrum of a xenon lamp is closest to daylight.
Now that you know what xenon is and what it’s used for, we can proceed directly to the procedure for installing xenon on a VAZ 2110.
First you need to get to the lamp itself, to do this you need to disassemble the headlight, read on how to do this.
- To begin with, we de-energize everything; to do this, remove the negative battery.
- Take the key and use it to unscrew the two bolts of the upper headlight mounting.
Next, disconnect the headlight electrical connectors.
- Remove the radiator grille and unscrew the lower mounting bolt.
- Using a screwdriver, you need to pry off the decorative trim.
- It is better to move the pad closer to the center, and then pull it out completely.
- Using a 10mm socket, unscrew the fastening nut that secures the headlight unit to the bracket.
- Now take out the headlight unit.
- Carefully pry the hydraulic corrector cylinder retainer using a screwdriver, then turn it and remove it from the headlight housing.
10. Unscrew the two mounting bolts and remove the turn signal.
11. Remove the halogen or whatever you have, and proceed to the second phase called installation of xenon lamps.
Before installing the xenon, I bought four additional “mothers” (two with regular fastenings, and two more with fastenings for a thick cord).
How to install xenon on a VAZ 2110
If you decide to install xenon lamps on your car, you do not have to go to a service station. This procedure is not particularly complicated, and you can perform all the manipulations yourself. Today we will look at how to install xenon on a VAZ 2110. To do this, you will have to purchase 4 more connectors, the so-called “female” connectors: 2 with regular fastening and 2 with fastening for a thick wire. So let's get started:
1) First, remove the headlight:
— you need to turn off the power to the car. It will help to do this by removing the negative terminal from the engine;
— disconnect the electrical connectors for the headlight unit and unscrew its two mounting bolts;
— remove the grille from the radiator and unscrew the nut located at the bottom;
— slide the decorative trim towards the center and pull it out; for convenience, you can use the same screwdriver;
— now you need to remove the headlight itself. It is attached to a bracket, this fastener needs to be unscrewed with a key with a 10mm head. Did you unscrew it? Shoot;
— to remove the hydraulic corrector cylinder, you need to carefully pry its lock with a screwdriver, turn it slightly and pull it out of the headlight housing;
— Next, remove the turn signal. To do this, unscrew two more mounting bolts;
- now there is nothing stopping you from removing the old lamp and installing xenon.
2) With the old bulb removed, cut the brown (“-”) and yellow (“+”) wires. Using tools, clean them.
3) Use pliers to squeeze two brown wires with a thick wire clamp and pass the insulation to avoid short circuits.
4) Do the same with the yellow wires, only now use a regular clamp.
5) If you have headlights from the manufacturer Kirzhach, then the xenon lamp should work without any problems. In the case where Bosch headlights are installed, you will most likely have to suffer and widen the hole with a file. Just don’t get carried away, periodically try on the lamp until you get the right size, otherwise too much recess can ruin everything.
6) Using a drill with a thin bit, make a hole approximately 23mm in diameter and thread the lamp wiring through it.
7) Install the xenon in the base and secure the lamp.
8 ) We connect the “mothers”. It is important not to confuse “+” and “-”. Be careful, otherwise you can damage not only the lamps themselves, but also the ignition units!
9) We connect our lamps to the ignition units as indicated in the instructions.
10) Return the negative terminal to the motor and check how your installation went.
If you see a bright light, then everything went well! Reassemble the headlight in reverse order and you are ready to use! And don’t forget to adjust the xenon headlights, as we discussed above. Respect your fellow road users! This will help you avoid many unpleasant and dangerous situations on the road.
If you liked the article, share it on social networks and leave comments!