Replacing valve stem seals on a VAZ 2106
The valve stem seals on the VAZ 2106 are replaced after approximately 30,000 kilometers. If it is not there, then it is still better to replace it after 2-3 years, because the caps dry out from old age. Find out how to replace the caps on 2106 in the article.
At the moment, in stores you can find silicone valve stem seals, which in terms of their characteristics are much better than rubber ones. Nobody talks about their durability, it's all about the elasticity of silicone. This is very important in Russian winter conditions, especially if the engine is not equipped with a pre-heater.
Let's summarize
From the above we can conclude that the procedure for replacing valve stem seals is not as complicated as it might seem at first glance. The most important thing is to do everything according to the instructions and master all the listed tools.
If you feel unsure of your abilities, it is better to entrust the work to professionals. The price of replacing VAZ 2109 valve stem seals is from 3,000 to 4,000 rubles. The process of replacing VAZ 2109 valve stem seals is clearly shown in this
video
:
When to change valve stem seals on 2106
Of course, there are car enthusiasts who carefully monitor their iron horse and carry out many procedures according to schedule. However, there are very few of them, so we will pay attention to external signs.
First of all, oil consumption. Before we talk about liters, it’s worth paying attention to this. Over time, when the oil seal wears out, it turns into a filler neck, and the valve stem turns into a piston that pushes this oil. Imagine that the engine is running at 1600 rpm. This means that 800 strokes are performed per minute in one cylinder, which means the valve moves back and forth 400 times. What if there are eight such valves? In general, a lot of oil can leak through the valve stem seals.
Further - increased smoke, reduced engine power. You need to remember one simple truth - engine oil does not burn, it cokes. Only the additives burn. We all know motorcycles in which oil is mixed with gasoline. We all remember how much smoke they make. But there the fuel is diluted with oil in proportions of 1:200. Here they are much larger. That is, if you see blue smoke from the exhaust pipe, then you should think about replacing the valve stem seals. Of course, with such a mixture the engine will not develop full power, as with pure gasoline.
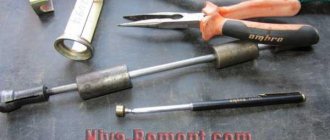
Tools for replacing valve stem seals 2106
First of all, you need to immediately stock up on a sufficient set of tools so that later, when the engine has already been disassembled, you don’t have to rush around looking for them. So here's a short list.
- Key for turning the crankshaft;
- Rassukhaka;
- Set of flat blade screwdrivers, different widths;
- Set of keys and sockets;
- Tweezers;
- Valve cover gasket;
- If you plan to adjust the valves, then a feeler gauge with a thickness of 0.15 mm is required;
- Tin rod about 1 cm thick;
- Puller for valve stem seals.
Preparation for replacing valve stem seals of VAZ 2106
We will consider replacing valve stem seals on a VAZ 2106 without removing the head, so it will be both easier and more difficult. The simplicity lies in the fact that there is no need to dismantle the head. And the difficulty, which is also logical, is not to drop the valve into the cylinder.
First, unscrew the chain tensioner, then you will need to tighten it. This is necessary so that you can remove the camshaft gear without any obstacles. Next, remove the valve cover and mark the position of the gear on the chain. This is necessary in order not to set marks later. In principle, you don’t have to do this, but it’s easier this way.
Now we unscrew the gear, remove it and secure the chain so that it does not fall into the crankcase. If this happens, you will have to remove the pan, radiator, front cover and then adjust the timing. In general, it’s not very pleasant.
Now remove the camshaft housing. Next, we unscrew the spark plugs to make it easier to rotate the crankshaft. We hold the chain tight and set the piston of the first cylinder to top dead center (TDC). This is why you need a key to rotate the crankshaft. To get exactly to TDC, you need to align the mark on the crankshaft pulley with the last mark on the front cover along the way.
Replacing VAZ valve seals
If you are wondering how to change valve seals for VAZ from 2101 to 2107, then you have come to the right place. I’ll explain how to change valve seals yourself at home.
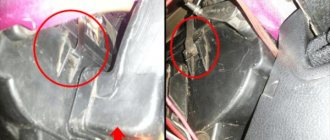
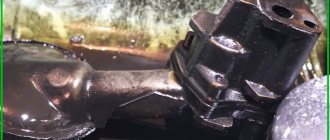
I will be changing valve seals on an old 7, but judging by the black fuel oil on the camshaft, diesel oil was poured into this engine, which was confirmed by the owner of the car. His words, I work at KAMAZ, why buy oil when you can get it for free.
I do not recommend pouring diesel oil into a gasoline engine; such fuel oil will appear that it can cause blockages in the engine oil passages.
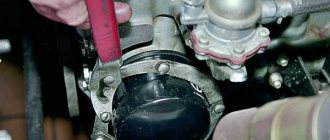
To change valve seals you need to get to them. To do this, remove the air filter, disconnect the choke cable, and unscrew the valve cover.
Move the crankshaft pulley to the top dead center mark, either under the first cylinder or under the fourth. Compression in the fourth cylinder, the sprocket mark will coincide with the mark on the camshaft.
Photo. Classic engine.
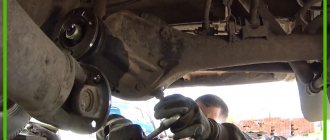
Unscrew the camshaft sprocket; if you do not want the adjusted ignition to go astray, do not remove the chain from the camshaft sprocket, lower the sprocket with the chain into the head as shown in the photo below.
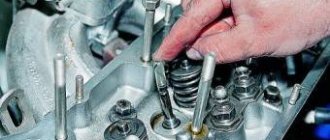
The mark on the crankshaft is at top dead center, which means the first and fourth piston are at the top, in this position you can safely open the valves of the first and fourth cylinders. But before that, be sure to unscrew the spark plug of the first and fourth cylinders, insert a screwdriver through the hole for the spark plug under the valve that you decided to open and change the valve seal. By inserting a screwdriver under the valve and turning the crankshaft, you can support the screwdriver tightly against the valve. The screwdriver will support the valve and prevent it from falling down when it is loosened.
Replacing valve stem seals on a VAZ 2106
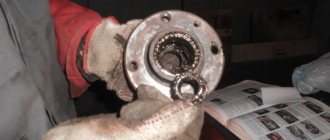
Now we install the sealant on any valve of the first or fourth cylinders, then insert a tin rod into the spark plug hole and clamp it, pressing on the sealant. This is done so that the valve does not punch a hole in the piston bottom. Now we jerkly press on the cracker so that the spring compresses, carefully remove the crackers with tweezers. It is important not to lose them, otherwise you will have to run to the store.
Then use a puller to remove the old cap and press on a new one. Now we compress the spring again and install the crackers. We do this with each valve in the first and fourth cylinders.
Now we rotate the crankshaft 180 degrees and set the pistons of the second and third cylinders to top dead center. We carry out the same operations with valves. Then we install the camshaft and housing in place. The procedure for tightening the camshaft housing bolts is shown in the figure. Now we combine the marks on the camshaft gear and the chain; if adjustment of the valves is required, then we carry it out. Then we put all the parts in place.
Video: replacing caps on a VAZ 2106
Source: https://fastmb.ru/autoremont/856-zamena-maslosemnyh-kolpachkov-na-vaz-2106.html
How to replace caps on a VAZ 2107
- Drain approximately two liters of coolant.
- Remove the air filter housing and throttle linkage if you have a carburetor.
- Remove the valve cover.
- Place the first cylinder in top dead center mode.
- Loosen the chain tension nut.
- Remove the camshaft gear mounting bolt.
- Remove the sprocket and chain and secure them with wire to prevent a possible fall.
- Remove the bearing housing and rockers.
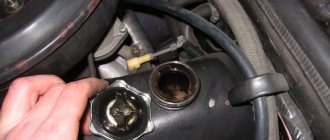
- Remove the candles. To prevent the valve from falling into the cylinder, be sure to plug the spark plug hole with a tin rod.
- Using a valve remover, remove the "crackers".
- Using a screwdriver, carefully pry and remove the oil seal.
- Before installing the new one, do not forget to lubricate the surface of the rod with oil.
- Replace the springs and other parts.
- Repeat all the described operations with each cylinder, installing them at TDC.
After completing all the work, return the crankshaft to its original state, install the bearing housing, camshaft gear and chain. The remaining elements are installed in reverse order.
Causes and results of wear of valve stem seals on VAZ 2107/2106.
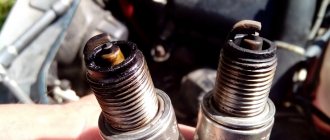
The purpose of the valve stem seals is to prevent excess engine oil from entering the engine combustion chamber. The cap should fit snugly against the valve and allow only the small amount of oil through that is necessary to lubricate it. The caps are made of special rubber, but over time, the edge of the valve stem cap wears out, deteriorates, the rubber ages, loses elasticity and peels off from the base. As a result, the cap begins to let oil through and it begins to get under the valve.
Leaking oil burns on hot valves , as a result of which carbon deposits build up on the internal walls of the engine, the cross-section of the intake and exhaust channels narrows, and the engine loses power. During active use of the engine, carbon deposits begin to fall off, its particles clog the seat and working chamfer of the valve, as a result, the fit of the valves is disrupted, the engine begins to operate intermittently and stalls. Another outcome is valve burnout, which leads to failure and replacement of VAZ 2107/2106 valves.
What are valve stem seals and where are they located?
These caps are located directly on the engine valves, in the cylinder head. Another name for these caps is valve seals. Their main task is to prevent excess oil from entering the engine. These caps are made of special rubber. And rubber, even special ones, deteriorate over time and oil begins to flow directly into the combustion chamber of the engine. In this case, it is worth changing these parts.
Signs of failure of valve seals on VAZ 2107, VAZ 2106.
Typically, the oil seal replacement interval is 80,000 kilometers. Only timely identification of a malfunction and its elimination will prevent major repairs of the engine. Let's look at the main signs of wear on valve stem seals:
- High oil consumption and the subsequent need to add more than a liter of oil per 10,000 km is the first sign of wear on the oil scraper rings and/or valve stem seals. The limit is considered to be oil consumption from the “max” mark to the “min” mark per 1000 km for gasoline engines.
- Smoke exhaust color. Color serves as an important diagnostic sign and directly indicates malfunctions in the engine. Smoke from the exhaust pipe can be white, black, blue and other shades, depending on the additives in the fuel and the type of fuel itself. White smoke on a warm VAZ 2106/2107 engine is a reliable sign of wear on the valve stem seals or burnout of the engine piston oil rings.
- Carbon deposits on spark plugs. This sign determines that the oil seals have worn out and/or a “rich mixture” of air is being supplied to the carburetor. Eliminated by replacing valve seals and/or cleaning the carburetor and repairing the engine ECU.
- Sticking engine valves. Sticking engine valves can be caused by worn oil seals, low-quality fuel and oil, as well as irregular oil replacement. Another reason may be a long pause in engine operation and overheating.
Types and purpose of devices
The main task of the VAZ 2109 valve stem seals is to create a seal at the point of contact between the timing valves and bushings. This prevents engine oil from entering the cylinders (combustion chambers). Progress in the automotive industry has come a long way, but some parts still wear out greatly during the operation of the car. Therefore, such parts began to be called consumables. Consumables also include valve stem seals. But with only a stretch, because their location is difficult to access.
Operating principle of valve stem seals
These parts are included in the gas distribution mechanism, as they function in close contact with the valves, which are an important part of the timing belt. Valves are divided into exhaust and inlet. Their upper part is always in the zone of oil mist, which is created by the rotation of the camshaft. Their lower part is in the area of the fuel-air mixture (for the intake valve) or in the area of the exhaust gases (for exhaust valves). For the camshaft to function properly, it urgently needs constant lubrication, but oil getting into the combustion chambers negatively affects the operation of the power plant.
When a valve is raised or lowered, oil is removed from its stem each time. This work is performed by valve stem seals. These small parts prevent the poppets and valve stems from becoming coked.
Carbon deposits appear when the fuel-air mixture ignites. In this case, excess oil burns, which leads to coking. Engine wear increases, the fuel-air mixture becomes leaner, and the engine begins to operate unstably. The good condition of the seals is very important, and they are subject to serious quality requirements.
Device
Oil seals are a modern version of valve seals, which are equipped with a powerful steel sleeve inside and an expander spring. Springs are used to secure the edges of the caps and valve stems.
Actual size of the caps
Gaskets are made primarily of rubber, which becomes harder over time and wear occurs, so the element ceases to properly perform its functions. As a result, oil ends up inside the combustion chamber.
There is only one sign of wear on the valve stem seals - thick blue smoke begins to actively pour out of the exhaust pipe, plus oil consumption increases.
There is only one solution to this situation - replacement.
Replacing valve stem seals for VAZ 2106
Seeing bluish smoke from the exhaust pipe of a VAZ 2106, the owner automatically begins to remember the last time he changed the oil scraper rings and rebuilt the piston. Then the budget for major repairs is automatically calculated, which always comes unexpectedly, like snow in January. But there is no need to rush. Most likely, the reason is different - in the valve stem seals.
How does valve seal wear manifest?
Valve seals, or valve stem seals, are designed to ensure that the oil that lubricates the gas distribution mechanism does not enter the combustion chamber. Valve bushings cannot ensure tightness on their own, so they are fitted with seals made of high-quality soft rubber with an oil scraper edge, which prevent oil from penetrating the valve stem into the cylinder.
Oil entering the combustion chamber in large quantities causes characteristic blue smoke from the exhaust pipe. Oil scraper rings may also be to blame for this, but if the engine smokes during a cold start, and the smoke disappears when warmed up, then we can say with one hundred percent certainty that the valve seals have outlived their usefulness.
Another sign of oil seal failure is increased oil consumption and greasy deposits on the spark plugs.
Tools and accessories for replacing caps
Replacing the valve stem seals of a VAZ 2106 is no different from the same work on engines of the entire classic VAZ series. To carry out the work, we do not need to remove the head, much less the engine. Therefore, we will do all the work ourselves with a minimum amount of tools and a minimum amount of time. It is advisable to carry out the work in a garage, under normal lighting and without excess dust - after all, we open the engine.
We will need, in addition to the usual set of keys:
- torque wrench;
- tweezers;
- set of heads with a knob;
- valve puller;
- a mandrel for shrinking the oil seal onto the bushing.
During the repair process, if necessary, we will illustrate some points, to the extent possible, but nothing complicated is expected in the process. Almost. To compress the springs, we will use a special puller with a lever, although you can do without it if you know all the intricacies of the process.
Replacing caps
We will begin replacing the valve seals by providing access to the cylinder head; further actions will be performed step by step, without breaking the sequence.
- We remove the air filter cover, the filter itself and its housing, after covering the carburetor diffuser with a rag so that nothing gets into the intake manifold. Otherwise you will have to remove the block head.
- Remove the timing cover and align the mark on the camshaft drive sprocket with the mark on the camshaft housing so that the pistons of cylinders 1 and 4 are at top dead center. They will prevent the valve from falling into the cylinder when we remove the spring.
- Loosen the chain tensioner by about half a turn, loosen the sprocket mounting bolt without unscrewing it completely.
- Using a screwdriver, press the plane of the chain tensioner and tighten the cap nut until it stops, after which you can unscrew the sprocket mounting bolt. We remove the sprocket, carefully tying it with wire to any convenient stud or to the hood spring.
- Unscrew the nuts securing the camshaft housing, remove it and unscrew the spark plug on the 1st cylinder. Then remove the drive levers by snapping the spring clip.
- We unscrew the adjusting bolt and fix the puller stop in its place, as shown in the figure.
- We insert any suitable sized rod into the hole for the spark plug - plastic, wood or very soft metal to fix the valve in the seat.
- Using a puller, we compress the spring, and using tweezers, remove the crackers mating the valve stem and the spring support plate.
- Remove the crackers, springs and support washers. The valve must remain closed.
- Carefully remove the old valve seal using pliers. Be extra careful not to chip off the edge of the valve sleeve - it is made of brittle cermet.
- Lubricate the fresh oil seal with clean oil and carefully place it on the valve stem, seating it as tightly as possible on the bushing. For tighter shrinkage, a cap mandrel will be required.
- We assemble the valve drive mechanism in the reverse order and move on to the next valve.
We do the same with the oil seals on the 4th cylinder, and then, carefully turning the crankshaft and holding the drive sprocket, set the pistons of cylinders 2 and 3 to the TDC position. We repeat all the described operations for the valves of these cylinders.
Timing assembly
Having replaced all the caps, we assemble the timing belt, observing the position of the sprocket according to the mark on the boss of the camshaft housing, and finish assembling the cylinder head. The tightening sequence for the camshaft housing nuts is shown in the figure and must be strictly followed to avoid warping the housing.
Now your VAZ 2106 will no longer cough up blue smoke, and valve seals will last for more than one season. Have a pleasant trip!
Source: https://avtoshef.com/zamena-maslosemnykh-kolpachkov-vaz-2106/
Malfunctions of valve stem seals
High quality materials do not guarantee the eternal operation of valve seals; sooner or later, under the influence of negative factors (high temperatures, aggressive chemical composition of oil, etc.), slight wear of a regular nature occurs, which ultimately leads to the fact that these parts can no longer perform their functions fully. The working surface is rubber and over time the structure becomes compacted, as a result of which elasticity is lost and cracks begin to appear. Long-term operation and exposure to an aggressive environment with high temperatures does not have the best effect on the damper spring. Ultimately, all this leads to the fact that the valve stem seals no longer effectively remove oil from the valve stems, and it ends up in the combustion chambers.
When is it recommended to replace valve seals?
| Causes | Subtleties |
| Depending on mileage. | In practice, the service life of oil seals on a VAZ 2109 with an 8-valve engine rarely exceeds 100,000 km. After this, these parts should be changed, even if there is no excessive oil consumption. |
| If the car has not been used for a long time. | Lack of operation will also have a detrimental effect on the condition of the devices. |
| There are cases when replacement is necessary even when the size of the valve stem seals is reduced prematurely. | This is not uncommon for domestically produced components. |
The fact that it is necessary to change the seals is indicated by some characteristic features.
Symptoms of a problem
Since these caps are installed inside the motor, it is impossible to visually assess their serviceability. However, there are a number of signs that may indicate their poor condition.
- The engine begins to consume oil. There are motors for which consumption of 100 grams per thousand kilometers becomes the norm. If you add a liter of oil every week, your engine is definitely consuming lubricant.
- Oil consumption will certainly be accompanied by bluish smoke from the exhaust pipe. You cannot see this at idle, but if you give the engine a good load, then this phenomenon can be seen in the rearview mirror.
This is interesting: How to choose the right Renault Megane spare parts: advice for an inexperienced driver
Causes of wear
At idle speed, the VAZ 2109 crankshaft rotates at a speed of 800 rpm, the maximum speed is 4,500–5,000 rpm. Each valve can perform from 120 to 1,200 working strokes in a period of time of one minute, i.e., lower and rise. Accordingly, each valve stem seal bears a serious load. In this case, one should take into account the aggressive environment in which they are located (high temperatures, chemically aggressive composition of oils, exhaust gases).
With use, the soft rubber part of the valve stem seals loses its original elasticity. And the diameter of the working edges on which the pressure falls decreases over time. The quality of the seals does not matter; even the best parts will need replacement.
How to know when it's time to change
Worn caps of a VAZ 2109 car
It’s simple: if thick bluish smoke comes from the exhaust pipe of the car, then it’s time to change the caps . As a rule, this smoke appears only when the engine starts and when it stops. But if the caps are very worn, thick smoke constantly comes out of the chimney. However, smoke is not the only sign that the caps need to be urgently replaced. Sometimes smoke is practically not visible, but oil consumption in the car increases several times, while no external oil leaks (through various oil seals and gaskets) are observed. All this also suggests that it’s time to change the caps.
The result of worn valve stem seals
When the first signs of wear of parts appear, it is necessary to immediately diagnose the causes of malfunction of the gas distribution mechanism. Including checking the condition of the valve seals. Experienced car enthusiasts who know the structure of the engine are aware of how to check it themselves. Beginners are advised to address this issue to qualified car repair service specialists. Operating a power plant with all signs of wear on the valve stem seals is highly not recommended for a long period of time.
The consequences of operating an engine with such malfunctions are not the most pleasant:
- engine power is significantly reduced;
- unstable operation at idle (stalls);
- “floating” engine speed;
- reduction of compression in cylinders;
- coking (carbon deposits on pistons, spark plugs and cylinder walls).
The appearance of characteristic soot is a serious symptom. Further operation without identifying and eliminating the causes of its occurrence is fraught with engine failure and major (and therefore expensive) repairs.
Necessary tools and accessories
Replacing the valve stem seals of a VAZ 2106 is done directly on the car, which significantly speeds up the work, since there is no need to remove and then reinstall the cylinder head. It is enough to place the car in a place protected from dust and precipitation. Apply the handbrake and place the gearshift knob in neutral. Replacing valve stem seals on a VAZ 2106 requires a set of caps and a new head cover gasket, standard tools, accessories:
- Carrying;
- Candle key;
- Spanners 17 mm., 13 mm.;
- Hexagonal internal heads 8 mm, 10 mm, 13 mm. with a collar;
- Pliers;
- Tweezers;
- Flat screwdriver;
- 8 mm thick soft metal rod;
- Torque wrench;
- Spring compression device
- Mandrel for installing caps
- Soft wire.
Different designs of special pullers for compressing springs
How to make your own devices
It is convenient to use a special device, since there is no need to hold it with your hands; it holds the springs compressed with a bolt. If you don’t have such a device, you can make it yourself. To do this, it is enough to have two steel square bars 10x10 mm, 300 mm long. They need to be fastened at three points, at the ends and in the middle, so that there is a gap of 12 mm between them, like rails, then the price will be much cheaper. So:
- You can attach it in any way; bolts, clamps, welding, in the fastening points between the rods you need to place metal plates 12 mm thick, which will provide the necessary gap between the rods.
- The valve stem will fit into the gap when the springs are released. To install valves, instead of a mandrel, you can use a steel tube 120 mm long, with an internal diameter of 14 mm, and a copper washer with a hole matched to the rim of the cap.
Assembly order
Pressing in valve stem seals using a bushing
- The valve stem, oil seal and cap are lubricated with engine oil; the valve cap corresponding to the valve is placed on the stem with the oil seal facing up. It descends down the stem, where it is pressed tightly against the hole with the valve guide.
- The end of the mandrel is pressed against the rim of the cap, by lightly tapping the top of the mandrel with a hammer, the cap is pushed into the hole until it stops. The cost of a mistake in case of strong impacts, damage to the oil seal or cap, will have to be replaced. The springs are installed in the reverse order of disassembly.
Attention! After installing the springs and removing the device for compressing the springs, you need to remove the plate from the spark plug hole and tap the end of the rod with a hammer so that the crackers sit in their place. This must be done carefully; if the crackers are positioned incorrectly, the springs may pop out.
Procedure for tightening the camshaft cover nuts
The camshaft cover, as required by the instructions, is pressed with a torque wrench with a force of 8 kg/m. tightening the nuts in the required sequence.
Source: https://masteravaza.ru/dvigatel/obsluzhivanie-dvigatelya/vaz-2106-zamena-maslosemnyh-kolpachkov-180
How to install new caps
On VAZ-2106 cars, the valve stem seals are replaced independently using a simple plastic device. It must be placed on the top of the valve stem to cover the recesses on it. In this case, you will not have to remove the springs from the valve seals. The work is carried out according to the following algorithm:
- Install the plastic bushing on the valve.
- Lubricate the auxiliary bushing and valve stem with engine oil.
- Push the oil seal on until it stops.
- Remove the plastic sleeve.
- Using a “10” tubular wrench or a large mandrel, you need to hammer in the cap.
- Install the support washer, spring and plate.
- Install the valve depressurizer and compress the spring.
- Put the crackers in place, and then release the desiccant.
This completes the replacement of the VAZ-2106 valve stem seals. If necessary, you need to double-check all gaps and correct them. Assembly of the entire assembly is carried out in the reverse order of removal.
Replacing valve stem seals without removing the head
It happens that blue smoke appears from the muffler, and the engine consumes oil excessively, but still pulls well. This is one of the sure signs that it is necessary to replace leaky valve stem seals - important parts of the valve mechanism. They begin to leak oil for the following reasons:
- natural wear and tear;
- untimely valve adjustment;
- Poor quality oil poured into the engine.
Of course, blue smoke from the exhaust pipe is one of the main symptoms indicating that the car needs this operation. But sometimes it makes sense to do it during repair of a piston unit. For example, replacing piston rings and oil seals is usually done at the same time, so as not to open the engine several times.
However, our repairs can be carried out separately without dismantling the cylinder head. In the following lines we will analyze how such a replacement is carried out on the VAZ, as well as on other brands of cars.
How to solve the problem on VAZs
Let's see how to replace the valve stem seals of a VAZ 2107. We will need:
- wrenches;
- device for compressing valve springs;
- tin solder rod;
- screwdrivers;
- hammer, mandrel;
- pliers, tweezers.
- We remove the air filter housing, as well as the cylinder head cover, by unscrewing the corresponding fasteners.
- We combine the marks so that the pistons of the first and fourth cylinders reach TDC.
- Having loosened the lock washer, we tear off the camshaft sprocket nut.
- Loosen the drive chain tensioner.
- We dismantle the shaft sprocket.
- After unscrewing the fasteners, remove the bearing housing.
- We unscrew the spark plug of the 1st cylinder.
- We remove the lever.
- We unscrew the adjusting bolt and instead screw in the equipment to compress the coils.
- We insert a rod of tin solder into the hole of the candle.
- Having tightened the bolt of the equipment, we take out the crackers using tweezers.
- We remove the equipment, take out the springs, washer and plate.
- Using pliers, carefully remove the worn part.
- We drive the new spare part using a mandrel and carefully hit it with a hammer.
- We reassemble the valve assembly.
- We replace the caps from the VAZ 2107 for the remaining sockets by turning the crankshaft half a turn.
- We assemble the engine.
Replacing valve stem seals on a VAZ 2106 is done in exactly the same way.
Now regarding the front-wheel drive cars of the Volzhsky Automobile Plant. Here the main difference with the described operation can be traced at the initial stage. And after they get to the crackers, they work in exactly the same way. So, when replacing the valve stem seals of a VAZ 2109, the following tools are taken:
- wrenches;
- device for compressing valve springs;
- tin solder rod;
- screwdrivers;
- hammer, mandrel;
- pliers, tweezers.
The first points differ from the previous instructions.
- Remove the camshaft pulley.
- The head cover is also removed.
- Remove the rear casing.
- Remove the ground wires from the studs.
- The bearing housings and the camshaft are unfastened and removed.
- Further steps for changing the caps on a VAZ 2109 are identical to those described in the previous instructions, starting from point 7. In this case, the piston of the cylinder with which they are working must be at TDC.
How to replace valve stem seals on a VAZ-2106
If you are here, then you are the proud owner of a VAZ-2106 car that has some problems. Perhaps you enjoy watching persistent foreign cars trail behind your “six” and swallow the gray exhaust, but small, unnoticeable caps, like a candle that burned Moscow, can lead to the death of the entire engine, and therefore turn your iron horse into a modest example of real estate. The decision to fix the car was absolutely correct, and with some skill you will quickly deal with the problem.
Before work
The combustion chamber of the engine must be protected from foreign substances, so the cylinders need protection from oil. This is where valve stem seals, or oil seals, come into play, protecting the combustion chamber as the valve stems move. Over time, they lose elasticity and the quality of their work decreases. Nothing prevents oil from getting where it shouldn't be.
If you notice that the exhaust has become bluish and thick, soot or even soot has appeared on the spark plugs, and your VAZ-2106 eats oil like gasoline, then it is very likely that the problem with the seals has affected you too. You need to have the courage to open the hood and examine the problem. Perhaps the entire gas distribution mechanism needs to be replaced, but for now we will only talk about the caps: if we really strain ourselves, then do it systematically.
The design of valve stem seals is not very complicated, although there are both high-quality samples and short-lived ones. They consist of the following parts:
- Frame. Steel bushing that guarantees the strength of the seal.
- A spring that applies pressure to the valve stem and ensures a tight seal.
- The cap itself removes any remaining lubricant from the rod. Made from elastic materials such as rubber or fluoroplastic. It is this part of the structure that hardens.
To prepare to replace the valve stem seals, you will need to find some tools. If you wish, you can do the work without them, trying to use available analogues, but who needs to hammer a nail with a cigarette lighter when a hammer has been invented. You will need:
- puller, tweezers or pliers for removing old caps;
- valve depressurizer for compressing springs;
- mandrel for installing oil seals;
- a rod or tube of soft metal to keep valves from falling.
If you are sure that you will earn more in the time it takes to tinker with the car, you can entrust the VAZ-2106 to professional auto mechanics. But, perhaps, if you are here, therefore, you are determined to change the caps yourself.
Repair procedure
- First of all, you need to get to the valve stem seals. We unscrew the cover nuts from the block head, do not forget to put the washers in a separate place so as not to lose them.
- We turn the crankshaft and carefully watch when the marks on the cover coincide with the marks on the camshaft sprocket. This position will ensure the safety of the valves after removing the crackers.
- Unscrew the camshaft bearings. Fixing the sprocket and chain can save you from a lot of problems, because they love to fall into the engine crankcase and ruin the rest of the day.
- The piston in the first cylinder has reached top dead center. Now is the time to dismantle the spark plug and remove the spring. After this, move the lever to the side.
- The adjusting bolt must be loosened, then a spring puller must be installed.
- We insert a rod or tube made of soft metal into the hole of the candle, this will protect the valves from falling.
- We take out the cracker and press the spring until the crackers appear. Sometimes they get stuck and need to be released by lightly tapping them.
- Remove the springs, valve plates and washers.
- We fix the valve with a clamp and remove the obsolete oil seal. You can help the process by lightly tapping the hammer.
- Before the procedure, lubricate the new valve stem seal with engine oil. We put protective caps on all new oil seals, which should be included in the kit. This will protect the valve surface from scratches during the pressing process. Pressing is done with the same desiccant, only on the other side.
- Repeat the same steps on the remaining valves. It is important to remember to crank the crankshaft before working on the second and third cylinders.
After installing the new, elastic and sealed valve stem seals, reassemble everything in the reverse order. If everything worked out correctly, you can be happy with yourself! The repair has been completed.
Source: https://ladaprofi.ru/vaz-2106/kak-osushhestvit-zamenu-maslosemnyh-kolpachkov-na-vaz-2106.html
Replacement procedure
When replacing valve stem seals on a VAZ 2106, you must adhere to a certain algorithm:
- Remove the cover from the block head by unscrewing all the nuts. And don't lose the washers underneath them.
- Rotate the crankshaft until the marks on the camshaft sprocket and the cover align. In this position of the crankshaft, the pistons of the first and fourth cylinders are at TDC. Therefore, after removing the crackers, the valves will not fall out.
- Remove the pastel of the camshaft bearings, fix the sprocket and chain so that they do not fall down, otherwise it will be very difficult to get them out.
- So, in the first cylinder the piston is at TDC, now you need to unscrew the spark plug and remove the spring, and then move the lever to the side.
- Loosen the adjusting bolt and install the spring puller.
- Insert a soft metal rod (tin is ideal) into the spark plug hole to prevent the valves from falling down.
- Using a desiccant compress the spring until the crackers are released. It is quite possible that you will have to tap them lightly - they often stick.
- Dismantle the springs, remove the plates and washers.
- Now you can install the first valve stem seal of the VAZ 2106 in its place. Place the clamp on the valve and, tapping with a small hammer, remove the old cap. Lubricate the new one with oil and remove the spring from the top. Place it in place and, using a mandrel, press it into the hole. Afterwards you can put on the spring.
- Replacing the VAZ 2106 oil seals on the remaining valves is carried out in the same way, just do not forget to rotate the crankshaft before working on the second and third cylinders.
After completing all work, install the chain and sprocket in place, and tension the drive. Make sure everything is installed before starting the engine. Video on the topic: