How I looked for the reason for the failure of the VAZ 2110 fuel pump
In the evening I drove into the garage, but in the morning I couldn’t start it.
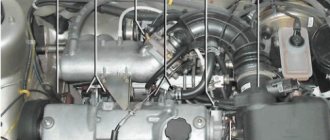
Usually I turn on the ignition and hear the relay click and the pump hum, and after about 3-5 seconds the relay click is heard again and the pump goes silent and I turn the key all the way, the starter works but the engine does not start because there is no pressure in the power system, the pump does not pump . I'm looking for the cause of the fuel pump failure by checking the fuse, which is located
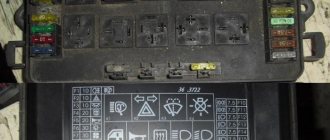
Under the side panel in the depths there is a fuse box, relay and ECU.
Relay and fuse box enlarged
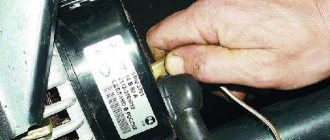
First, I checked the fuse number 3, took it out of the socket, examined the condition of the contacts and checked the integrity with a device, the fuse turned out to be intact (by the way, 15 amperes), this did not help, then I checked the relay number 4. To do this, I unscrewed the nuts indicated by the arrows to remove the relay and install known to be correct. Where can I get a working relay?
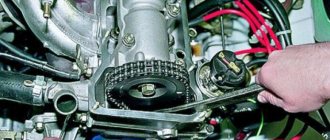
You can remove the “high beam” relay in the mounting block for the duration of the check; it is exactly the same as the fuel pump relay. This did not help, I removed the rear seat under which there is a gas tank with a submersible pump.
Next, a hatch opens in front of us and underneath is a fuel pump.
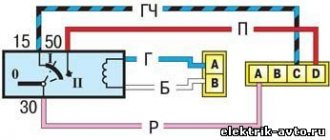
Before performing the above actions, I checked the power circuit (+)(-), that is, the mass of the fuel pump at connector number 5 can be obtained with a test lamp and the result is positive, I checked the integrity of the circuit on the pigtail on connectors numbered 4,6
It may happen that there is no power circuit (+) or (-) at connector number 5. If (-), that is, ground does not come to the connector, you need to check the connection point with the body. My power supply circuits are ringing.
The ground connection point is difficult to access; to get there you need to dismantle the upper and lower lining of the floor tunnel.
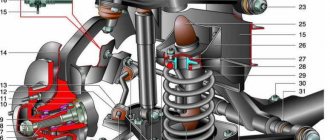
I checked the power circuits coming to connector number 4, and the fuel pump does not work, then I performed the above steps as shown in the figure, took out the fuel module with the fuel pump from the fuel tank. Removed the pressure ring and gasket
Carefully pulled the fuel module out of the tank a little, tilting it towards the right door of the passenger compartment so as not to bend the float arm of the fuel gauge sensor (FLS)
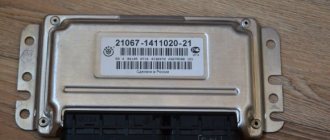
I disassembled the fuel module. Separately, I checked the pump directly from the battery. The pump is running. I checked the connectors and found the cause of the failure; it turned out that the positive contact of the connector (in the form of a pin) at the bottom under the casing was slightly burnt. I cleaned the contact (in the form of a pin) of the connector, but I couldn’t clean the other side of the connector.
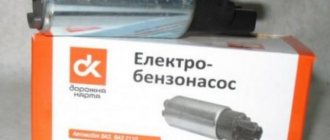
I bought it complete with float.
I assembled the fuel module without installing it in the gas tank, checked it, it works. The pump must be installed with the arrow pointing towards the trunk. Installed and drove the fuel pump works fine. See further
How to remove a logo or caption from a video
Eliminating knocking noise in the VAZ-2110 stove
How to welcome 2021
Lada 2112 ebalaika › Logbook › Replacing the fuel pump 2112 in the UTES housing
I ran into a problem that on the Internet all the articles on replacing the fuel pump were made with a fuel pump completely different from mine. And since I climbed there for the first time, it was a little boring... I had to do everything using the method of scientific knowledge. I took photos for myself so as not to forget what, where and how later.
First you need to relieve the pressure in the fuel pump. To do this, just pull out the fuel pump fuse, which is located behind the plastic partition on the passenger side, near the “brains”. In theory, the fuse will be the first on the right (closer to the engine compartment, mine was 15 A). We pull it out and start the car until it stalls.
We recline the rear seats. We see a black hatch. Unscrew its two screws and remove it.
Judging by the abundance of dirt, I am the first to climb here. We disconnect two pipes, I had to tinker with the second one, because it did not want to come off, resting against the back wall. When disconnecting the pipes, prepare a cloth; a little gasoline may leak out of them. Disconnect the power plug. Using a 10mm wrench, unscrew the 8 nuts.
After that, I vacuumed and washed there so that when pulling out the pump, dirt would not get into the gas tank. We remove the piece of iron, which was held by 8 nuts, and remove the seal under the piece of iron.
After this, we pull out the fuel pump module, carefully tilting it so as not to tear off the fuel level measurement float. We let the gasoline flow back into the tank) And then we carry the patient to the operating table. Let's start to sort it out. First I unscrewed the spring from the first metal rod.
Then, from the second rod, carefully prying it with a screwdriver, remove the metal ring.
Then we disconnect the pipe by simply pulling it to the side.
Then I disconnected the electrical plug.
To remove the fuel pump from the housing, you need to bend the latches and carefully pull it up along the plastic “rails”
We gained access to the filter mesh. Having looked at the state of my mesh, I doubted whether it was even capable of letting anything through itself... We simply remove it by pulling it towards us.
Next, we bend the latches and take out the electric motor of the fuel pump, which I was going to replace.
The next stage was the most difficult for me. It was necessary to remove the old corrugated tube and then put on a new one. These tubes are crammed in so hard that you can't even take a horseradish away. I had to use an industrial hair dryer. First heat it up and then pull it out.
I took a new BOSH motor bought for 1300 rubles and a corrugated tube for 50 rubles. Putting the tube on was a pain in the ass... First I warmed it up, then put it on. To be sure, I tightened one end with a zip tie.
It turned out to be a little easier to put it on the motor
After that we start collecting. We insert the motor into the housing. Then we put on the filter mesh. There is a pin on the motor body on which you need to place it, just pressing it down well.
Upon completion of the assembly, I noticed that I had made a mistake in the location of the new plastic corrugation
It rested and did not allow the body to close completely. In general, I was too lazy to take everything back apart, so I just cut a couple of turns from the spring, which is attached to the metal rod. We put the fuel pump in place. We turn on and turn off the ignition a couple of times so that it sucks in gasoline)) And that’s it. let's start.
The result: firstly, the terrible squeaking noise when I turned on the ignition disappeared, secondly, the car began to behave much more cheerfully, and the jerking when switching to second gear also disappeared. And of course it’s nice that you made it yourself