03.24.2021 9 915 VAZ 2106
Author: Ivan Baranov
Replacing the camshaft on a VAZ 2106 may be required for various reasons, but before moving on to this process you need to have an idea of the purpose of this unit. The camshaft is the main timing link and participates in the combustion process of the combustible mixture.
The camshaft is located at the top of the cylinder head. It is connected to a pulley or toothed sprocket of the crankshaft via a belt or chain drive.
VAZ 2106 car near a pond [Hide]
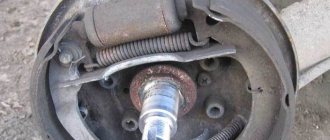
Camshaft VAZ 2107
The camshaft is the main element of the gas distribution mechanism of a car engine. This is an all-metal part, made in the form of a cylinder with support journals and cams placed on it.
The camshaft contains cams and journals
Purpose
The timing shaft is used to control the processes of opening and closing valves in the combustion chambers of the engine. In other words, it synchronizes the operating strokes of the power unit, promptly admitting the fuel-air mixture into the combustion chambers and releasing exhaust gases from them. The camshaft of the “seven” is driven by the rotation of its star (gear), connected through a chain to the crankshaft gear.
Where is it located?
Depending on the design of the engine, the timing shaft may have a different location: upper and lower. With its lower location, it is installed directly in the cylinder block, and with its upper location, it is installed in the cylinder head. For "sevens" the camshaft is located in the upper part of the cylinder head. This arrangement, first of all, makes it easily accessible for repair or replacement, as well as for adjusting valve clearances. In order to get to the timing shaft, just remove the valve cover.
Operating principle
As mentioned, the camshaft is driven by the crankshaft gear. At the same time, its rotation speed, due to the different sizes of the drive gears, is reduced exactly by half. The full operating cycle of the engine occurs in two revolutions of the crankshaft, but the timing shaft makes only one revolution, during which it manages to let the fuel-air mixture into the cylinders one by one and release the exhaust gases.
The opening (closing) of the corresponding valves is ensured by the action of the cams on the valve tappets. It looks something like this. When the shaft rotates, the cam with its protruding side presses the pusher, which transmits force to the spring-loaded valve. The latter opens a window for the intake of the combustible mixture (exhaust of gases). As the cam rotates further, the valve closes under the action of a spring.
The valves open when the protruding parts of the cams press on them
Characteristics of the VAZ 2107 camshaft
The operation of the VAZ 2107 timing shaft is determined by three main parameters:
- phase width - 232o;
- intake valve lag - 40°;
- exhaust valve advance - 42o.
The number of cams on the camshaft corresponds to the number of intake and exhaust valves. The "seven" has eight of them - two for each of the four cylinders.
Find out more about the operation of the timing belt: https://bumper.guru/klassicheskie-modeli-vaz/grm/grm-2107/metki-grm-vaz-2107-inzhektor.html
Replacing Opel camshafts
On Opel cars, in contrast to VAZ models, there are a lot of different types of power units - there are both small-displacement and fairly high-volume internal combustion engines. The line of power units includes 3, 4 and 6 cylinder engines; they can be equipped with one or two camshafts. On single-shaft Opel engines, the cams often wear out; the shafts of twin-shaft engines are much more reliable, they rarely fail.
Let's look at how you can replace the camshaft on an Opel car with a 1.6-liter 8-valve internal combustion engine (C16NZ engine):
- remove the valve cover (8 bolts);
- dismantle the upper plastic timing case;
- install timing marks;
- remove the module or distributor (depending on the modification), which is located at the rear;
- drain the antifreeze, since you will have to unscrew the bolts that secure both the camshaft bed and the cylinder head at the same time;
- loosen the tension belt, unscrew the camshaft;
- we twist the cylinder head bolts (10 pcs.), they also secure the camshaft housing (bed);
- remove the shaft assembly;
- if the shaft has a fairly long mileage, it is better to replace it together with the housing;
- Having secured the new shaft in place, we put everything in place - we tighten the cylinder head bolts from the middle with a force of 11-12 kg in several stages.
When making repairs, it is important not to touch the cylinder head itself; if it is moved from its place, you will have to change the cylinder head gasket. But this design feature is typical only for 8-valve engines; on 16-valve Opel internal combustion engines, the cylinder head is not affected in any way.
Is it possible to increase the power of a VAZ 2107 engine by installing a different camshaft?
Probably, every owner of the “Seven” wants the engine of his car to work not only without interruptions, but also with maximum efficiency. Therefore, some craftsmen are trying to tune power units using various methods. One of these methods is to install a different, more “advanced” camshaft.
The essence of tuning
Theoretically, it is possible to increase the power performance of a power unit by increasing the phase width and lift height of the intake valve. The first indicator determines the period of time during which the intake valve will be open, and is expressed in the angle of rotation of the timing shaft. For the “seven” it is 232o. The lift height of the intake valve determines the area of the hole through which the fuel-air mixture will be supplied to the combustion chamber. For VAZ 2107 it is 9.5 mm. Thus, again, in theory, as these indicators increase, we get a larger volume of combustible mixture in the cylinders, which can really have a positive effect on the power of the power unit.
The phase width and lift height of the intake valve can be increased by changing the configuration of the corresponding cams of the gas distribution shaft. Since such work cannot be done in a garage, for such tuning it is better to use a finished part from another car.
Camshaft from Niva
There is only one car whose camshaft is suitable for the “seven”. This is a VAZ 21213 Niva. Its timing shaft has a phase width of 283°, and the intake valve lift is 10.7 mm. Will installing such a part on a VAZ 2107 engine give anything in reality? Practice shows that yes, there is a slight improvement in the operation of the power unit. The power increase is approximately 2 liters. s., but only at low revs. Yes, the “seven” responds a little sharper to pressing the accelerator pedal at the start, but once it gains speed, its power becomes the same.
Sports camshafts
In addition to the timing shaft from Niva, the VAZ 2107 can also be equipped with one of the shafts made specifically for “sports” tuning of power units. Such parts are produced by a number of domestic enterprises. Their cost ranges from 4,000–10,000 rubles. Let's look at the characteristics of such camshafts.
Table: main characteristics of “sports” timing shafts for VAZ 2101–2107
| Name | Phase width, 0 | Valve lift height, mm |
| "Estonian" | 256 | 10,5 |
| "Estonian +" | 289 | 11,2 |
| "Estonian-M" | 256 | 11,33 |
| Shrik-1 | 296 | 11,8 |
| "Shrik-3" | 304 | 12,1 |
Chevrolet camshaft replacement
Chevrolet cars are equipped with different engines, it all depends on the specific model. For example, Chevrolet Lanos is equipped with almost the same GM engines as Opel, only with a slightly different modification.
The Chevrolet Niva is equipped with VAZ-2123 engines - in fact, these are the same power units as the VAZ classic, only the ICE 2123 has a larger volume (1.7 l) and a distributed injection system. Therefore, replacing the camshaft on a Chevrolet Niva model with a 2123 engine is carried out according to the same scheme as on cars of the 2101-07 family. The Chevy Niva is also equipped with an Opel 1.8-liter internal combustion engine from GM, the brand of this power unit is Z18XE. The engine from GM has a 16-valve engine, and therefore has two camshafts.
The Chevrolet engine line also includes 6-cylinder in-line engines, for example, the Chevrolet Epica is equipped with two types of six-cylinder internal combustion engines:
- two-liter X20D1;
- 2.5 liter X25D1.
Both power units are two-shaft and equipped with a timing chain drive. Camshafts on Epic rarely fail; most often they are replaced during overhauls, and if they show signs of wear.
Malfunctions of the VAZ 2107 camshaft, their symptoms and causes
Considering that the timing shaft is subject to constant dynamic and temperature loads, it cannot last forever. It is difficult even for a specialist to determine that this particular unit has failed without detailed diagnostics and troubleshooting. There may be only two signs of its malfunction: a decrease in power and a quiet knocking sound, which manifests itself mainly under load.
The main camshaft faults include:
- wear of the working bodies of the cams;
- wear of the surfaces of the bearing journals;
- deformation of the entire part;
- shaft fracture.
More about timing chain repair: https://bumper.guru/klassicheskie-modeli-vaz/grm/grm-2107/kak-natyanut-tsep-na-vaz-2107.html
Wear of cams and journals
Wear is a natural occurrence for a constantly rotating part, but in some cases it can be excessive and premature. This leads to:
- insufficient oil pressure in the system, as a result of which lubricant does not flow to loaded areas or is supplied in smaller quantities;
- low-quality motor oil or one that does not meet established requirements;
- defect in the production of the shaft or its “bed”.
If the cams wear out, the engine power is noticeably reduced, since they, being worn out, cannot provide either the appropriate phase width or the required lift of the intake valve.
When the cams wear out, engine power drops
Deformation
Camshaft deformation occurs as a result of severe overheating caused by malfunctions of the lubrication or cooling systems. At the initial stage, this malfunction may manifest itself in the form of a characteristic knocking sound. If you suspect such a breakdown, further operation of the car is not recommended, as it can damage the entire gas distribution mechanism of the engine.
Deformation occurs due to malfunctions in the lubrication and cooling systems
Fracture
A camshaft fracture may be a consequence of its deformation, as well as poor timing. In the event of this malfunction, engine operation stops. In parallel with this problem, others arise: destruction of the shaft “bed”, bending of valves, guides, damage to parts of the piston group.
A shaft fracture may be a consequence of deformation
Tightening torque of cylinder head bolts VAZ 2112
Force is measured in newtons per square meter. The standard tightening scheme for a 16 valve head does not require any special frills:
- tighten all 10 bolts in the correct sequence with a force of 20 N/m;
- wait 2 minutes and turn the caps 90 degrees;
- after 3-4 minutes. repeat the previous point.
Note! Tightening is performed in a similar way for VAZ Priora 21126.
The manufacturer strongly recommends following the procedure. The longevity of the entire power plant depends on the correct tightening. If the bolts are not tightened enough, oil leaks may occur or antifreeze may enter the crankcase. If excessive force is applied, the bolts break, which will require a major overhaul of the block with drilling out the remaining threads.
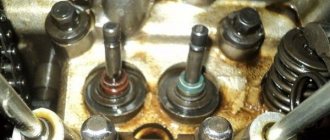
Troubleshooting the VAZ 2107 timing shaft
When the camshaft is removed from the “bed”, it is necessary to assess its condition. First this is done visually. The camshaft must be replaced if its working surfaces (cams and bearing journals) have:
- scratches;
- bullies;
- cut wear (for cams);
- enveloping a layer of aluminum from the “bed” (for support necks).
In addition, the camshaft must be replaced if even the slightest traces of deformation are found.
The degree of wear of the support journals and the supports themselves is determined using a micrometer and caliper. The table below shows the permissible diameters of the journals and working surfaces of the supports.
Defect detection is carried out using a micrometer and calipers
Table: permissible diameters of the camshaft journals and its “bed” supports for VZ 2107
| Serial number of the neck (support), starting from the front | Allowable dimensions, mm | |
| Minimum | Maximum | |
| Support journals | ||
| 1 | 45,91 | 45,93 |
| 2 | 45,61 | 45,63 |
| 3 | 45,31 | 45,33 |
| 4 | 45,01 | 45,03 |
| 5 | 43,41 | 43,43 |
| Supports | ||
| 1 | 46,00 | 46,02 |
| 2 | 45,70 | 45,72 |
| 3 | 45,40 | 45,42 |
| 4 | 45,10 | 45,12 |
| 5 | 43,50 | 43,52 |
If during the inspection it is determined that the dimensions of the working surfaces of the parts do not correspond to those given, the camshaft or “bed” must be replaced.
Timing faults
Any mechanism tends to wear out over time, and various malfunctions can occur in the timing belt:
- the chain stretches;
- belt or chain drive breaks;
- the teeth of gears (sprockets) wear out;
- grind off the cams of the RV;
- support journals wear out;
- the chain tensioner fails;
- wedge the belt tension roller.
In some cases, the RVs themselves break down; the breakdown may occur due to the shaft jamming in the bed of the block head. Also, the RV must be replaced if it causes engine knocking or the engine runs intermittently.
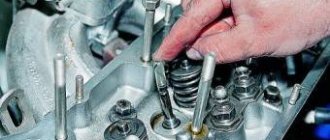
Installing a new camshaft
In order to install a new timing shaft, you will need the same tools as to dismantle it. The installation procedure is as follows:
- Be sure to lubricate the surfaces of the cams, bearing journals and bearings with engine oil.
- We install the camshaft in the “bed”.
- Using a 10 mm wrench, tighten the bolts of the thrust flange.
- We check how the shaft rotates. It should turn easily around its axis.
- We set the shaft to such a position that its pin would coincide with the hole on the fixing flange.
- We install the bed on the studs, screw on the nuts, and tighten them. It is important to follow the established procedure. The tightening torque is in the range of 18.3–22.6 Nm.
The nuts are tightened using a torque wrench with a torque of 18.3–22.6 Nm - We do not install the valve cover and camshaft sprocket in place, since it will still be necessary to set the valve timing.
Torque and sequence of tightening the camshaft bed
Camshaft cover tightening sequence
Correct tightening of the camshaft bed, as well as other parts of the cylinder head, determines the normal functioning of all components and assemblies. So, in order to tighten threaded connections, a standard tightening pattern and a torque wrench are used.
Before installing the bolts in place, they must be washed thoroughly and lubricated with silicone grease.
In order to properly tighten the bolts, you need to know the sequence. It starts from the middle part and gradually moves directly to the edges. The detailed sequence can be seen in the photo below.
Tightening diagram for each camshaft bed bolt with numbering
As for the tightening force itself, it is 8.0-10.0 Nm . After the bed is installed on the block head, the connection bolts are tightened by hand or without much force using a ratchet with a head.
We tighten all the bolts by hand, but do not tighten them
When all the bolts are in place, you need to take a torque wrench and tighten them according to the standards in the order indicated above.
Torque wrench for tightening threaded connections
In what cases is it necessary to tighten the camshaft bed?
The bolts are tightened. Marked with arrows
Tightening the camshaft bed will be necessary if it was previously dismantled for restoration and repair work. So, in what cases will you need to remove the bed, let’s look at it in more detail:
- Replacing camshafts, lifters or valve seals.
- Overhaul of the block head.
- Engine repair operations.
- Replacement of individual elements of the cylinder head.
Consequences of improper bed tightening
The consequences of improperly tightening the camshaft bed include the following:
- Oil leakage due to a gap or loose connection.
- Passing air inside the cylinder head.
- Malfunction of the engine or cylinder head.
- Ingress of foreign objects (water, dirt, dust).
All these factors can negatively affect the performance of the cylinder head and main power unit.
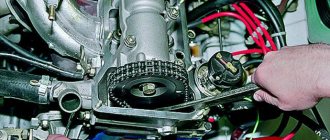
Setting ignition timing (valve timing) by marks
After the repair work has been carried out, it is necessary to set the correct ignition timing. To do this you need to do the following:
- Install the camshaft sprocket with the chain, secure it with a bolt without tightening it.
- Install the chain tensioner.
- Place the chain over the crankshaft, accessory shaft and camshaft gears.
- Using a 36mm wrench placed on the crankshaft pulley nut, rotate the crankshaft until the mark on the pulley aligns with the mark on the engine cover.
Labels must match - Determine the position of the camshaft sprocket in relation to the “bed”. The mark on the star should also line up with the protrusion.
If the marks do not match, you need to shift the sprocket relative to the chain - If the marks do not match, unscrew the camshaft sprocket bolt and remove it together with the chain.
- Remove the chain and turn the sprocket to the left or right (depending on where the mark is shifted) by one tooth. Place the chain on the sprocket and install it on the camshaft, securing it with a bolt.
- Check the position of the marks.
- If necessary, repeat shifting the star by one tooth until the marks coincide.
- Upon completion of work, secure the star with a bolt and the bolt with a washer.
- Install the valve cover.
Secure it with nuts. Tighten the nuts in the order shown in the photo. Tightening torque: 5.1–8.2 Nm. The nuts must be tightened with a torque wrench to a torque of 5.1–8.2 Nm - Carry out further engine assembly.
Renault camshaft replacement
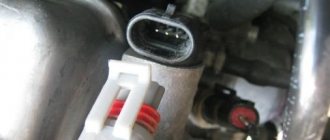
Renault passenger cars are equipped with engines with timing belt and chain drive; the most common engines have volumes from 1.4 to 2.0 liters. Camshafts on Renault cars rarely fail, but failure of the camshaft position sensor is quite common, and their failure often occurs on 1.9 liter dCi diesel engines.
Replacing the camshaft for Renault Logan with engine. K7M (8 valves, 1.6 l) is not an easy task, the work is quite labor-intensive and requires certain skills. To remove the shaft from the GB bed, you will need to lift the engine, so the work should be done using lifting mechanisms - a hoist or a hoist. You can do without a pit or a lift here, but it is possible to perform such work only in stationary conditions - in an equipped garage or in a car service center.
In order to replace the shaft, you will still need to hang the engine, since you have to remove its right front support. We carry out the work as follows:
- open the hood, remove the air filter housing;
- We disconnect the plug from the ignition module, pull off the high-voltage wires from the spark plugs;
- unscrew the valve cover fasteners, remove the cover along with the ignition module;
- remove the upper timing belt casing;
- dismantle the protection;
- in order to get to the front lower part of the engine, remove the right front wheel and put the car on a jack;
- remove the lower plastic protection on the right side;
- loosen the bolts of the lower support;
- loosen the tension roller of the drive belts, dismantle the belt;
- unscrew the bolts of the right upper engine mount and remove the engine mount with the bracket completely;
- loosen the bolt securing the gear (to pull it out of place, you can put the car in fifth gear), put the shafts according to the marks;
- remove the cam gear;
- dismantle the rocker arms on the block head;
- lift the engine up (using an electric chain hoist), remove the camshaft.
Reassembly should be done in reverse order, remembering to accurately mark the shafts.
The work of removing the cylinder head on a K7M (or K7J 1.4 liter engine - it is identical to the 1.6 liter engine) is not easy, and therefore in some cases the craftsmen remove the cylinder head. Removing the cylinder head takes about the same amount of time, but you don’t have to worry about hanging the engine and disassembling parts under the hood - the removed cylinder head is easier to disassemble. The only disadvantage of removing the head is that you will have to buy a new gasket.
Engines ZMZ-402 and ZMZ-4021
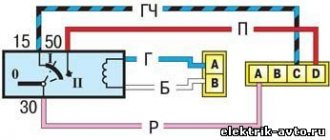
Bolt for fastening the cover of the timing gears 11-16 (1.1-1.6) Nut for fastening the cover of the timing gears 12-18 (1.2-1.8) Nut for fastening the cover of the pusher box 12-18 (1.2-1.8 ) Cylinder head mounting nut 85-90 (8.5-9.0) Cylinder head rear cover mounting bolt 11-16 (1.1-1.6) Connecting rod cover mounting bolt nut 68-75 (6.8- 7.5) Flywheel mounting nut 78-83 (7.8-8.3) Crankshaft pulley mounting bolt 11-16 (1.1-1.6) Crankshaft pinch bolt (ratchet) 170-220 (17-22 ) Bolt for fastening the thrust flange of the camshaft 11-16 (1.1-1.6) Bolt for fastening the camshaft gear 55-60 (5.5-6.0) Nut for fastening the rocker arm axle rack 35-40 (3.5- 4.0) Bolt securing the rocker cover 4.5-8.0 (0.45-0.8) Nut securing the exhaust manifold to the intake pipe 44-56 (4.4-5.6) Nut securing the intake pipe and exhaust manifold to the block head 40-56 (4.0-5.6) Oil sump mounting nut 12-15 (1.2-1.5) Oil pump mounting nut 18-25 (1.8-2.5) Drive mounting bolt ignition distributor 6.0-8.0 (0.6-0.8) Main bearing cover mounting nut 100-110 (10-11) Oil filter mounting nut 12-18 (1.2-1.8) Fuel filter mounting bolt pump 12-18 (1.2-1.8) Fine fuel filter mounting nut 12-18 (1.2-1.8) Water pump mounting nut 18-25 (1.8-2.5) Pulley mounting bolt water pump 12-18 (1.2-1.8) Clutch housing mounting bolt 28-36 (2.8-3.6) Clutch housing mounting nut 40-56 (4.0-5.6) Pressure plate mounting bolt clutch 20-25 (2.0-2.5) Generator bracket mounting nut 44-62 (4.4-6.2)
Generator mounting nut 44-56 (4.4-5.6) Spark plug 30-40 (3.0-4.0) Fan mounting bolt 14-18 (1.4-1.8)