Replacing the carburetor of a VAZ 2106 Zhiguli
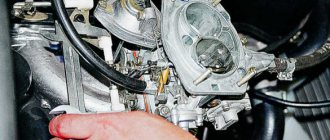
Loosen the clamp and disconnect the corrugated warm air intake hose from the pipe.
Remove the air filter (see Replacing the air filter element).
Using a size 8 wrench, unscrew the four nuts securing the air filter housing to the carburetor. To avoid accidentally dropping them into the intake manifold, you can cover the carburetor with a clean rag.
Remove the air filter housing.
Loosen the clamp and remove the fuel supply hose.
Disconnect the tip from the solenoid valve outlet.
Using an “8” wrench, loosen the tightening of the bolt securing the sheath of the air damper drive cable.
. Use a slotted screwdriver to loosen the cable fastening screw, holding the nut with a “7” wrench.
. and remove the end of the cable from the holes.
Disconnect the crankcase gas suction hose.
Using a screwdriver with a wide blade, remove the rod from the throttle valve drive lever (see Adjusting the carburetor drive).
Disconnect the vacuum ignition timing regulator hose.
Remove the return spring.
. Using a 13mm wrench, unscrew the four carburetor mounting nuts.
Remove the carburetor from the engine.
We install a new (or washed, repaired and adjusted old) carburetor in the reverse order of removal. Be sure to replace the carburetor gasket with a new one.
ATTENTION! Do not use much force when tightening the carburetor mounting nuts. The soft metal mating surface of the carburetor body can be damaged.
Removing and installing the carburetor
- We remove the hose that takes warm air from the pipe. To do this, you will need to first loosen the clamp.
- Remove the air filter.
- Cover the carburetor with a clean, lint-free cloth. This is necessary so as not to accidentally drop the filter housing mounting nuts into the float chamber.
- Unscrew these nuts.
- We remove the plate.
- Remove the hose from the crankcase.
- Remove the filter housing.
- Remove the fuel hose.
- Remove the tip of the solenoid valve.
- Unscrew the bolt that secures the drive cable.
- Unscrew the cable screw.
- Carefully remove the cable.
- Remove the gas exhaust hose from the crankcase.
- Removing the ignition regulator hose
- We remove the spring.
- Unscrew the nuts securing the carburetor. You need to act very carefully, not to use too much force. The fact is that the mating plane of the device is made of soft metal and can easily be damaged.
- The carburetor can be removed from the engine.
Installation of a working device is carried out in reverse order according to the same scheme.
This article is part of a series of 9 lessons dedicated to 7 carburetors. To view all nine lessons, follow the link: https://7vaz.ru/chto-takoe/karbyurator.html
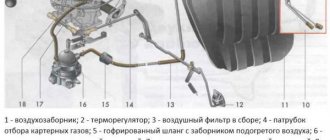
Connecting the carburetor to the engine and other vehicle systems.
The first device we see connected to the carburetor is the air filter. The dimensions of the filter are such that it completely covers the carburetor. The filter housing is attached directly to the top of the carburetor using 4 nuts. A fuel hose is connected through a fitting located on the side of the carburetor, through which fuel is supplied from the tank using a fuel pump.
A hose is connected from the distributor (ignition system) to the Ozone. A vacuum is created in the carburetor, which rotates the contact plate in the distributor through this hose, thereby changing the ignition timing.
A wire is connected to the solenoid valve. Through it, voltage from the fuse box is supplied to the valve.
A thin cable is connected to the throttle control lever. This thrust increases the amount of produced fuel-combustible mixture, which is supplied to the engine combustion chamber. It is this thrust that acts when the driver presses the gas pedal in the cabin.
In the area of the air inlet (which is blocked by a special flap), a so-called “choke” rod is connected. This device starts a cold engine: the flap allows less air into the carburetor, thus producing a rich mixture. The rod leads to the choke handle, located inside the car, at the bottom right of the steering column.
The intake manifold, which directs the air-fuel mixture directly into the cylinders, is connected to the carburetor by a short spring and two bolts.
How to reinstall the carburetor
After the device has been washed and repaired, you will need to reinstall the carburetor. To do this, first a new seal is applied to the installation site, and the carburetor itself is installed on it. Nuts are screwed onto the four mounting studs, ensuring a tight fit of the carburetor body to the engine manifold:
Then you will need to connect two thin hoses for vacuum and ventilation to two fittings that are located in the upper part of the carburetor.
A fuel supply hose is connected to the inlet valve; it is recommended to replace the clamp with a new product.
The return hose is screwed on the reverse side.
Next, the EPHH wire is connected to the solenoid valve.
It is better to install the throttle return spring before connecting the throttle and air valves.
Installation and connection of the DAAZ carburetor is considered complete.
Basic operations for removing/reinstalling, flushing and adjusting the carburetor are available to drivers with any level of training and experience. It should be borne in mind that the mechanisms are considered to be quite capricious, so all stages of the procedures you perform will require increased concentration.
Source
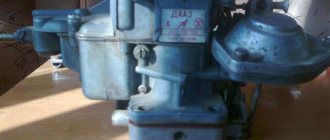
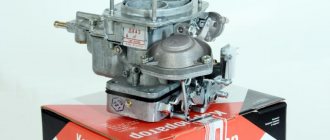
Carburetor VAZ 2106
The carburetor is one of the most critical components in the fuel supply system to the engine of a VAZ 2106 car. It is responsible for creating the fuel-air mixture, which is necessary for the normal operation of the power unit.
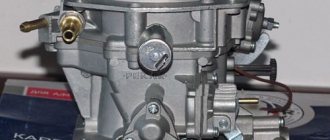
Carburetor OZONE
A carburetor with the correct settings prepares a normal combustible mixture of gasoline and air (1:15). But during prolonged or intensive use, the factory settings are violated, as a result of which an enriched or lean fuel mixture constantly begins to flow into the engine. This immediately affects its operation and requires carburetor repair.
How to change the gasket
Over the years, gaskets made from a wide variety of materials were installed on DAAZ: heat-resistant cardboard, paronite, metal. The main function of the gasket is to create the most reliable and tight connection between the carburetor body and the surface of the engine intake manifold. This is the only way to ensure normal operation of the power unit.
After dismantling the carburetor, it is necessary to inspect the gasket for deformations, tears or severe dents. The manufacturer recommends changing the seal after each carburetor removal.
On the left - new, in the center - when dismantling the carburetor for the first time, on the right - after 3 years of operation of the car
Symptoms of a problem
If the carburetor begins to produce a rich mixture, you will understand this by the following signs:
- Fuel consumption increases
- Loud exhaust is heard from the muffler and the smoke turns black
If the engine receives a lean mixture, you will understand this by the following sign:
Loud bangs are heard from under the hood.
In both cases, the engine heats up noticeably more, and its power is also lost.
If you encounter a similar problem, remember that it is a natural consequence of using the carburetor. Any element of the car requires care, regular inspection and maintenance. Therefore, the VAZ 2106 carburetor must be adjusted from time to time.
Before proceeding with the adjustment, you need to make sure that the cause of the breakdown is not the failure of any element inside the device. You need to disassemble it, wash it and clean it. And only after you are convinced that all components of the structure are in full working order, you can begin adjustment.
The easiest option is to send the car to a specialist. Carburetor technicians have a special tool - a gas analyzer. Using this device, you can achieve the most efficient system setup. However, the services of specialists in this profile are not cheap. You may want to do all the work yourself, using available materials. Next we will look at how to set up a carburetor step by step.
What to put?
Sometimes there is a need to completely replace the carburetor. Therefore, you immediately need to decide which model to buy. Today there are two most common families: Solex and Ozone carburetors.
Many car owners don’t even know what kind of device they have. Externally, these devices can be distinguished by the following characteristics.
- In Ozone, the fuel intake fitting has the shape of an oblong tube, in Solex it is a return
- Ozone consists of three parts: the throttle valve axis, the float chamber and the cover. Solex consists of only two parts: the lower part with the float chamber and the upper part - the cover in which the float is held.
- The ozone has a vacuum valve that controls the opening of the throttle valve of the second chamber.
- On a Solex carburetor, the air damper is controlled by such a large lever: On ozone, this lever looks completely different. It is also called a three-arm lever.
In the 90s, a massive hobby began to replace the standard Ozone with Solex. Taxi drivers were especially guilty of this. This was explained by the fact that fuel consumption decreased slightly, and engine dynamics became a little better.
If you install an oxygen sensor and compare its values on different models, you can understand the reason for this phenomenon. With Solex, after adjusting the mixture composition, the range in composition is no more than one. On ozone, after adjusting the mixture at the moments of braking and acceleration, the mixture acquires a very strong spread of values. At the same time, it can increase or decrease by a large value.
Replacing the Solex 21083 carburetor on a VAZ 2106
To carry out work on replacing the Solex 21083 carburetor, you need to prepare gasket material made of paronite, a fuel supply hose about 80 cm in length, a carburetor rocker and the Solex product itself. A set of motorist's locksmith supplies will be useful for the job.
Installing a Solex 21083 carburetor on a VAZ 2106:
- We clean the power compartment to prevent contamination of the motor and power system.
- We disconnect the cables and ties of the carburetor device, the fastenings of the fuel wires and hoses of the heating complex.
- We remove the bracket holding the casing covering the throttle valve drive cable.
- We clean the manifold platform for attaching the carburetor.
- Apply a layer of sealing lubricant to prevent air from entering the system.
- We place the gaskets in the following sequence: thin, then thick, then again thin gasket. A large cross-section gasket is used to remove heat and prevent heat transfer to the carburetor device.
- We mount the Solex on the seat, removing the front part of the product for ease of operation.
- We install the rocker on the side of the over-valve cylinder head cover.
- We pull the cable from the throttle drive of the carburetor valve and set the required length of the cable and then connect it to the carburetor device.
- We install the updated gasket and lock the front carburetor cover.
- We connect the hoses of the heating and distribution ignition system.
- Connect the tee to the fine fuel filter element and connect the return hose to the fuel system.
- We connect the reverse valve to the “return” hose, and then connect it to the carburetor device.
- We connect the return type spring to the axial element of the rocker, which is located on the cylinder head casing.
- We mount an additional spring element for the throttle drive of the carburetor valve for the period of running-in of the product (if necessary).
- Connect the idle air solenoid valve to the relay connector.
- Restore the original position of the air filter housing and connect the gas outlet hose.
- This completes the Solex installation.
It is important to choose the right model of Solex carburetor for the VAZ 2106, the price of which is quite reasonable for Russian car enthusiasts. It all depends on the size of the power plant
In some cases, it is advisable to install the Solex 21073 product, but you should know that when using such a modification of the carburetor, the dynamics of the vehicle improves, although fuel consumption also increases in direct proportion.
In a VAZ 2106 car, adjustment begins with correcting the fuel level in the float chambers. For all the different methods of arranging the “return” (directly into the fuel tank or tapping into the gas line in front of the pump), the following steps must be taken:
- We place the vehicle on a level surface, start the engine, warm it up, test it at all speeds and turn off the power plant.
- We remove the fuel hose from the carburetor device, and do this carefully so that fuel does not get into the chambers, because The float level will be incorrect.
- We dismantle the front cover of the Solex together with the accelerator cable, after which we use a caliper to measure the distance from the fuel level to the cut of the product body (should be 24 mm in both chambers) with an error of 1 mm. Due to a possible system error in the vehicle horizon, you can take the arithmetic average value based on measurements in the carburetor chambers.
- Based on the measurements taken, we bend the tongue of the float in the required direction, after which we check, after assembling the product, for the transfer of fuel from the chambers.
- Next we adjust the idle speed.
This work is carried out on a power plant heated to operating temperature. The peculiarity is that the mixture quality regulator is equipped with a red arrow, and the mixture quantity regulator is equipped with a blue arrow. Otherwise, the adjustment is of a normal nature, only the value is set by the quantitative regulator to 9000 instead of 800 on previous models.
Which carburetor is better for VAZ 2106
Since carburetors of the SOLEKS and WEBER families were completely copied from foreign-made analogues, their reliability is beyond doubt. It is enough to regulate and clean these units every 60 thousand kilometers, and there will be no problems with the supply of fuel to the engine of your car.
But the most popular are the devices of the OZONE family. They need to be adjusted and cleaned twice as often. In addition, they have many different diaphragms, which often break. The most common breakdowns of melon units are incomplete opening of the second chamber and malfunction of the accelerator pump.
Do-it-yourself carburetor idle adjustment
To solve the problem of how to adjust the idle speed on a VAZ 2106, you need to stock up on a set of driver’s tools, although one screwdriver is enough for this technological operation. On the Internet you can watch the “VAZ 2106 idling” video clip about carrying out adjustment work to stabilize the idling speed of the vehicle.
To adjust the idle speed of the “six” carburetor, a number of preparatory conditions must be observed. These include:
- The operation is carried out only on the motor that has reached operating temperature (about 90 degrees Celsius).
- The clearances of the timing valves and ignition contacts (with a contact system) must correspond to the required dimensions.
When adjusting the idle speed of a VAZ 2106 carburetor on a cold engine, the required result cannot be achieved. If there is no idle speed, it will appear only if the correct adjustment conditions are met.
If the VAZ of the “sixth model” stalls at idle, then to find out how to adjust the idle speed, you need to use the following algorithm:
- The process of adjusting the idle speed on a VAZ 2106 car is carried out using two screws for adjustment, the first is the quality screw, the second is the quantity of the mixture.
- In accordance with the factory parameters, the quantitative adjusting screw is locked with a sealed limiter sleeve. To carry out adjustments and when there is no idle speed on the VAZ 2106, the seal is removed and adjustment work is carried out.
- Using a high-quality screw, we achieve a value of 900 rpm, checking the value with the tachometer readings.
- Using the quantity screw, we use a gas meter to set the carbon monoxide value in the range of 0.6-1.3 percent. The circular movement of the adjusting screw changes the number of rotations of the crankshaft of the power unit.
- In this situation, we re-fix the required crankshaft speed parameters with the first screw. If everything is done correctly, then when you sharply press and lower the accelerator pedal, the rotation value should remain stable.
- If all operations are performed correctly, there should be a smooth increase in engine speed and the unit should operate stably.
If the idle speed floats or the VAZ 2106 engine operates spasmodically, that is, jerkily and unevenly, then the unit settings need to be restored. Upon completion of the setup, the power plant should produce stable speed.
You need to know how to set the idle speed of the VAZ 2106 in order to adjust the carburetor. You can perform this procedure quite quickly with your own hands, if, of course, you have an idea of what a carburetor consists of and the functions of its main components. But first things first, let's start with the saddest thing - the case when suddenly there is no idle speed and the engine starts to stall.
You'll be lucky if this happens close to home. But if you’re on the road, it’s not good enough. On my own behalf, I’ll add that several times I had to remove and disassemble the carburetor while standing on a narrow highway, shying away from passing trucks and highlighting it with a flashlight. A good habit is to take a thermos and a flashlight on the road.
Setting up a V8 carburetor on a VAZ 2107
After Solex-21083 is finally installed and engineering work is completed, it is necessary to adjust the carburetor. The adjustment takes place on a warm engine. You will need a slotted screwdriver.
The setup sequence is as follows:
- it is necessary to unscrew the mixture quality screw until the engine increases rpm to 1200;
- go to the quantity screw (with a plastic handle) and by rotating it, reduce the engine speed to 1000 per minute;
- we return to the quality screw and slowly tighten it until the tachometer needle is at 850-900 rpm.
The most common breakdowns
However, the most common devices are the OZONE family of devices. They need to be cleaned and adjusted twice as often. In addition, they have a lot of different diaphragms, which break every now and then. The most common breakdowns of these units are incomplete opening of the second chamber, as well as malfunctions of the accelerator pump.
- Popping sound when you press the accelerator pedal, as if something is shooting into the carburetor.
- Similar pops, but now it shoots into the muffler.
- The idle speed is either too high or too low (floats).
- The car thinks for a long time when driving on the highway. When you press the gas pedal all the way, it does not accelerate at all or accelerates too slowly.
- When you shift into 2nd or 3rd gear and press the accelerator pedal, the car first slows down and then jerks forward with a sharp increase in speed.
The detonation problem may be associated with a violation of the ignition timing angle. In any case, you should first try to eliminate detonation by adjusting the carburetor. In 90% of cases this helps.
The symptom described in point 3 indicates the need to adjust the idle speed. The situation indicated in paragraph 4 indicates that camera drive 2 is faulty. Eliminated by replacing broken parts. The symptom described in paragraph 5 indicates a breakdown of the accelerator pump - the diaphragm or spring must be replaced.
Carburetor 2106
The standard option used on the Six engine is the “Ozone” sample. This is a two-chamber carburetor, with a falling air flow, emulsion type. The technical characteristics of the engine, when running, produced 75 horsepower, and the maximum speed was 155 km/h. Acceleration time to hundreds is 16 seconds.
The engine response is good, but when you press the gas pedal sharply, the car first chokes and then starts to move. This was explained by the fact that in the Ozone float chamber, the fuel level was insufficient, and during sharp acceleration there was not enough of it.
VAZ 2106 car owners were racking their brains over the question of which carburetor is better to install so that the engine's throttle response increases, while having minimal losses. Most opinions agreed that installing a Solex with a VAZ 21083 would be the best option.
Bottom line
After installation, the characteristics of the Six engine will acquire several pros and cons.
The advantages are that the engine will be more responsive, the maximum speed will increase (up to 160 -165 km/h), and the acceleration time to the first hundred will be reduced (instead of 15 seconds - 13). The modernization will not significantly affect the rated power, increasing it by 5 - 10 hp.
The only downside is fuel consumption. With normal, non-economical driving in the urban cycle, it will increase by 1 - 1.5 liters.
The general conclusion is this: installing this carburetor is a necessary thing, because for the price of 1 - 1.5 liters per 100 kilometers, you will get more driving comfort.
Before you begin removing the carburetor on the VAZ 2106, you must first remove the air filter. After this, it is necessary to completely remove its body, since it will also interfere. First, as usual, I will give a complete list of the necessary tools that will be needed to replace the carburetor:
- Open-end wrench 13
- crosshead screwdriver
- Heads for 8 and 10
- Ratchet handle or crank
- Small extension cord
BRIEFLY ABOUT THE FEATURES AND DEVICE OF THE “SIX” CARBURETTOR UNIT
Before adjusting the carburetor on a VAZ 2106, it doesn’t hurt to know its design features. After 1980, Ozone and Solex began to be installed on Tolyatti cars. The purpose of the unit’s operation is to prepare a combustible mixture before feeding it into the car’s cylinders. Down to the subtleties, this is not a driving school, we will not disassemble the design, it is enough to familiarize yourself with the main components that ensure optimal operation of a carburetor internal combustion engine:
- Fuel dosing system.
- Mechanisms for controlling throttle valves and enriching the mixture.
- Idle system.
- Accelerator pump and econostat.
- Float chamber.
A chamber with a float and a needle valve is responsible for the stability of the fuel level. Next, gasoline, flowing through the spray tube, enters the chamber, where it mixes with air from the inlet pipe. The amount of mixture is adjusted by the throttle valve, which is connected to the accelerator pedal.
Precise adjustment allows you to prepare the correct mixture of gasoline and air in a ratio of 1:15. During long-term operation of the car, the settings get lost and you have to think about how to adjust the carburetor on a VAZ 2106 on your own. The adjustment technology is the same for both Solex and Ozone.
WHEN IS ADJUSTMENT NEEDED?
Adjusting the carburetor unit is no more difficult than adjusting the clutch drive on a VAZ 2107, since it only involves adjusting the jets. In some cases, they need to be cleaned of resins and other contaminants; the presence of contaminants is felt by power dips in the process of accelerating. Many car owners claim that Ozone carburetors are not a very good option and recommend replacing them with Solex.
However, the signs that the device has begun to prepare an enriched mixture and needs to be adjusted are the same for both types of units:
- Increased fuel consumption.
- Frequent overheating of the motor.
- Black smoke from the exhaust pipe and pops.
- Loss of power.
The preparation of a lean mixture is characterized by the following characteristics:
- Popping sounds in the carburetor.
- Loss of power.
- Engine overheating.
Of course, you don’t always need to immediately grab a screwdriver and turn the adjusting screws - perhaps it’s something else. For example, when the idle speed floats, air may leak through the intake manifold gasket, or there may be a breakdown of the brake booster diaphragm. But even the reasons listed are not all the options, so specific recipes for eliminating certain problems cannot be given. The issue should be addressed comprehensively, taking into account the connection between vehicle systems.
↑ Main carburetor malfunctions
Malfunctions in the operation of the carburetor during the operation of the car are most often associated with clogging of its channels (calibrated holes of small diameter and fuel jets), as well as with the deposition of resins in them.
We eliminate this malfunction by washing the jets and internal cavities of the carburetor with acetone and blowing them with compressed air under a pressure of at least 4 kgf/cm2.
Violation of the tightness of the carburetor channels leads to incorrect operation or complete malfunction of the idle system, the second chamber damper drive and its other systems and devices.
↑ Causes of carburetor malfunctions
- damage to gaskets, rubber sealing rings;
- loosening of fastening connections;
- deformation of the cover and lower plane of the carburetor body (the result of overtightening the nuts and screws of their fastening);
- damage to the diaphragms of the throttle valve drive of the second chamber, the starting device and the accelerator pump).
Some malfunctions may be caused by wear of individual carburetor elements, for example, a needle valve with a seat.
As an example, a complete carburetor repair is shown here. In practice, it is often enough to perform only part of these operations to eliminate specific faults. Some of them can be performed without removing the carburetor from the car.
Carburetor adjustment: setting the fuel level
The level of fuel in the float chamber affects the composition of the mixture in any operating mode of the carburetor, the toxicity of exhaust gases, the dynamics of engine operation and fuel consumption. Work order:
Unscrew the carburetor cover mounting screws and install it in a vertical position. A prerequisite for its installation is light contact between the float tongue and the needle ball. Using a special gauge, measure the gap between the bottom surface of the float and the plane of the cover (taking into account the cardboard spacer)
It is important that the gap is 6.5+0.25 mm. If the gap size does not match, the value is corrected by bending the float tongue. Finally, check the float stroke, which should be 8.0+0.25 mm.
How is a carburetor repaired and flushed?
Many problems can be eliminated by flushing the carburetor, but for it to be effective, the unit must be removed from the car. After which you will need to disassemble it to the required level so that you can gain access to absolutely all elements of the mechanism.
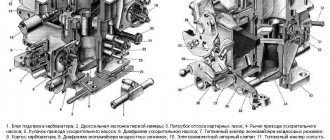
Parts of the carburetor body 2107-1107010 in the diagram: 1 - rod of the pneumatic drive of the second throttle valve; 2 — pneumatic drive housing; 3 - diaphragm; 4 — pneumatic drive cover; 5 — fuel jet of the transition system of the second chamber; 6 — fuel nozzle body; 7 — small diffuser of the second chamber; 8 — accelerator pump nozzle; 9 — screw valve of the accelerator pump; 10 — main air jet of the second chamber; 11 — emulsion tube of the second chamber; 12 — main air jet of the first chamber; 13 — emulsion tube of the first chamber; 14 — main fuel jet of the second chamber; 15 — main fuel jet of the first chamber; 16 — accelerator pump adjusting screw; 17 — fuel jet of the idle system; 18 — fuel nozzle body; 19 — return spring of the accelerator pump; 20 — accelerator pump diaphragm; 21 — accelerator pump cover; 22 — small diffuser of the first chamber; 23 — lever return spring; 24 — three-arm air damper control lever; 25 — connection rod with the throttle valve; 26 — throttle valve return spring bracket
Repair consists of the following steps:
- Dismantling the device.
- Flushing, which includes cleaning and purging of carbon deposits and adhering dirt.
- Replacement of faulty parts.
Important: You need to remove the carburetor if you are 100% sure that the problem is in the carburetor, because the problem in other components of the car’s fuel system is also possible
Where does carburetor repair on a VAZ 2106 car begin?
Do-it-yourself repair of a VAZ 2106 carburetor begins with its removal. To do this, you will need to remove the air filter, which will still have to be replaced with a new one, and dismantle its housing.
It is recommended to first seal the openings in the chambers with rags to prevent small objects from getting into them. After this, the hose going to the brake vacuum is removed from the pneumatic valve, the choke installation cable is unscrewed and the rod is removed from the gas pedal lever that controls the throttle valve.
If you have the latest Solex carburetor, then the wires from the throttle valve, air damper and economizer are disconnected, providing forced idle.
Next, remove the fuel supply and return hoses and the ventilation pipe. After disconnecting all suitable and supply elements, you can begin to remove the block itself. To do this, you need to unscrew the 4 fastening nuts and carefully remove the device from the studs. It is highly recommended to plug the hole in the collector with a soft rag.
Step-by-step instructions for removing the carburetor
For your convenience, I have compiled detailed step-by-step instructions for removing the carburetor from the photo:
Important to remember: Be sure to replace the gasket under the carburetor with a new one. To avoid air leaks
Spare parts included in the carburetor repair kit for the VAZ 2106:
- Trigger diaphragm
- Jet body
- Idle jet - 2 pcs.
- Main air jet - 2 pcs.
- Main fuel jet - 2 pcs.
- Needle valve assembly
- Accelerator pump diaphragm
- Filter element
- Carburetor cover gasket
- Starter gasket
- Return spring
- Accelerator pump diaphragm spring
- Idle speed screw (adjustment needle)
- Ring sealing
- For R/K 2105-10, 2105-20, 2106, 2107-10, 2107-20:
- Acceleration pump nozzle
- Spray Valve
- Sprayer gasket - 2 pcs.
- Screw M5x0.8x20
- Screw M4x0.7x15
DIY repair
If your carburetor suddenly becomes unusable, do not throw it away. Repairing this important “organ” of the car involves replacing faulty parts as quickly as possible. In order to determine which parts need to be replaced, you should disassemble, clean the carburetor and carefully inspect the component mechanisms.
How to remove a carburetor
The carburetor is removed if a malfunction is detected in it, but there is no way to do this by partial disassembly. The carburetor is also removed to replace, adjust and clean it.
It is removed as follows:
- To begin with, all kinds of hinged parts and damper drive cables are removed.
- The air filter housing is removed from the studs. To do this, you need to unscrew all the nuts that secure it to the carburetor. The clamping nut is pulled back and the choke cable sheath is pulled out from the mounting bracket.
- The outer surface of the parts is cleaned of dirt.
- The choke drive cable is loosened and the fuel supply and crankcase gas exhaust hoses are removed.
- The hose between the economizer and the pneumatic valve and the hose of the vacuum ignition distributor are disconnected.
- Then the nuts that secure the carburetor to the intake manifold are unscrewed.
- The carburetor body is removed and the intake manifold hole is plugged with a clean rag to avoid clogging.
Don't forget to check the integrity of the sealing gasket, which is located between the carburetor and the intake manifold. Replace it if necessary.
Photo gallery: removing the carburetor from a VAZ
How to clean a carburetor
Before you start cleaning the carburetor, you need to carefully prepare: buy a special aerosol cleaner at a car shop, arm yourself with smooth, dry cloths, a tire inflator, remove the carburetor and disassemble it.
Cleaning the jets
Jets—fuel and gas supply channels—are cleaned with compressed air or a liquid cleaner under pressure. Mechanical cleaning with any fleecy or metal objects is prohibited.
When cleaning the jets with compressed air (you can use a tire pump for this), the body of the idle jets, the main metering system (air and fuel), then the valves and channels of the pump sprayer are blown out.
In case of severe contamination, the jets are placed in acetone so that the deposits soften or completely dissolve. Then they should be blown out.
Table: jet calibration values
| Hole diameter, mm | First camera | Second camera |
| Main fuel jet | 1,35 | 1,25 |
| Air jet | 1,70 | 1,90 |
| Idle fuel jet | 0,45 | 0,60 |
| Idle air jet | 1,80 | 0,70 |
| Accelerator pump nozzle | 0,50 | — |
| Accelerator pump bypass jet | 0,40 | — |
| Fuel nozzle of enrichment device | — | 1,50 |
| Emulsion nozzle of the enrichment device | — | 1,70 |
| Air jet of enrichment device | 0,70 | — |
Flushing the float system
To get to the carburetor float system, you must:
- Remove the air filter and fuel hose clamps.
- Disconnect the cable that controls the starting device.
- Remove the electrical connector on the solenoid valve.
- Then unscrew the fastening bolts and, without turning over, remove the carburetor cover.
It is best to clean the float compartment with a rubber bulb, carefully drawing out any remaining fuel from the chamber. You should not use fluffy rags - they can accidentally clog the jets.
To complete the cleaning, you can wipe the bottom of the float chamber with a stiff brush.
To check how well you have cleaned the float chamber, you need to unscrew the air jets and blow out the emulsion wells. If dirt appears in them, washing should be repeated and checked in the same way.
It is best to clean the float system compartment with a rubber bulb
Flushing the throttle valve
It is produced using a cleaner, which can be purchased at a specialized auto store.
- The throttle valve itself is washed, as well as all accessible elements, channels, valves, etc. Particular attention should be paid to the forced crankcase ventilation channel, since it becomes clogged more often and more severely than other parts.
- After this, the idle speed sensor is unscrewed and the internal elements are washed.
- The procedure is repeated again.
Video: how to clean the throttle valve on a VAZ
Replacing the gasket
The gasket is located between the carburetor body and its cover. If during disassembly you find any damage to the gasket, it should be replaced.
This is not so difficult to do - you just need to dismantle the float and put a new one in place of the old unsuitable gasket. Then install the float and put the carburetor cap back.
After washing the internal elements of the carburetor, it should be blown out. An air or car compressor is perfect for this.
Video: how to remove and clean the carburetor on a VAZ
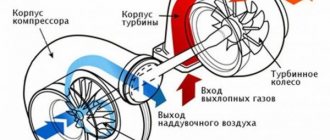
How does the Ozone carburetor work?
The VAZ 2106 “Ozone” carburetor is a two-chamber emulsion-type device with a falling flow. The first chamber is intended for the dosing system and enrichment device, in the second the mixture of fuel and air is created in the required ratio. What is the operation scheme of the Ozone carburetor?
The fuel pump directs fuel into the float chamber through a needle valve, which maintains the required level. Through the nozzles, the fuel enters the first and second chambers, and then into the emulsion wells, where it is mixed with air, also entering through the nozzles. The created mixture is supplied to the carburetor diffusers.
Immediately after the engine starts, the idle channel is closed by an electromagnetic valve, then at idle speed gasoline flows from the first chamber. As the fuel moves through the nozzle, it mixes with air. When the throttle valves open more (when you press the gas pedal), the resulting mixture goes into the carburetor float chambers, through the transition holes. Through the econostat, the mixture enters the atomizer, which directs it into the combustion chamber of the engine.
General view of the Ozone carburetor
Types of carburetors
The technology for flushing and adjustment after repair depends on the design. Therefore, the first thing you need to do is determine which model of device is installed on your car.
Throughout the history of the existence and production of the VAZ 2106 and VAZ 2107, 3 types of carburetors were used:
| DAAZ model “Ozone” is a second generation carburetor. It is more economical, environmentally friendly, but also complex in design, as it is equipped with a second combustion chamber. It uses a pneumatic valve, which can block the operation of the unit if it is dirty or incorrectly adjusted. Provided consumption of less than 10 liters per 100 km. | |
| DAAZ is the third modification of 21053. The device was produced under a Solex license. It is even more complex in design, since in addition to the second camera it also has feedback, which made it even more economical. But they were capricious about the quality of the fuel, because of which the jets quickly became clogged. |
Good to know: Regardless of the model, the carburetors used on the VAZ 2106 are two-chamber and consist of 3 main parts: the device cover (protects the fuel fittings from dirt), the housing (it contains chambers, diffusers, from which the mixture is transferred to the engine), lower part (the float chamber and throttle valves are located).
It is the small parts of the carburetor that play a very important role. Thanks to them, fuel enters the cylinders in certain proportions and is correctly mixed with air to form a high-quality fuel mixture.
But during operation, due to contamination with small particles or dirt, especially with regard to the accelerator pump and jets, the operating modes of the carburetor are disrupted, which leads to malfunctions and failures when pressing the gas or “sneezing” of the carburetor. Flushing consists of removing dirt from all channels and jets, thereby ensuring their stable operation.
Adjusting the drive
- Checking the length between the tips. The required size is 80 millimeters.
- If you deviate from this size, remove one tip.
- Loosen its lock nut and by rotating adjust the distance to the desired size.
- Tighten the nut and return the rod.
- You need to check the adjustment. To do this, our assistant presses the gas pedal. We observe the throttle valve to see if it has opened completely.
- If not, then you need to remove the tip from the lever and reduce the length of the rod.
- Now you need to see what position the damper is in when the gas pedal is released: does it close completely. If not, the pull needs to be lengthened a little.
- Next we work with the air damper. We weaken its drive. In the cabin, we completely recess the damper.
- Press the three-arm lever so that the flap opens all the way. In this position, tighten the locking screw.
- Checking the adjustment. To do this, we completely close and open the door from the passenger compartment again. If the damper has not opened completely, we carry out the adjustment again. If the outcome is positive, fully tighten the screw.
Types of carburetors for VAZ 2106
On the assembly line, five types of carburetors were installed on the “sixes”:
- DAAZ 2106-1107010. Mounted with 1.6-liter internal combustion engines on vehicles manufactured before 1980.
- DAAZ 2103-1107010 "WEBER". Installed with 1.5-liter engines on cars manufactured before 1980.
- DAAZ 2105-1107010-20 “OZONE”. Mounted with 1.1-1.3-liter internal combustion engines on cars produced in 1980-1991.
- DAAZ 2107-1107010-20 “OZONE”. Mounted with 1.5-1.6-liter internal combustion engines on cars produced in 1980-1991.
- DAAZ 21053-1107010 "SOLEX". Installed on all cars from 1991 to the end of the 90s.
The first two types of carburetors can be distinguished from other units by the absence of a pipe - a thin black or yellow hose running from the carburetor to the distributor - the ignition timing vacuum corrector hose is put on it.
You can distinguish “OZONE” from other types of devices by the “flying saucer” - a pneumatic drive for opening the second chamber. If there is no connection for the vacuum corrector hose, but there is a “flying saucer”, this is a DAAZ 2107-1107010-10 carburetor device. This unit is quite rare; it was installed only at service stations to replace the first two types of devices after they broke down.
What models are installed on VAZ 2106/2107 cars
All types of carburetor mechanisms equipped with the VAZ 2106/2107 are aimed at reducing fuel consumption and giving the car maximum dynamism. In addition, an important role is played by such an indicator as environmental friendliness. For a decade, AvtoVAZ engineers gave preference to the most environmentally friendly types of carburetors.
Carburetors of three different models were installed on modern VAZ 2106/2107, as well as on cars produced in previous years:
Manufacturer: Dimitrovgrad Automobile Assembly Plant (or DAAZ). It should be noted that the company produced carburetors under license from Weber. Structurally, these devices were as simple as possible both in operation and in further maintenance. In addition, their main advantage was to provide excellent speed performance for cars of the sixth and seventh VAZ models. At the same time, DAAZ carburetors consume a very large amount of gasoline - from 10 to 14 liters per 100 kilometers.
The design of the VAZ 2106 carburetor
High-quality independent maintenance of any vehicle system requires a detailed study of the components and mechanisms responsible for its operation.
Before adjusting the carburetor on the VAZ 2106, you need to consider the main units:
- System for supplying and dosing the combustible mixture;
- Control of mixture enrichment flaps, throttle position;
- The structure of the float chamber and its main purpose;
- Operation of the accelerator pump and idle mechanisms.
View of the carburetor from the throttle valve drive side: 1 - air damper; 2 — starting device; 3 — air damper control lever; 4 - telescopic rod; 5 — lever for driving the throttle valve of the primary chamber; 6 - lever that limits the opening of the throttle valve of the secondary chamber; 7 - return spring; 8 - rod connecting the throttle valve of the primary chamber with the air damper control lever; 9 — pneumatic drive rod; 10 - pneumatic drive.
The process occurs by filling the float chamber with fuel, which must have a stable level. The fuel is transferred to the spray mechanism, where, in turn, it is mixed with air in proportions of 1 to 15, the quality of the mixture is regulated by the throttle valve.
Preparing to adjust the carburetor
Car repair and maintenance requires prepared tools and space.
Setting up the carburetor of the six is no exception; for fast, competent work you need to carry out the following steps:
- Before work, the car is placed on a flat surface, a place is prepared for disassembling components in the form of a table or a clean area. A container for washing and clean rags will definitely be needed.
- Prepare a set of keys and screwdrivers; without tools, it will not be possible to carry out the work.
- Purchase a repair kit from an auto parts store that contains all the O-rings, gaskets and mechanisms.
- Disassembly and adjustment of the VAZ 2106 carburetor occurs after completing the tool and the necessary materials.
Removing the carburetor from the car
If you are completely sure that the carburetor adjustment has been carried out in full accordance with the requirements and recommendations of the manufacturer, but the symptoms of the malfunction do not disappear, you will need to remove the device and disassemble it. The latter is carried out in several main stages:
- Remove the carburetor cover with extreme caution so as not to damage the sealing element and float. It is better to immediately place the fasteners in a place where you cannot accidentally touch and scatter them;
- turn the telescopic rod until the groove of the lever hole coincides with the protrusion on the part itself and remove it;
- unscrew the fuel filter cap;
- remove the filter, then completely remove the carburetor trigger;
- We completely dismantle the starting device, removing the diaphragm, spring and adjusting screw from it;
- remove the float axis. To perform this action you will need to use a bit. The float is pulled out with some effort, but try not to damage it during the dismantling process;
- remove the carburetor gasket;
- unscrew the fuel valve;
- remove the air damper. This operation should only be carried out if you are completely sure that the part is faulty. Otherwise, it is better to refrain from dismantling it, as there is a high risk of damaging the thread;
- remove the pneumatic drive;
- take out the solenoid valve and fuel nozzle;
- Let's start disassembling such a part as the accelerator pump. To do this, it is necessary to remove the special valve-screw responsible for the fuel supply, as well as the atomizer, two sealing washers and the air nozzle;
- we disassemble both chambers of the carburetor, removing the emulsion tubes and jets. All work should be carried out with extreme caution. If the parts do not give way due to severe contamination, it is better to use a self-tapping screw that is screwed into the tubes;
- take out the diffuser of the first chamber. First, you need to move it a little to the side to loosen the clamps;
- repeat the same procedure for the second diffuser;
- We continue disassembling the accelerator pump - remove its cover, which is held on by several screws, after which we remove the spring, drive lever, diaphragm and adjusting screw, which allows you to control the amount of mixture in the idle system;
- remove the last two adjusting screws and the O-ring;
- This completes the disassembly of the main components of the carburetor, however, if necessary, you can also remove the throttle valve. This is a very difficult task, since in addition to unscrewing the fasteners, it is also necessary to remove the heat-insulating seal and disconnect the special spring from the lever.
Such serious disassembly is only necessary if all adjustments are made correctly. To eliminate malfunctions, worn and failed parts are replaced with new ones, and installation is performed in the reverse order. Otherwise, it is better to first adjust the carburetor, based on the recommendations given below.
Repairing a faulty device
The procedure for dismantling the carburetor using the example of OZONE.
That's it. The collector must be covered with a cloth. From the removed device, you can unscrew the pneumatic drive of the second chamber and the accelerator pump cover. After this, the faulty parts should be replaced and the breakdowns described above in paragraphs 4 and 5 should be repaired.
If you don’t know how to clean a carburetor, we attach instructions from specialists.
Sources
- https://avtovx.ru/karburator/soleks-na-vaz-2106-178/
- https://expertvaz.ru/2106/strelyaet-neispravnosti-pochistit-karbyurator.html
Setting up the VAZ 2106 carburetor
On a VAZ 2106 car, idle adjustment should be carried out provided that all filters are clean (at least install a new air filter), the spark plugs are practically new, and the ignition system works perfectly
Please note that the air filter must be installed when adjusting the carburetor. You also need to take into account that the level in the float chamber must be adjusted in advance if necessary
Don't forget about the valve clearances either.
Adjusting the idle speed on a VAZ 2106 car occurs by rotating two screws - the quality and quantity of the fuel mixture. The procedure begins by turning the fuel mixture quality screw. This is done using a flat-head screwdriver to achieve the maximum engine crankshaft speed.
Then, turning the quantity screw, set the frequency to about 1100 revolutions. And the last step is to set the final idle speed at 800-900 by turning the mixture quality screw.
If the idle speed sensor does not work on a VAZ 2107 with an injector engine, this manifests itself in unstable operation at idle and during startup. In the event of a malfunction of the DZH, an emergency situation may be created, since it is not visible that the driver is backing up. The article provides instructions for replacing the DZH and IAC, and also includes photos.
How to adjust a Solex carburetor
Only a properly adjusted carburetor can ensure maximum engine performance and efficiency. For the most accurate adjustment, experts recommend installing the car on a level surface - this promotes better preparation of the air-fuel mixture. First, start the engine and test its operation at different speeds. This way, you can determine in which mode the normal mixture is prepared, and in which adjustment is required.
The following guide will tell you how to set up a Solex carburetor on a VAZ-2106:
- Once you have started the engine, let it run to warm up to operating temperature.
- During warm-up, the float chambers will fill with fuel, which will allow you to check its level. To do this, you need to remove the cover from the carburetor and measure the distance between the upper edge of the float chamber and the level of gasoline in it. Use a caliper. The recommended level at which the spark plugs will not flood and the engine will not stall at idle is 23–25 mm. If the obtained values do not correspond to the norm, you will have to adjust the carburetor regarding the fuel level.
- Adjustment of the gasoline level in the float chambers is carried out by bending/bending the float up or down.
- Once the setup and control measurements are complete, replace the cover and proceed to the next step.
- Next, adjusting the Solex carburetor on the VAZ-2106 consists of adjusting the idle system. If you purchased a new unit for installation, then the optimal settings for preparing a combustible mixture at idle speed are as follows:
- The mixture quantity screw must be unscrewed 1.5–2 turns;
- The mixture quality screw should be unscrewed 4–4.5 turns.
This concludes the guide on how to adjust the Solex carburetor on a VAZ-2106 after installing it. However, in conclusion, it should be said that the “sixth” model with this unit will inherit both important advantages and noticeable disadvantages. The first includes improved engine response and a top speed increased to 165 km/h. The modernization also has a positive effect on acceleration - the car will be able to reach the first 100 km/h two seconds faster. As for the disadvantages, there are only two of them - increased fuel consumption and increased requirements for the quality of gasoline use. In general, by installing a Solex carburetor on a VAZ-2106 with your own hands, you will get more comfortable driving, the cost of which is not so high.
Source: carextra.ru