Replacing the fungus (oil pump drive gear) of a VAZ “Classic” with your own hands is a very simple procedure. Some craftsmen remove this gear using a magnet; in this case, they offer a simple way to remove the gear using improvised means (a piece of wire and an oil dipstick). To get to this so-called fungus you need to remove the distributor. To avoid problems with installing the ignition, you need to mark the position of the slider on the engine block with chalk. The next steps are sleight of hand, you need to bend a piece of wire and engage the oil pump drive gear and pull it out.
Subscribe
to our channel in
Index.Zen
Even more useful tips in a convenient format
VAZ classic oil pressure decreases
What is the response pressure (kg/cm2) of the bypass valve on the VAZ 21011?
No oil pressure VAZ 2104
Oil pressure light is on
There is pressure but it won’t start, they said to change the fungus, but the bushing needs to be changed and how?
In the reliability rating of components and parts of the VAZ 2106/07, the oil pump occupies one of the first places. However, it sometimes requires repair or replacement. If it fails, the oil circulation in the engine is disrupted. The consequences can be extremely unpleasant and costly.
Where is the oil pump located in a classic?
With the help of an oil pump, oil pressure is created in the engine, which has a positive effect on the operation of all mechanisms in the form of reducing friction of moving parts, as well as increasing their service life. If the device breaks down, the result of such a malfunction is manifested in the form of a decrease in oil pressure, an increase in friction force and a decrease in service life, up to engine seizure.
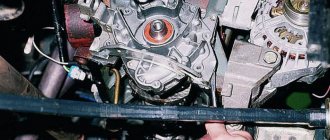
The location of the oil pump on the VAZ 2107 carburetor and injector is identical. It is located directly at the bottom of the engine under the crankshaft. It follows that the procedure for replacing this device is labor-intensive. Access to the pump is provided by removing the crankcase protection, after draining the engine oil from the internal combustion engine. Replacement work is carried out exclusively when the vehicle is installed on an inspection pit or overpass.
How does an oil pump work?
The seven is equipped from the factory with an oil pump, which has a gear design with external gearing. The VAZ 2107 oil pump is driven by a gear located under the distributor.
The pump consists of two gears, to which lubricant is supplied through the oil intake channel from the engine crankcase. When rotating, oil is captured and then pumped into the lubrication system. When the engine heats up and the speed increases, the likelihood of an increase in pressure increases, which negatively affects not only the operating mechanisms, but also the lubricating consistency itself. To avoid the occurrence of excess pressure in the system, a pressure reducing valve is installed in the system design. The essence of this valve is that it opens the channel, thereby allowing excess oil to flow back into the engine crankcase.
Repair of the oil pump should be carried out immediately as soon as the device fails. The first sign of a malfunctioning oil pump on a VAZ 2107 is the oil pressure light coming on. If the light comes on not only at idle, but also when accelerating, then there is a high probability of oil pump failure. Before replacing the pump, you need to make sure that it is really the fault, since a burning oil pressure light may also indicate a faulty pressure sensor.
How to change a seven oil pump
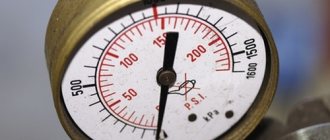
If checking the pressure sensor shows that it is working, then it is recommended to measure the pressure in the oil line using a pressure gauge screwed in instead of the pressure sensor. The pressure should be 2.4-4.5 kgf/cm². If there is no pressure, you should begin the procedure of dismantling and replacing the oil pump on the seven.
To remove the VAZ 2107 oil pump, to replace or repair it, you will need to take the necessary tools and materials. The set of tools is standard, but the materials you will need to buy are a new oil pump gasket, a pan gasket and, of course, a new pump. After draining the engine oil and replacing parts, it is recommended to fill in new oil, especially if the mileage of the drained oil is more than 5 thousand km. One of the important points is that you will need an extended wrench with a cardan at the end, with which you can unscrew the mounting bolts of the pan cover located in hard-to-reach places.
It is possible to repair a faulty oil pump, but it all depends on what caused it to fail. Often the cause of a malfunction is wear (deterioration) of parts, as a result of which only replacement will help.
Step-by-step instructions on how to remove and replace the oil pump on a VAZ 2107:
- To begin with, we install the car on the inspection hole, since the work will be carried out in the lower part of the car.
- Having descended into the pit, you should unscrew the bolts securing the protection and dismantle it, freeing access to the engine crankcase.
- Using a special hex wrench, you need to unscrew the oil drain plug and place the container. Please note that it is recommended to drain the oil on a slightly warm engine. If you do this with a cold engine, there will be a lot of metal shavings left inside, and if you do it with a hot engine, there is a chance of getting burned.
- As soon as the oil drains from the engine, you can begin further manipulations. By the way, if you change the engine oil, do not forget to change the filter.
- Using a wrench with an adapter for heads, it is necessary to loosen the fastening of the front engine mounts.
Unscrew the 19 bolts securing the pallet
- Using a jack, or better yet two, lift the engine through spacers in the form of boards. If you have a winch and the ability to secure it in the garage, then it is better to use it. If it is not there, then 2 jacks will do, with the help of which you need to hang the engine in order to unscrew all the bolts securing the sump cover and remove it.
- Remove the studs securing the front supports from engagement with the cross member.
- Unscrew the mounting bolts using a 10mm wrench.
- Using a key set to “13”, you need to unscrew the two oil pump mounting bolts.
- After unscrewing the mounting bolts, remove the pump along with the sealing gasket.
- After this, the oil pump is repaired or replaced with a new one.
The assembly process of the mechanism is performed in the reverse order of removing the oil pump. It is important to observe the following:
- A new gasket is installed in place, and only after that the oil pump is screwed on.
- The pump mount should be tightened well with a wrench.
- Having previously cleaned the pan cover, it should be replaced in place by installing the sealing gasket.
- The pan cover bolts should be tightened evenly.
- After this, you can put the supports in place, lowering the engine, and tighten the mounting nuts.
- Reinstall and secure the crankcase protection.
- Fill the engine with new engine oil and replace the filter.
You can try to repair the oil pump, but definitely, when removing it, you should install a new one to keep the car running. The repair process can take a long time. The experience of the owners shows that the oil pump on the VAZ 2107 is far from the most expensive spare part, so it’s easier to buy a new mechanism and install it on the seven than to try to repair the old one.
How to change engine oil on a VAZ 2101-VAZ 2107?
Draining: 1) First you need to remove the cap from the oil filler neck.
2) Next you will need to unscrew the drain plug.
3) Whatever pollutes the environment, place some container for drained oil.
4) After the oil has poured out of the hole, you will need to screw the plug back on.
5) Now unscrew the oil filter and remove it.
Note! You can unscrew the oil filter by hand, but if nothing comes out, use a special wrench!
Pouring:
If you are going to fill in with a different brand of oil, then you need to: 1. Drain the old oil. (We do not change the oil filter!) 2. Fill in new oil to the bottom mark on the dipstick. 3. Start the car and let it run for about 10 minutes. (You can’t move away!) 4. Turn off the car and drain the oil. 5. Replace the oil filter with a new one. 6. Now you can fill in new engine oil. (You need to fill up to the top mark on the dipstick!)
If you are not going to change the brand of oil, then you need: 1. First, pick up a new oil filter. 2. Then pour new engine oil into it, one-third of the filter volume. (A third of the volume is slightly less than half the filter.) 3. Then lubricate the filter O-ring with new engine oil. 4. Then screw the new filter into place. (Wrap it with your hands!) 5. Now you need to pour clean oil into the oil filler neck (For convenience, you can use a funnel!) 6. After pouring the oil, start the car and let it run for a few minutes. (You should not drive the car right away!) 7. While the engine is running, look to see if oil is leaking from under the drain plug or oil filter.
Important! 1. The oil must be drained at engine operating temperature! (Draining oil on a cold engine is “PRIMBERED”)
2
Also, when draining used oil, be careful because the oil is hot!
2. Also, when draining used oil, be careful, because the oil is hot!
For newbies! Question: What does the oil filter look like? Note: The oil filter may come in different colors! Answer:
Question: What does the special wrench for unscrewing the oil filter look like? Note: This is one of the types of keys that come in other shapes! Answer:
Additional video on replacement: Below is a video in which you will learn in detail the instructions for changing the oil:
Welcome! The oil in the gearbox is replaced quite rarely, but it still needs to be changed at certain intervals. Otherwise, if you do not change the oil on time, then it will gradually lose its properties and the package of additives that are added to it, as a result of which this will lead to the fact that the oil will begin to oxidize and thereby have a very detrimental effect on the box.
Note! To change the oil, you will need to stock up on: A small container of 2 liters or more, as well as a hex wrench and one 17mm wrench, if possible, also stock up on a special syringe for filling the oil and take a clean rag with you!
- Change of oil
- Additional video:
When should you change the oil in the box? In fact, the answer to this question depends on what kind of oil you poured into the system, so if the oil you poured is very bad (Fake), then it will begin to oxidize within a couple of months and thus require replacement.
But if the oil is good and is not fake, then it can last a long life. Basically, you can look up the service life of a particular oil on the Internet by typing in your brand and model of oil.
But still, the approximate frequency of changing the oil in the gearbox is “40,000-60,000 thousand km” or “3 years” from the date of filling the oil. (Whichever comes first)
Note! Only transmission oil should be poured into the gearbox; for more detailed information, see the article entitled: “What kind of oil should be poured into the gearbox?”
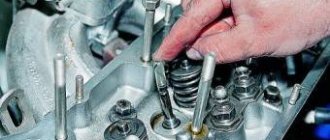
Purpose of valve stem seals and their replacement
To prevent engine oil from entering the combustion chamber through the valve holes of the engine head, the design includes valve stem seals consisting of rubber and a spring. Like all rubber products, over time they lose their physical qualities and become hard. They need to be changed. In addition, many owners of the “six” replace the rubber valve stem seals with imported ones made of rubber. Replacing valve stem seals on a VAZ 2106 will not cause much trouble for car owners who own plumbing tools.
If you are the owner of a “six” and are repairing it, then you should have:
- flat screwdriver;
- a tool used to compress a spring;
- mandrel for installing caps.
- pliers.
- soft metal wire.
Having prepared the tools and new seal kits, you can begin the process of replacing old parts with new ones.
- Remove the cover from the block head by unscrewing the nuts.
- Rotate the crankshaft until the marks on the camshaft drive sprocket and the cover align.
- Remove the camshaft bearing housing and be sure to secure the sprocket and chain.
- Remove the pastel of the camshaft bearings, fix the sprocket and chain so that they do not fall down, otherwise it will be very difficult to get them out.
- Unscrew the spark plug, remove the spring, move the lever to the side.
- The adjusting bolt fastener must be loosened and a puller installed to work on compressing the spring.
- Insert a tin rod into the spark plug hole to hold the valve.
- Using a tool to compress the spring, bring it to a position where the crimp elements are released.
- Remove the springs, disc elements, washers.
Next, to install new parts, proceed in this order.
| See all advertisements in the archive |
| Stages of work | Actions |
| Reinstall the first oil seal. | To do this, place the clamp on the valve and remove the old oil seal, tapping lightly with a plumber's hammer. |
| Lubricate the new cap with engine oil. | Install it in place using a mandrel. |
| Replace the seals on the remaining valves. | This is done in the same way: by scrolling the crankshaft to bring out the second and third cylinders. |
The VAZ 2106 engine lubrication system has a combined structure. Under pressure, the camshaft supports and cams, roller bearings, oil pump drive gear and ignition distributor, and bearings are lubricated. The oil flowing from the gaps lubricates the cylinder walls, piston-type elements, camshaft drive chain, valve stems in their guide bushings, and valve drive lever supports.
How to adjust the pressure?
In order to regulate the pressure created by the pump in the lines, it is necessary to perform the following manipulations:
- Make sure that the engine oil is of high quality and the level is normal.
- Make sure the drain plug is tight and no oil is leaking through it.
- Check the VAZ-2106 oil pump drive.
- Check the pump operation. Please note that the gasket often fails, but it is easy to replace.
- Check the tightness of all pump bolts.
- It is recommended to install a new filter every time you change the oil. And pay attention to the degree of contamination of the old one.
Now you can configure the pressure relief valve so that it operates at a certain pressure. The hoses through which oil enters the system must be sealed.
A few words about the service life of the automatic machine of modern passenger cars
Automatic transmissions released in recent years have become noticeably more reliable than their predecessors. Despite this, the complexity of the design of such a transmission requires its owners to properly operate and maintain it. Often, violations in the organization of these particular events provoke typical unit breakdowns, in which the automatic transmission hums or begins to “kick” or “push.”
To prevent a kicking transmission from causing inconvenience to the owner, first of all, he must study in detail the rules of operation and maintenance of the machine. With the proper approach in these procedures, automatic transmission malfunctions will bypass any motorist, and its unit will cover its entire operational mileage without any problems. By the way, the service life of many automatic transmissions of modern cars is designed for the service life of the engines with which they are equipped. That is, the service life of an average automatic machine is 300,000-600,000 kilometers. Quite a lot, right?
Oil relief valve
GAS ENGINE
6-cylinder petrol engine
| 1. Oil pump. Sucks engine oil through the suction filter and suction pipe from the oil pan 2. Longitudinal oil passage to the oil filter 5. Main oil passage To the support areas 6. Oil jets. Engine oil is injected from below for cooling towards the piston bases 7. Pressure line to chain tensioner 8. Check blocking valve 9. Chain tensioner 10. Gas outlet hole in cylinder head gasket 14. Oil jet for control chain | 15. Discharge pipe to the cylinder head 17. Oil throttle. Inner diameter 4 mm 22. Oil channel. For lubrication of 12 disc tappets on the exhaust side 23. Oil channel. To lubricate the 12 intake side poppet tappets 27. Camshaft adjuster 30. Hydraulic tappet tappet a. Oil channel from oil pump to oil cooler b. Oil channel from the oil filter to the supporting surfaces c. Drain hole in the oil pan |
If the oil pressure is too low when the oil level is normal, check the valve. Removal
| 1. Vinit plug, SW22 2. Compression spring 3. Guide pin 4. Piston |
| EXECUTION ORDER |
| 1. Disassemble the oil pan. |
| 2. Unscrew the screw plug with a SW22 wrench. Warning The screw plug is under pressure from the compression spring and can easily jump out. |
| 3. Remove the compression spring, guide pin and piston. Warning A stiff or jammed piston can be removed using ring pliers. |
| 4. Clean the hole in the oil pump and blow out with compressed air. |
| 5. Move the piston of the oil pump hole back and forth several times. If the piston is difficult to move, smooth it slightly with a polishing cloth. |
Installation
| EXECUTION ORDER |
| 1. If you are replacing the piston, check that it moves easily in the hole. If necessary, remove burrs from the piston with an emery cloth. |
| 2. Install the piston with the guide pin and a new compression spring. |
| 3. Screw in the screw plug without the O-ring and tighten to a torque of 50 N.m. |
DIESEL ENGINE Removal
| 249. Vinite plug, 50 N.m. 250. Guide pin 251. Compression spring 252. Piston |
| EXECUTION ORDER |
| 1. Remove the oil pan. |
| 2. Unscrew the screw plug. Warning The screw plug is under pressure from the compression spring and can easily jump out. |
| 3. Remove the compression spring, guide pin and piston. Warning Remove a stiff or jammed piston using the outer ring collet. |
| 4. Clean the oil pump cylinder and blow with compressed air. |
| 5. Move the piston in the oil pump cylinder back and forth several times. If the piston moves hard in the cylinder, lightly polish the piston using a cloth. |
Installation
| EXECUTION ORDER |
| 1. If the piston is replaced with a new one, check the new piston for ease of movement in the cylinder. If necessary, remove burrs on the piston with an emery cloth. |
| 2. Install the piston with the guide pin and a new compression spring. |
| 3. Screw in the plug without the O-ring and tighten to a torque of 50 N.m. The screw plug is sealed with a conical fit. |
Symptoms of a faulty oil pump
The main signs of problems in the lubrication system are sounds uncharacteristic of engine operation and the oil pressure light coming on. In this situation, you should stop, turn off the car and after a while check the oil level in the engine with a dipstick (you need to wait a little until the oil drains into the sump). If the level is below the minimum, add oil and check the level again (it should be between the min and max marks). If the light goes out when starting the engine, the reason it came on was precisely the low oil level.
A burning oil pressure light indicates a problem with the lubrication system.
If, after adding oil, the extraneous sounds do not disappear and the light continues to light, you should not continue driving. Most likely, there is a problem with the oil pump and will require replacement or repair. You can get to the garage or car service using a tow truck or tow. However, the light may also be on due to a failure of the oil pressure sensor. Therefore, until an accurate diagnosis is made, you should not rush to repair the oil pump and start disassembling the engine.
Lada 2106 Project No. 1 (Dzhulbars) › Logbook › Tell me if anyone knows.
Hi all! I ask those who know to provide all possible assistance. A problem arose when installing the BSZ distributor. The point is this. My engine has a one and a half oil pump, enlarged by 15mm. The distributor is not included, the skirt to the block hangs at a distance of 11mm. Has anyone encountered something similar and how did you solve the problem? Or it’s just that the fungus hasn’t settled into place.
VAZ 2106 engine lubrication system
The lubrication system of any engine is a complex of various elements and parts that allow high-quality maintenance of the power unit. As you know, the key to successful engine operation is proper lubrication so that the moving parts do not wear out for as long as possible.
On VAZ 2106 cars, the lubrication system is considered combined, since the rubbing parts of the engine are lubricated in two ways:
- through splashing;
- under pressure.
The minimum oil pressure in the system at an engine operating temperature of 85–90 degrees should be 3.5 kgf/cm2, the maximum - 4.5 kgf/cm2.
The total capacity of the entire system is 3.75 liters. The lubrication system on the “six” consists of the following components, each of which consumes or conducts its own part of the oil:
- fluid sump;
- level indicator;
- pumping unit;
- engine oil supply pipe;
- oil filter element;
- valve;
- oil pressure sensors;
- highways.
The oil pump plays a vital role in the operation of the entire lubrication system. This device is designed to ensure continuous circulation of oil throughout all components of the system.
oil pump of a VAZ 2107 car - replacement
We replace the oil pump if there is insufficient or excessive oil pressure in the engine of a VAZ 2107 car when idling.
Removing the oil pump from a VAZ 2107 car engine
3. Using a 13 mm socket wrench, unscrew the two oil pump mounting bolts. The VAZ 2107 oil pump mounting bolts have different lengths.
4. Remove the oil pump and sealing gasket.
2. Installation of all removed parts on a VAZ 2107 car is carried out in the reverse order.
Removal and installation
To remove the oil pump VAZ 2104, VAZ 2105, VAZ 2107:
— place the car on an inspection ditch or a lift, disconnect the wires from the battery and drain the oil from the engine crankcase;
— remove the mudguard of the VAZ 2105 engine;
— unscrew the nuts securing the front engine mount cushions to the cross member and slightly lift the engine with a jack or hoist so that the cushion studs come out of the holes in the cross member;
— remove the engine crankcase of the VAZ 2104;
— remove the oil pump along with the inlet pipe.
Perform operations to install the oil pump on the Lada Classic engine in the reverse order of removal.
Disassembly and assembly
Secure the VAZ 2107 oil pump in a vice carefully so as not to damage the housing, and then:
— unscrew the bolts and remove the intake pipe along with the oil pressure reducing valve;
Disassembling the oil pump: 1—reducing valve; 2 - spring; 3 - cover; 4 — body; 5 - roller
Replacing the automatic transmission oil pump - as a way to fix the problem
As mentioned above, repair work with the oil pump consists in most cases of replacing this element. It is not very expensive, so car owners and service workshop specialists do not recommend restoring a damaged unit and replacing it with a new pump. In this case, we recommend using only original spare parts, which will guarantee the durability and trouble-free operation of this unit.
Let us recall the common reasons that contribute to automatic transmission pump breakdowns. First of all, such reasons include insufficient oil level in the system. Automatic transmission repair, how to check the oil pump, etc. That is why the car owner needs to closely monitor the oil level in the gearbox. It is recommended to carry out this procedure every month on a special overpass or inspection pit.
Wear of the oil pump automatic transmission ZF 4HP20
If the gearbox is repaired incorrectly, problems may occur with the flexible disk, which is necessary for attaching the automatic transmission torque converter to the engine. If the installation technology is violated, the gearbox cannot maintain the size of the end gap, which also leads to problems with the oil pump. Quite often, a car owner operates his car in the most severe mode, which involves fast driving and sharp braking. This mode of operation leads to rapid wear of the entire gearbox and the pump in particular. Problems with the oil pump in the gearbox can occur if the vehicle is not properly maintained.
If it is necessary to repair the oil pump, you must contact experienced specialists who repair gearboxes. If you have special diagnostic equipment, the technician will be able to accurately determine the breakdown and fix it as quickly as possible. In most cases, repair work to replace the oil pump in the gearbox takes about one working day. At the same time, the oil and oil filter elements are replaced. This ensures maximum durability and trouble-free operation of the vehicle.
Oil pump
On VAZ 2106 cars, a gear pump is installed, on the cover of which there is already an oil receiver and a pressure-reducing valve mechanism. The housing design is a cylinder with gears installed on it. One of them is leading (main), the other moves due to inertial forces and is called driven.
The design of the pump itself is a series connection of a number of units:
- metal case;
- oil receiver (the part through which oil enters the pump);
- two gears (driver and driven);
- pressure reducing valve;
- stuffing box;
- various gaskets.
The service life of the oil pump on a VAZ 2106 is approximately 120–150 thousand kilometers. However, the oil seal and gaskets may break much earlier, which will lead to premature replacement of the device.
The only function of the oil pump is to supply oil to all engine components. We can say that both the functioning of the motor and its service life depend on the performance of the pump. Therefore, it is important to monitor what kind of oil is poured into the engine and in what mode the oil pump operates.
Principle of operation
On the “six” the oil pump is started using a chain drive . This is a rather complex starting system, and therefore repairing and replacing the pump can cause some difficulties.
The operating principle is based on the following stages of pump startup:
- After turning on the ignition, the first gear of the pump starts.
- From its rotation, the second (driven) gear begins to rotate.
- As the gear blades rotate, they begin to draw oil through the pressure reducing valve into the pump housing.
- By inertia, the oil leaves the pump and enters the engine through the lines under the required pressure.
If, for a number of reasons, the oil pressure is higher than the norm for which the pump is designed, then part of the liquid is automatically redirected to the engine crankcase, which helps normalize the pressure.
Thus, oil circulation is carried out through two rotating gears. In this case, it is very important that the entire pump structure is completely sealed, since the slightest oil leak can significantly reduce the operating pressure in the system and deteriorate the quality of engine lubrication.
Bypass (reducing) valve
The drive and driven gears rarely break because they have a simple design. In addition to oil seals and gaskets, there is another component in the pump design that can fail, which will have disastrous consequences for the engine.
We are talking about a pressure reducing valve, which is sometimes called a bypass valve. This valve is needed to maintain the pressure in the system that was created by the pump. After all, an increase in pressure can easily lead to damage to engine parts, and low pressure in the system does not allow high-quality lubrication of rubbing parts.
The pressure reduction (bypass) valve on the VAZ 2106 is responsible for controlling the oil pressure in the system . If necessary, it is this valve that can reduce or increase the pressure so that it corresponds to the norm.
Increasing or reducing the existing pressure is carried out by simple actions: either the valve closes or opens. Closing or opening of the valve is possible due to the bolt, which presses on the spring, which, in turn, closes the valve or opens it (if there is no pressure from the bolt).
The bypass valve mechanism consists of four parts:
- small body;
- a valve in the form of a ball (this ball closes the passage for oil supply, if necessary);
- spring;
- stop bolt.
On the VAZ 2106, the bypass valve is mounted directly on the oil pump housing.
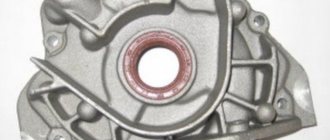
Location, structure and purpose of the oil pump VAZ 2106/07
The oil pump of any car creates pressure in the engine lubrication system. As a result, friction between the moving elements of the engine (crankshaft and camshaft, piston group, etc.) is reduced and their service life increases. When the pump fails, oil pressure drops sharply, friction increases, and the engine may seize. A complex and expensive overhaul will be required. Therefore, it is so important to promptly detect and correct any oil pump malfunctions.
The VAZ 2106/07 oil pump is located inside the engine in the lower part.
The VAZ 2106/07 oil pump is located in the lower part of the engine under the crankshaft. To provide access to it, you will need to remove the protection and oil pan and install the machine on an inspection hole, overpass or lift.
Operating principle of the oil pump
The VAZ 2106/07 is equipped with a gear-type pump with external gearing. It is driven by a chain transmission from the crankshaft of the engine. The same chain rotates the camshaft during operation of the power unit. The pump design is based on two gears, to which lubricant is supplied from the crankcase through the oil receiver. As the gears rotate, they capture oil and supply it under pressure to the engine. Pump performance depends on engine speed and oil viscosity. The design of the pump includes a pressure reducing valve, which is activated when the pressure exceeds the permissible value and directs part of the oil back to the sump.
Pressure reducing valve
The design of the gears is very simple, which is why they rarely break. As a rule, the gap between the teeth simply increases and the oil is pumped worse. But much more often, the bypass valve breaks, which is necessary to control the pressure in the system. If necessary, this element increases or decreases pressure. And this is done very simply - the valve opens at high pressure and closes at low pressure.
Bypass valve design:
- The case is small in size.
- Valve (small ball that closes the oil passage).
- Spring.
- Bolt for stop.
The element is placed inside the housing of the VAZ-2106 oil pump. The price of the valve is no more than 200 rubles. And if the cause of the breakdown lies precisely in it, then it is easier to change only the valve. After all, the cost of the entire pump is about 1,500 rubles.
Location
The oil pump in an automatic transmission is located inside the gearbox, so if problems arise with this element, it is necessary to dismantle the protective metal casing from the automatic transmission. In most cases, repair work does not require removing the transmission from the vehicle. However, in this case, you must take into account the design features of each specific vehicle and specific modifications of the automatic transmission. Only an experienced technician will be able to quickly determine the location of the oil pump and carry out all the necessary repair work as quickly as possible.
In order to understand the location of the oil pump, familiarize yourself with the automatic transmission structure as a whole.
The design and principle of operation of the oil pump - Video
Oil pump repair
Usually the faulty oil pump is replaced with a new one. However, you can try to repair a failed pump.
Required Tools
To repair the VAZ 2106/07 oil pump you will need:
- keys at 10;
- ruler;
- a set of flat probes;
- vice.
Disassembling the oil pump
Disassembling the pump is carried out in the following order:
- After unscrewing the three bolts, remove the receiving tube. To do this, it is more convenient to clamp the pump in a vice.
The oil receiver is secured with three bolts - Remove the tube, spring and washer of the pressure reducing valve.
When disassembling the pump, remove the tube, spring and pressure reducing valve washer - Having bent the edges of the oil receiver screen, remove it from the pump and clean it thoroughly.
- Remove the gears from the pump.
Both gears are removed from the pump
All parts of the disassembled pump are washed in kerosene and wiped with a clean rag. Then all components are inspected and worn elements are replaced. The pump is reassembled in reverse order.
Repair and replacement of oil pump elements
After disassembly, cleaning and inspection, the pump elements are checked for wear. To do this, a series of measurements are made and compared with acceptable values:
- the maximum permissible gap between the driven gear and the axle should not exceed 0.1 mm;
- the gap between the teeth of the gears after they are installed in the housing should not exceed 0.25 mm;
- the gap between the housing and the outer diameter of each gear should not exceed 0.25 mm;
- the gap between the plane of the cover and the upper surface of the gears should not exceed 0.2 mm;
- The height of the pressure reducing valve spring without load should be 3.8 cm, and under a load of 60–65 N - 2 cm.
One of the steps in diagnosing an oil pump is checking the gaps between the gear teeth.
When turning the pump by hand, you should not feel even the slightest jamming. If any of the listed gaps exceed the value, replace either individual parts or the entire pump. It is very important that there are no defects on the surface of the pressure reducing valve and its spring. Otherwise, the valve will not be able to operate normally.
Video: checking the oil pump for wear
Replacing the oil pump drive gear
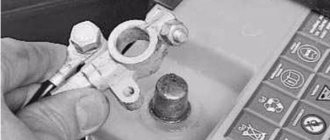
During operation, the oil pump drive gear wears out. If it is not replaced in a timely manner, it begins to slip, reducing the performance of the pump. As a result, a lack of oil may form in the lubrication system. The gear is located under the ignition distributor shaft (under the distributor) and is removed in the following order:
- On an injection engine, remove the plug; on a carburetor engine, remove the ignition distributor, having previously marked its position. To do this, unscrew one nut.
- There is a hole in the center of the oil pump drive gear. With a little force (you can tap lightly), insert a wooden stick with a sharpened end into this hole and remove the gear.
The gear is inspected and if wear is detected on the internal splines, it is replaced with a new one. Assembly is performed in reverse order.
To remove the oil pump drive gear, use a wooden stick with a pointed end.
Thus, independent repair and replacement of the oil pump on classic VAZ models is not very difficult. To do this, you only need desire, a little free time, a standard set of plumbing tools and careful adherence to the recommendations of specialists.
- Author: ratico19
Rate this article: (9 votes, average: 3.7 out of 5)
DIY oil pump repair
The oil pump is considered a mechanism that can be repaired even by an inexperienced driver. It's all about the simplicity of the design and the minimum number of components. To repair the pump you will need:
- open-end wrenches "10" - 2 pcs.;
- ruler - 1 pc.;
- probes - set;
- vice.
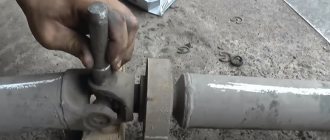
To repair the oil pump, you need to remove it from the car and disassemble it. It is best to disassemble the part in order:
- Disconnect the oil supply pipe from the pump housing.
- Remove the three mounting bolts.
- Disconnect the pressure reducing valve.
- Remove the spring from the valve.
- Remove the cover from the pump.
- Remove the main gear and shaft from the housing.
- Next, remove the second gear.
Photo: main stages of repair work
At this point, disassembling the oil pump is considered complete. All seized parts must be washed in gasoline (kerosene or ordinary solvent), dried and inspected. If a part has a crack or signs of wear, it must be replaced.
The next stage of repair work is to adjust the gaps:
- between the axle and the second gear the gap should be no more than 0.1 mm (measure with a ruler), if the gap is larger, then the second gear must be replaced;
- between the teeth of two gears there should be no more than 0.25 mm;
- the gap between the top of the gears and the cover is no more than 0.2 mm;
- the gap between the pump casing and the outer part of any gear is no more than 0.25 mm.
After checking the parameters, you can proceed to the final stage of repair - checking the spring on the valve. You need to measure the length of the spring in the free position - it should be no more than 3.8 cm in length. If the spring is very worn, it is recommended to replace it.
Video: how to measure gaps correctly
It is mandatory to change the oil seal and gaskets during repairs, even if they are in satisfactory condition.
After replacing all worn elements, the oil pump must be reassembled in the reverse order.