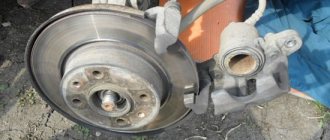
Symptoms of a problem
The wheel bearing must always be in good condition. If the part becomes unusable, this can lead to an accident, since the malfunction is accompanied by large wheel play. As a result, the disc may be sheared off the wheel bolts. If such a situation occurs at high speed, a serious accident cannot be avoided. This indicates that the hub bearing needs periodic inspection, and if play is detected, it needs to be adjusted or replaced.
The main manifestations of a part malfunction are:
- Dry crunch. When a bearing breaks, a metallic crunching sound occurs while driving. It appears as a result of uneven rolling of the rollers due to damage to the separator. It is difficult to confuse this sound with any other.
- Vibration. If the element in question has severe wear, vibration appears, which is transmitted to both the body and the steering wheel. It indicates severe wear of the bearing cage, which can lead to seizure.
- The car pulls to the side. The problem is somewhat reminiscent of the case with incorrect wheel alignment adjustment, since the faulty element does not work correctly due to its parts being wedged.
Definition of failure
To determine the condition of the wheel bearing, you need to perform a few simple steps:
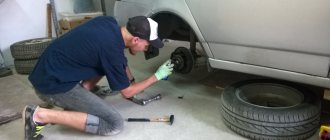
- Hang the front wheel on the desired side using a jack, not forgetting to put the car on the handbrake and install stops under the rear wheels.
- Place a support under the lower suspension arm and remove the car from the jack.
- Take the wheel with both hands (top and bottom) and perform movements from yourself to yourself, and no play or knocking should be felt.
- Spin the wheel. If the bearing has become unusable, a grinding noise, hum or other extraneous noise may appear.
When carrying out work with a removed wheel, for safety reasons, it is recommended to place an additional support under the car body, which will protect you in case of a sudden fall of the car.
Preparing and disassembling the unit
The manufacturer does not know which wheel will be replaced, so he completes the product with both nuts. Additionally, you need to purchase an oil seal, which is located at the rear of the hub and does not allow grease to leak out. You can carry out the work on a level surface, securing the car with the hand brake so that it does not roll away.
It is recommended to first remove the brake pads from the caliper, then it will be easier to put it back.
Now you can completely unscrew the nut, pull out the washer and remove the hub from the axle axle by hand. After this, you need to remove the old grease from all parts; it contains metal shavings.
AUTOFIZIK.RU / auto repair
We take out the brake pads and remove the caliper (see Replacing the front wheel brake caliper).
We hang the caliper in the wheel well so that the brake fluid supply hose is not strained.
If necessary, if the outer bearing cage is damaged along the way, we do not press out the outer ring of the bearing, but replace only its inner part. However, at the first opportunity we install a new bearing assembly.
Carefully, trying not to damage the cuff, remove the hub together with the brake disc from the steering knuckle axis.
In order not to disturb the mutual balancing of the disk and the hub, it is better not to disconnect the disk unnecessarily, and when removing it, mark its original position on the hub.
Using a 12mm wrench, unscrew the two guide pins and...
...remove the brake disc and spacer from the hub.
We clean the inner cavity of the hub from old lubricant, wash all parts with kerosene and add fresh lubricant.
To remove the outer race of the outer bearing, secure the hub in a vice. Using a beard, trying not to damage the hub, we apply light blows along the perimeter of the outer ring of the bearing and...
...knock it out of the hub.
We take out the hub cuff by prying it off with a screwdriver.
A spacer bushing is installed under the cuff.
We remove the inner bearing from the hub in the same way as the outer one.
We press the outer rings of the bearings in a vice, using the corresponding rings from old bearings.
The old rings should be oriented with a smaller cone diameter inside the hub to facilitate their removal after pressing in the new rings.
Using caution, the outer bearing rings can be pressed in by lightly hammering them through the spacer.
We put about 40 g of Litol-24 lubricant into the inner bearing separator and the inner cavity of the hub. Cover the new cuff with the same lubricant.
Install the inner bearing into the hub. Install the spacer bushing.
Carefully press in the new cuff using a hammer and a suitable tool (installation blade).
Trying not to damage the cuff, install the hub on the steering knuckle axle.
Lubricate and install the inner ring of the outer bearing, the washer and tighten the hub nut.
We adjust the clearance in the hub bearings (see Adjusting the clearance in the front wheel hub bearings) and install the protective cap. Before installing it, put Litol-24 lubricant in the hub cap.
Installation and adjustment of new parts
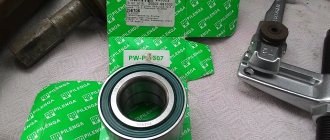
The insides of the outer bearing are removed, and the old grease is removed from the opened hole. To get to the insides of the second part, you will need to pull out the oil seal by prying it with a mounting spatula or a powerful flat-head screwdriver. It is recommended to wash the inner surface of the hub together with the remaining clips in it with gasoline or diesel fuel. Sequence of further work.
- Place the hub on 2 wooden boards and attach a punch or other metal rod with a pointed end to the holder from the inside. Lightly tapping with a hammer, knock the part out. During the process, the punch needs to be moved so that the clip comes out evenly. Turn the hub over and perform the same operation on the other side.
- Now you need to study the condition of the surface of the hub seats. If traces of turning the clips are visible, you should think about replacing it. It is possible to somewhat extend the “life” of the hub, for this they use the old antiquated method. Small notches should be made on the surface of the seats with a core or chisel. After pressing the clips, they will sit tightly on these bumps and will not turn for some time.
Repair of VAZ 2101, 2106, 2107 hub
Maintenance-free front hubs on VAZ 2107 (bushing drawing)
This time we will talk about maintenance-free front hub bearings. Having changed 3 bearings over the winter (sometimes they didn’t last, sometimes they overtightened them, sometimes they fell apart during maintenance), I got tired of all this, surfing the Internet and DRIVE came across articles about maintenance-free bearings on the front. There are several options: 1. Buy a ready-made kit. There are people who sharpen hubs and axles for them. 2. hub with axle from Izh od (also suitable) - I couldn’t find it 3. Rear hub from 08 VAZ + bearing also rear and + adapter sleeve - that’s what you need and in terms of cost.
hub with bearing
Since I didn't look carefully at the bearings? and bought an extra stopper, but they were in the box. Next, we will need classic wheel nuts, 08 ones will not fit, and the ring that presses the bearing is also classic.
all assembled + bushings
made the bushings according to the drawings
3,1
The first time I did it according to the first one, I’ll say right away it was in vain, the size 22 was not the topic and during installation the bushing swelled while I was inserting it. but more on that later.
here is my modified drawing
So we collect all this and happily go to the garage (well, that’s how it was for me), we begin to take everything apart
Having unscrewed the nut and the caliper, I had the first problem: I bent the brake disc (I don’t know how, but I did, I realized this when I was putting everything back together after the second problem), so I knocked over the old hub with the dead bearings, we start assembling it and now it’s not a problem, there’s an error in size, no Well, it’s okay and you can knock it out, and in the end I put everything back in the car in the garage and we’re waiting for it to be re-sharpened...
this is how it was inflated due to the wrong size, after measuring the axle, I changed the dimensions
Finally, they machined the bushings for me, and I, happy, flew to the garage to finish it... Since everything was put back in place temporarily, we disassemble everything: we remove the caliper, peel off the brake disc, knock off the hub (I’ll tell you right away that everything came off quickly on the left side, but on the right I had to suffer.) When everything was removed and wiped clean of fuel oil and grease, we put it back together.
I figured it wasn't bad
We put the bushing on the axle, now everything is easy to install
now with the hub
Install the second part of the bushing
Well, a washer with a nut (the nut and washer are original - classic)
Now everything needs to be tightened. I pulled it with a ratchet and then, using a piece of a meter-long pipe, tightened it with force. I don't have a torque wrench, and I don't need one yet.
I almost forgot about the disks
I bought these on occasion for only 1500 for 2, and they look better, and are not much more expensive than the original 600 rubles pieces. I assembled the left side - let's move on to the right. There was a little dance with a tambourine, a vdshka, a sledgehammer, and everything flew off (of course, I removed the caliper). In general, the hub, together with the disk, flew off.
We assemble it, tighten it in the same way, and test drive... Result: it steers better, rolls better, less noise. I really don’t know what’s causing it, maybe I just haven’t driven for a long time, the controls are somehow better. These are my impressions.
this is what the front looks like now
Replacing front wheel bearings VAZ 2101-07
Problem: less than 2 years later, the bearing on one wheel began to hum, and on the second there was a slight crunching sound when braking. I will try to explain in detail but briefly and in pictures what and how. First, remove the wheel.
Removing the hub cap
We unscrew the caliper, not forgetting to bend the fixing plates of the bolts highlighted in yellow (and, by the way, be prepared to replace them - they often break).
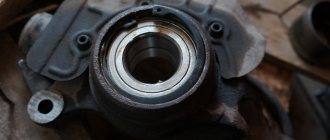
And remove the hub assembly. It came off without any problems, but sometimes it gets stuck. It is better to knock it out through a block. In this photo, the working surface of the shaft is highlighted in yellow where the oil seal actually sits. I had a decent amount of wear in this place, as a result of which the oil seal quickly failed and water got inside during the season as a result and the bearing did not pass for a long time. By the way, this is also noticeable in the lubricant - it is brownish in color (the presence of rust).
The axis is relative, the road is 700 - 800 rubles. Therefore, I take a new oil seal, remove the spring and cut it about a centimeter from the side where it is widely highlighted in yellow in the photo. I screw the spring into the spring and put it on the oil seal. I think with such an oil seal it will be enough for a longer mileage.
We pry out the old oil seal with a large screwdriver or wrench, remove the spacer ring and pull out the inner race.
And using a mandrel or an unnecessary shaft, we knock out the outer race on one side and the other.
We clean out the old grease and use the old clip to drive in a new one. We only knock out the old one back.
We install the inner race and spacer washer and carefully hammer in the oil seal.
And fill it with lubricant. The ABC says Litol 24 Front wheel bearings 0.4 l Front wheel hub cap 0.25 l. We naturally wipe off the old grease from the axle and put on the hub, install the washer and tighten the nut with a little force.
We fasten the caliper without forgetting to bend the locking plates. We put the cap on lightly to prevent debris from getting in and screw the wheel on. Since the nut is tightened with little effort, we turn the wheel 90 degrees in one direction or the other so that the rollers find their place. Then loosen the nut until the wheel spins freely. We lower the car to the ground and, shaking the wheel, see if there is any play, i.e. We are trying to catch the moment so that the wheel rotates relatively freely and there is no play in the bearing. And we tighten the nut so that it does not unscrew.
We hammer in the cap and tighten the wheel completely. After a short break-in, we check again for the presence of play and, if necessary, make adjustments. In one bearing there were shells on the rollers, on the other, on the outer race, there was a scratch on the mirror, apparently some piece of metal had gotten into it. shavings. And the fastening of the hood pillar also broke, so we had to improvise. I cut out a metal plate, drilled holes and screwed it on.
I screwed the nuts from below in such a simple way.
Video about replacing wheel bearings for a VAZ classic
https://www.drive2.ru/l/6919354/, https://www.drive2.ru/l/7087225/, https://www.drive2.ru/l/4993033/
Replacing balls
8. If the finger rotates, clamp the lever using a pry bar. 9. Unscrew the fastening of the ball joint to the upper
Method No. 1 - replacement without removing the strut and without further collapse
Only the wheel, disc, caliper and hub are removed. The replacement itself is carried out directly on the machine, without removing the rack. In addition to the list of replacement tools, you will definitely need a universal wheel bearing puller.
Execution order:
- First, unscrew the bolts from the brake drum.
- We remove the drum, and then unscrew the two bolts securing the ball joints.
- Now we remove the driveshaft from the front bushing using the steering knuckle; manual force will be enough.
- For ease of replacement operations, it is recommended to disconnect the steering tip from the rack.
- The next step is to remove the front hub from the knuckle. Use a chisel and knock it out as shown in the photo.
- Another option for dismantling the VAZ 2107 hub. Using a brake drum, bolt it to the hub, as shown in the photo, and then remove the hub with some force.
- Having disassembled the front hub, remove it to the side.
- Remove the retaining ring from the knuckle, which remains the outer part of the old wheel bearing.
- We install the puller on the steering joint as follows.
- Tighten the bolt of the removable device, start the pressing process.
- Gradually the part will come out of the pin, now we move on to the hub.
- Remove the protective cover and then remove the inner support from the hub.
- If you have a universal device, put it on as shown in the photo.
- The ring is pressed from the hub as follows.
- We are starting to install a new product. First we clean the inside of the fist, making sure to lubricate it.
- Install the puller with a new front wheel bearing in the same way as steps 9-10.
- We insert the part into the fist evenly and without distortion, and only then tighten the device and compress it.
- Now put on the hub, press it if necessary. Subsequent assembly is carried out in reverse order. We start with the hub nut and tighten it with a torque wrench to 20 Nm.
See more at:
Replacing the front wheel bearing of a VAZ 2109
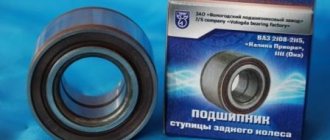
Wheel bearings SS20 for VAZ cars
Wheel bearings are subject to extreme loads, especially on Russian roads. To ensure rotation of the car wheel without play, with minimal noise and friction, it is necessary to carefully select wheel bearings. SS20 hub bearings have passed 100% quality control and guarantee car owners confidence in road safety.
Share with your friends
Applicability
- VAZ 2101-2107
- VAZ 2108-2110
- LADA Kalina, Kalina II
- LADA Granta
- LADA Priora
- VAZ 2121, 2131
- VAZ 2123 (Chevrolet Niva)
- Datsun on-Do/mi-DO
Advantages of SS20 hub bearings
- high service life and reliability of the bearing;
- quiet operation;
- long service life;
- ensure easy and silent rotation of the wheels;
- high-quality high-temperature lubricant;
- roller bearings are equipped with lubricant, sealed ball bearings are lubricated during assembly and do not require maintenance;
- low level of mechanical losses in the bearing due to low surface roughness and high dimensional accuracy;
- comprehensive protection against counterfeiting;
- complete installation kit.
Guarantee
- Description
- Buy
The wheel bearing is one of the most heavily loaded suspension elements. Wheel bearings allow wheels to rotate and the vehicle to move as a whole. In addition to the perception of loads directly from the wheel rolling on the road, shock and thermal loads are added. Through the hub bearing, all forces arising in the contact patch between the wheel and the road are transmitted to the suspension.
That is, of the suspension and the car depends on the correct choice of front and rear wheel bearings . The main problem when replacing wheel bearings is the large number of low-quality fakes on the market that last no more than 2-3 thousand km, as well as violation of installation technology and incorrect adjustment of clearances.
Malfunctions of wheel bearings manifest themselves in the form of hum, knocking and play when the car is moving, clicks when starting and stopping. As raceways, rolling elements and cages wear, rolling resistance increases and this is accompanied by increased noise and heating of the bearings.
You can determine the malfunction of the wheel bearings yourself. To do this you need:
- Check ease of rotation. Spin the suspended wheel with a sharp jerk and evaluate the noise level emitted by the bearing during rotation. The wheel run-out time is also estimated.
- Determine the presence of play in the hub bearing. On a suspended wheel, applying a load with your hands in the vertical and horizontal planes, check for swing (play) in the bearing. By applying force along the axis of rotation of the wheel, you can estimate the axial clearance.
SS20 wheel bearings will help you avoid problems with low-quality spare parts. The reliability and durability of SS20 bearings is achieved through:
- accuracy of geometric dimensions in the design and production of a product;
- use of high quality steel;
- achieving the required level of surface roughness;
- use of high-tech equipment.
The manufacturing precision of wheel bearings, surface roughness and rolling elements are the key aspects that influence the level of mechanical losses in the bearing and, ultimately, determine the noise class.
During production, the service life of the hub bearings is checked selectively from the batch before failure on a stand that simulates real loads on the bearing. As part of a comprehensive quality assessment, bearing runout is checked with an assessment of the reduction in speed at two stages from 100% to 70%, and the drop in speed from the initial stage to a complete stop. At the same time, the vibroacoustic parameters of the freewheel bearing are checked.
A whole range of serious checks at all stages of the production process allows us to guarantee the buyer the high quality and reliability of SS20 wheel bearings.
SS20 hub bearings have the SS20 branding and additional protection against counterfeiting, which will provide car owners with confidence and safety on the road, and protect them from possible financial and time losses when using counterfeits.
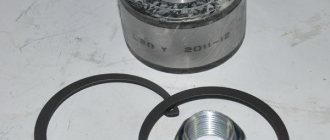
Front wheel bearings for VAZ 2101-07 and 2121, 2123 are supplied as part of repair kits. The SS20 front hub repair kit contains all the washers, oil seals, rings, nuts, bearings and special high-temperature complex lithium grease for bearings required for replacement.
The high quality of the lubricant ensures a service life of up to 300,000 km in the wheel bearing assembly. The amount of grease is calculated to ensure reliable lubrication of the bearings throughout their entire service life. The operating temperature range of the lubricant is from –40°С to +180°С.
We draw your attention to the process of adjusting the clearance in the hub bearings. The durability of the unit largely depends on the correctness and quality of this operation, therefore, we offer you step-by-step instructions (included in the delivery kit) that will allow you to adjust the clearance in the wheel bearing unit, both during initial installation and during further scheduled maintenance.
Repair kits for front and rear hubs of front-wheel drive VAZ cars
In the hub units of front-wheel drive VAZ cars, double-row ball bearings are used. During assembly, the required amount of lubricant is placed in the bearing. The internal space of the bearing is reliably sealed with oil seals, which prevents contamination from getting inside. This ensures normal lubrication of the raceways, balls and cages throughout their service life. Wheel bearings SS20 for front-wheel drive VAZ cars are maintenance-free and do not require adjustment or lubrication during operation. This approach significantly reduces the labor intensity of vehicle maintenance and at the same time ensures high reliability.
The reliability of the bearing directly depends on the accuracy of manufacturing and compliance with all standards during the production of the bearing. Therefore, for SS20 double-row ball bearings we carry out a number of additional checks, for example, monitoring the amount of axial clearance and radial “runout” in the mounted state.
The procedure is no more complicated than others associated with repairing a VAZ 2107 car. After hanging it on a jack and removing the wheel, the replacement is performed directly. First, remove the caliper by unscrewing its mounting bolts. It is not necessary to remove the brake hose; it is enough to carefully hang the caliper so that it does not interfere with operation.
Next, you need to use a flat-head screwdriver to pry up the cap covering the nut and remove it. By unscrewing the hub nut and removing the washer and separator, you can remove the hub with the brake disc. Then everything is simple:
- We take out the oil seal;
- Remove the separator;
- We take out the ring separating the inner and outer bearing;
- Using an extension of the required size and a regular hammer, knock out both clips.
Installing new bearings and assembling the hub occurs in the reverse order. Before assembly, it is necessary to remove old grease by thoroughly washing all parts.
- We press in the races of new bearings;
- Lubricate and install the internal separator;
- Insert the ring;
- Press in the oil seal.
All that remains is to put the hub in place and screw on the caliper. After inserting the pre-lubricated outer bearing cage and thrust ring into place, tighten the hub nut until it stops. By gradually loosening the nut, we achieve free rotation of the wheel with complete absence of play. Thus, the bearing operates in normal mode, which means it is in this position that the nut needs to be locked.
We remove the used lubricant from the protective cap and apply new one, after which we put it on the hub. We put the wheel in place and screw it on, and remove the car from the jack. The job is done, the fault has been successfully fixed, the replacement has been completed. After a short run, it is recommended to check the hub for play and, if necessary, adjust it.
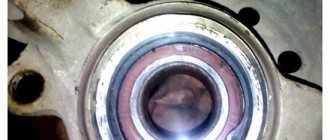
How can I disassemble the hub and check the condition of the bearing?
- The hub cap is removed, then using a 27mm (socket) wrench, the hub nut is unscrewed, the washer with the outer roller bearing separator and the inner ring are removed, then to remove the hub, you need to pull it towards you and remove it from the steering knuckle axle, along with the brake disc :
- Now, using variable size pliers or a slotted screwdriver, remove the oil seal from the hub, then you can remove the inner roller bearing cage, without the outer ring.
- After this, we carefully clean the old grease from the hub cavity, wipe it, it is better to moisten a rag with white spirit.
- Then, using the same straight-slotted screwdriver, you need to pry the slotted sleeve and remove it. Then we take a socket wrench with a head of sufficient depth - 7 mm, and turn out the guide pins.
- Now you can remove the brake disc and spacer. After this, firmly install the hub in a bench vise and, using light and precise blows with a hammer on a drift, “punch” the outer ring of the inner bearing around the perimeter and press it out.
After this, having turned the hub, we also press it out, but the outer bearing ring:
Thus, you can make sure whether the bearings or hub housing need to be replaced, and evaluate the quality of the lubricant.
When assembling the hub, all seats are washed, new lubricant is applied, and the bearing rings are also pressed in, clamped in a vice. After all bearings are properly installed, the clearances in the bearings should be adjusted.
It should be noted that if you are not confident in the ability to press the bearing rings into the hub with high quality, then it is better (and much more useful for life) to contact a car service center. You will still need to stop by afterwards to balance the wheels and wheel alignment.
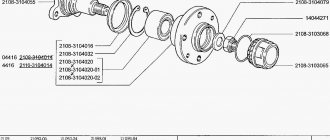
The table shows the dimensions for the front wheel bearings of a VAZ classic car.
| Installation location | Bearing type | Size, mm | Quantity |
| Front wheel hub (outer support) | Roller, conical, single row | 19,5*45,3*15,5 | 2 |
| Front wheel hub (inner support) | Roller, conical, single row | 26*57,2*17,5 | 2 |
Repair of VAZ 2101, 2106, 2107 hub
Maintenance-free front hubs on VAZ 2107 (bushing drawing)
This time we will talk about maintenance-free front hub bearings. Having changed 3 bearings over the winter (sometimes they didn’t last, sometimes they overtightened them, sometimes they fell apart during maintenance), I got tired of all this, surfing the Internet and DRIVE came across articles about maintenance-free bearings on the front. There are several options: 1. Buy a ready-made kit. There are people who sharpen hubs and axles for them. 2. hub with axle from Izh od (also suitable) - I couldn’t find it 3. Rear hub from 08 VAZ + bearing also rear and + adapter sleeve - that’s what you need and in terms of cost.
hub with bearing
Since I didn't look carefully at the bearings? and bought an extra stopper, but they were in the box. Next, we will need classic wheel nuts, 08 ones will not fit, and the ring that presses the bearing is also classic.
all assembled + bushings
made the bushings according to the drawings
1
23,1
The first time I did it according to the first one, I’ll say right away it was in vain, the size 22 was not the topic and during installation the bushing swelled while I was inserting it. but more on that later.
here is my modified drawing
So we collect all this and happily go to the garage (well, that’s how it was for me), we begin to take everything apart
Having unscrewed the nut and the caliper, I had the first problem: I bent the brake disc (I don’t know how, but I did, I realized this when I was putting everything back together after the second problem), so I knocked over the old hub with the dead bearings, we start assembling it and now it’s not a problem, there’s an error in size, no Well, it’s okay and you can knock it out, and in the end I put everything back in the car in the garage and we’re waiting for it to be re-sharpened...
this is how it was inflated due to the wrong size, after measuring the axle, I changed the dimensions
Finally, they machined the bushings for me, and I, happy, flew to the garage to finish it... Since everything was put back in place temporarily, we disassemble everything: we remove the caliper, peel off the brake disc, knock off the hub (I’ll tell you right away that everything came off quickly on the left side, but on the right I had to suffer.) When everything was removed and wiped clean of fuel oil and grease, we put it back together.
I figured it wasn't bad
We put the bushing on the axle, now everything is easy to install
now with the hub
Install the second part of the bushing
Well, a washer with a nut (the nut and washer are original - classic)
Now everything needs to be tightened. I pulled it with a ratchet and then, using a piece of a meter-long pipe, tightened it with force. I don't have a torque wrench, and I don't need one yet.
I almost forgot about the disks
I bought these on occasion for only 1500 for 2, and they look better, and are not much more expensive than the original 600 rubles pieces. I assembled the left side - let's move on to the right. There was a little dance with a tambourine, a vdshka, a sledgehammer, and everything flew off (of course, I removed the caliper). In general, the hub, together with the disk, flew off.
We assemble it, tighten it in the same way, and test drive... Result: it steers better, rolls better, less noise. I really don’t know what’s causing it, maybe I just haven’t driven for a long time, the controls are somehow better. These are my impressions.
this is what the front looks like now
Replacing front wheel bearings VAZ 2101-07
Problem: less than 2 years later, the bearing on one wheel began to hum, and on the second there was a slight crunching sound when braking. I will try to explain in detail but briefly and in pictures what and how. First, remove the wheel.
Removing the hub cap
We unscrew the caliper, not forgetting to bend the fixing plates of the bolts highlighted in yellow (and, by the way, be prepared to replace them - they often break).
And remove the hub assembly. It came off without any problems, but sometimes it gets stuck. It is better to knock it out through a block. In this photo, the working surface of the shaft is highlighted in yellow where the oil seal actually sits. I had a decent amount of wear in this place, as a result of which the oil seal quickly failed and water got inside during the season as a result and the bearing did not pass for a long time. By the way, this is also noticeable in the lubricant - it is brownish in color (the presence of rust).
The axis is relative, the road is 700 - 800 rubles. Therefore, I take a new oil seal, remove the spring and cut it about a centimeter from the side where it is widely highlighted in yellow in the photo. I screw the spring into the spring and put it on the oil seal. I think with such an oil seal it will be enough for a longer mileage.
We pry out the old oil seal with a large screwdriver or wrench, remove the spacer ring and pull out the inner race.
And using a mandrel or an unnecessary shaft, we knock out the outer race on one side and the other.
We clean out the old grease and use the old clip to drive in a new one. We only knock out the old one back.
We install the inner race and spacer washer and carefully hammer in the oil seal.
And fill it with lubricant. The ABC says Litol 24 Front wheel bearings 0.4 l Front wheel hub cap 0.25 l. We naturally wipe off the old grease from the axle and put on the hub, install the washer and tighten the nut with a little force.
We fasten the caliper without forgetting to bend the locking plates. We put the cap on lightly to prevent debris from getting in and screw the wheel on. Since the nut is tightened with little effort, we turn the wheel 90 degrees in one direction or the other so that the rollers find their place. Then loosen the nut until the wheel spins freely. We lower the car to the ground and, shaking the wheel, see if there is any play, i.e. We are trying to catch the moment so that the wheel rotates relatively freely and there is no play in the bearing. And we tighten the nut so that it does not unscrew.
We hammer in the cap and tighten the wheel completely. After a short break-in, we check again for the presence of play and, if necessary, make adjustments. In one bearing there were shells on the rollers, on the other, on the outer race, there was a scratch on the mirror, apparently some piece of metal had gotten into it. shavings. And the fastening of the hood pillar also broke, so we had to improvise. I cut out a metal plate, drilled holes and screwed it on.
I screwed the nuts from below in such a simple way.
Video about replacing wheel bearings for a VAZ classic
https://www.drive2.ru/l/6919354/, https://www.drive2.ru/l/7087225/, https://www.drive2.ru/l/4993033/
Ball joints VAZ 2101, 2106, 2107
Reinforced ball joints for VAZ 2106 - description Increasing the castor of the VAZ 2107 by moving the ball
Rear axle repair and gearbox replacement
Depending on the cause of the breakdown, the following repair work may be necessary to restore the transmission’s functionality:
- replacing the VAZ 2106 gearbox oil seal;
- replacement and adjustment of the main pair;
- Troubleshooting differential and shank bearings and replacing them if necessary;
- replacement of VAZ 2106 gearbox.
Repair with replacement of bearings and (or) elements of the main gearbox pair is very difficult in technical terms. It requires special knowledge and tools in the process of adjusting the VAZ 2106 gearbox. As a rule, this unit is adjusted either at the factory or in specialized workshops. By watching a video about repairing a VAZ 2106 gearbox, you can see this for yourself. Meanwhile, in order to prevent damage to this transmission element, it is necessary to monitor whether the shank nut is tightened and whether there is any oil leakage from the seals.
Replacing the VAZ 2106 gearbox oil seal is necessary in case of transmission oil leaking from under it. Simply tightening the nut is not enough. Therefore, before we learn how to adjust the VAZ 2106 gearbox, we will learn how to replace a leaking oil seal. To carry out repair work you will need:
- a set of open-end wrenches and socket heads;
- puller for removing the oil seal;
- Litol-24 lubricant;
- mandrel for installing a new oil seal;
- hex wrench for unscrewing the drain plug;
- hammer;
- container for draining oil;
- transmission oil.
It is best to carry out work on replacing the rear axle gearbox oil seal in the inspection pit.
Replacement is carried out in the following order:
- We unscrew the plug to drain the oil, and, replacing the container, drain it.
- Unscrew the driveshaft from the rear axle gearbox flange.
- Unscrew the flange nut, counting the exact number of turns, and write down the value.
- Remove the flange. It usually comes off easily, but you can easily tap it with a hammer once it's firmly in place.
- If there are shells on the surface of the flange, or wear in the place where the oil seal fits, it must be replaced.
- Using a puller, remove the worn oil seal of the VAZ 2106 rear axle gearbox.
- Lubricate the new oil seal with Litol-24 grease to facilitate its installation.
- Using a mandrel, lightly hammer the oil seal into place.
- We install the flange and tighten the nut exactly the same number of turns that we wrote down.
- We attach the driveshaft to the rear axle.
- Fill the VAZ 2106 gearbox with oil to the level of the filler neck. It is recommended to use gear oil from well-known manufacturers. It would be useful to add a molybdenum additive to it to reduce friction between parts.
After repairs, it is also necessary to check the condition of the breather and, if necessary, clean it. If there is a need to completely replace this unit, then you need to know that the gear ratio of the VAZ 2106 gearbox is 3.9, and the car’s speedometer readings are guaranteed. Read about how to remove a VAZ 2106 gearbox in other articles on our website.
Wheel bearing: 4 simple ways to check before it’s too late - Advice from experts
Many people know that there are certain bearings in the wheel area called wheel bearings, and from time to time they wear out. But this is where the ideas about the subject end. No problem! Today we’ll talk in detail about what it is and, most importantly, how to determine the need for replacement. And first, a little theory.
Without abstruse definitions, a wheel bearing is a bearing on which the wheel rotates. Of course, we all removed the wheels (or at least were present at this sacrament) and saw that there were no bearings on the wheel itself, and they were also not visible on the one from which they were removed. Right. Because this bearing stands between the fixed axis of rotation and what the wheel is screwed to . The part that acts as a fixed axis is called a fist
or
trunnion
.
A small clarification: the concept of “axis” in this case is used precisely as the geometric axis of rotation, and not as the shape of the part. For example, in the steering knuckles of a front-wheel drive car, this axis is hollow, and the drive shaft passes inside it. See pictures below.
In turn, the part to which the wheel rim is directly attached is called the hub.
. Thus, if you strain your head a little and imagine everything written above, then the following picture emerges: a bearing is put on the fixed axle (or inserted into it, if there is a drive), and a hub is put on the bearing, to which the wheel is screwed. This is such a simple nesting doll. Now about malfunctions and self-diagnosis.
Since today’s hero is not highly complex, the symptoms of the malfunction will be quite clear.
Symptom No. 1
Noises . Those who have ever heard the noise/hum of dry or worn bearings will understand what we are talking about. Those who don’t know shouldn’t despair either. If you have doubts about the serviceability of any hub, simply hang up two wheels of the same axle, put the box in neutral and spin both. I’m sure you can spot a noisy hub right away. The main thing is not to confuse the noise of the bearing with the friction of the pads on the brake disc, so as not to change all four in a fright.
Symptom No. 2
Once you have hung the axle with the suspected wheel, shake it in all directions. A heavily worn bearing will give a play that can be clearly detected by hand . Again, do not confuse the bearing play with the play of the steering tips (if they are also tired). If you lack experience, it is better to call a friend: one will rock the wheel in all directions, the other will look at it from the inside. I’m sure the two of you can easily determine whether the wheel is loose relative to the axle (then it’s a hub wheel), or whether the entire axle assembly is loose relative to the steering rod - then you need to change the tips.
Symptom No. 3
Noticeable heating. Very often the wheel bearing begins to jam and, as a result, heats up. After the trip, touch the wheel (not the brake!) disc with your hand and compare the temperature on the wheel in doubt with the second wheel of this axle. If the hub jams, the temperature will be noticeably higher. And you definitely won’t need thermometers to determine the difference. But again, we take a situation where we are confident in the serviceability of the brake mechanisms: a soured brake caliper can also cause overheating.
Symptom No. 4
And finally, sideways movement when moving . If the hub is already moving into a better world and jams heavily when rotating, this will affect the straightness of movement. The car will drag towards the wheel with a faulty bearing. By the way, as in option “3”, this is always associated with parallel heating of the part and can also be caused by jamming of the caliper, or the handbrake mechanism, if we are talking about the rear wheels. Therefore, the last two points are relevant only with a known-good brake system.
If you find an error, please select a piece of text and press Ctrl+Enter .
The device of the hub on the Lada Grant
Front
- rounded fist;
- external and internal dirt-reflective metal rings;
- front roller bearings;
- hub;
- washer;
- hub nut;
- retaining ring, plug.
Rear hub device
- hub mechanism axis;
- metal ball bearing;
- mud ring;
- retaining ring;
- washer;
- screw;
- sealing ring;
- rubber boot;
- hub cover.
Resource for replacing hub mechanism elements
The average service life of wheel joints is 80 – 85 thousand km. The indicator is average, as it depends on the following factors:
- quality of workmanship of the part;
- frequency of operation of the technical device;
- driving style;
- quality of road surface;
- aggressive environment;
- high operating temperatures;
- compliance with technical inspection intervals.
Signs that a hub needs to be replaced
- the appearance of uncharacteristic noise during wheel rotation;
- wheel runout in the steering column;
- vibrations at different speeds. Sometimes there is vibration at a certain speed;
- metallic grinding noise as the wheel rotates;
- front wheel hub play.
Diagnostics of the hub mechanism
- We place the car on a level platform, squeeze the parking brake if we are checking the front row. For the rear, we install wheel chocks.
- Let's jack up the front (rear) part.
- We turn the car wheel and carry out troubleshooting.
- We shake the wheel up and down with our hands. In good condition there should be no play. Otherwise, we dismantle and replace worn elements.
Wheel Bearing Adjustment
The main parameter when carrying out a replacement is setting the correct hub clearance. The procedure is performed in two ways: using a dial indicator or by touch.
- Prepare an indicator stand.
- Place the device on the brake disc and secure with bolts.
- Place the end of the indicator against the end of the trunnion, as shown in the figure.
- Rotate the hub to measure the play.
- If the value is more than 0.15 mm, it is necessary to loosen the nut and tighten it with a torque of 9.6 N*m. Spin the disk several times. Loosen the nut (approximately 20-25 degrees), tighten with a torque of 6.8 N*m.
- Check the backlash value.
- Lock the nut.
Setting the gap without an indicator:
- Put on the wheel.
- Evenly tighten the nut while rotating the hub.
- Rock the wheel in a vertical plane to “feel” for play. To do this, place your finger on the end of the trunnion. A barely noticeable gap should be felt when the wheel rocks.
- If the play is caught, tighten the nut to a torque of 19.6 N*m. Don't counter.
- Rotate the assembly several times in both directions (to self-install the bearing). Check the gap.
- Lock the nut.
The rebuilt unit should rotate easily, without wedging.
Replacing the front hub of Lada Granta
- We place the car within the perimeter of the repair area and provide priority safety measures.
- Let's jack up the right (left) side.
- Unscrew the bolts and remove the wheel.
- Let's unlock the hub.
- On the back side, unscrew the two bolts that guide the brake caliper.
Location of two bolts
- We remove the caliper, hang it on a wire (we fix it on the steering tip).
- Unscrew the hub nut and remove the brake disc.
Removing the hub nut
- We unscrew the two bolts - the rack clamps. If necessary, we use a liquid to remove deposits like WD-40.
- Disconnect the strut with the steering knuckle and unscrew the ball joint fasteners.
- We remove the CV joint.
Next, install the new hub assembly and assemble the structure in the reverse order.
Replacing the front wheel bearing of Lada Granta
- The front hub joint is located in the steering knuckle housing, remove it. Pre-clamp the structure in a stationary vice.
- We install the metal spacer - the head at “22” on the surface of the hub. We apply targeted blows with a hammer to press it out.
- We disconnect the inner race of the hinge and remove the separator with metal balls.
- To remove the outer part of the hinge, use pliers and remove the retaining rings.
- To dismantle the inner part of the cage we use a chisel. Gently tap with a hammer.
- Use a puller to press out the axle shafts.
Ignition relay VAZ 2109 Where is it located?
Welcome! Starter activation relay - many will think at this point that we are talking about a retractor relay, in fact this is not so, in total the starter has two relays, one that turns it on and the second one that extends the bendix and pushes its gear onto the crankshaft pulley (2- This is the same solenoid relay), if the first one fails (happens occasionally mainly due to overloads on it or due to faulty wiring), you will not be able to start the starter and therefore the car will not start, if it fails secondly, the situation will be slightly different, and specifically the car may also not start and the clicking will occur when the key is turned, but this can still be said acceptable, but if this relay fails completely and does not return the bendix to its reverse position, then the following will happen: when you turn the key, the starter will begin to turn the engine of the car and eventually it will start, but when you return the key after the engine has started in the reverse position, the bendix at the starter will not turn back (the solenoid relay does not work) and for a very small the starter will become unusable.
Note! To change the relay that is responsible only for turning on the starter, you need to stock up on: Only one “8” wrench, more of it for you and you don’t need to take anything, but perhaps one more wrench so that, just in case, the minus terminal from the battery is reset !
Summary:
Where is the starter relay located? It is located in the engine compartment and is attached there to the car body with the help of one single nut. In the photo below, this relay is indicated by a reddish arrow, and the blue one shows the air pipe behind which this relay is located.
When do you need to change the starter relay? There are some people who either don’t know the electronic part of their own car well, or simply never look at this relay (They say it lasts forever and never breaks), we just want to say that a lot of people, when they see that their car won’t start with the key, immediately jump into starter, first remove it, then replace the parts on it, remember for the future, you always need to start small and easily accessible and only later go to things that are difficult to easily access and inspect them and change them if a malfunction is detected.
Ignition relay VAZ 2109 Where is it located?
Note! If the starter relay fails, as we have already said, the car will not start and therefore will not respond to turns of the key in the ignition switch, the same will happen if the battery charge is weak, and therefore if you suspect it, either charge it or change it to the newest one if it is already very worn out, besides this, exactly the same situation (the car will not start) can occur due to the ignition switch, and specifically because of its contact group, but on cars with a starter relay this happens occasionally, so how the relay also unloads the contacts at the ignition switch and thus the contacts burn out less often, but you can still read about how to check the contact group of the lock in the article entitled: “Replacing the ignition switch and its contact group on a VAZ”!
How to replace the starter switch relay on a VAZ 2108-VAZ 21099?
1.
If you carefully read the above text, you will immediately guess how to remove this relay, but we will still instruct you, find this relay in your car (the location is shown in the photo above), you see a block of wires is connected to it, then disconnect it, and then After it is removed and set aside, pick up a wrench and unscrew the relay mounting nut with it and then remove it, by the way, if the work is done in the rain or in very wet weather, or if you are simply afraid of a short circuit in the wiring (In this case the entire wiring will burn out and will need to be replaced), then protect yourself by disconnecting the wire from the minus terminal on the battery to do this; if you don’t understand how to do this, then study “this article”, it says everything in the first paragraph.
Note! To check whether the relay is working or not (we don’t recommend just taking a new relay, always inspect everything), you can use 2 different methods, the first is that you have to remove the cover from the mounting block and remove the relay from there exactly with the same marking as yours, the relay goes to turn on the starter, after pulling out these two relays, change these two relays and try to start the car, if it doesn’t start, it means the problem is not in the relay and you need to find the problem either in the starter itself or in the ignition switch, 2- This method assumes that you will find a jumper wire (Indicated by a blue arrow, the wire can also be used) and bring its conclusions to the wire block, specifically to its contacts “30” and “87” (These are the lower and upper contacts of the block, take a closer look at the relay they are marked on it or for clarity, look at the photo they are indicated by a reddish arrow, although there is a block from a completely different car, but it is actually the same and on it you can understand where these two contacts are located), if the car starts up immediately (Don’t forget the jumper when it starts to start remove it right away) then it’s all in the relay, if not, then look further (When you do the 2nd method, do not forget to turn the key in the ignition until all the devices light up)!
THIS IS INTERESTING: VAZ 2114 fuel pump relay where it is located
Additional video clip: For more detailed information about checking the relay using the classic example, see the videos below:
Source: https://avtotrue.ru/rele-zazhiganija-vaz-2109-gde-nahoditsja/
Replacing the axle bearing
The axle shaft is an integral part of the rear axle of the VAZ 2107. The axle shaft itself practically does not break, but the bearing by which it is attached to the axle housing sometimes fails. Its purpose is to rotate the axle shaft smoothly and evenly while the car is moving. Signs of bearing failure are the same as those of the hub elements. If problems occur, it is necessary to dismantle the axle shaft and replace the faulty part.
Bearing removal
Before starting work, you need to prepare the following list of tools:
- set of socket wrenches with a crank;
- hammer;
- flat screwdriver;
- chisel;
- grinder;
- new axle bearing with retaining ring.
To replace, follow these steps:
- Raise the rear wheel using a jack, then remove it, not forgetting to install stops under the front wheels.
- Remove the brake drum.
To dismantle the drum, you need to carefully strike its inside through a wooden block.
Installing a new part
After removing the bearing, you can immediately begin reassembly:
- Clean the axle shaft from dirt and wipe it with a rag.
- Press the new bearing onto the axle shaft, and then install the retaining ring. To install the latter, it is advisable to heat it up with a blowtorch, which will ensure easier installation and reliable retention after cooling.