Replacing the shank oil seal on a VAZ 2106. How to check the rear axle gearbox
It is necessary to replace the shaft seal of the VAZ 2106 when there is an oil leak from under the tail of the gearbox. This breakdown looks like this: drops of lubricant appear on the outside of the surface of the gearbox housing. It sometimes happens that an oil film is mistaken for damage. Only when there are drops on the surface is this an indicator for replacing the rear axle tail seal. You can easily repair such damage yourself.
Necessary tools for replacing oil seals:
If you decide to start replacing the oil seals yourself, prepare the following tools first:
- Screwdriver Set;
- Set of wrenches;
- Hammer;
- A small container for oil;
- A socket wrench or a 24mm socket;
- To unscrew the drain plug, take a hexagon;
- Two-jaw puller;
- Torque wrench;
- To fill the lubricant with a syringe;
- Jack;
- Body stands.
Important: all work on replacing oil seals on a VAZ 2106 should be done efficiently. Otherwise, any oversight and carelessness may lead to unpleasant consequences and lead to repair of the axle gearbox. If you doubt your abilities, it is better to contact the service. This way you will protect yourself from unnecessary costs and unexpected car repairs.
Purpose of the gearbox oil seal
All classic Lada car models, up to VAZ-2108, have rear-wheel drive. Starting from VAZ 2108 and higher, cars are driven by front-wheel drive. Everyone knows that a gearbox is a device through which torque is increased with its further transmission from the cardan to the rear wheels. All parts of the rear axle operate predominantly in an oil environment, which has a positive effect on the following factors:
- The service life of rubbing parts increases due to reduced wear.
- The heat generated by gear friction is removed.
- The friction force is reduced.
- The gears are cleaned from metal dust and shavings that are formed when metal parts come into contact with each other.
In order to transmit torque from the engine to the rear wheels, a cardan shaft is used, which is connected to the gearbox flange. An oil seal is installed on the flange axis to prevent lubricant from leaking out of the rear axle gearbox. When the cuffs wear out, oil stains and even puddles appear under the car, leaking outward. To avoid significant loss of oil in the rear axle of the VAZ 2107, the cuffs should be replaced in a timely manner when oil leaks are detected.
Checking the serviceability of the shank oil seal
The first sign that it is necessary to replace the shank oil seal on a VAZ 2107 is the presence of traces of lubricant, dust and dirt on the outer part of the rear axle. Determining the presence of leaks on the rear axle is not difficult. To do this, you need to climb under the car and inspect the bridge.
If the oil seal is worn significantly, a puddle of oil may be found under the car. If the problem is not resolved in a timely manner, oil may leak out of the bridge, which will lead to its rapid breakdown. Despite the fact that the cuff is a small part in a car, its serviceability plays a very important role.
What will be required when carrying out replacement work
To replace the device in question on a VAZ 2107 car, you will need a number of the following tools:
- Open-end wrenches for 13 and 24.
- Calipers.
- Screwdriver.
- Flange puller. This tool is not difficult to make yourself.
- Dynamometer or torque wrench.
After all the tools are ready, you can install the car on the inspection hole, since it is much easier to carry out work on replacing the cuff.
How to remove the shank oil seal on a VAZ 2106:
To make it convenient to change the tail seal, place the car in an inspection hole or on an overpass. Pre-prepare new tail seals. The old oil seal has a worn appearance and excess oil. It must be removed immediately. To do this, proceed with the following steps:
1) Unscrew the drain plug on the gearbox housing using a hexagon. Here you need to place a container for oil;
2) Wait until the lubricant has completely drained from the gearbox. Screw the plug back in;
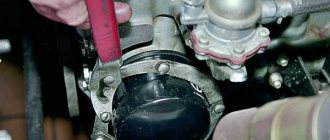
3) Disconnect the reverse drive gear flange and the driveshaft;
4) Put the car on the handbrake;
5) Using a 24mm , begin to unscrew the nut that holds the tail flange.
It is not necessary to use a hand brake to prevent the flange from rotating.
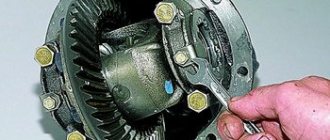
6) Insert several bolts into the hole in the final drive gear flange;
7) Using special tools, try to hold the flange by these bolts. At the same time, unscrew the nut;
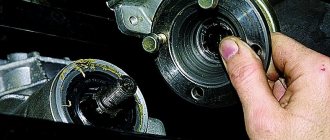
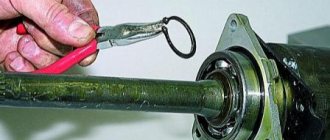
8 ) Take a two-jaw puller and use it to remove the tail flange from the splines;
9) If you do not have a puller, remove the flange by hand. This will require some effort, but it is not difficult to remove;
10) Remove the washer and flange from the tail of the main gear at the same time as the dirt deflector;
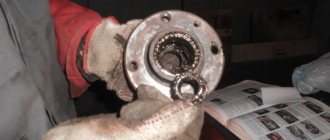
11) Take a flathead screwdriver and pry off the seal. Remove it from the hole in the gearbox housing using a bracket. The oil seal has been removed and you can begin replacing.
Important : Before you begin installing a new tail seal, you should check the surface of the flange that is in direct contact with the seal. It must be undamaged and free of rust. If any defects are found, eliminate them by polishing the surface.
VAZ 2106 replacement of the shank oil seal
We begin the replacement by installing the car on an inspection hole or on an overpass, and then:
- We unscrew the drain plug on the gearbox housing using a hexagon and place a container for oil
- We wait for the lubricant to drain from the gearbox and return the plug to its place
- Separate the flange of the reverse drive gear and the driveshaft
- We move the parking brake lever to the uppermost position (simply put the car on the handbrake)
- Using a “24” socket wrench (or a “24” socket with a wrench), unscrew the nut securing the shank flange
Using a socket wrench or a 24mm socket, unscrew the nut securing the flange
Note: It is not necessary to use the parking (hand) brake to prevent the flange from rotating.
- For this purpose, you can insert a pair of bolts into the holes in the final drive gear flange
- Hold the flange using a suitable tool by these bolts and at the same time unscrew the nut
- We take a two-jaw puller and use it to remove the shank flange from the splines
- If you don't have a puller, try pulling the flange off by hand
Use a two-jaw puller to remove the flange from the splines
- Remove the washer and flange along with the dirt deflector from the main gear shank
- Use a flat screwdriver to pry up the oil seal and remove it from the hole in the gearbox housing
Remove the washer with flange from the shank. Use a flat screwdriver to pry up and remove the oil seal.
Note: Before installing a new shank seal, check the condition of the flange surface that comes into contact with the seal. Usually rust appears on this surface, and this surface wears out. Detected defects are often eliminated by polishing the surface
Advice: When there is already a deep groove on the cylindrical surface of the flange, we press the oil seal with a slight offset so that the oil seal itself protrudes slightly relative to the end of the neck surface of our gearbox
- Using a plastic lubricant (sealant), we treat the seating surface, then the working edge of our new oil seal
- We press in the new oil seal by hitting it with a hammer through an adapter of the required diameter (photo below)
- It is important to avoid distortion of the part.
Press the new oil seal into the mandrel using a hammer.
- We assemble all the parts removed from the shank
- We replace the locking nut of the shank flange with a new one
- Hanging out the back of the car
- Disengage the differential gears and axle shaft
- We fix the shank flange using the bolts that are inserted into the flange holes.
- We tighten the shank nut using a torque wrench with a tightening torque of 120 N∙m
- We change the oil in the gearbox (see When you need to change the oil in the gearbox)
Checking the rear axle gearbox
- Turn the flange by hand
- The resistance should be uniform and minimal
- The flange should rotate without jamming, jamming or clicking.
- If these defects are detected, the axle gearbox must be urgently repaired in a specialized workshop
- It is also important to make sure that there is no or no axial play in the shank bearings.
- Even minimal play is not allowed here
- Having detected play, we increase the tightening torque of the shank mounting nut by 20–30 N∙m
- And again we check the play and smooth rotation of the flange
- It is important to remember that the permissible total tightening torque is 225 N∙m and no more
- With greater force there is a possibility of damage to the special spacer sleeve
- When the play cannot be eliminated by tightening the flange, contact an auto repair shop to repair the axle gearbox
- When, with additional tightening of the fastening nut, the torque does not increase, but also remains less than the value we need (120 N∙m), this means that the spacer sleeve is “sagging”
- It needs to be changed, and to do this, disassemble the gearbox in a specialized auto repair shop.
If the problems described above that require the help of professionals from the auto repair shop are not found, replacing the rear axle gearbox oil seal is completed. VAZ rear axles have the same type of design, so this instruction is also suitable for VAZ 2107 other models. Additionally, we recommend that you watch the training video.
Last year I encountered the same problem. At first it got a little “wet” in the area of the oil seal, then with the onset of cold weather it started getting stronger, and as you know, the volume of oil in the gearbox of a Zhiguli car is less than a liter, and if it leaks, then the consequences are not far away. Fearing that the oil would run out and my gearbox would “buzz,” I decided to quickly change the oil seal before I had to change the gearbox itself, which costs almost 10 thousand a new one. I changed it exactly as described in the article, the main thing is to buy a better quality oil seal and install it without distortion, then you will forget for a long time about problems with the oil level in the rear axle.
How to change the gearbox seal on a VAZ 2106:
1) Treat the seating surface with a lubricant, namely sealant. The working edge of the oil seal is also well lubricated;
2) The seal should be driven in with light hammer blows. Apply blows through an attachment of a certain diameter, while avoiding distortion of the parts;
3) Collect all parts removed from the ponytail;
4) The flange locking nut will need to be replaced with a new one;
5) It is necessary to hang the rear of the car;
6) Disengage the differential gears and axle shaft;
7) Secure the tail flange using the bolts that are inserted into the flange hole;
8 ) Using a special torque wrench, tighten the tail nut;
9) Change the oil in the gearbox.
How to check the rear axle gearbox of a VAZ 2106?
- Turn the flange by hand. In this case, the resistance should be small and uniform.
- The flange should rotate without clicking, sticking or jamming.
- If defects are found, send the flange for repair to a specialized workshop.
- There should be no axial play in the tail bearings. There should not be even the slightest play here.
- If play is detected, then the tightening torque of the tail mounting nut should be increased by 20-30 N.m. After this, check again for smooth rotation of the flange.
Important: The total tightening torque should be 225 N.m and no more. Otherwise, damage to the special spacer sleeve may occur.
It happens that the backlash cannot be eliminated by tightening the flange. Here it is worth asking for help from a workshop so that the craftsmen can repair the axle gearbox.
When the spacer sleeve is seated, the torque of the fastening nut does not increase, even if additional tightening is done. It remains slightly below the desired value. Therefore, it needs to be changed, while disassembling the gearbox. This procedure is done in a car repair shop.
Replacing the VAZ 2106 shank oil seal will be completed only if no damage is found that requires professional help or repairs.
Tell us, how did you change the oil seal on your car?
What to do with VAZ
Initially, we will discuss these types of repairs in relation to the “classic” Zhiguli. We will tell you how to replace the gearbox seal of the rear axle of a VAZ 2107.
- wrenches;
- screwdriver;
- mounting blade;
- Litol type lubricant;
- sandpaper;
- mandrel and hammer;
- a special key for holding the flange - a tube with two bolts inserted into the holes of the part.
Find out also how to remove the brake drum on a VAZ 2109 and about replacing the coolant on a VAZ 2110.
Begin.
- First of all, drain the oil from the assembly unit.
- We remove the axle shafts from the beam.
- We use a screwdriver to disconnect the cardan flange from the mating part of the tail gear, having previously unscrewed the bolts. We keep the cardan from turning with a mounting blade.
- We wrap a strong rope around the neck of the counter element of the drive gear and attach a hand scale to it. The force of uniform rotation of the part (kg s) multiplied by the radius of its neck gives the value of the required moment - we write down this value.
- Unscrew the tail gear flange nut, holding the part with a special wrench.
- We remove the detached element and the washer.
- Using a screwdriver, we remove the reinforced rubber product.
- Clean the seat with sandpaper and lubricate it with Litol.
- We press in the new spare part with a mandrel using hammer blows until there is a gap of 2 mm from the end of the crankcase to the part embedded inside. Now the reinstallation of the differential assembly cuff can be considered completed.
- We install and screw the flange element, holding it with a special key. If the initially measured moment of resistance to rotation was at least 6 kg s x m, then the new moment should be greater by 1 kg s x m. In any case, we tighten until the moment reaches 6 kg s x m, but not higher than up to the moment 12 – 26 kg per x m.
- Then we collect everything along the way in reverse.
- Add oil.
This is how a defective oil seal is replaced on a VAZ 2107.
It should be added that the replacement of a defective VAZ 2106 part is carried out exactly according to the same scenario. By the way, as you can see, at the same time we changed the oil in our gearbox.
To completely reinstall the entire assembly unit, immediately after separating the parts according to point 3 of the instructions given, unscrew the bolts securing the beam. This is how the rear axle gearbox of the “classics” – VAZ 2106, 2107 and others like them – is replaced. Let's also consider replacing the leaking oil seal on the VAZ 21213 Niva. Let's take the same tools as for the “classics”.
- We also drain the oil.
- After hanging the drive, remove the wheels, then the brake drums.
- Having disengaged them from the differential gears, we remove the axle shafts.
- We also disconnect the cardan from the counter element of the tail gear.
- Then we measure the moment.
- Everything else, including the tightening torque values, is followed according to the instructions for the “classics”.
If you need to replace a broken gearbox, say, on a Niva 21214, disconnect its housing from the beam after separating it from the cardan. The same can be said about replacing a defective gearbox on a Chevy Niva.
However, here we must remember that an important rule must be observed: both differential elements of the all-wheel drive must have the same gear ratio. Therefore, when replacing a broken VAZ rear axle gearbox on an all-wheel drive vehicle, you need to know the gear ratio of the second unit.
At the same time, changing a bad oil seal on a Chevrolet Niva is carried out according to the instructions already described.
Why does oil leak from the rear axle gearbox of VAZ 2107, 2106?
It is important to understand when the seal is leaking and when there is simple fogging. If after using the machine no drops of oil are visible near the oil seal, we can assume that the oil seal is simply sweating. In a situation where drops of oil or a trail followed by a drop are visible, we can assume that the oil seal is leaking.
Causes of leakage of the rear gear axle seal of VAZ 2107, 2106:
- Wear of oil scraper elements of the oil seal.
- Rupture of the compression spring of the oil seal.
- Oil seal defect.
- Development on the flange.
- Faulty or clogged gearbox breather.
The main causes of oil leakage from the rear axle gearbox
If oil begins to ooze down the gearbox shaft, then its oil seal has failed. The reason for this may be:
- wear;
- rupture of the tension spring;
- manufacturing defects;
- development on the flange.
In all cases, replacement of the axle gearbox oil seal is required. If the oil seal only slightly fogs up, and the gearbox works well and does not require any intervention, do not worry and get in there ahead of time.
It is only necessary to check the oil level in the bridge from time to time and add it as necessary.
Replacement of the rear axle gearbox seal on a VAZ 2107 is carried out if there are obvious problems with this element. Also, it is often necessary to change the oil seal when replacing the gearbox. The problem can be diagnosed by the following signs:
- With increased noise from the rear axle. This is usually due to an oil leak. The oil seal should be replaced and the required amount of transmission fluid should be added;
- Noise occurs during acceleration. Check the condition of the seal. If there is lubricant on the axle gearbox, then replacement is performed again.
Often inexperienced drivers mistake oil seal fogging for a leak. This is not true. Some moisture may be released on the surface of the cuff, which is completely normal. A lubricant leak is characterized by a large amount of transmission oil on the gearbox. If you stand on dry and clean asphalt for a while, you can see an oil stain.
In general, get into the habit of inspecting the coating under the car for leaks of technical fluids before each trip. This will help avoid unnecessary problems on the road.
Replacing the rear axle oil seal on a VAZ 2107 with your own hands.
First, let's prepare spare parts and tools. Of the new parts we will need:
- The seal itself.
- Spacer sleeve.
- Oil deflector washer.
- New gear oil.
You will need 1.35 liters of oil. According to Murzilka, it is recommended to change it together with the oil seal. Ideally you need:
- Head 24
- The key is 17 (you can have a head) .
- A dynamometer (can be replaced with spring scales up to 15 kg) or a torque wrench of at least 150 N*cm.
- Open-end wrench 13.
- A good, thick flathead screwdriver.
- Mandrel for oil seal.
- Hammer or mallet.
- Container for old oil.
- Rags.
- Marker.
- Jack.
We've prepared everything and are starting the replacement!
Preparing and dismantling the gearbox oil seal.
We drive the car into a pit or overpass and drain the oil from the bridge (do not forget to immediately screw the drain plug back). We make a mark with a marker at the junction of the cardan with the gearbox (so as not to throw off the balancing during installation). We take a 13 mm wrench and a strong screwdriver or some kind of mounting tool and unscrew the nuts securing the cardan to the gearbox.
We disconnect the driveshaft from the gearbox and see the 24 nut, but do not unscrew it. This is where a torque wrench or dynamometer comes in handy. We need to measure the force at the input to the gearbox until the suspended wheel begins to spin. Use a jack to jack up any rear wheel and then proceed according to the situation:
- If you have a torque wrench, then simply turn the nut 24 degrees until the wheel starts spinning and look at the readings on the wrench at this moment. We remember them because When assembling, we will tighten with the same force.
- If you have a dynamometer (or scales), then we hook it onto the bolt and pull until the suspended wheel moves. We remember the readings because When assembling, we will tighten the nut until we achieve the same readings.
- if you have nothing at all, then make a mark on the flange, nut and gearbox and count how many turns you unscrew the nut to tighten it the same number of turns.
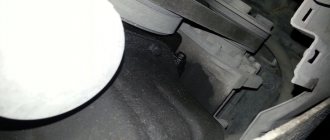
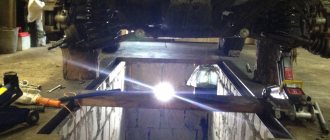
We remove the wheel from the jack (but do not remove it far) and unscrew the nut by 24. To unscrew it, we place bricks under the wheels as stoppers, or we screw in 2 bolts and make a stop from a mounting or pipe as shown in the photo below.
Next, use a mallet or hammer to knock down the gearbox flange through a wooden spacer.
Now you can see the oil seal itself and you can remove it with a screwdriver or wrench.
Installing a new oil seal in the rear axle gearbox.
Wipe the oil seal installation area from dust and debris. Check the flange for wear or rust. Before installation, lubricate the outer part of the oil seal with lithol. Press the new oil seal through the mandrel to a depth of 1.7-2mm from the edge of the gearbox. If there is a large hole on the flange , then it is better to drive the oil seal a little deeper or, conversely, slightly undercut it. Focus only on the outer edge of the oil seal, otherwise you may damage it.
After installing the oil seal, use an oil can to lubricate its inside with oil. And install the flange.
How to tighten the flange nut of the rear gearbox of a classic.
We tighten the nut based on what you had in order to measure the force with which it was tightened. After tightening, check that there is no play either axial (forward-backward), up-down, left-right.
We assemble further in the reverse assembly process. Don't forget to add oil to the gearbox.
Have smooth roads!
Still have questions for the author? Ask them in the comments!
Replacing the rear axle gearbox seal of a VAZ 2106
↑ How to remove the gearbox drive gear oil seal
A damaged cuff can be replaced without removing the gearbox from the car. To do this, after hanging the rear axle, drain the oil from the crankcase, remove the wheels and brake drums, and disengage the axle shafts from the differential gears.
We disconnect the driveshaft from the drive gear flange and move it to the side.
↑ Determining the torque of the shaft
We determine the moment of rotation of the drive gear shaft, for which:
- We tightly wind a strong thread around the neck of the flange in several turns and attach a dynamometer to it.
- The force at which the flange begins to rotate uniformly, multiplied by the journal radius, will give the value of the desired moment. We write down its value.
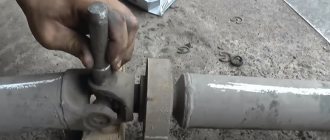
Having inserted two bolts into the holes of the flange and holding it from turning with a mounting blade, use a 27 wrench to unscrew the nut and remove the flange from the splines of the main gear drive shaft.
Using sliding pliers, remove the cuff.
↑ Installing a new collar and flange nut
Using light blows of a hammer, we press in a new cuff through a piece of pipe of suitable diameter, having previously coated its seating surface with Litol-24 lubricant.
We install a new flange nut and gradually tighten it with a torque wrench to a torque in the range of 12–26 kgf.m, periodically checking the shaft rotation force with a dynamometer.
- If the initial force was greater than or equal to 2.9 kgf (which corresponds to a torque of 6 kgf.cm), then tighten the nut until a flange turning force is 0.5–1.0 kgf (1–2 kgf.cm) greater than the original .
- If the initial force was less than 2.9 kgf (6 kgf.cm), then tighten the nut until a turning force of 2.9–4.3 kgf (6–9 kgf.cm) is obtained.
- If, when tightening the nut, the turning torque exceeds 9 kgf.cm, then disassemble the gearbox and replace the spacer sleeve.
↑ Replacing the rear axle gearbox oil seal video
Replacing the VAZ-2106 gearbox oil seal
How often do you look under your car? Many car enthusiasts do not do this at all, subsequently facing huge costs. Only with the help of a visual inspection can serious faults be identified, prevented and eliminated. In particular, a leak in the area of the VAZ-2106 gearbox may indicate the need to replace the oil seal.
Purpose and features
What is an oil seal anyway? This is an ancient version of the name for a rubber cuff. The term appeared at a time when ordinary felt or felt was used to seal shafts with casings of various components, which were previously lubricated with ordinary fat or, more often, lard. Hence the name – “oil seal”.
Modern products have already moved far from past technologies and are high quality parts made of resistant rubber in accordance with a number of GOSTs. The purpose of the seals is not only to seal the joint, but also to reliably protect the system unit from the ingress of various debris, moisture and even dust. In this case, the seals can be different in diameter and shape (it all depends on the purpose of the product).
Oil seals operate over a wide range of temperatures - usually from -60 degrees Celsius to +170 degrees Celsius. The material used for manufacturing is rubber (butadiene-nitrile or silicone based) or fluorine rubber. Oil seals are able to withstand various working environments and are not destroyed by the action of mineral oils, diesel fuel and water. The maximum pressure that the oil seal can withstand is about 0.04-0.05 MPa.
Malfunctions of the rear axle and reasons for replacing the oil seal
Aging of the oil seal or its premature failure can lead to serious oil leakage. As a result, the following problems may arise:
Replacing the rear axle gearbox seal on a VAZ-2104-2107
The rear axle gearbox serves to increase torque and transmit it at an angle of 90⁰ to the vehicle wheels from the driveshaft.
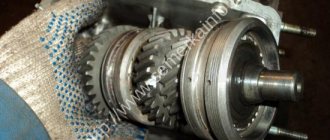
In simple terms, it increases the force transmitted to the wheels from the secondary shaft of the gearbox. The gearbox unit consists of a main (hypoid) gear and a differential unit (satellites). All rotating shafts that come out of the bridge (half shafts and the drive shaft of the gearbox) are protected from the environment by seals, because the bridge is filled with oil.
When they fail, oil begins to leak.
The main causes of oil leakage from the rear axle gearbox
If oil begins to ooze down the gearbox shaft, then its oil seal has failed. The reason for this may be:
- wear;
- rupture of the tension spring;
- manufacturing defects;
- development on the flange.
In all cases, replacement of the axle gearbox oil seal is required. If the oil seal only slightly fogs up, and the gearbox works well and does not require any intervention, do not worry and get in there ahead of time.
It is only necessary to check the oil level in the bridge from time to time and add it as necessary.
Cost of the oil seal and work to replace it
The estimated cost of replacing the rear axle gear seal of a VAZ 2107 at various services ranges from 400-600 rubles. The price of an oil seal produced by BRT (Balakovo Rezinotekhnika) is about 80 rubles.
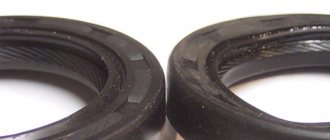
This oil seal is considered the best option on the market. Installed on new cars from the factory. In order not to run into defects, when purchasing an oil seal, you should check that its steel part is free of defects.
They should not be on the oil-containing cuff; it should be perfectly round. There must be a tension spring on the cuff.
Replacing the rear axle gearbox seal of a VAZ 2107
To replace the oil seal, drive the car onto an inspection hole or overpass and drain the oil from the axle.
Unscrew the 4 nuts securing the propeller shaft to the axle gearbox flange, having previously marked the relative position of the flange and the driveshaft fork. To make this operation easier, you can jack up one wheel to rotate the driveshaft.
Having disconnected the driveshaft, move it to the side and hang it on a wire or rope, lower the wheel to the ground and apply the handbrake.
ATTENTION! Before unscrewing the flange nut, be sure to mark its position relative to the flange!
This nut is an adjustment nut; it determines the tension between the cone bearings of the main pair drive shaft. Over-tightening threatens the imminent failure of the entire gearbox mechanism.
Having made a mark on the nut, shaft and flange, unscrew it, counting the number of turns by which it was tightened, and then pull the flange off the drive shaft.
To do this, you need a special puller, which can be purchased at any car market. It is not recommended to knock the flange with a hammer; it can be deformed.
Pull the flange off the shaft splines using a long, powerful screwdriver or an open-end wrench of a suitable size (17-19).
Pry up the oil seal and pull it out of the housing.
Carefully wipe the oil seal seat from dirt and old oil and install a new oil seal.
Carefully hammer the oil seal into place using a mandrel of a suitable size. If you don’t have one at hand, then this can be done using some kind of blunt drift or similar object, lightly tapping the oil seal along its radius evenly until it is flush with the gearbox housing.
It is very important not to distort the oil seal too much when driving it, so that its steel cage does not deform and does not allow oil to pass through.
ATTENTION! If the car's mileage is more than 200,000 km and a large wear appears on the flange, the oil seal must either be driven deeper, or, conversely, not hammered in a little in order to shift its working edge to the flange surface without wear.
Place the flange back at the mark on the shaft, having first lubricated the working surface of the oil seal with transmission oil.
Tighten the nut the same number of turns as it was unscrewed and tighten it to the mark. Align the propeller shaft to the mark and tighten its mounting bolts.
Pour oil into the bridge. At this point, the work of replacing the rear axle gearbox seal can be considered complete.
To summarize, it can be emphasized that replacing the gearbox seal is only required if there is a strong oil leak; slight fogging can be ignored.
Brief summary of the replacement
The work of replacing the oil seal is not so complicated and can be done in a garage if there is an inspection hole, but if you don’t want to mess around in the dirt and waste time, the cost of replacing the oil seal is not so high and the car can be sent for repairs to a service center.
VAZ 2106: replacing the axle seal with your own hands
Rear axle cuff
Probably all motorists know that for long-term service of a vehicle, it needs an eye and an eye. You shouldn’t wait until car parts fail at the most inopportune moment. Experienced drivers carry out preventative maintenance in advance, and their car never fails. One of the most common jobs on the VAZ 2106 is replacing the axle seal. Thanks to its periodic replacement, oil will not leak out of the gearbox. Replacing the axle seal on a VAZ 2106 is a simple procedure and you can handle it yourself.
Why might oil leak?
First, let's try to understand how to determine the time to replace the oil seal. If you believe the manufacturers, a high-quality cuff should last more than 60-70 thousand kilometers. But is this really so? Of course not. Under conditions of constant load, bad roads, dirt falling on parts, and poor quality oil, the oil seal cannot withstand and needs to be replaced quickly. A visual inspection of the rear axle will help identify the need for replacement. It is clear that for a better inspection it is recommended to put the car in a pit. It is often possible to eliminate a leak from the gearbox by tightening loose fastening bolts or replacing the washers with softer options. In this case, copper washers are considered ideal. Often, instead of a washer, a sealant in the form of a thread or ordinary gel is used on threaded connections.
Oil seal replacement process
First you will need to arm yourself with the necessary tools. In particular, you need to prepare:
- flat screwdriver;
- calipers;
- a regular mount or some convenient strong metal rod;
- keys for 13 and 24;
- torque wrench;
- dynamometer;
- durable cord.
On a VAZ 2106, the rear axle oil seal is replaced after the oil is drained from the crankcase. In this case, you must not forget about the oil drain cap, which should be screwed into place.
Removing the axle shafts
Let's get started:
- both rear axle shafts will need to be removed from the rear axle beam.
To do everything correctly, you need to strictly follow the instructions. So:
- dismantle the wheel;
- remove the brake drum;
- we see four nuts that will need to be unscrewed (to avoid problems, you will need to turn the axle shaft until the large diameter holes coincide with the two brake shield locking nuts):
- unscrew the nuts;
- remove the spring washers;
- turn the axle flange 90 degrees so that the large-diameter holes and the brake shield mounting nuts coincide;
- We secure the brake drum with two wheel bolts (you can tighten them by hand).
Note. These wheel bolts do not need to be tightened, leaving approximately 5 mm to ensure acceleration of the drum. But you need to be extremely careful not to damage the brake drum.
- The axle shaft is abruptly removed from the rear axle beam.
Advice. There is a special impact puller that will allow you to remove the axle shaft much faster.
Special impact puller for removing axle shafts
Removing the old cuff
After both axle shafts have come out, you need to do the following:
- holding the cardan from turning with a pry bar (see Repairing the cardan on your own) from turning, unscrew the four nuts securing the hinge flange;
- remove the bolts;
Replacing the rear axle oil seal on a VAZ 2106
- disconnect the flanges using a flat-head screwdriver;
- now you need to wind a strong cord, which was stored in advance, onto the flange of the drive gear (when winding it, you need to make several turns and wind it);
- We use a dynamometer to check the moment of resistance to turning or the RPM of the drive gear (this value must be remembered or written down).
Note. MSP is the product of the dynamometer readings, expressed in kgf, and the force application lever, expressed in cm.
- Now you will need to unscrew the flange mounting nut, holding the drive gear with a special wrench;
- remove the flat washer.
Advice. There is a special wrench to hold the pinion flange. You can even make it yourself from a piece of metal pipe of the required size and two bolts and nuts.
Homemade key for holding the pinion flange
Replacement of the oil seal in the rear axle of the VAZ 2106 continues:
- the drive gear flange is removed;
- we find the drive gear oil seal and remove it from the neck using a screwdriver;
- install a new cuff.
Replacing the drive gear oil seal of the VAZ 2106 gearbox
If an oil leak is detected, it is necessary to replace the gearbox drive gear oil seal with a new one, and for this, prepare the necessary tools for the job. To carry out repair work, you will need wrenches “13” “24”, a screwdriver, a mounting blade, a caliper, a set of torque wrenches and a dynamometer itself to control the tightening force of the bolts. If you have everything you need, then we will proceed directly to the repair work.
- It is necessary to drain all the oil from the rear axle housing into a previously prepared container; to do this, unscrew the plug, and after draining the oil, screw the plug back.
- Remove both rear wheels and take out the two axle shafts.
- Disconnect the propeller shaft from the drive gear flange; to do this, use a mounting spatula to secure the drive shaft from turning and unscrew the four bolts securing the cardan joint flange from the drive gear flange, remove the bolts.
- Using a screwdriver, disconnect the cardan drive.
At the next step of the repair work to replace the drive gear oil seal of the VAZ 2106 gearbox, you will need a dynamometer and a strong cord to check the moment of resistance.
- Wrap the cord around the flange of the drive gear, wind the cord and use a dynamometer to check the moment of resistance to turning the drive gear and remember the value.
- Next, you need to unscrew the nut securing the drive gear flange, for this you will need a special key, which you need to hold the flange from turning and unscrew the nut, remove the flat washer and then remove the flange itself.
- After you have removed the flange, you will see the oil seal, which is why you are bothered with such repairs, you need to remove it, to do this, pry it off with a screwdriver and remove it from the neck of the gearbox housing.
After removing the inoperative oil seal, prepare a new one, lubricate its outer surfaces with Litol-24 grease and press it into place by lightly tapping it with a hammer through a special mandrel; seat the oil seal to a depth of about 1.7-2 mm from the end of the crankcase.
Reassemble in the reverse order, install the flange in place, to do this, secure it from turning with a special wrench, tighten the fastening nut, tighten with a torque wrench with a tightening torque of 12-26 kg.cm, depending on the moment of resistance to turning of the drive gear. Tighten until the required resistance torque is obtained.
After tightening the nut, install all parts back in place in the reverse order of removal. At this point, the repair of the VAZ 2106 can be considered complete.