How to independently adjust and replace the heater dampers on a Lada Kalina
Probably every car enthusiast eventually encounters poor heater performance.
The owners of the Lada Kalina, unfortunately, are no exception. Sometimes it is very difficult to understand the true reason for poor interior heating when a normally working heater suddenly begins to fail to cope with its task. The problem of weak heating can be solved by replacing and adjusting the heater damper on the Lada Kalina.
What is the damper responsible for?
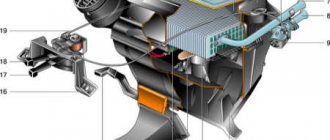
While the engine is running in the cooling system, the heated liquid moves through the heater radiator, while it heats the air flowing through it. The volume of air passing through the radiator and outside it is controlled by the main heater damper. Depending on how the temperature control knob is located on the dashboard, the amount of incoming air will depend.
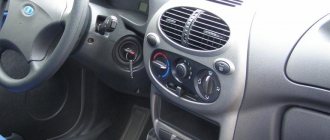
You can distribute air movement throughout the cabin by turning the handle that regulates the position of the damper. But there are cases when the damper jams and it is impossible to properly regulate the flow of heat into the Kalina’s cabin.
If the problem is only with the valve, then you can correct the situation quite simply by tightening its cable. If after these actions the situation has not changed for the better, then you need to conduct a visual diagnosis of the condition of the mechanism and perform a number of simple steps.
Fan replacement
Before removing all the necessary parts, cables and other components from Kalina, prepare a new radiator, pipes and clamps. The pipes will be required in case the old ones are worn out or they have never been changed over the years of operation. As practice shows, hoses are most susceptible to wear due to temperature changes, so in any case they need to be changed from time to time.
Instructions on how to change the radiator are presented below:
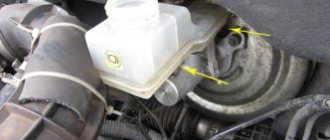
- We begin the replacement procedure in the engine compartment. First, place a container under the drain hole and drain all consumables from the radiator. If you notice that the coolant is already old and has exhausted its service life, which can be understood by its color and deposits, then it is also better to change the antifreeze.
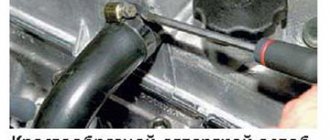
- You need to ensure the most convenient access to all pipes and hoses of the radiator assembly in the engine compartment. To do this, dismantle the power unit air filter housing, the battery, and its platform. Next, you need to disconnect all the lines from the radiator unit in the engine compartment. Having done this, you can use a wrench to unscrew the nut that secures the metal casing to the engine shield. This nut is located next to the pipes that go into the Kalina's interior.
- Next, we move into the car interior. You need to remove the gas pedal; to do this, unscrew the three nuts. As for the brake pedal, it cannot be removed, so just move it to the side as far as possible.
- Now you have to cut the steel casing as shown in the photo, and then cut off the tubes of the radiator assembly. Having done this, you can dismantle the device from the pedals, but to do this you will also need to unscrew the bolts that secure it.
- Before installing a new radiator device, it will be necessary to carefully sand its tubes. Please note that they should be as even as possible. After all surfaces are ready, a line with a widened end is put on the upper tube, and a line with a narrower end is put on the lower tube. The remaining outputs must be connected in the engine compartment instead of the old ones. Also note that on the side of the Kalina’s interior, it is advisable to treat the place where the lines exit into the engine compartment with sound-insulating material.
1. Disconnect the pipes from the radiator system. 2. Cut off the casing and saw off the tubes as shown in the photo. 3. Remove the assembly lock and replace it with a new one. It is most convenient to get to the unit from the passenger seat, which will have to be removed so that you do not have to do acrobatics inside the cabin.
- Remove the cabin filter and remove dirt and dust from the opening.
- Unscrew 4 screws located on the back wall of the glove compartment, and another one under the right heater grille.
- Remove the plastic cover from the stand and unscrew the 2 screws that secure the panel and the blower unit.
- Remove the blower unit, lift the plastic panel and loosen the 2 fan mounting nuts underneath it.
- Move the dashboard as far back as possible and secure it. The turbine must be removed from below, from a lying position.
DETAILS: Gearbox in a Lada Kalina car
New Lada: LADA Kalina ::: Diagram of the engine management system 1.6i (EURO II)
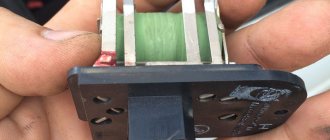
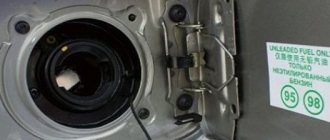
You should not rush to change the fan when it only works at speed 1 and the heater switch is at maximum. This is a sure sign that the resistor located below the glove compartment has failed. The part is a small green plastic panel with a connection connector. Replacing the heater resistor is carried out without any disassembly; you just need to disconnect the connector and unscrew the 2 screws that secure it to the body.
Many novice motorists ask questions: how to remove the heater regulator on Kalina, what LED is in the heater switch on Kalina, what should be done when the heater mode switch on Kalina does not work. Answering these questions, I want to say that initially it is necessary to dismantle our entire mechanism, after which we proceed to disassembly according to the following scheme:
- First of all, disconnect the negative terminal from the battery. This is done to de-energize the system so as not to short-circuit any of the sensors during the disassembly process.
- We remove the radio and turn off the power coming from the wiring harness.
- We remove the damper switch lever, then remove the temperature regulator and the air flow distribution regulator.
- At the bottom, remove the plugs behind which there are 2 screws, unscrew the fastening screws and gradually begin to remove the instrument panel console.
- After our panel is removed, it is necessary to disconnect the power supply connectors located on the back.
- After eliminating the malfunction, assembly is carried out in the reverse order.
To carry out this work, we only need a flat and Phillips screwdriver from the tools.
Difficult or impossible switching of the temperature regulator may be due to a breakdown of the switch itself. On a Lada Kalina car, replacing the heater switch is quite easy (provided that work has previously been done to remove the heater control mechanism). On the rear console of the control panel, unscrew the four screws securing the switch block.
We remove the cable fastening clamps, then remove the cables from engagement with the drive unit. We replace the broken switch and reassemble it in the reverse order. When performing this work, I give you useful advice: the location of the cables on the lever block must be marked with a marker; this is done in order to install the rods in their original places during assembly.
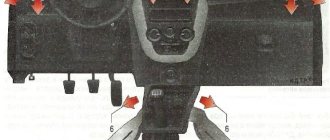
The dashboard of a Lada Kalina car disassembled
When the stove temperature regulator does not work on Kalina, the main reasons for the breakdown may be: a disconnected connection wire or a failure of the thermistor. Such malfunctions are treated by soldering the wire and replacing the broken element. It happens that the stove regulator on Kalina does not work due to a breakdown of the temperature sensor, which happens quite rarely. This sensor is located inside the car interior lamp. If it is found to be damaged, it must be replaced with a new one.
Visual instructions for removing the fan resistor
Answering the question about what kind of LED is installed in the stove switch in Kalina, I want to say that there are LED lamps with a power of 3 Watts and a voltage of 12 Volts. This lamp is quite enough for illumination, but some motorists install LEDs with a power of 5 Watts. This does not affect the work process, the backlight just becomes a little brighter.
How can I check the operation of the heater damper?
- Set the temperature control knob on Kalina to the extreme position of the blue sector, and the fan speed to the maximum value.
- Turn the damper control handle on the block and at the same time watch for changes in the direction of the air flow.
If the air flow remains unchanged, this indicates a breakdown of the mechanical control unit of the stove. Most likely, the rod fell off and stopped screwing onto the roller due to its malfunction. Or the second option could be that the damper is stuck. If your car has climate control, then check the damper micromotor and check the condition of the ventilation control unit, heater and air conditioner.