Replacing the oil pump
There is nothing difficult about replacing an oil pump. We drive the car into the pit, prepare the tools and get to work.
Removing the battery terminal for repair
The plug is unscrewed with a key
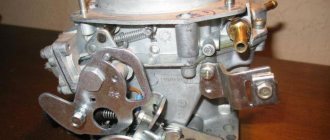
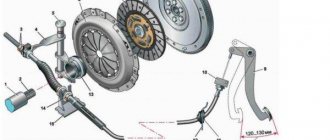
Timing belt without casing.
The location of the 6 bolts that secure the oil pump is marked with arrows
Reassemble the oil pump in reverse order.
The pan and oil pump gaskets must be replaced with new ones. Also, the new oil pump should be washed out of preservative grease and filled with oil (to prevent it from running dry during the first start after repair).
Removing and replacing the pump
This is what the part looks like
- socket heads for 10 and 13;
- extension with cardan;
- pit, overpass or lift.
A lot of work will have to be done under the car, so a hole will not hurt. In the absence of one, you can jack up the car and place it on reliable supports. First of all, unscrew the four bolts securing the engine crankcase protection. After this, drain all the oil from the engine into a previously prepared container.
You need to remember the location of the mounting bolts, because they have different lengths. Pay attention to the gasket under the oil pump housing. If it is damaged, replace it with a new one. In cases where the repair was carried out a long time ago, it is advisable to install all new parts.
Why is an oil pump needed?
Pump appearance
The oil pump in the engine is designed to build up pressure in the oil system, for the necessary lubricating effect of all rubbing parts of the internal combustion engine. If the pressure in the system is insufficient, the lubrication effect will be ineffective, which in turn will lead to the engine being unsuitable for operation. In this case, the low oil pressure warning light on the instrument panel should light up. Therefore, you should not delay repairing the oil pump.
You are left with two options. Take the car to a service station and lose a lot of time and money, or change the oil pump yourself.
Pump diagnostics
Oil pump removed for diagnostics. Symptoms: oil leak.
Secondly, you need to check whether power is supplied to it correctly or whether a wire is broken somewhere. And only after these procedures, if the light does not go out, will you have to change the oil pump.
Why might it break prematurely?
An oil leak from the oil pump can lead to expensive engine repairs.
Replacement of the oil pump can also be caused by poor quality oil, which will lead to rapid clogging of the oil receiver grid and subsequent lack of oil pressure in the system. It is not uncommon for an oil pump to become wet and oil to leak from underneath it. In these cases, you can get by by replacing the gasket and cleaning the oil receiver mesh.
Repair of the oil pump on VAZ 2101-VAZ 2107
Welcome! Oil pump - thanks to this part, the most important units in engines are lubricated with oil, these include: Crankshaft, camshaft and other parts. If you remove this part from the car, then these parts listed above will not be lubricated with oil at all, which will lead to a very rapid failure of the engine, therefore the oil pump must always be kept in good condition and, if it malfunctions, be repaired or replaced with a new one.
Note! To repair this part, you will need to stock up on: A main set of wrenches, as well as a set of flat probes with a width from “0.15 mm” to “0.25 mm”, and also stock up on a straight iron ruler and for ease of work it is better have a vice!
And also to wash the parts you will need to stock up on: Kerosene, a container in which kerosene will be poured and in which you will wash all the removed parts from the oil pump, and also, if possible, stock up on a special cylinder or a compressor with compressed air to blow through the parts !
A short :
Where is the oil pump located? In a car, it is located in the inner part of the engine and therefore it will be virtually impossible to see it without removing the oil pan, because in order to properly examine it you will first need to remove the crankcase protection and only after that the oil pan, and after the operations performed you will see it.
When is it necessary to repair an oil pump? It is subject to repair in case of any breakdowns that will adversely affect the operation of the car engine, namely:
READ How to check the VAZ 2109 carburetor switch
If, for example, the pressure reducing valve that is installed in the pump is worn out or clogged, the oil in the system will rise very much and we will notify you of this by the oil pressure light, which at idle speed at the operating temperature of the engine will constantly glow, because, most importantly, if the oil is faulty pump, you will be immediately notified by an oil pressure lamp. (You can find out more about the oil pressure in the system from the article entitled: “Useful information about pressure in the system”)
Automatic transmission oil pump | Repair | Signs of malfunction | Location
During operation, the oil pump in the gearbox is subjected to the most severe loads, and therefore quite often fails. Problems with the oil pump can be expressed either in the complete inoperability of this element or in a drop in pressure in the lubrication system. Modern automatic transmissions, which use numerous sensors, have the ability to monitor pressure in the system, which allows the car owner to be warned if there are problems with the pump. In most cases, eliminating this breakdown involves replacing the failed element.
Content :
Automatic transmission oil pump - causes of malfunction
Poor quality oil
The main reason for pump failure in a gearbox is the use of low-quality oil. During operation, wear particles and coking oil settle on the moving elements of the pump itself. All this leads to problems in the operation of the pump, which ultimately contributes to its failure.
Use only original automatic transmission oil
Improper use of the vehicle
We also note that the cause of breakdowns may be improper operation of the car in the winter season. Quite often, car owners do not warm up the transmission oil, but start driving in a cold car. As a result, the oil does not have the proper viscosity, which leads to excessive load on the automatic transmission oil pump . Under the influence of such a load, it quickly fails.
Automatic transmission oil pump repair
Signs that suggest repairs
Problems with the oil pump in the transmission lead to insufficient lubrication of the moving parts and an increase in the overall temperature inside the transmission. As a result, significant problems with moving mechanical parts can occur, resulting in the need for costly and complex repairs. That is why at the first sign of oil pump failure, we recommend that you contact experienced specialists. The car owner can identify problems with the gearbox by the appearance of noticeable jerks in the automatic transmission when shifting some gears, which may indicate insufficient lubrication of the clutches, acceleration dynamics suffer, and a continuous howl appears, which changes depending on engine speed. We recommend that you contact the service center as soon as possible, which will allow you to fix the breakdown at minimal cost. Repair of the automatic transmission pump should be carried out by experienced specialists.
To replace the automatic transmission pump, you must first remove the box
Location
The oil pump in an automatic transmission is located inside the gearbox, so if problems arise with this element, it is necessary to dismantle the protective metal casing from the automatic transmission. In most cases, repair work does not require removing the transmission from the vehicle. However, in this case, you must take into account the design features of each specific vehicle and specific modifications of the automatic transmission. Only an experienced technician will be able to quickly determine the location of the oil pump and carry out all the necessary repair work as quickly as possible.
In order to understand the location of the oil pump, familiarize yourself with the automatic transmission structure as a whole.
The design and principle of operation of the oil pump - Video
Replacing the automatic transmission oil pump - as a way to fix the problem
As mentioned above, repair work with the oil pump consists in most cases of replacing this element. It is not very expensive, so car owners and service workshop specialists do not recommend restoring a damaged unit and replacing it with a new pump. In this case, we recommend using only original spare parts, which will guarantee the durability and trouble-free operation of this unit.
Let us recall the common reasons that contribute to automatic transmission pump breakdowns. First of all, such reasons include insufficient oil level in the system. That is why the car owner needs to closely monitor the oil level in the gearbox. It is recommended to carry out this procedure every month on a special overpass or inspection pit.
Wear of the oil pump automatic transmission ZF 4HP20
If the gearbox is repaired incorrectly, problems may occur with the flexible disk, which is necessary for attaching the automatic transmission torque converter to the engine. If the installation technology is violated, the gearbox cannot maintain the size of the end gap, which also leads to problems with the oil pump. Quite often, a car owner operates his car in the most severe mode, which involves fast driving and sharp braking. This mode of operation leads to rapid wear of the entire gearbox and the pump in particular. Problems with the oil pump in the gearbox can occur if the vehicle is not properly maintained.
If it is necessary to repair the oil pump, you must contact experienced specialists who repair gearboxes. If you have special diagnostic equipment, the technician will be able to accurately determine the breakdown and fix it as quickly as possible. In most cases, repair work to replace the oil pump in the gearbox takes about one working day. At the same time, the oil and oil filter elements are replaced. This ensures maximum durability and trouble-free operation of the vehicle.
How to check the oil pump
An emergency light will warn the driver that there are some problems with the oil pump. Strictly speaking, if there is enough oil in the system, but the lamp still continues to light, then there is definitely a malfunction in the operation of the oil pump.
A red “oil can” is displayed on the instrument panel in cases where there are at least minimal problems with engine lubrication
To identify a pump malfunction, you do not need to remove it from the car. It is enough to measure the oil pressure and compare them with normal values. However, it is more advisable to carry out a full check of the device by removing it from the car:
- Drive the VAZ 2106 onto an overpass or inspection hole.
- First of all, turn off the power to the car (remove the wires from the battery).
- Drain the oil from the system (if it is new, then you can reuse the drained liquid).
- Unscrew the nuts securing the suspension to the cross member.
- Remove the engine crankcase.
- Remove the oil pump.
- Disassemble the pump device into its components: remove the valve, pipes and gears.
- All metal parts must be washed in gasoline, cleaned of dirt and wiped dry. Blowing with compressed air will not be superfluous either.
- After which you will need to inspect the parts for mechanical damage (cracks, chips, signs of wear).
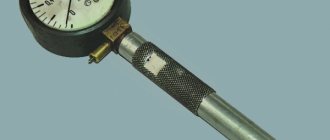
- Further checking of the pump is done using probes.
- The gaps between the gear teeth and the pump walls should be no more than 0.25 mm. If the gap is larger, then you will have to change the gear.
- The gap between the pump housing and the end side of the gears should not exceed 0.25 mm.
- The gaps between the axes of the main and driven gears should be no more than 0.20 mm.
Video: checking the oil pump for serviceability
Oil pressure adjustment
The oil pressure should always be normal. Increased or decreased pressure characteristics always negatively affect the operation of the internal combustion engine. For example, a lack of pressure may indicate severe wear or contamination of the oil pump, and excessive oil pressure may indicate a stuck pressure reducer spring.
In any case, you will need to check several basic mechanisms of the VAZ 2106 in order to find the cause of the high/low pressure and adjust the operation of the lubrication system:
- Make sure that the engine is filled with high-quality oil, the level of which does not exceed the norm.
- Check the condition of the oil drain plug on the pan. The plug must be completely tightened and not allow a drop of oil to pass through.
- Check the operation of the oil pump (most often the gasket fails, which is easy to replace).
- Check the tightness of the two oil pump bolts.
- See how dirty the oil filter is. If the contamination is severe, you will have to replace it.
- Adjust the oil pump pressure reducing valve.
- Inspect the oil supply hoses and their connections.
Photo: main stages of adjustment
Types of oil pumps for internal combustion engines
A wide variety of car models with internal combustion engines, their operating parameters and engine types determine differences in the design of oil pumps. According to the type of control, all modifications are divided into adjustable and unregulated.
- With adjustable oil pumps, the output can be varied to obtain optimal oil pressure in the system.
- When using unregulated oil pumps, parameter correction is carried out using pressure reducing valves.
According to the type of design, oil pumps for internal combustion engines are divided into gear and rotary. In the second case, oil is transported through the system and a certain pressure is created using rotor blades, and in gear structures similar functions are performed by gears.
Gear models of oil pumps, in turn, are divided into designs with external and internal gearing.
- External gear oil pumps have gears located next to each other.
- Internal gear models house a smaller gear inside a larger one. This makes it possible to reduce the dimensions of the structure without reducing operational parameters.
How to replace the oil pump, also known as the oil pump, on a VAZ 2101-VAZ 2107?
Note! This work is labor-intensive, but still feasible if you have special tools, and this work must certainly be performed on an inspection ditch or on lifts, otherwise it will not be possible to change the oil pump normally!
Removal: 1) First you need to remove all the parts that do not allow access to the pump, so first remove the crankcase protection from the car, and only later move on to removing the oil pan. (For information on how to remove the protection and pan, see the article: “Replacing the crankcase pan on a VAZ”)
2) Next, unscrew the two bolts that secure the oil pump to the car engine.
Note! Be sure to look at which bolt you will pull out from where, since the whole point is that these two bolts are of different lengths (One is shorter and the other is longer) and therefore look later when installing a new pump, screw the same bolts specifically to those places where they were installed earlier!
3) Next, when the bolts are unscrewed, remove the pump and pay attention to it, since there will be a gasket on it, which will also need to be removed, and if it is deformed, then replace it with a new one.
Note! In this case, if you are going to install a new pump on a car, then this gasket must be replaced with a new one, since over time the old gasket is compressed and takes on its shape, and when buying a new pump, usually its shape may be slightly different and due to This can cause oil to leak through this place where the gasket does not match its shape!
Installation: Install a new oil pump on the car, in the reverse order of removal.
How to replace the pump drive
Replacing the drive gear is a complicated procedure, but after painstaking preparation you can remove the drive and repair it:
- Remove the car's ignition distributor.
- To remove the intermediate gear, you will need a special puller. But it is possible to get by with an ordinary wood stick with a diameter of about 9–10 mm. The stick must be hammered into the gear and then rotated clockwise. The gear will then simply come out.
- In place of the worn gear, install a new one using an ordinary stick.
- Replace the ignition distributor.
READ Cigarette lighter VAZ 2108 does not work
Bypass (reducing) valve
The drive and driven gears rarely break because they have a simple design. In addition to oil seals and gaskets, there is another component in the pump design that can fail, which will have disastrous consequences for the motor.
The pressure reduction (bypass) valve on the VAZ two thousand one hundred six is responsible for controlling the oil pressure in the system. As needed, this particular valve can reduce or increase the pressure so that it corresponds to the norm.
Increasing or reducing the existing pressure is done by ordinary actions: either the valve closes or opens. Closing or opening of the valve can be due to a bolt that presses on a spring, which, in turn, closes the valve or opens it (if there is no pressure from the bolt).
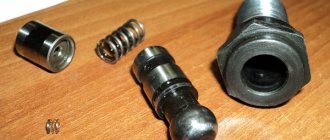
The bypass valve mechanism consists of four parts:
- small body;
- a valve in the form of a ball (this ball closes the passage for oil supply, if necessary);
- spring;
- stop bolt.
On a VAZ two thousand one hundred six, the bypass valve is installed specifically on the oil pump housing.
installation of an oil pump on a VAZ 2106. Photo: main stages of adjustment. : how to measure gaps correctly
After replacing all worn parts, the oil pump must be reassembled in reverse order.
replacing the oil pump drive mechanism
Purpose of the oil pump
For most engine parts, static lubrication is not enough - they require regular supply of fresh portions of lubricant, pre-cooled and filtered from wear products. Therefore, it is important to ensure oil circulation in the system by creating a certain pressure in the lines. It is this task that is assigned to the oil pump.
The oil pump creates a vacuum in the system by sucking lubricant from the oil pan through the oil receiver. While moving along this line, the oil is filtered through a sequential full-flow filter, or less often through a partial-flow element. The oil passing through the pump enters the main line, and from there it is distributed through channels and supplied to consumers in accordance with their operating conditions. Thus, the crankshaft and camshaft bearings receive oil under maximum pressure, the timing gears, valve mechanism and part of the cylinder mirror are lubricated by splashing, and the oil flows to the rods, pushers, and cams by gravity.
Design and principle of operation
The oil pump is driven by torque from the camshaft through a gear or pulley. There are also stand-alone pump drive circuits that use an electric motor, but they are not widely used.
Structurally, the pump is represented by a sealed metal casing, in which one pair or two pairs of gears are located. In a pair of gears, one of the gears is the drive one, that is, it is connected by a key to the drive shaft, and the second one rotates freely. When designing and manufacturing oil pumps, the main design requirement is the minimum clearance between the teeth of the interacting gears, as well as between the teeth of each gear and the housing. This is necessary to ensure maximum efficiency of the device.
The lubricant is transported in the depressions formed between the teeth of the interacting gears as they rotate. Thus, the gears “squeeze” oil into the main channel in a continuous flow, forming the required pressure, the regulation of which is assigned to the pressure reducing valve.
The pressure reducing valve is most often located in the oil pump housing and is necessary to protect the lubrication system from excess pressures, which are especially dangerous when starting a cold internal combustion engine, when the viscosity of the lubricant is high. The valve is located in a channel, the opposite edges of which are connected to the discharge and suction chambers of the oil pump. When the pressure is normal, the channel is blocked by a piston or ball, which is pressed by a spring. The compression of the spring is controlled by an oil plug, thereby setting the pressure in the system. When the threshold value is exceeded, the piston or ball moves away from the seat, opening the channel and releasing part of the oil pumped into the main line back into the suction chamber.
Modern oil pumps are divided into one- and two-section. The difference between the two-section system and the design described above is the presence of an additional housing section, the gears of which are responsible for supplying oil to the oil cooler for cooling, usually with subsequent drainage into the sump. A classic example of such a device is the engine pumps of trucks of the ZIL and YaMZ brands.
How to repair the oil pump, also known as the oil pump on a VAZ 2101-VAZ 2107?
Disassembly: 1) First of all, you will first need to remove the pump from the machine for its upcoming repair. (For information on how to remove the pump, see the article: “Replacing the oil pump on a VAZ”)
2) Next, install the pump in a vice and then simply use a wrench, or better yet, a socket wrench (Which is shown in the photo), unscrew the three bolts that secure the inlet pipe to the body of this pump.
Note! When unscrewing the screws, be sure to pay attention to the bolts that secure the inlet pipe to the oil pump housing. So, one of these fastening bolts will be shorter than the others, so when reassembling, screw this bolt into the same place from which it was unscrewed!
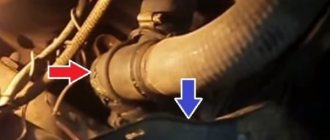
3) Now that the bolts are unscrewed, slowly disconnect the intake pipe from the body, but when disconnecting, make sure that the pressure reducing valve washer (the washer is installed in the place shown by the arrow) is not lost, otherwise you will have to find the same one, only the newest one.
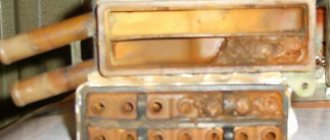
Note! Carefully inspect the removed pipe; it should not be deformed; there should be no cracks or other defects. Then pay attention to the mesh of this pipe, it is almost always dirty, so remove it or directly clean it of dirt without removing it, rinsing it thoroughly with white spirit!
And in this case, if your mesh cannot be cleaned or it is damaged, then change it (When replacing the mesh, be sure to change it to one in which the holes will coincide in diameter with the holes of the old mesh). If you haven’t found the exact same mesh, then change the oil pump inlet pipe!
4) Now that everything is disconnected, carefully remove the pressure reducing valve spring without deforming it.
Note! There should be no damage or various types of deformation on the pressure reducing valve spring. If possible, check this spring for its elasticity, for this: First, using a ruler, measure the length of the spring, which should be “20 mm” with its vertical load of “6.15 - 6.65 kg”. And in a 100% free state, the length of the spring should be within “38 mm”!
5) And then remove the pressure reducing valve itself.
Note! Carefully inspect the pressure relief valve as well as the place where it comes into contact with the oil pump cover. In this place where it comes into contact, there should be no damage of various kinds of burrs, etc. There should also be no dirt or deposits, since due to all these defects the pressure in the lubrication system will drop!
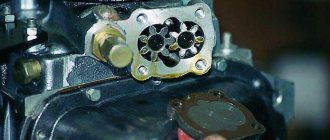
6) Then remove the cover from the oil pump housing.
Note! When the cover is removed, inspect it, pay special attention to the surface of the cover where it comes into contact with the pressure reducing valve and the inlet pipe, and also check the contact surface of this cover with the edges of the oil pump housing. In all of the above places, there should be no various types of damage such as nicks, burrs, etc. And there shouldn’t be any contamination or deposits, otherwise the pressure in the lubrication system will drop evenly with the above-mentioned dilemmas with the lid!
7) Next, remove one of the two gears from the oil pump housing by pulling it up and then put it aside.
Note! You may first remove not the driving gear as shown in the photo above, but the driven one and it will come off a little differently, so if you pulled out the gear and it came out without a roller as shown in the photo above, do not be alarmed as this will mean that you pulled out the driven gear and it usually comes without a roller but separately!
 After the drive gear is removed, remove the driven gear by also pulling it up and it will come off.
9) Next, wash all the previously removed parts well in a container into which kerosene will be poured and after that, be sure to blow all the parts with compressed air so that they dry quickly and so that all the dirt that is in inaccessible places is removed.
Note! When the parts are dry, check their condition, replace the deformed parts with new ones!
Assembly: 1) First, install the driven gear on the axis indicated by the arrow, and during installation, use a ruler or eye to determine the gap between this axis and the inside of the driven gear.
Note! The usual gap should be within the range of “0.017-0.057 mm”, and the very last limit of this gap can be “0.1 mm” but less than that!
2) Next, install both gears in the same way as they were installed earlier, and after installation, take the feeler gauge in your hands and insert it between the gear teeth as shown in the figure below:
Note! This gap can start from “0.15 mm” and ending with “0.25 mm”, but less than that!
3) Now, again, using the same probe or probes, check the gap between the outer diameter of the gear and between the wall of the oil pump housing - this diameter, like the previous one, should be within the limits of “0.15-0.25 mm”, but less than that.
READ Bmw E34 Speed Doesn't Drop
4) Then apply a thin feeler gauge first to the end of the driven gear, and then to the end of the drive gear, and in both cases place a ruler on top so that it touches the edges of the housing.
Note! This gap should be within the limits of “0.161 - 0.166 mm”, and the maximum permissible value is “0.2 mm”!
5) Next, try to rotate the driven gear and make sure that both gears rotate smoothly and without jamming.
6) Next, measure the gap between the hole in the oil pump housing (indicated by a reddish arrow), and between the supporting surface of the drive gear, which is indicated by a blue arrow.
Note! This gap should also be small and fluctuate between “0.016 – 0.055 mm”, in the latter cases this gap can be “0.1 mm” but less!
7) And finally, install all the parts in the reverse order of removal, at the same time, replace all the parts that are very worn out with new ones and always remember that the oil pump plays a very important role in the car and if it fails, the engine can in a very short time (2 -5 min) grab the wedge due to which its main parts such as pistons, etc. will fall into disrepair.
Additional video: The video located just below shows a short check of the oil pump for serviceability, therefore, in addition to the main article, we also recommend that you watch this video.
Necessary tools and equipment
To replace the oil pump you will need:
- set of socket wrenches;
- knife;
- jack;
- strong wood block;
- wood spacer;
- container for draining oil;
- new oil pump gasket;
- new pan gasket;
- new oil pump.
replacing the oil pump on classic VAZ models. Required Tools
To repair the VAZ 2106/07 oil pump you will need:
- keys at 10;
- ruler;
- a set of flat probes;
- vice.
Design features of rotary oil pumps
As a rule, a rotary-type oil pump consists of a small number of parts, including:
- suction and discharge cavities;
- external and internal rotors;
- drive shaft.
Oil pump operation
with rotors is based on the interaction of two rotors. In unregulated designs, the oil that is drawn in is transferred into the system by rotor blades. If the pressure becomes excessive, the pressure relief valve opens and excess oil is released.
Signs of a faulty oil pump
Like any other system with moving parts, the oil pump can fail.
Malfunctions in the oil system will be indicated by an oil pressure lamp.
.
The reasons for this may be various factors, including:
- decrease in oil level in the crankcase;
- breakdown of pressure monitoring devices;
- use of low-quality oil or oil unsuitable for this pump;
- oil filter clogged;
- breakdown of the safety or lubrication valve;
- clogging of the oil pump itself and other problems.
Signs of problems with the lubrication system include:
- decrease in oil pressure;
- increase in its consumption.
This will be indicated by a warning light on the dashboard.
MAIN FAULTS
The design of the oil pump, no matter what type it is, is relatively simple, which ensures its reliability and long service life. And yet it does have faults, or rather there is only one – a decrease in productivity, which leads to a drop in pressure in the system. And this can lead to more serious damage, since components that are not sufficiently lubricated begin to wear out intensively due to oil starvation. This can happen for various reasons.
- The first of these does not apply to the pump, but leads to negative consequences in its operation - clogging of the oil receiver mesh with wear products and dirt. As a result, insufficient oil flows to the pump. It is not difficult to fix such a malfunction - just remove the pan and oil receiver, then thoroughly clean and rinse the mesh.
- The problem with pressure drop can occur due to wear of the pump components or prolonged operation with oil that contains a large number of contaminants. The result of this is the formation and increase of gaps between pump parts. Because of this, the lubricant simply flows through these gaps inside the injection cavity and the gears or rotors are not able to capture it in order to pump it into the line. In most cases, the performance of the lubrication system is restored by replacing worn elements or the assembly as a whole.
- The bypass valve can also create problems. Due to dirt, it can jam in the open position, and oil will constantly flow into the pan. This malfunction can be eliminated by disassembling and washing the pump and its channels.
Advantages of variable oil pumps
The use of adjustable oil pumps is more preferable, since such models provide a number of noticeable advantages:
- reduction in the share of power taken from the engine (by approximately 33%),
- reduction in the intensity of oil waste due to a decrease in the number of revolutions, a decrease in frequency,
- reduction of oil foaming.
An adjustable oil pump makes it possible to obtain uniform oil circulation in the lubrication system and increase its service life (replacement is required less often), which provides significant economic benefits.
VAZ 2106 engine lubrication system
The lubrication system of any engine is a complex of various elements and parts that allow high-quality maintenance of the power unit. As you know, the key to successful engine operation is proper lubrication so that the moving parts do not wear out for as long as possible.
On VAZ 2106 cars, the lubrication system is considered combined, since the rubbing parts of the engine are lubricated in two ways:
- through splashing;
- under pressure.
The minimum oil pressure in the system at an engine operating temperature of 85–90 degrees should be 3.5 kgf/cm
2
, maximum - 4.5 kgf/cm
2
.
The total capacity of the entire system is 3.75 liters. The lubrication system on the “six” consists of the following components, each of which consumes or conducts its own part of the oil:
- fluid sump;
- level indicator;
- pumping unit;
- engine oil supply pipe;
- oil filter element;
- valve;
- oil pressure sensors;
- highways.
The oil pump plays a vital role in the operation of the entire lubrication system. This device is designed to ensure continuous circulation of oil throughout all components of the system.
High-quality engine lubrication allows you to extend its life even with aggressive driving style
Features of repair and replacement
Oil pump repair may involve replacing the working pair (which is not always advisable), replacing the pressure reducing valve and rubber goods, and installing bushings in worn mounting holes. In some cases, it is possible to restore gears by surfacing followed by metalworking. Broken threaded connections can also be repaired - they are bored out or equipped with threaded bushings.
However, much more often the oil pump is replaced as an assembly. This is due to the relatively low cost of the part, as well as the high labor intensity of work to restore worn elements. In this case, the process comes down to dismantling the worn oil pump and installing a new one with a sealed connection to other elements of the lubrication system. Of course, this involves replacing the engine oil and filters, and subsequent flushing of the system will not be superfluous.
The nature of the operation, reliability and service life of the engine largely depend on the technical condition of the lubrication system elements. Therefore, it is important to carefully monitor their operation and do not forget to check the serviceability of parts during vehicle maintenance.
DIY oil pump repair
The oil pump is considered a mechanism that can be repaired even by an inexperienced driver. It's all about the simplicity of the design and the minimum number of components. To repair the pump you will need:
- open-end wrenches "10" - 2 pcs.;
- ruler - 1 pc.;
- probes - set;
- vice.
To repair the oil pump, you need to remove it from the car and disassemble it. It is best to disassemble the part in order:
- Disconnect the oil supply pipe from the pump housing.
- Remove the three mounting bolts.
- Disconnect the pressure reducing valve.
- Remove the spring from the valve.
- Remove the cover from the pump.
- Remove the main gear and shaft from the housing.
- Next, remove the second gear.
Photo: main stages of repair work
At this point, disassembling the oil pump is considered complete. All seized parts must be washed in gasoline (kerosene or ordinary solvent), dried and inspected. If a part has a crack or signs of wear, it must be replaced.
The next stage of repair work is to adjust the gaps:
- between the axle and the second gear the gap should be no more than 0.1 mm (measure with a ruler), if the gap is larger, then the second gear must be replaced;
- between the teeth of two gears there should be no more than 0.25 mm;
- the gap between the top of the gears and the cover is no more than 0.2 mm;
- the gap between the pump casing and the outer part of any gear is no more than 0.25 mm.
After checking the parameters, you can proceed to the final stage of repair - checking the spring on the valve. You need to measure the length of the spring in the free position - it should be no more than 3.8 cm in length. If the spring is very worn, it is recommended to replace it.
Video: how to measure gaps correctly
It is mandatory to change the oil seal and gaskets during repairs, even if they are in satisfactory condition.
After replacing all worn elements, the oil pump must be reassembled in the reverse order.