How to remove the stove VAZ 2105
In order to remove the heater from a VAZ-2105 car, it is necessary to disconnect the ground wire from the car’s battery.
Remove the instrument panel, glove box body and radio mounting panel (for more details, see the “Instrument Panel” chapter).
Move the heater valve control lever all the way to the right and drain the liquid from the engine cooling system
Loosen the clamps 7 (Figure 1) and disconnect the rubber hoses 8 for draining and supplying fluid from the heater pipes.
Unscrew the two bolts securing the seal 9 on the heater radiator pipes inside the engine compartment and remove the seal.
Remove the trim of the heater control levers, unscrew the bolts securing the bracket 2, loosen the bolts of the brackets securing the shells of flexible rods 5 on the bracket, disconnect the rods and remove the bracket.
Unscrew the screws and remove air duct 1 for internal ventilation.
Overcoming the resistance of the latches of the nozzle housings 10 for heating the side windows, remove the right and left nozzles.
Unscrew the nut securing the right air duct 4 for the heated side window. Release the latches of the damper housing 12 and remove the air duct.
Dismantling, repair, replacement of the VAZ-2105 stove
Remove the left air duct in the same way.
Remove the four spring clips and fan shroud assembly.
Remove the four nuts securing the radiator casing, disconnect the ground wire under one of the nuts on the left side, remove the radiator casing and air duct 6 for heated windshield.
Installing the heater on the car must be done in reverse order.
It is necessary to pay attention to the correct installation of the sealing gasket between the radiator casing and the car body
When assembling and installing the heater, you need to adjust the heater control (see “Adjusting the heater control”).
After installing the heater on the car and connecting the hoses, fill the engine cooling system with coolant and check the tightness of the hose connections.
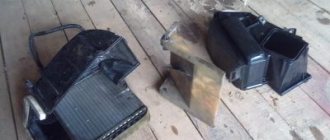
Disassembly and assembly of the heater
Remove two spring clips 13 (Figure 2) and remove the fan from casing 3.
Radiator for stove in VAZ 2107: copper or aluminum
Unscrew the impeller fastening nut 11 and remove it from the electric motor 12.
Unscrew the nuts securing the brackets and remove the air distribution cover 16 of the fan casing 2.
Having pressed the latches of the damper housings of the 15 air ducts for heating the side windows from inside the casing, remove the housings assembled with the dampers and disconnect the rods from the damper levers.
Slightly unscrew the bolts securing the brackets that clamp the shells of the flexible rods of the crane drives and the damper of the windshield heating air duct, and remove the rods.
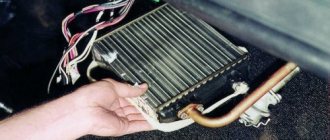
Having unscrewed the nut of the bracket securing the inlet and outlet pipes 9, remove the bracket and remove the radiator 8 from the casing 5. Having unscrewed the fastening nuts, disconnect the outlet pipe and valve 10 with the inlet pipe from the radiator.
Loosen the bolt securing the shell of the flexible rod of the air supply cover 6 and remove the rod. Unscrew the fastening nuts, remove the air supply cover bracket and remove the cover.
Reassemble the heater in reverse order. When assembling, be sure to ensure that the sealing gaskets are installed correctly. When installing flexible rods, it is necessary to maintain the installation dimensions of 5±2 mm (as shown in Figure 3) of the ends of the rod shells behind the brackets for their fastening on the tap, radiator casing and fan guide casing.
Adjusting the heater control system
Remove the trim on the heater control levers.
Tuning the stove VAZ 2107
Place the valve levers and air intake covers in the fully closed position, and the windshield heated air duct flaps in the fully open position and check the distance between bracket 3 (Figure 3) and the control levers, which should be 5 mm. If this value does not correspond, it is necessary to adjust the heater control.
Remove the instrument panel (see chapter “Instrument panel”).
Slightly unscrew the bolts of brackets 2 and secure the shells of all three rods on bracket 3 so that the control levers do not reach the end of the bracket by 5 mm when the tap and air supply cover are fully closed, and the windshield heating air duct flaps are fully open.
Install the instrument panel and the trim of the heater control levers.
Features of the VAZ 2109 stove design
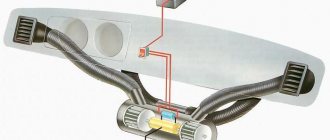
1. Heater casing mounting bracket; 2. Heater control damper; 3. Left heater casing; 4. Leg heating damper rod; 5. Radiator gasket; 6. Radiator; 7. Heater gasket; 8. Electric motor; 9. Fan shrouds; 10. Fan impeller; 11. Heating damper; 12. Heated windshield air duct; 13. Side nozzle air duct; 14. Side nozzle; 15. Central nozzle flap; 16. Blade pusher; 17. Blade axis; 18. Shoulder blade; 19. Lever for shutting off the central nozzle; 20. Windshield heating damper rod; 21. Lever for changing the direction of air flow; 22. Air heating control handle; 23. Windshield air supply handle; 24. Leg air supply handle; 25. Control lever bracket; 26. Bracket for fastening the rod shell; 27. Crane control rod; 28. Heater control damper rod; 29. Foot heating flap; 30. Axes of air heating control levers; 31. Screw clamp; 32. Heater valve; 33. Crane body; 34. Valve lever; 35. Hoses connecting the tap to the heater radiator; 36. Internal ventilation duct; 37. Windows for heating the feet of rear passengers; 38. Heater valve; 39. Driver's foot heating window; 40. Facing the central pillar; 41. Internal cavity of the central pillar; 42. Exhaust ventilation duct; 43. Upholstery of the central pillar; 44. Exhaust ventilation deflector lining; 45. Rubber valve; 46. Deflector housing; 47. Exhaust ventilation deflector; 48. I. Heater; 49.II. Heater operation diagram; 50.III. Heater valve; 51.IV. Interior exhaust ventilation
The stove consists of 2 plastic casings (right and left), which are connected to each other along the perimeter with fastening brackets. A special harness is placed into the grooves of the casings for sealing. The electric fan, which forces air into the passenger compartment, is secured with two screws on top of the heater. The design of the stove is made in such a way that the electric fan can be easily removed from the engine compartment.
How to properly flush the radiator of a VAZ-2107 stove
During operation, the stove radiator becomes dirty, as a result of which its heat transfer deteriorates. You can restore normal operation of the stove by flushing the heat exchanger. You can wash a dismantled radiator with maximum quality, but in some cases you can achieve the desired result without removing the heat exchanger. A simplified flushing scheme involves disconnecting the inlet and outlet pipes in the engine compartment and supplying tap water to one of them. From the second pipe the water drains out. After rinsing with water, the radiator can be filled with a cleaning solution using a watering can and the scale allowed to dissolve for 2–3 hours, after which the solution can be drained. If the radiator is not very “running”, then such a measure may well improve its performance. It should be remembered that an aluminum radiator cannot be washed with alkaline solutions, and a copper radiator cannot be washed with acidic solutions. For washing, you can use special products such as “Mole”, “Comet”, “Tiret”, “Kalgon”, etc.
How to remove a radiator
In most cases, you still have to remove the heater radiator for cleaning. To dismantle the heat exchanger you will need:
- keys for 7, 10 and 17;
- Phillips screwdriver;
- spare gaskets;
- rags.
After completion of work, a certain amount of coolant will be required to fill the system.
To remove the heater radiator of a VAZ-2107 car, you must:
- Free the system from coolant by unscrewing the drain hole on the cylinder block with a 17 key, as well as the caps of the expansion tank and the cooling radiator.
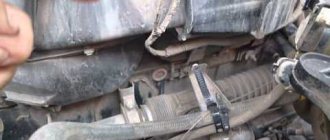
- Open the hood and use a Phillips screwdriver to loosen the clamps that secure the hoses of the inlet and outlet pipes.
- Remove the hoses from the fittings.
- Using a 7 key, unscrew the two bolts securing the pipes.
- Remove the seal.
- Move into the interior and unscrew the screws holding the radio shelf.
- Remove the shelf and use a 7 key to unscrew the fastening of the radiator valve drive cable.
- Disengage the steel brackets that secure the two halves of the heater body together.
- Remove the lower half of the stove body.
- Remove the heat exchanger along with the tap.
- Using a 10mm wrench, unscrew the bolts securing the valve to the radiator.
- If necessary, replace the gasket.
- Using a 10mm wrench, unscrew the inlet pipe from the tap and also replace the gasket if the old one has become unusable.
How to install a radiator
You can wash the dismantled radiator:
- water directed into the product using a Karcher installation under a pressure of 5.5 atmospheres;
- caustic soda solution poured into the radiator for 1 hour;
- by complete disassembly method. In this case, you should unsolder the radiator tanks with a torch or soldering iron, clean the internal cavity of the product using mechanical and chemical means, dry and solder the structure.
Before installing a new or repaired stove radiator in place, you should check the functionality of the faucet. If there are any problems with the old faucet, it is better to immediately replace it with a new one. In addition, for high-quality assembly you will need a sealant.
If there are any problems with the old faucet, it is better to immediately replace it with a new one
To install the heat exchanger you need:
- screw the inlet pipe to the tap, placing a new gasket lubricated with sealant between them;
- screw the tap to the radiator body, also placing a gasket treated with sealant between them;
- place the radiator in place;
- put the hoses on the pipes and clamp them with clamps;
- fill the system with coolant;
- tighten the caps of the cooling radiator and expansion tank and start the engine;
- with the engine turned on, check the connections for leaks;
- if everything is in order, attach the crane cable;
- Reinstall the lower part of the heater housing, securing it with brackets;
- Replace the radio shelf, securing it with self-tapping screws.
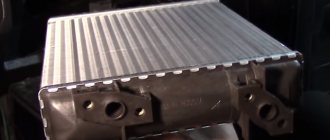
The radiator used in the VAZ-2107 heater is integrated into the cooling system of the power unit and, despite its simple design, plays a primary role in creating a favorable microclimate inside the car. Like any other vehicle component, the radiator may require revision or replacement after some time of operation. The VAZ-2107 can be equipped with heater radiators made of various materials (most often copper, brass or aluminum) and with different tube configurations (round or square). Any driver can replace the heat exchanger independently, following a certain sequence of steps. To flush the radiator, you should use safe products that will not damage the body of the product.
Control mechanism
The control of the VAZ 2107 stove is mechanical. It consists of a fan switch and a block of sliders. The control mechanism is installed on the center console at the top, which provides easy access to the elements.
There are three sliders of the control mechanism, and each of them controls its own element:
- The top one is responsible for supplying antifreeze to the radiator and is connected by a cable to a tap installed on the inlet pipe. The extreme left position of the slider means the tap is closed (the stove does not heat), the right position means the tap is open (antifreeze enters the radiator).
- Middle – air supply damper control. When you move it to the left, the damper shuts off the air supply from the street (closed air circulation in the cabin), while the right position means the air flow is open (air from the street enters the cabin).
- The lower one controls the damper for distributing the flow through the air ducts. Left position - the flow is supplied through the side and central deflectors, right - to the windshield area. Each of these sliders can be adjusted to any position to achieve optimal stove operation.
Exhaust ventilation
This car is also equipped with exhaust ventilation to remove air from the passenger compartment. Unfortunately, there is no diagram of this ventilation specifically for the VAZ-2104, but it is identical to the VAZ-2105 model, which is presented below:
So, 1 is the car heating system, 2 3 is hidden under it , through which air can escape when the windows are closed. The same valve prevents dust and moisture from entering the interior.
Correct control of the heating and ventilation system of the VAZ-2104
Correct control depends on the weather outside. In summer, when it is hot and there is no need to supply hot liquid to the radiator :
- The lower handle of the system control panel is moved to the right all the way to open the air supply cover and supply fresh air to the cabin;
- Air flow distribution is carried out by the middle handle;
- To ensure a greater flow of fresh air, you can turn on the fan;
When it's cold outside:
- Move the top handle all the way to the right to ensure the supply of hot liquid to the heater radiator;
- Turn the nozzles of the side air ducts so that warm air flows onto the side windows in the area where the side mirrors are located;
- To warm your feet, you need to lower the heater housing cover down;
If the windshield is covered with frost and needs to be defrosted quickly:
- Move the top handle to the right all the way for maximum fluid supply to the heater radiator;
- Middle handle - all the way to the left to shut off the air supply from outside the car;
- The lower handle - to the right all the way to ensure the supply of warm air only to the windshield;
Radiator and heater fan
You should know that in order to always keep the interior of a five-wheeler warm and cozy, especially on winter days, you need to be able to increase the amount of heat supplied. Which part is directly responsible for supplying warm air? Of course, the radiator. But there is a problem - at the top five the fan is so loud that it makes you laugh. It is very small and simply not capable of creating the required flow. What to do? First, let's compare the fans on the VAZ 2105 and the VAZ 2108. The first motor consumes 4.5 A current and has a rotation speed of 3000 rpm, and the second one 14 A, but spins 4100 rpm. This already says something. It is recommended to replace the fan with another one.
Replacing the heater fan VAZ 2105
Replacing the heater fan on a VAZ 2105 is carried out as follows:
- the lower part of the stove is removed (this is a simple casing, on top of which a regular electric fan is installed);
- the old fan is removed;
- we cut off one of the aerodynamic ridges that supply air to the legs of the driver and passenger (this is done due to the fact that the fan motor of the VAZ 2108 is much longer);
- the impeller is also removed, which will not allow the fan from the VAZ 2108 to sit in place;
- Instead, a homemade one is installed.
Advice. In order not to remove the impeller, but to leave everything as is, you can use another fan. A standard five-bladed fan for classics, which has a motor several times more powerful, is suitable. And its weight is much lighter, and the rotor of the new motor rotates stronger than even that of the VAZ 2108.
- increase the diameter of the impeller hole;
- we insert a new shaft there (we do this very carefully so as not to break the impeller);
- connect the fan and check its operation;
- adjust the resistor and assemble everything in reverse order.
Advice. It is recommended to replace the resistor on the five by installing the eight version. The new resistor must ensure quiet operation of the fan. The fan switch should also be replaced.
Work order
Before starting work, you need to fully read the instructions on how to repair the device. A complete understanding of the process will allow you to act more confidently. The technician must first understand how to remove the fan. First you need to prepare the car for work: remove the gear shift lever, remove the radio and all the blocks with wires. Now you can start working:
- To gain access to the device, carefully remove several parts. First you need to remove the shelf on the passenger side, it is secured with 4 bolts.
Now you need to remove the panel with the cigarette lighter, it is removed with a screwdriver, you need to pry the corners one by one until it clicks.
Then you need to dismantle the console with the buttons; it can be easily lifted with a screwdriver and moved upward. This makes the two fasteners located underneath accessible; they need to be removed. Now the part is completely free, it can be removed and put aside.
Also, access to the engine cooler is blocked by air ducts; to dismantle them, you need to pry off the plastic latches with a screwdriver
But you need to understand that the fasteners are made of fragile plastic and must be bent carefully. Access to the bottom of the heater is now open
There are four latches on the stove - two on each side. You can bend them with your fingers or a screwdriver, but be careful - the latches spring strongly and fly off far away. Now access to the required unit is open, and you can begin to remove the VAZ 2107 heater fan. The electric motor and cooler are secured with two steel latches, one on top, the other on bottom. You can bend them with a screwdriver with a thin and long tip. The dismantled unit is removed and a new device is installed in its place.
Now you can perform assembly in the reverse order of disassembly.
You can also see the procedure for replacing the stove fan on a VAZ 2107 in this video:
The stove blows cold air. How to turn on the stove VAZ 2107
» The heater blows cold air: how to turn on the heater on a VAZ 2107 How to turn on the heater so that hot air blows If you are cold in your car, then it’s time to turn on the heater. It seems like a simple question, but sometimes warm air comes out, something hums, but there is no heat and warming up does not help.
Therefore, this article is not just an answer to the question of how to turn on the heater on a VAZ 2107, and what to do if the heater blows cold air, but a consideration of all possible cases with specific recommendations.
As a rule, it heats up faster when taking air from the street. Lower: extreme left position – heated side windows, right – heated windshield.
Selecting a new heater radiator
Buying a stove radiator today is not at all a problem. Automotive markets and spare parts stores are overflowing with such products, but making the right choice is not always easy. It's all about the manufacturer and price.
The cheapest radiator from an unknown manufacturer, also made from an unknown alloy, will cost you a maximum of 500 rubles. Naturally, no one will give a guarantee for several years of its productive operation. At the same time, you can buy a high-quality heat exchanger made of copper-brass alloy with a guarantee, at a price of about 3,000 rubles.
There are also compromise options that involve fairly high-quality products from well-known manufacturers at reasonable prices. Below is a table indicating the models of VAZ 2107 heater radiators from trusted manufacturers.
New interior heater radiator
The stove radiator is not a rare part, and buying it is not difficult; the whole question is in the price of the product. A similar stove at a VAZ can be purchased for a few hundred dollars, but it is difficult to figure out who the manufacturer is and what it was made from. Nobody gives a guarantee for such spare parts. You can buy it for several thousand rubles, then you will receive a product with a guarantee for several years. The alloy of such a radiator will be copper-brass.
The choice is up to the buyer. There are also compromise solutions when a trusted manufacturer offers to buy high-quality stove radiators at an affordable price.
It is worth noting several manufacturers from different countries whose products can be safely purchased for installation on a VAZ, such as:
- Copper radiators – Hola Italy, SHAZ Russia.
- Aluminum radiators – Extra Hungary, AVTOVAZ Russia.
The list of domestic and foreign manufacturers of stove radiators that have earned a good reputation is quite large. It is necessary to check at the point of sale or read it on the packaging.
Tuning the VAZ 2107 stove
You can improve the VAZ 2107 heater by installing an additional fan to increase the air flow to the windows. Another common type of tuning of the VAZ 2107 stove is replacing the fan mode switch with a button.
Modification of the VAZ 2107 stove (DETAILS)
All cars of the “Classic” family from AvtoVAZ were equipped with an interior ventilation and heating system. In many ways, they were similar in design and simple, since they did not use modern air conditioners. And although it is impossible to wait for coolness in the “Classics” cabin in the summer, the heating system will not allow you to freeze in winter.
Next, let's look at the heating and ventilation system for the interior of one of the two station wagon models that belong to the “classics” - VAZ-2104.
The heating system of the VAZ 2104, like the other models of the family, was derived from the liquid cooling system of the power plant. To make it clear, this system includes two radiators, which remove heat from the coolant passing through them.
But one of the radiators is the main one; it regulates the temperature of the liquid, so heat is removed from it into the environment so that heat exchange is carried out efficiently. It is installed in front of the car, under the radiator grille.
The second radiator provides interior heating. It also carries out heat exchange with heat being released to the air, but this air is supplied to the cabin, and this ensures its heating.
But this radiator is small in size, so to efficiently heat the interior, an entire system is used to ensure forced air supply to the radiator, removal of already heated air to a certain area of the cabin, while it is possible to shut off the supply of heated liquid to the radiator of the VAZ-2104 stove. After shutting down, the system can continue to operate, providing cold air into the cabin - which is provided by the cabin ventilation system in the summer.
Heating and ventilation system design
Next, let's look at what kind of device the VAZ-2104 stove has, then how it works, as well as how the interior ventilation works.
For clarity, a diagram of the VAZ-2104 stove is provided
So, under position 1 there is a resistor for changing the fan speed. The base of the stove consists of a fan housing 2 and a blower fan guide 3 . They are connected to the upper part of the body with brackets 4 . The upper part of the housing is the radiator casing 5 . An air supply hatch 6 .
8 is located inside the upper part 7 is used to ensure its tight fit . This radiator is connected to the cooling system via metal pipes 9 . A valve 10 for supplying liquid to the radiator is installed on the incoming pipe.
The stove fan consists of an impeller 11 and an electric motor 12 . The fan is attached to the housing using a bracket 13 , and to prevent its vibration, it is pressed with a cushion 14 .
On the lower part of the body there are flaps for supplying warm air to the front doors 15 , as well as a cover for supplying air to the footwell area 16 .
But this is only the design of the stove; in order for the VAZ 2104 interior to be heated properly, additional mechanisms are attached to it.
The following pictures show the remaining elements of the system
Design of the heating system VAZ 2104
Heating system side view
Under designations 1 and 2, the left and right air ducts with the left 4 and right 5 nozzles are shown. Position 3 indicates the windshield air duct. Control panel – 6 , with handles for controlling the tap 9 , controlling the inflow cover 10 and controlling the heating of the side and windshields 11 . Under position 12 there is a lever for the air distribution cover.
Next come the elements of the stove itself: 13 – fan housing with impeller 14 and electric motor 15 , windshield damper 16 , fan speed control resistor 17 , fan housing guide 21 , fluid supply control valve 22 , radiator housing 23 , radiator 25 with gasket 24 , elements fastening the air supply cover 26 .
Position 18 – control rod for the side heating flap, 19 – heated side window flap, 27 – heater rod, 28 – air intake grille, 29 – car hood, 30 – air supply box, 31 – windshield.
Repair
After the diagnostics have been completed, you can begin troubleshooting.
If the coolant level drops, it is necessary to find the location of the leak and eliminate the leak. Then add liquid until the neck is full. Then remove the air plug from the cooling system by pushing through the rubber pipes with the engine running, and add fluid if necessary. To replace the thermostat, you need to drain the coolant, unscrew the thermostat cover and replace it with a new one. Then fill in coolant and get rid of the air lock, as described in point No. 1.
To “break” a soured faucet, you can try to turn it manually (without a cable drive), and if it does not turn, you need to dismantle it and replace it with a new one. To do this, it is not necessary to drain the coolant; it is enough to clamp the pipes before and after the tap. You can try to lubricate a soured valve “remotely” by spraying water-repellent grease onto the hinge joint. If this procedure does not bring results, then you need to dismantle the entire heater and “develop” the damper. You can clean a clogged radiator by rinsing it with a special liquid or running water. But this will only help clean the inside, and the outside will remain clogged, so to achieve the maximum result from the work done, you need to remove it and wash it both inside and outside. If flushing does not produce results, then you need to replace the radiator with a new one.
Before replacing, it is advisable to flush the entire cooling system, otherwise this replacement will have a positive effect in a short time. The body is fastened together with iron brackets; it is important that they all stand in place and tightly press the parts of the body to each other. The radiator must be sealed in the housing around the perimeter to prevent flow from passing through the honeycombs
It is better to use foam rubber for compaction. After checking the fuse and wiring of the fan, you can begin to dismantle it. Then assess the feasibility of repairing this unit. Before final assembly, you need to connect the motor to the standard wiring and check the functionality on the car. The fan impeller is made of plastic and can be damaged with slight force, so special care must be taken during assembly.
https://youtube.com/watch?v=D7rHla9Rk1M
The diagnostic and repair methods outlined above will help you carry out repairs in the shortest possible time with minimal costs. After this, you will enjoy the warmth and comfort in your car for a long time.
Refinement using a new snail
To radically change the airflow of the stove and make it quieter, you can install a snail from the VAZ-2108 on the VAZ-2101.
What to buy
To do this you will need:
- New airflow mode switch.
- Resistance from a VAZ-2108 car.
- Snail from VAZ-2108.
- Wires, bolts, nuts, aluminum or any other corners.
- Thick plexiglass for the box.
- Industrial hair dryer to bend plexiglass.
Work step by step
As a result, we will get an improvement in all heating indicators - the cabin will be warm, and the most pleasant thing is that the noise will be significantly reduced.
- We make a housing for attaching the “snail” from plexiglass. That is, we cut it, bend it with a hair dryer, getting the desired shape. To reduce the size of the case, you can cut off the snail plugs.
- The side walls can be made of duralumin (1.5 mm thick). If cracks or crevices appear in the joints during work, they should be sealed with silicone sealant.
- We make collapsible air channels through which the flow will go to the air duct openings.
- Turns must be made smoothly to reduce air resistance in the flow and direct the air straight.
- If you want to bring airflow to your feet, make slots with flaps in the right places. If desired, you can install a variable resistor for adjusting the speed of the cochlea instead of the backlight brightness resistor.
Modernizing the VAZ 2101 stove
If you do everything correctly, you will get a stove that operates almost silently, especially at low speeds. Despite the large number of bends in the design, the air flows will be sufficient to quickly heat the interior, and the second and third speeds can be turned on only in emergency cases - when you need to heat the interior very quickly.
Therefore, if you are not satisfied with something in the VAZ heating system, try to modify it. And you will succeed!
Heaters old and new
Finally, we note that the VAZ-21099 of different years of production used heaters with certain design features that related to the angle of the radiator and the location of the main damper.
In so-called old-style stoves (on cars before 1998), the radiator was installed almost vertically, and the main damper was located under the heat exchanger. There was a partition between the rear wall of the case and the radiator, which formed a channel that provided air supply down the case.
When the damper was open, the air flow moved through the radiator, where it was heated and supplied to the air ducts. In ventilation mode, the main damper closed the heat exchanger, forming, together with the front wall of the housing, another channel through which the flow went directly to the air ducts.
In the new model stoves (on cars produced since 1998), the radiator position angle was significantly smaller than on old heaters, which is believed to provide a larger contact area of the air flow for heat exchange.
The position of the main damper and its shape also changed (it became arched). It began to be located above the radiator. In the closed position (ventilation mode), the damper ensures air movement along the shortest path to the air ducts. In heating mode, it blocked the cold air supply channel to the air ducts and directed the flow down the housing, from where it went to the heat exchanger.
Heating of the interior of any car is provided by air, which is heated in the heater radiator. The VAZ 2109 heater radiator is connected in parallel to the main radiator, which is part of the cooling system of a car engine.
The heater itself is secured with four nuts in the passenger compartment under the instrument panel to bolts that are welded to the air supply box. The air heated in the heater is directed through an air duct system into the passenger compartment. The air ducts are attached to the instrument panel from below and sealed with gaskets.
Purpose and principle of operation of the VAZ-2107 heater radiator
The source of heat in the heating system of the VAZ-2107 car is the liquid with which the cooling system is filled. The cooling system is designed in such a way that the heater radiator is part of its overall circuit. The principle of operation of the radiator is that air flows, penetrating into the car through the air intake on the hood, enter the heating compartment, where they are heated by the heater radiator and move further through the air ducts into the passenger compartment.
The VAZ-2107 heater radiator is a key element of the vehicle heating system
The degree of heating of the air directed into the car interior depends on the temperature of the coolant and the position of the heater valve damper. You can adjust the position of the faucet using the upper slider of the heating system control mechanism: the extreme left position of the slider means that the faucet is closed and the stove is not working, the extreme right position means the faucet is fully open.
The position of the tap can be adjusted using the upper slider of the heating system control mechanism
Initially, the heater radiators of the VAZ-2107 (and other “classic” models) were made exclusively of copper. Currently, many car owners, in order to save money, install aluminum heater radiators, which, although they are cheaper than copper ones, have worse heat transfer rates. The aluminum radiator does not always cope with the large flow of frosty air entering the air intake when driving on the highway, and in this case the interior does not warm up enough.
The heater radiator can be two or three rows. The heat exchanger has a horizontal position and is housed in a special plastic housing. The radiator is attached to the body with two self-tapping screws, the tap is mounted in the supply pipe. Structurally, the radiator consists of:
- systems of tubes located in honeycomb ribs that improve heat transfer;
- inlet and return tanks;
- inlet and outlet pipes.
Video: recommendations for choosing a VAZ-2107 heater radiator
WHICH OVEN RADIATOR IS BETTER???
The cross-section of the tubes can be round or square. Round tubes are easier to manufacture, but the heat transfer of such products is lower than that of square ones, so so-called turbulators are placed inside the round tubes - spiral-shaped plastic strips that help increase heat transfer rates due to turbulence and mixing of the refrigerant. In flat tubes, turbulence is created due to their shape, so additional elements are not required.
The dimensions of the three-row copper radiator SHAAZ are:
- length - 254 mm;
- width - 67 mm;
- height - 184 mm.
Product weight - 2.2 kg.
A double-row aluminum radiator may have other dimensions.
Design of the VAZ-21099 heater
And then everything is simple: the created flow passes through the radiator honeycombs, where heat exchange occurs, as a result, heat is transferred to the air, which then blows into the required zones through the air ducts.
The design of the VAZ-21099 stove includes several main components:
- stove body made of plastic;
- heating system radiator (connected to the cooling system);
- electric fan;
- air ducts;
- heater control mechanism.
This car used heaters of two modifications (old and new), which were slightly different in design, but their components were completely identical.
Housing, radiator, dampers
Thanks to the housing, the required redirection of heating is ensured, since the movement created by the fan motor is immediately fed into it, rather than being dissipated. The body of the VAZ 2109 stove itself consists of two halves, connected to each other with special brackets. To reduce flow losses, a seal is placed between its halves. Partitions are made inside both halves, which provide the correct direction.
There is also a niche inside this case into which the radiator is installed. Initially, the radiator was made of brass, but now it is almost always made of aluminum. The design of the stove radiator 2109 is identical to the main one (consists of two tanks, tubes through which coolant circulates, and plates that form honeycombs), but is significantly smaller in size.
Video: The stove in the VAZ 2108, 2109, 21099, 2110, 2111, 2112, 2113, 2114, 2115 HEATS poorly
Air is blown through the stove dampers, also installed inside the housing. These elements are movable, and thanks to them it is possible to close some and open other air ducts. There are three of them in total - the main one (heater control), an air duct that redirects between the foot area and the supply to the cabin, and a damper for supplying flow to the windshield.
Additional flaps are installed on the side and central deflectors. It turns out that by default, air from the housing constantly blows onto the deflectors and this is done so that the flow always has an exit. Thanks to the existing dampers, it is possible to provide simultaneous supply of hot air to several zones at once (the interior and the windshield or the windshield and the footwell area).
The main heater damper provides air flow to the radiator or bypasses it. This is all done because the heater also plays the role of a forced ventilation system for the interior. This allows for a supply of cool air in the summer. And to do this, you just need to redirect the movement bypassing the heat exchanger, and the supply of heated coolant to the radiator itself will stop. To disconnect the heat exchanger from the cooling system, a heater tap is used, which is located on the supply pipe in front of the radiator.
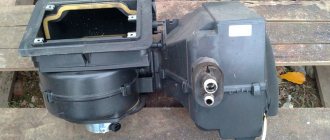
Fan
The air flow is created by a squirrel wheel fan driven by an electric motor. These two elements are enclosed in their own separate housing, installed on top of the heater housing. Moreover, it is structurally designed to provide the easiest possible access to the electric motor, since it is considered one of the weakest components of the system.
The design provides three modes of fan operation. This allows you to select optimal air supply conditions (cold or hot).
Control mechanism
Video: Useful tips for cars. Why does the VAZ stove not work?
To control the stove and redirect air movement and open and close the coolant supply valve, a control mechanism located on the center console is used. It consists of a three slider mechanism and a fan operating mode switch.
The lower slider is the main one, since it changes the system mode (heating or ventilation). It controls two elements at once - the main damper and the tap. When this slider is switched to the “ventilation” mode, the tap and damper are simultaneously closed, which ensures air movement bypassing the heat exchanger. And everything is exactly the opposite - when you switch it to the “heating” mode.
Improvement of the heating system
The design of the VAZ 2107 stove is far from perfect. Therefore, car owners modify it in a variety of ways. First of all, attempts are being made to improve the tightness of air ducts, especially at joints. This allows you to slightly increase the efficiency of heating the interior.
VAZ 2107 owners modify the heating system in a variety of ways
Fan replacement
Often, to improve the operation of the stove, car enthusiasts replace their original fan with a more powerful one, used in other VAZ models (for example, VAZ 2108). The factory fan motor is mounted on plastic bushings, which wear out quickly. As a result, shaft play appears, and a whistling noise becomes audible in the cabin when the fan is operating. Repair and lubrication of bushings in this case, as a rule, do not bring the expected effect. The VAZ 2108 fan electric motor is mounted on bearings. Therefore, installing it in the VAZ 2107 stove will not only increase the efficiency of heating the interior, but will also make the operation of the fan more reliable.
Usually, along with the fan electric motor, a number of other elements of the stove control unit are also changed. The rotation speed of the VAZ 2107 factory fan at a current of 4.5A is 3000 rpm. The VAZ 2108 electric motor consumes 14A at a frequency of 4100 rpm. Therefore, when replacing, you should install the appropriate fuse, resistor (usually from a Niva) and speed switch (for example, from a Kalina).
Video: modification of the VAZ 2107 stove
Modification of the VAZ 2107 stove (DETAILED)
To dismantle the fan you will need:
- flat and Phillips screwdrivers;
- keys for 7 and 10;
- round nose pliers.
The fan is removed in the following order.
- The instrument panel, shelf and glove box are dismantled.
- Use a 7 key to loosen the casing of the air damper control cable. The cable loop is removed from the lever.
- Use a 10mm wrench to unscrew the nut securing the heater housing.
- Use a flat screwdriver to remove the left and right air ducts from the heater body.
- Use a flat-head screwdriver to remove the latches that secure the fan to the stove.
- The wire terminals are disconnected.
- The fan is removed from the stove body.
- The impeller is removed. If necessary, use pliers.
The size of the new fan (from VAZ 2108) is slightly larger. Therefore, its installation will require some changes in the design of the stove. If only the motor is changed, it will be necessary to make an additional hole in the grille through which warm air enters the lower part of the cabin. If this is not done, the motor housing will rest against the grille.
Replacing the stove body
When installing a fan from a VAZ 2108, you will need to make a new frame, usually from plexiglass. This is quite labor-intensive and will require certain skills.
The material for a homemade frame when modifying the stove can be plexiglass
When making a new frame, all dimensions must be strictly observed. The slightest inaccuracies can lead to vibration or failure of the new fan. Having assembled the structure, you should lubricate the joints with sealant and install the new housing in place. After this, the noise level in the cabin usually decreases, and the stove begins to heat the air better.
When making a new frame for the motor, all dimensions must be strictly observed.
Other stove tuning options
Sometimes the design of the air ducts is modified. Additional holes are made in the stove body into which plumbing hoses are inserted. Through these hoses, connected to the side and bottom air ducts, when the engine is running, an additional flow of warm air is created onto the windows and into the legs.
Often the cause of poor interior heating is a clogged heater radiator. The coolant begins to circulate more slowly or completely stops circulating through the heating system, and the efficiency of air heating decreases noticeably. Usually in these cases the radiator is replaced with a new one.
A clogged heater radiator leads to a decrease in the efficiency of heating the interior.
VAZ 2105 1988 interior heating diagram
The stove of VAZ 2105, 2107 cars has disadvantages: it makes a lot of noise, blows weakly, is made on the principle of a fan in a pan and, as a result, blows only into the right air duct (on the right window) and at the driver’s feet. Personally, I was especially bothered by the freezing of the left window, which made changing lanes around the city more difficult. Therefore, I decided to redo it. I’ll say right away that I couldn’t capture all the steps in the photo. I don’t give the dimensions of the parts either.
Several similar designs are posted on the Internet, in fact, I used them as a guide. The idea is to stuff a classic “snail” VAZ 2108 into the stove. I tried to do everything with minimal modifications to the car’s heating system and minimal costs. I advise you not to touch the original stove, you can install it if something happens. Let's get started.
We purchase the lower and middle parts of the stove with resistance (this will also come in handy). You'll have to look for it, but it's inexpensive (usually they only sell the engine and throw away the housing). There we also purchase an assembled heater fan from a VAZ 2108 (“snail”). I recommend checking it locally by connecting it to the battery and listening for squeaks and noises. Immediately take the original figure-eight resistances to the engine.
We cut off the middle part of the stove, to which the original engine is attached, and leave only the frame. It will be a kind of gasket between the upper and lower parts of the stove.
We saw off the walls at the bottom so that the parts of the new body can be firmly attached to them.
We cut out 2 side walls from polystyrene. We cut out the front and back walls, bend them using a technical hair dryer or a burner of a household gas stove. So we cut out three internal partitions and bend two side ones. We make the necessary holes in the parts.
I wanted to install Logon round deflectors for the legs. However, whether in the store or on sale, they are quite expensive. I had to cut it out by hand.
I assembled the body parts using corners and screws, then coated the joint seams with sealant. The outside of the body was painted with black nitro paint.
I insulated the stove body from the inside, in general, I don’t know if this makes sense. I insulated it so that the radio would not be heated by polyethylene foam.
Now for the “snail”. I completely disassembled it. I drilled a pair of non-through holes in the bushings with a small drill so that there was a supply of lubricant. I sawed off the small cover covering the motor shaft so that it would not interfere with the air flow.
That's it, the snail is ready. We place the snail in the body, coating the exhaust nozzle of the snail with sealant. On the opposite side, I simply fixed the snail with a piece of soft material.
Installation
Here's the fun part. Anyone who has ever removed a stove in a classic will understand me. The lower part of the stove, together with the middle one, is attached to 4 brackets, which can still be removed, but installation is not so easy! (During disassembly, you can grab a couple of staples; they tend to get lost when installing/dismantling the stove). But for those who have done this operation twice, it will already be familiar and easy. When I tried on the stove body for the first time, it didn’t fit in, I reduced the height a little, wondering in every possible way whether the snail would fit in. When I started betting, he still didn’t enter. Then I took a block and a sledgehammer and bent the dashboard a little, so to speak, I adjusted the car under the stove. Yes, I wasn’t the first to do this either, don’t worry, there’s enough space on the other side.
Electrics
The eight engine eats twice as much, so when running at full power there may be problems with wiring or fuses. In addition, in the figure-of-eight connection scheme we have three rotation speeds, but we have two. Car enthusiasts who did this modification made 4 speeds by connecting figure-eight resistances in series and a native one, replacing the switch with a Kalinovsky one. They added a relay and changed the wiring to a more powerful one. However, many of them wrote that in practice they use the first two speeds (slow), and at the maximum speed “the hair on their head moves.” Because I didn’t want to change the wiring and switches, so I decided to do this: also use three resistances (2 eight-grade and native), but use only two slow speeds (1 and 2 out of 4). In addition, according to my estimates, consumption in this case should not exceed native ones. In case the airflow turns out to be weak, I planned to exclude one of the resistances (Use speeds 2 and 3. Fortunately, this is easy to do, the wiring between the resistances is made on the wall of the stove behind the radio). The resistances must be installed opposite the exit of the volute nozzle so that they are well cooled.
Replacing the electric motor of the heating system of a VAZ 2107
For work you will need: wrenches “8” and “10”, screwdrivers, pliers.
Removing the electric motor
Replacing the VAZ 2107 heater fan electric motor begins with removing it from the car. So:
- The side dampers of the air ducts are closed by placing the lower lever of the heater control unit in its extreme right position.
- The dashboard is removed.
- The storage shelf and glove compartment body are removed.
- The radio panel is removed.
- The red and blue-black wires are disconnected from the block of wires that provide switching of operating modes of the heating system fan.
- The bolt securing the flexible rod that controls the damper, installed behind the instrument panel, is loosened, and the rod is disconnected.
- The tip of the flexible rod is removed from the axis of the lever to drive the damper.
- Use a socket wrench to unscrew the nut holding the furnace radiator casing and the ground tip of the fan wire, which is located behind the central air duct.
- The tip of the ground wire is removed from the studs.
- The nut holding the right air duct is unscrewed.
- The same is done for the left air duct.
- Using a slotted screwdriver, the four holders installed along the perimeter of the air ducts are pressed out, which are then disconnected from the furnace radiator casing.
- The fan casings and the guide together with the fan are removed.
- The rubber seal is removed from the housing, and the wires are passed into the inside of the casing.
- The tip of the red wire that goes to the heater fan is disconnected from the plug on the additional resistor.
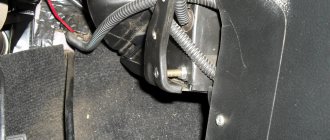
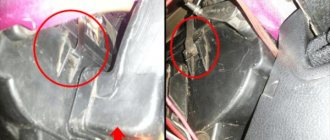
- The heater fan shroud is disconnected as shown in the photo.
Heater fan shroud
- Use a slotted screwdriver to move the lock washer and remove it from the fan shaft.
- The adjusting washers are removed.
- The fan impeller is removed from the electric motor shaft.
- The two spring clips that secure the heater fan motor to the guide housing are disconnected.
- The electric motor and two rubber pads are pulled out.
Replacing the electric motor of the heater fan VAZ 2107
Installing a new electric motor
After the electric motor of the heater fan on the VAZ 2107 has been replaced, all previously removed parts are installed in the reverse order. Instructions for removing and installing the electric motor of a VAZ 2107 car are clearly visible in the video. With its help, you can easily perform all operations yourself. In this case, the price of the work will be much lower than for repairs in a car service workshop.
https://youtube.com/watch?v=myTK1yBufiQ