Did you feel vibration when braking? One of the reasons may be uneven wear of the brake discs, which are best replaced in pairs. Discs are also changed when their thickness becomes less than 17.8 mm. Replacing brake discs on all modern Lada cars (XRAY, Vesta, Largus, Granta, Kalina, Priora and Niva 4x4) is performed in the same way without significant differences.
Required:
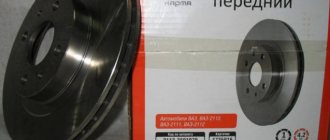
- new brake discs (Granta, Priora, Kalina): catalog number: 2110-3501070 (13 inches) and 2112-3501070 (14 inches)
- new brake discs (XRAY, Vesta, Largus): 7701206339 (without ABS) and 7701207795 (with ABS).
- set of tools.
Raise the car on a jack and remove the wheel. Unscrew the brake fluid reservoir cap and spread the brake pads, checking the brake fluid level (pump out if necessary). Then:
- remove the brake hose (No. 4) from the strut bracket (No. 5).
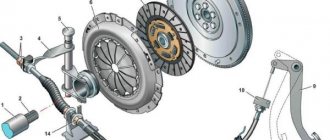
- Unscrew the 2 bolts (No. 2) securing the caliper.
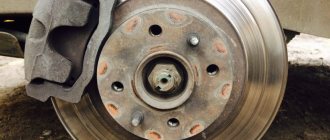
Hang the front brake by the suspension spring, preventing the brake hoses from twisting. To remove the brake disc, you will need to unscrew the 2 mounting bolts on the wheel hub, holding the brake disc with your hand from turning. If the brake disc cannot be removed, tap the disc with a hammer on the contact plane of the wheel (hitting the working surface (No. 1) of the disc with a hammer is unacceptable).
Installation of the brake disc is carried out in the reverse order, after first cleaning the adjacent surfaces from dirt. After installation, you must press the brake pedal 2-3 times and check the brake fluid level. The whole process is also shown in the video:
Let us remind you that to prevent squeaking brakes, it is important to choose the right brake pads.
This illustrated step-by-step instruction will help you check and, if necessary, replace the front brake pads of the Lada Priora.
LADA > Priora
During maintenance, it is necessary to check the condition and degree of wear of the brake pads and discs of the front wheels. To do this, remove the wheels one by one.
Snapshot2
Attention! The brake pads of the front wheels must be replaced as a set - all four pads. Replacing the pads of only one brake mechanism can lead to the car pulling to the side when braking.
If the fluid level in the brake hydraulic reservoir is at the MAX mark, then before installing new pads, use a syringe or a rubber bulb to pump out some of the liquid from the reservoir so that when the piston is recessed into the wheel cylinder of the brake mechanism, liquid does not flow out from under the reservoir cap.
After removing the front wheel, we securely fix the car on a factory-made support stand.
| Ventilated brake discs of the Lada Priora change as they wear out, when the thickness of one of the discs becomes less than the minimum allowable 17.8 mm. Do you know how to replace brake discs with new ones? |
How to remove the Priora caliper
You will need : remove the front wheels and prepare a 17mm spanner.
Procedure:
- Unscrew the two bolts securing the shoe guide to the steering knuckle using a 17mm wrench.
- Remove the pad guide from the disc along with the bracket and pads.
- Make sure that the brake hose is not stretched; to do this, tie the caliper to the suspension spring.
If you have to unscrew the working cylinder from the tip of the brake hose, then you should close the hole in the hose in any way so that the brake fluid does not leak out.
Installing the Priora caliper is done in the reverse order. Check that the brake hose is not kinked. After installation, do not forget to check the brake fluid level in the reservoir and remove air from the brake system.
Replacing the front brake discs of Priora
You will need : remove the caliper and prepare a ring wrench “7”.
Procedure:
- Unscrew the two guide pins using a 7mm wrench.
- Remove the Priora brake disc with your own hands. If this cannot be done, then you should knock it down with a hammer.
Installation of brake discs is carried out in the reverse order.
The mating surfaces of the hub and disk should be cleaned of rust and scale. If a small particle of dirt gets between them, then it will cause the disc to run out and vibrate when braking. In order for the Priora brakes to work properly, when replacing brake discs, be sure to replace the brake pads with a new set.
What rear brake discs can be installed on the Lada Priora?
Initially, the stock version of the car with r14 wheels had a brake drum on the rear axle. But there are many dedicated rear wheel disc brake kits on the market. You can buy them at any time. The installation process is quite complicated, but even a regular driver can handle it. You need to stock up on special tools.
Sources:
https://autoparts-remix.ru/obsluzhivanie/zamena-tormoznyh-diskov-na-priore-svoimi-rukami.html https://qqcar.ru/remont/vaz/ladapriora/48-zamena-tormoznyh-diskov-na -priore-foto-i-video.html https://nadouchest.ru/zamena-tormoznyh-diskov-priora-video/ https://zapchasti.expert/tormoz/diski/tormoznye-diski-na-lada-priora. html
Instructions for quickly and easily replacing Priora brake discs:
- We get rid of the support. Immediately before replacing the main elements of the car’s brake system, it is necessary to remove the caliper. The tools required for this action are a 17-size wrench.
Remove the two front wheels of the car and unscrew the shoe guide bolts that secure them using the above tool. Carefully remove the pads and their guide along with the bracket from the discs. Carry out the process so that the brake hose is not stretched or twisted, otherwise it may be damaged, and you risk losing brake fluid in this situation.
Tie the caliper securely to the suspension spring. You need to put it back in place at the end of the job exactly the opposite.
We replace disks. To complete our main task, we need the “7” key. Using this tool, unscrew the two guide pins, allowing you to easily remove both brake rotors from your car. Installing new disks in place follows the same procedure, only in reverse order.
An important point: if you want to install old drives for further use, then you should definitely make sure that they are suitable for this. In addition, you will have to try hard to clean them of scale, dirt and rust. Therefore, it is best, for your own safety, to purchase new car parts and install them.
Brake discs on the Lada Priora were installed only in size R14 and ventilated. For them, the minimum thickness is 17.8 mm. If, when measuring with a caliper or other device, it turns out that the thickness is less than acceptable, the disks must be replaced, on both sides.
Replacement
Changing discs is quite easy; any driver who has ever held a wrench or hammer can handle it.
Required tool:
- Ratchet
- Head "17" or Torx E10
- Head "7" or key "10"
- Grease “WD – 40”
- Wood block
- Hammer
- Sandpaper
- Powerful screwdriver
- A piece of wire or rope
Work process
- We wet the wheel and remove it from the hub.
- Then we separate the pads, insert a powerful screwdriver between the pads and pull towards ourselves until the brake cylinder piston falls completely into the cylinder and releases the brake pads.
- Using the “17” socket, unscrew the 2 bolts securing the caliper to the steering knuckle. (some Lada car models use “E10” cap screws)
- We remove the caliper and hang it by the strut spring using a rope or wire (hanging the caliper by the brake hose is not allowed)
- We unscrew the guide wheels with a head to “7” (in some models of Lada cars, turnkey guides to “10” are used)
- We take out the brake disc, it is possible that the disc will be difficult to remove; you can remove it by hitting it with a hammer through a wooden block.
- Before installing a new brake disc, you must use sandpaper to remove all rust from the hub.
- We install the new brake disc on the car in the reverse order.
After installation, start the car engine and press the brake several times. This is necessary for the brake pads to fit into place and press the new brake disc.
- You should also check the presence of brake fluid in the reservoir. If necessary, top up to the MAX mark.
- The brake disc replacement process is complete. We hope our article was useful to you. As they say, not a nail, not a rod.
Instructions for replacing brake discs on a Priora
So, the first step is to jack up the front of the car, and then remove the front wheel brake caliper.
After that, using a 7 mm socket and a wrench, unscrew the guide pins of the brake disc, as is clearly shown in the photo below.
To minimize the risk of breaking the studs, tap them with a hammer first without using excessive force. And only then unscrew it. Then you can tap the area where it contacts the hub with a hammer.
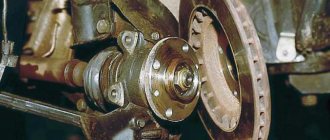
Now you can try to remove it with your hands, or with the help of special devices. If you can’t remove it by hand, and you don’t have a puller at hand, you can carefully knock it off from the back with a hammer, of course, using a special wooden spacer.
We finally remove the Priora brake disc from the front wheel hub, which is clearly demonstrated in the photo below.
Before installing new discs on the Priora, it is necessary to clean the surface of the hub with a metal brush if there is rust or other formations on it. It is also worth applying copper grease to the contact area between the hub and the inside of the disk.
This procedure will reduce the occurrence of vibration and extraneous sound when braking, as well as reduce the temperature effects on the elements of the braking system. Replacement is carried out on both sides simultaneously. To ensure that the surface of the disc remains smooth and free of defects, it is necessary to use only high-quality pads, and it is advisable to replace them at the same time!
The price of a new brake disc on a Priora is from 900 rubles per piece. Of course, there are more expensive options, even up to 1500 per unit, but factory components for around 1000 rubles per unit are also quite good.
How to replace a brake disc on a VAZ 2170-VAZ 2172?
The note! If you are going to change the front brake disc, it is better not to rush and save on buying a second exactly the same disc, we warn you, it is better to change two front discs, and not one, like many, the discs are worn out at the same time (unless, of course, you have changed one before, otherwise, in this case, uneven abrasion will result) and most importantly, the car can brake with different force on each brake disc (manufacturers make them in different compositions, and some brake more, and some, on the contrary, worse), and because of this it will deviate the car from straight course during emergency braking, to prevent this, it is best to change both discs at the same time, and the car will slow down strongly and will not distract it from straight movement (the first 100 km, this may be due to the fact that the brake pads will rub)!
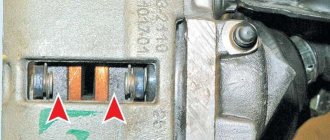
Conclusion: 1) First you will need to remove the wheel from the car, and then the brake pads (How to remove a wheel, read “here”, and how to remove the pads, read “here, in this article”), when the operation is already completed and the pads are lying on the side (by the way, if you have the means, you can buy new pads, usually when replacing brake discs and pads they also suffer the most and are replaced with new ones), unscrew two bolts of size “17” that secure the brake pad guide (the location of the bolts is in the large photo indicated by arrows, and a more detailed location of these bolts is shown in the small photo in the corner) and immediately remove it from the brake disc, as it will greatly interfere and in no case allow the guide to hang on the brake hose (it may burst), and best of all carefully tie it to the spring with wire so that it does not hang down, but stays there firmly.
2) Now, taking the crank and putting the head of the “7” cap on it (if there is no crank, then ordinary keys will do), unscrew the two guide pins that secure the disk (see small photo.), but they will only be unscrewed with a very great difficulties if the car is no longer young (in this case, penetrating oil, such as WD-40 or something like that will help), and as soon as the studs are unscrewed, take a hammer (a rubber one is best, if not, then also stock up on a plate) and use it to knock the brake disc out of place (by the way, the seat is marked with a blue arrow, we also recommend lubricating it with penetrating lubricant so that the disc can be easily removed), but only if there is an impact, do it in another place rather than in one place, otherwise you will be in trouble for a long time There will be almost no point in fighting about it.
Installation: The new disk is installed in its original place, in the reverse order of removal, if it happens that you reinstall the old disk (for example, you removed it to get to the hub, etc.), remember to carefully remove the saw collar, formed by brake disc wear.
Additional: You can see how to visually replace a brake disc with a new one below: