Braking of the car is carried out due to the brake pads - they are rear and front. Under pressure, they are pressed against the disc or drum, in the case of rear brakes, as a result of which the car stops. The brake system is one of the most important, since the safety of everyone in the car depends on its good condition. Keeping your brakes in good working order is a very important task. One of the main stages of ensuring their serviceability is the timely replacement of pads.
Characteristics of Vesta's standard brake pads
From the factory, Vesta is equipped with a ventilated disc braking mechanism at the front and drum-type brakes at the rear. The catalog number for the standard front pads is 8200 432 336 TRW, they were borrowed from Renault Logan. The front and rear brake consumables are metal plates with special material. Thanks to it, friction against the disc or drum becomes most effective for braking.
Typically, rubber with the addition of resins, organic fibers, and other fillers is used to make this material. The chemical composition of Lada Vesta pads is quite complex. This is explained by the fact that the coating must withstand the high temperature conditions in which it remains during friction with the metal.
As for the rear brakes of the Lada Vesta, AvtoVAZ offers a disc option only in the Sport version.
Sports cars are not equipped with an anti-lock braking system; besides, the wheels allow you to deal with skids much more effectively. In favor of the rear drums, we can say that they are more durable, and for the civilian version of the car they are quite effective and do not cause any complaints.
Causes and signs of worn pads
The need for replacement or preventative inspection of the pads can be determined by a number of characteristic signs. Malfunctions consist either in low-quality components, causing destruction of the friction material, or in natural wear.
Increased parking brake travel
Since the Lada Vesta is equipped with rear drum brakes, this feature is relevant for it. Normally, the handbrake is raised 3 or 4 clicks. A sign of wear is a rise of 5-7 clicks. When stopping on a hill, the car rolls with the handbrake raised - the handbrake does not hold. The problem may be a stretched cable, but it wouldn't hurt to check the pads.
The wear sensor gives a signal
Vesta is equipped with a brake pad wear sensor in the maximum configuration. When the friction material lining thins to a critical level, the sensor will begin to make a characteristic sound with each braking. On some cars, an electronic type sensor is installed; it signals wear and tear with a warning light on the instrument panel.
Brake fluid level decreases
If the main element of the brake system is in a worn condition, then in order to effectively press it against the disc or caliper drum, the cylinders must exert more force, using more fluid. Accordingly, a decrease in its level can be observed. The volume of brake fluid may decrease if the cylinders are faulty, hoses or lines are damaged.
Long travel brake pedal
As in the previous case, if the pads are worn out enough, then greater effort is required to press them, and accordingly, the pedal stroke increases.
Damage to pads
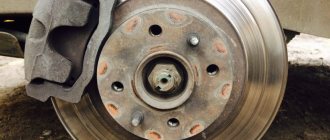
On disc brakes, mechanical damage (flaking, chips, cracks) can be seen with the naked eye. They can also be found on the disks themselves.
Unevenly worn pads
If increased wear of the friction material is observed on one side relative to the other, this may indicate a failure (jamming) of one of the calipers. If you do not change it, then replacing a set of pads will do nothing - the wear will be just as uneven, and braking will be ineffective and even dangerous, since the car will pull to the side.
Increased braking distance
It is urgent to replace spare parts of the brake system if the car’s braking distance has become unnaturally long. Low braking efficiency may indicate severe wear of the front pads - they wear out much faster than the rear ones, as they take a greater load. Another reason could be a faulty caliper, a leaking system, or low brake fluid levels.
You can determine the degree of wear yourself; it takes no more than an hour. All you need to do is remove the wheels and inspect the friction material. In the case of drums, you need to remove them first. At the same time, you can assess the condition of the drums and discs for wear, cracks and other mechanical damage.
In the most advanced cases, the indicator of critical pad wear will be a grinding noise when braking. This occurs when the lining wears down to the base and the metal plates of the pads begin to rub against the discs or drums. Operating a vehicle with such wear is prohibited, as it can lead to jamming of the drums and serious damage to the discs, which ultimately will require them to be completely replaced.
Adjusting the brakes on Lada Vesta
The brake system does not require adjustment or adjustment, with the exception of the parking brake. The handbrake cable must be tightened every 30 thousand kilometers. Depending on your driving style, the handbrake will need to be tightened more often if it becomes loose.
On the Lada Vesta, for these operations you no longer need to crawl under the bottom to get to the adjustment mechanism. You can tighten the handbrake cable directly from the passenger compartment.
The following manipulations must be carried out:
- remove the plastic cover under the parking brake lever;
- by removing the rubber cap, gain access to the adjusting nut.
The adjustment process is carried out as follows:
- using a 10 mm wrench, loosen the nut to adjust;
- The parking brake lever needs to be raised up one click - it should take the second position of the gear sector;
- start tightening the adjusting nut until the rear wheels stop rotating by hand;
- raise and lower the parking brake lever all the way to the lower and upper positions;
- lower the lever and try to rotate the rear wheels;
- if the wheels rotate with difficulty or do not rotate at all, the adjusting nut is loosened, and a slight touch of the working surface of the drum may be allowed, but it should not heat up.
If brake pads are installed on already used drums or discs, it should be taken into account that the working surfaces will differ from the smooth surfaces of new parts. Therefore, braking for the first 100 km will not be very effective. In this case, it is necessary to calculate the increased braking distance in advance - perhaps the discs will heat up, which means a burning smell is also allowed.
It is impossible to change the pads on only one side; replacement is carried out on the entire axle, and ideally - at the back and front. The inspection can be combined with a seasonal change of tires - at the same time check the condition of the discs or drums. If defects are detected, they can be replaced in a timely manner. Do not neglect the brake system, postponing replacing the pads until later. After all, the safety of the driver and his passengers depends on this seemingly insignificant detail.
How to choose brake pads
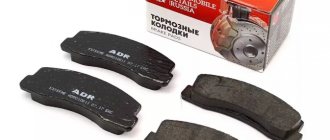
Car enthusiasts believe that original pads are much more efficient and durable than their numerous analogues. Standard spare parts recommended by the manufacturer are produced without the use of asbestos in a composition that has been proven to be hazardous to the environment. But many car owners are considering the option of purchasing non-original spare parts. The main criterion for this choice is the low cost of analogues. On the car parts market you can find non-original brake pads of fairly high quality, not inferior to the original. But there are many outright fakes - to avoid buying them, you should purchase spare parts and consumables in trusted places or directly from an official Lada dealer.
Replacing front pads on Vesta
According to the regulations, it is necessary to inspect brake pads at least once every 15 thousand kilometers. Consumables must be replaced if:
- friction material thickness less than 1.5 mm;
- the friction lining has cracks, scratches or traces of oil on its surface;
- the friction lining peels off from the base;
- The wear on different sides is uneven and unequal in thickness.
Due to its design features, the caliper puts pressure on the center of the pad, and not on its entire area, so the linings wear unevenly over the entire surface and have a wedge-shaped shape. The side with the maximum degree of wear is not visible without removing the pads, so it is recommended to remove them from the calipers and evaluate them more objectively.
The car is placed on a level surface and secured with a parking brake. In the case of removing the rear pads, on the contrary, the handbrake should not hold the car, and its cable should be as loose as possible. Then you need to assess the brake fluid level. If it is normal, you should pump it out to a minimum. Wheel chocks are installed under the rear wheels. Using a wheel wrench, the wheel nuts are loosened and the car is raised on a jack. After the wheel does not touch the ground, the lifting stops, and any reliable stop is installed under the bottom next to the jack, which will serve as insurance in case the lift falls off. The wheel bolts are unscrewed all the way and they are removed.
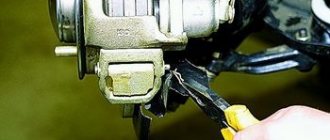
The hub with the desired disc must be turned outward from under the wheel arch. To do this, turn the steering wheel all the way to the right or left. Using a screwdriver or a flat-end paddle, press the caliper piston all the way in. To do this, you need to insert a screwdriver between the piston and the block from the inside. When doing this, be careful not to damage the rubber boot.
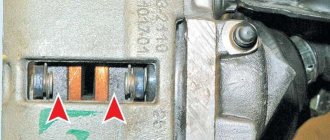
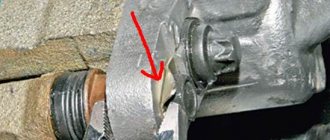
Using a 13 mm wrench, unscrew the bolt securing the bracket to the guide, while at the same time the guide is held in place with another 15 mm wrench.
Next, the bracket is folded together with the brake hose to the side, and the old pads along with the spring brackets are removed from the guide sockets.
The condition of the friction linings is assessed, the caliper mechanism is checked, and, if necessary, a new set of pads is developed and prepared for installation. The brackets and guide sockets are cleaned with a wire brush to remove dirt and rust. The anthers are checked for damage and replaced if necessary. New pads are also inspected and inserted into the socket guides. Next, this unit is assembled in the reverse order, after which you can proceed to replacement on the other side.
Upon completion of all work, you need to press the brake pedal all the way several times until resistance appears, this means that the pistons have taken their place and are in the working position. Then you need to add the brake fluid level to about.
Installing new pads
New brake pads are inspected for manufacturing defects and installed in the seat guides.
When installing without experience, you need to pay attention to the fact that the pads are installed to the disc with the side with the friction lining, and not with the steel base.
Then the brake assembly is assembled in reverse order, and they begin to replace the pads on the other side, which is performed identically.
At the end of the work, it is necessary to press the brake pedal several times until stable resistance appears in it, which indicates that the pistons are in working positions, then check the brake fluid level in the reservoir and, if necessary, top it up to the max mark.
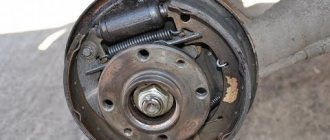
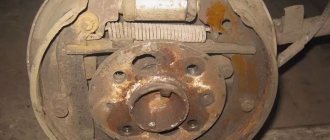
Replacing rear pads
To replace the rear pads with your own hands, without resorting to the help of specialists, you will need about two hours of free time and a minimum set of tools: a hammer, a screwdriver, pliers and a 36 mm socket. All actions are performed in the following order:
- using a jack, the rear part of the car is raised - the wheel bolts are first loosened, and a stop is placed under the front wheel - and the wheel is removed;
- if the car is in a stable position, the handbrake goes down to its extreme position - you will need to loosen the handbrake cable;
- Using a screwdriver and a hammer, you need to remove the cap covering the hub nut;
- use a 36 mm wrench or socket to unscrew the hub nut;
- the brake drum is removed;
- Using a screwdriver, remove the handbrake cable from the shoe lever;
- springs are disconnected;
- use pliers to remove the spring clip;
- the support is removed from the opposite part in the same way;
- the spacer bar and the block in front are removed;
- the rear block is removed;
- the tip of the parking brake cable, which is attached to the lever from the rear side, is disconnected;
- By disengaging the adjustment mechanism is removed.
Before reassembling the unit in the reverse order, it is necessary to thoroughly clean all parts from dust and rust and lubricate the drum with a special lubricant.
Removing and installing the front brake assembly
We prepare the car as described above.
Remove the front wheel.
Raise the car to a comfortable height.
Clean the brake parts.
Remove the front brake hose.
Using a 18mm socket, unscrew the two bolts 1, Figure 3, securing the front brake guide 3 to the steering knuckle, remove the bolts and remove the front brake assembly.
Installation
After removal, bolts 1, Figure 3, securing the guide to the steering knuckle must be replaced.
We install the front brake assembly on the steering knuckle and secure the front brake guide with new mounting bolts. The tightening torque of the bolts is 120 Nm (12.0 kgf.m).
Install the front brake hose.
We bleed the brake system and, if necessary, the hydraulic clutch.
We check the effectiveness of the service brake system.