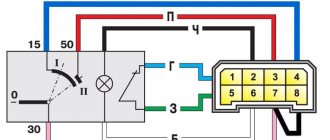
Wiring diagram VAZ 2114 injector
Acoustics for cars
In this article I will tell you how to connect and install component acoustics.
After 3 thousand km of mileage on the VAZ 2114, I was ready to replace the front speakers and install tweeters on the instrument panel. I decided after I felt the difference in sound on my car and my father’s 14, which had mystery tweeters, and my front speakers for 400 rubles began to choke after 5 months of use.
- Throw away the factory wires and install silicone ones with a diameter of at least 1.5 mm.
- For better sound quality, it is recommended to solder the wire contacts rather than twist them by hand.
Do-it-yourself engine start | Motorist's benefit
Probably, many have already heard about remote starting of a car engine; recently we have already published information about how autostart works and how it works. Those who are interested can read this article in more detail. Today we will talk about how to independently make a remote car engine start at home.
Adding the engine auto-start function to a regular alarm system
In this example, we will connect the autostart function to the StarLine A6 car security system. The image shows a schematic diagram of connecting all elements including the remote start module.
The image shows a schematic diagram of connecting all elements including the remote start module.
To connect you will need:
- Universal 4-pin relays – 2 pcs.
- Universal 6-pin relays (22.3777) – 1 pc.
- Schottky diodes SR360 (60A), analogue of diode 1N5822 60A – 3 pcs.
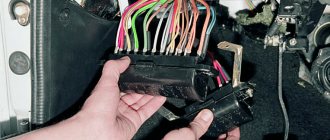
You shouldn’t have any problems assembling the circuit; the only nuance in this story is the low pulse duration of the additional channel on the StarLine A6 alarm (0.6 sec.) or long (10 sec. and 30 sec.), which in one case is not enough to turn on the starter , and in the other there is a lot of this. To solve the problem, it is necessary to reprogram the additional channel for 0.8 seconds, this is enough to start the starter. In the following photos you can see how the assembly and connection were carried out.
The photo shows the connection of diodes to output 85 of the starter relay
We hide the assembled circuit in the torpedo niche
The standard alarm program on channel 3 gives a pulse mode of 0.8 seconds. The first press of the button turns on the ignition, the second turns on the starter, only after 1.5 seconds the engine stalls and the ignition turns off. If the second time you press and hold the button, the engine runs until you release the button, this problem can be solved by reprogramming the alarm to supply a negative contact to certain relay contacts.
Before reprogramming, we have Relay 22.3777 supplies +12 current to the 4th contact when a minus appears and disappears on the 5th contact, and relay 21.3777 supplies a plus to the 4th leg as soon as a minus appears on the 5th.
After programming, relay 22.3777 supplies minus 12 volts to the 4th contact when a minus appears and disappears on the 5th contact, and relay 21.3777 supplies a minus to the 4th leg as soon as a minus appears on the 5th. As a result, we have a remote start with three clicks , and on the fourth, we turn off the engine. The positive aspect of this circuit is the presence of relay 22.3777, which makes a pause for the fuel pump (pause between the 2nd and 3rd press).
Component acoustics - reviews
I still didn’t dare to buy new speakers with tweeters, but a month later I went to the store, looked at the selection, and realized that my budget of 1000 rubles only fit into component acoustics.
Having heard about the quality of MYSTERY products, I turned around and went home. I decided to read the reviews out of curiosity, and as it turned out, many spoke very positively about such a system, and the next day I was already standing near the cash register and trying out new speakers. The price for MYSTERY MJ550 was 952 rubles.
Instructions for installing speakers in doors
Installation
The process of installing a subwoofer in the fourteenth VAZ model begins not with anything, but with the ShVI (unless, of course, sound insulation has already been carried out (see Soundproofing a VAZ 2114 with your own hands according to the instructions)).
Subwoofer in the trunk of a VAZ 2114
Unfortunately, the level of shvi of domestic cars, even new ones, is not of sufficient quality. And without the appropriate preparation, installing a speaker is tantamount to throwing money down the drain.
Vibroplast or other modern materials will be an ideal option for this operation. If you read the corresponding step-by-step instructions for conducting a ShVI, you will be able to conduct the event on your own.
Next you need to do the following:
- Lay the speaker wires specifically under the subwoofer. You need to know that the RCA runs on the left of the car interior, and the power cables run on the right.
Note. The power cable runs from the battery through the hood. To avoid making unnecessary holes in the partition, it is recommended to find a rubber plug, remove it and pass the cable through the finished hole.
Subwoofer in the trunk of a VAZ 2114
The following scenario for installing a subwoofer in the fourteenth VAZ model is suitable if the trunk of the car will be used for standard purposes for transporting goods. Thus, there will be no more space left for mounting a subwoofer and an amplifier.
Here's what we recommend:
- Buy an active subwoofer Mystery or some other one with a flat shape. A super-compact underseat speaker is also suitable for these purposes;
- Prepare a set of necessary wiring, including power and audio cables;
- The wire responsible for power supply is connected to the battery (a fuse must be used);
- The cable is brought into the cabin through a prepared hole made for the rear window washer hose. Further, already in the cabin, you will need to remove the plastic thresholds in order to “follow the tracks” of the hose;
- The same should be done with audio wires;
- The button responsible for adjusting the bass can be placed under the dashboard.
Limit switch device
The design of any such device consists of:
Cases. It can be made of dielectric or conductive material, depending on the design. The moving part with the help of an impact on which the contact group is pressed. There is no moving mechanism in reed switches and non-contact limit devices. Contact part. Can contain both NO (normally open) and NC (normally closed) contacts
When choosing a limit switch, you should pay attention to the voltage and current that will flow through the contacts. Since the duration of proper operation of the switch directly depends on this. It depends on what mechanisms it is intended to control.
It depends on what mechanisms it is intended to control.
Mechanical
Mechanical limit switches come in different designs, which determine their scope of application.
Their main types:
Most often they are used, of course, for production purposes, metallurgy, mechanical engineering, and construction. They are often equipped with a rubber seal and contain a group of contacts that include both make and break contacts.
One of the varieties of this kind of limit switches is called microswitches and their operating principle is similar to conventional ones. But the sizes and currents are much smaller. The working stroke of such elements is measured in millimeters, and therefore they are used using an additional lever, which can be equipped with a small roller. Therefore, installing it will require careful adjustment of the trigger.
Contactless
All these contactless switching devices are divided into:
- Capacitive - based on interaction with the human body. The fact is that when a person approaches it, an electric capacitance arises as a result of which the multivibrator circuit installed inside the limit switch is activated. The closer the human body approaches, the greater the capacitance and the lower the pulse frequency. This element is highly sensitive. The main function is performed by a plate tightly connected to the capacitor.
- Inductive - this is an electronic proximity switch that responds to the movement of magnetic material. Depending on this, such a sensor is equipped with a metal or non-magnetic core. When an object that is set to trigger approaches or moves away, it generates electrical impulses that are processed by a threshold element, and a signal is given to close or open the key.
- Optical is a special type of limit switches, which is equipped with an infrared LED and a special transistor that captures this signal (phototransistor). The optical element works regardless of natural light. When the LED beam is interrupted, the photocell will close, thereby turning off the actuator in whose circuit it is connected.
- Ultrasonic. Here quartz sound emitting elements are already used. They can also be used as motion or volume sensors. When it appears within its range of action, the amplitude of a sound signal of a certain frequency, often inaudible to the human ear, changes.
On the basis of these switches, all kinds of sensors for monitoring bulk and liquid materials, dispensers, etc. are manufactured.
Magnetic
An electromagnetic limit switch (reed switch) responds to a constant magnetic field. Often contains one
Automotive
Such devices used in cars are often used for lighting and alarm circuits. By and large, this is a mechanical limit switch. Structurally, it is made with one terminal to which a positive potential is connected. The negative terminal is considered to be the housing that is clamped to the metal element of the car body.
In this case, you need to ensure that the part of the body where the limit switch is installed is cleaned of paint.
Often equipped with several groups of normally open and closed contacts.
Pneumatic
A pneumatic limit switch is a device that can stop the flow of compressed air or other gas by pressing a control button or lever. At the same time, there is another type of these switches, which operates when a certain pressure in the system is reached.
I would like to remind you that you should connect or disconnect limit switches to the electrical circuit when the voltage is completely removed. After that, the voltage indicator will make sure that there is no voltage, and metal cases must be grounded.
Installing speakers in doors
Installing speakers in doors is a very easy process if you just need to replace old speakers with new ones. But if this is your first time installing front speakers, then the level of difficulty depends on the presence of wiring in the doors and the availability of space for the speakers. Fortunately, our cars are supplied from the factory with side podiums for speakers with pockets, so this is already minus one problem.
The correct installation of speakers in the front doors is that the speakers must be mounted strictly in their places and the polarities of both the wires and the speakers themselves must be correctly connected. When it comes to installing front speakers, everyone has their own approach: some simply attach new speakers, while others also add noise and vibration isolation for better sound quality.
- We unscrew the 3 screws securing the podiums, unscrew the speaker mounts and remove the connectors.
- We install new ones, tighten them tightly and install the podiums.
How to route wires from the front doors of 2114
- Registration
- Entrance
- To the beginning of the forum
- Forum Rules
- Old design
- FAQ
- Search
- Users
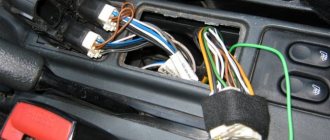
I couldn't find where to run the wire there.
The old wire has shorted to ground somewhere.
More often than not, this happens to someone else.
On 14, the wires to the driver and passenger door limit switches go separately, as I understand.
there I wanted to connect to the wires, separating them with a diode
I pulled out the connector of the display unit and there I wanted to connect to the wires, separating them with a diode. I think this is how it was done so that the buzzer would only beep when the driver’s door is open.
Pulling acoustic wires in the doors of a VAZ 2114
Hello everyone, friends! Today I decided to compile a small guide on how you can lay an acoustic cable in the doors of our Samaras in the simplest possible way, without disassembling the panel, and without getting too fancy. In this way, you can lay a cable of any cross-section, except that for thick cables you will most likely have to drill a hole in the door itself for the second corrugation. There is a lot of text on the Internet, but I couldn’t find everything in general terms or detailed instructions with photos. Therefore, I will make my own “guide”, which I hope will be useful to someone. So let's get started.
Step one. We unscrew the bolt of the plastic door sill and remove the plastic joint on the rack that goes to the dashboard (I explained it clumsily, you’ll understand in the photo). We move the insulating materials aside, and right under the plastic cover we see an excellent hole. On some models it may be sealed with electrical tape, but this is not certain. We take out the corrugation from its regular place, on the side that goes to the body. When removing the corrugation, you can help yourself carefully with pliers if it gets stiff.
Step two. We will need thin but dense wire; corrugated wire worked well for me for laying wires. We pass the wire through the top hole and catch it in the bottom. You can use tweezers or calmly stick your fingers through and catch the wire. Pull it out from below.
Step three. We tie an acoustic cable to the BOTTOM end of the wire; it is better if you tie the wire around the cable and press it with pliers, because massive knots on top will not fit. After making sure that everything is securely fastened, pull the wire from above. With effort, but not foolishly, slowly. If it doesn't work, then do it again. When pulling, you need to aim slightly to the left (for the driver's door) and to the right (for the passenger door). Soon everything will work out and you will pull out the cable. Hurray, half the way has been completed.
Limit switch with roller: principle of operation, buying tips, installation instructions
Limit switches are simple devices that perform important tasks and ensure the safety of people and the normal flow of technological processes.
The operation of automatic moving mechanisms requires timely shutdown or startup without human intervention. These are sliding gates, shutters, and other structures that require timely shutdown when the controlled part reaches a certain position. To implement this function, specialized devices are used that have many design options and operating principles.
The effective and most common type of such devices is a limit switch with a roller. It is reliable, resistant to external loads, and durable. Existing types of such devices have some differences in design and functionality, so we should consider them in more detail.
WEIGHT VAZ 2114
Unreliable weight on the VAZ 2114 or its absence leads to various unpleasant surprises. For example, instead of a turn signal in the rear light, the lights suddenly start blinking (the so-called Christmas tree), or the starter barely turns. If you know where the masses of the VAZ 2114 are located, you can cope with many troubles in the electrical part of the car.
Location of common (mass) wires
The main ground wire is short and thick - it comes from the battery and is attached to a stud with a nut in the area of the front left side member. Its thickness is about 14-16 mm. Also from the negative terminal of the battery there is a thin wire that serves as a power supply to various energy consumers. Weak contact at the terminal leads to rapid discharge of the battery.
The electronic engine control system also requires a common wire. The mass of the ECU on the VAZ 2114 can be mounted in two different places depending on the modification of the car:
- On versions 2115 with a 1.5 liter engine, it is taken from the engine (two M6 bolts on the rear camshaft plug).
- On 1.6 liter internal combustion engines, as well as 1.5 liter engines with a Bosch or “January” version 7.2 ECU, it is fixed with a bolt screwed to the metal frame of the center console under the dashboard.
If the common wire of the electronics does not make good contact with the car body, then the ECM on the VAZ 2114 may cause various malfunctions.
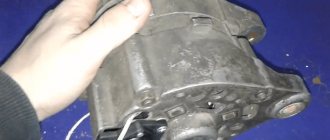
Article on the topic: Independent replacement of generator brushes on a VAZ 2114
Please note that the wire must be well secured
Where is the mass of the VAZ 2114 instrument panel located? There is only one common mass point in the cabin for the instrument panel wiring, luggage compartment wiring harness and fuse box circuit (models 2108-09 and 2113-2114-2115), it is located under the instrument cluster near the steering column.
The heater motor also requires a minus. It is attached to the heater body on the driver's side of the cabin.
The question remains - where is the mass of the VAZ 2114 engine. The mass is precisely the place where the main negative terminal of the battery is attached to the body.
Advantages and disadvantages of various blockers
Mechanical hood switch, advantages:
- Simple design is the key to reliability.
- Volatility independence, that is, the performance of your battery and the condition of the car’s wiring will not in any way affect the protective capabilities of the hood locking system.
- The hybrid system, assembled on the basis of a mechanical hood lock together with an engine start blocking system, is considered one of the most reliable protection against theft.
Mechanical hood switch, disadvantages:
- Low practicality, or simply put, the mechanical system is inconvenient to use. The driver must remove the hood lock every time at the start of a trip. This is explained by safety rules, since in the event of a fire or other emergency situations, the engine compartment should not be blocked.
- The need to attach the lock cylinder of a mechanical lock. On the one hand, the lock must be securely hidden, but, on the other hand, every driver wants to have convenient access to it. In addition, upon seeing the lock, the attacker will immediately understand which hood lock is installed on the car. In this case, if you have special tools, removing the blockage will not be difficult.
- Complicated installation. Correctly and safely installing a hood lock is quite a troublesome task, since one must take into account the factor of moving objects, which, if jammed, can create an emergency situation. You should also take into account the strong heating of some elements of the car, and the fact that within a year after installation the cable will be subject to deformation and may lengthen by a couple of millimeters. Given these factors, the installation of a mechanical locking system should only be trusted to professionals, and the cost of the work may exceed the cost of the system itself.
Electromechanical hood lock, advantages:
- Ease of use. To turn the lock on or off, you just need to press a button.
- Maintaining secrecy. The control button may even be in the driver’s pocket, but even if it is installed inside the car, it is much easier to hide the button. Thus, it is quite difficult to understand which locking system is installed.
- Easy installation. Installing electric drives is not difficult, and connecting power wires and, if necessary, a button activation contact to them is much easier than installing a metal hose for the control cable.
The electromechanical hood lock has only one, but very significant, drawback - its volatility. That is, if the battery is discharged or the car's electrical wiring fails, the hood switch loses its functionality.
There are ways to solve this problem, for example, an additional safety rope stretched into the cabin, or the installation of an additional independent power source. However, this significantly complicates the design features of the device.
If you want to reliably protect your vehicle, be sure to install a hood locking device. But to do this, you should carefully study the operating principles of all devices, their advantages, and only then make a choice.
Limit switches - also known as limit switches - are electromechanical devices whose task is to open/close an electrical circuit. Although the device was originally developed for use in engineering structures, but with the increase in the number of electronics in vehicles, they began to be widely used in their control system.
So, since the 50s of the last century, almost all cars were equipped with an automatic system for turning on the light in the cabin when the front door was opened, but with the progress of progress, an increasing number of tasks began to be assigned to the limit switches used in the car, for example, the limit switches of the VAZ 2114 are located on the entrance doors and trunk.
Door lighting VAZ 2110
In this article we will learn how to illuminate the doors of a VAZ 2110. Performing such tuning is quite simple and quick, but first you need to figure out why door lighting is needed at all. Thanks to this device, you can avoid many unpleasant situations, for example, when you leave the salon of a VAZ 2110 in the dark and your feet end up in some puddle.
At the moment, such lighting is installed, but many foreign cars are already from the factory. In our case, we will have to do everything ourselves. To make door lights for the VAZ 2110, we will need lampshades that are used as lighting for the license plate. You will need exactly four lamps - equal to the number of doors. To ensure power supply to the future lighting, you will need to connect the wires; it is recommended to lay them in corrugation. One of the wires of the illuminator is connected to the standard lighting system, and the negative wire is connected to the end switch of the illuminated door. If you are not satisfied with the usual lighting, you can change its color. If necessary, install a door light switch in the car interior. This is necessary to forcefully turn off the backlight when the car door is open. Let's consider another way to install lighting on the door of a VAZ 2110. First, we need to dismantle the door podium, where the license plate light will be attached. We take the lampshade and take the necessary measurements so that we can then make precise cuts. We cut it off, measure it again and screw the lampshade to the podium.
Next we carry out the wiring. You need to open the thresholds and look at how the wires are pulled, then we take the wiring from the speakers or from the electric window lifter and stretch it so that the ends remain in the door, using insulating tape we wrap the wiring from the VAZ 2110 door lighting to them. Pull the wiring to the lampshade, We make the connection and install the podium in its regular place. After assembly, do not forget to connect the negative wire to the limit switch. Plus you can take it from the cigarette lighter. The door lighting goes well with the underbody lighting and wheel rim lighting. The proposed methods are the simplest and most reliable, however, the work can be done using another, more cunning scheme. Instead of a regular light bulb, in some cases an LED strip is used. During installation, we do not need to make a cut in the door trim, we do not need to cover the hole with transparent plastic, we do not need to hide tape inside the door trim to protect it from external influences - although all this will not be superfluous. And at the same time, this is the brightest option, we use a piece of tape of maximum length, the light is not weakened by protective plastic or silicone. We glue the tape to that part of the door that is inside the car and during the process of opening/closing the doors it does not come into contact with foreign objects and liquids. The only danger to the tape is car washers; they can pour water on the inside of the door during washing, so they need to be warned in a timely manner about the presence of door lighting.
Areas of application
Each type of limit switch is typically used in various fields of activity. By application they can be divided into:
- Protective, which are installed to protect the mechanism or personnel from ill-considered actions. For example, a cage lowering people into a mine will not begin to move until all its doors are closed, thereby ensuring the safety of the miners.
- Functional. They regularly turn lights or other electrical mechanisms on or off. The most obvious example of such a device, known to everyone, is the turning on of the light in the refrigerator when the door is opened.
In general, the use of limit switches depends on the possibility of the mechanism for its use and the imagination of the designer. People don’t even realize how often they have to deal with this electrical mechanism:
- in everyday life and household appliances;
- in the automobile and in the automotive industry;
- in furniture products;
- in production to solve a wide variety of problems.
How to run wires through a vaz door
- Registration
- Entrance
- To the beginning of the forum
- Forum Rules
- Old design
- FAQ
- Search
- Users
On the forum for 16 years Messages: 376 From: Omsk
On the forum for 17 years Messages: 2322 From: St. Petersburg Car: Mitsubishi L200 New. Quadric Dinli 600. Peugeot 206
When I pulled the audio cable into the front doors, I did this: — Unscrew the plastic door sill trim from the torpedo side + 2-3 self-tapping screws as desired. — You bend this plastic cover, you bend the Shumka. You can immediately see where the wires go. Another thing is that, for example, my corrugation was completely packed. I didn't get hemorrhoids. - pulled the corrugation out of the door and out of the body - threaded the wire from the interior side outwards, passed it through the corrugation and threw it into the door - with smooth movements “screwed” the corrugation back.
Not the easiest way, but this is the only way I did it. When installing the corrugation, I lubricated the installation location with Movil - as you know, it fits in easier with lubrication
On the forum for 17 years Messages: 26 Car: VAZ21122 1.5 8kl 2003
Subject Actually, the question is interesting both on the front and the rear. Yesterday I tried to find a hole in the protective corrugation (which goes into the front door) from the passenger compartment, but I couldn’t. WHERE IS SHE?
On the forum for 19 years Messages: 1633 From: Samara
as we said above, we unscrew the plastic, then we take the wire (for the first time I even took a branch from a tree, not very dry but not just plucked) I tied the wire to it with electrical tape and pushed it from the side of the door towards the body
if it's a wire, then spray it with silicone grease - an aerosol - it will be easier to walk and then nothing will rub
On the forum for 16 years Messages: 376 From: Omsk
The wires that are already inserted into the tube have a free “move”
On the forum for 17 years Messages: 5448 From: Moscow Car: NF/Yeti 1.8 dsg
The wires that are already inserted into the tube have a free “move”
On the forum for 17 years Messages: 2322 From: St. Petersburg Car: Mitsubishi L200 New. Quadric Dinli 600. Peugeot 206 On the forum for 16 years Messages: 376 From: Omsk
In general, this is how I solved this problem for myself.
I unscrewed 5 screws on the sill trim on the interior side, removed the trim, and bent the noise on the floor in the area of the hood opening handle. It was not possible to push the wire through, because... The corrugation is slightly twisted into a wire. I removed it from the door and from the side of the body, pulled out the door wire, stuck it in the corrugation and then into the passenger compartment.
It's quite simple. Thanks everyone for the advice! What would I do without the forum?