The principle of operation of the device and its diagram
The electric generator acts as an autonomous source of energy in any car; it is designed to evenly recharge the battery. If the generator fails or wears out, the battery stops receiving the required amount of energy and cannot ensure stable operation of the technical component of the machine.
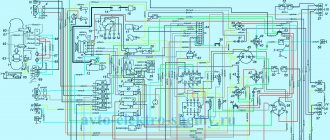
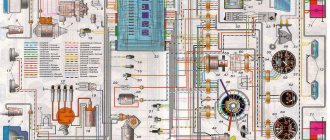
As soon as its charge runs out, the vehicle stalls. Starting a car after something like this is not the easiest task. To get a visual representation of the operation of the electric generator, you will need its diagram. The VAZ 2108 generator diagram is shown in the figure. All elements that are important in the operation of the device are numbered on it.
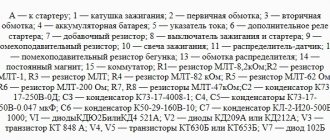
- Electric generator.
- Negative diode.
- Spare diode.
- Positive diode.
- Battery discharge control lamp.
- Instrument block.
- Voltmeter.
- Mounting block.
- 100 ohm backup resistors.
- Ignition relay.
- Ignition power.
- Battery battery.
- Capacitor.
- Rotor winding.
- Voltage controller (available only in car models produced before 1988).
VAZ 2108 generator diagram. 1 - generator; 2 - negative diode; 3 - additional diode; 4 - positive diode; 5—battery discharge warning lamp; 6 — instrument cluster; 7 - voltmeter; 8 — mounting block; 9 — additional resistors of 100 Ohm, 2 W; 10 - ignition relay; 11 — ignition switch; 12 — battery; 13 - capacitor; 14 — rotor winding; 15 - voltage regulator
The electric generator on the VAZ 2108 is located under the hood of the car; it operates using a special belt. The main reasons for equipment failure are:
- brush wear;
- charging relay failure;
- diode bridge malfunction;
- rotor shaft bearing stopper.
Malfunctions, repair and replacement of the VAZ 2108 generator step by step instructions
The VAZ 2108 device, like any other vehicle, involves powering electrical circuits from a battery. To ensure that the battery is always in good condition and does not let you down at the most inopportune moment, a generator is always connected to it.
The battery is especially important when the engine is ignited; while driving, when the car develops sufficient speed, the entire electrical circuit is powered by the generator.
When the question arises about connecting additional powerful electrical appliances to the car, it is very important to match their load with the permissible power of the generator. To do this, it is important to know its technical characteristics. And if the battery lack of charge indicator suddenly lights up, it’s better not to even look under the hood without understanding how the electrical charging circuit, voltage regulator and ignition work.
After reading today's article to the end, you will learn about the connection diagram and dimensions of the VAZ 2108 generator, the main reasons for failure and how to check the voltage in the circuit. If trouble happens to the generator, then don’t worry, we will clearly show you the process of removing and installing it.
G8 generator repair
First of all, you need to determine the cause of the breakdown. This is done according to the following criteria:
- presence of sounds uncharacteristic of vehicle operation (bearing locking);
- low performance of the device (the VAZ 2108 generator belt is loose, the brushes are worn out);
- unstable output voltage (failure of the diode bridge).
To diagnose a breakdown, you first need to use a voltmeter to measure the voltage level on the battery. To do this, you need to release both terminals and connect the device. If the electric generator is in working condition, the voltage will be in the range of 13.8-14.5 V. After this, you need to start the engine and touch the generator cover with your hand to detect the vibration level.
In case of severe wear of the rotor shaft bearings, the vibration will be quite noticeable. When working properly, it is practically non-existent. Then you need to check the level of belt slack. To do this, turn off the engine and press on the belt with your fingers. It is considered serviceable when the deflection is no more than 1-1.5 cm.
After the initial diagnosis and identification of the problem, it is necessary to dismantle, disassemble and repair the device, and then install it back.
Replacement and repair of generator for VAZ 2109
If any problems are detected, it is imperative to carry out only high-quality work to replace or repair the device. Remembering to connect everything correctly during assembly. Since this is a good guarantee of good performance of the repaired or replaced generator.
How to remove a generator on a VAZ 2109
Moreover, you can replace or repair the generator not only at a service station, but also with your own hands.
1. Disconnect the block with the wire from the generator terminal.
2. Slide the rubber boot, unscrew the nut and disconnect the wires from the “ZO” terminal of the generator.
3. Loosen the adjusting nut and the lower generator mounting nut.
4. Move the generator to the engine and remove the belt.
5. Unscrew the bolt securing the adjusting bar.
6. From the bottom of the engine compartment, unscrew the two bolts securing the bracket, holding the generator.
7. Remove the generator from the vehicle.
8. Install the generator in reverse order. When attaching the generator bracket, the longer bolt is installed closer to the generator drive! After installation, adjust the belt tension.
But at the same time you should always adhere to the necessary stages:
- disassembly,
- troubleshooting,
- replacement of broken elements,
- installation,
- connection.
Replacing a generator on a VAZ 2109 takes approximately 30 minutes. And for this you will definitely need to take spanners for 10, 13 and 17, as well as screwdrivers and a vice.
- The battery is turned off to de-energize the entire on-board system,
- All existing wires that are connected to the generator are disconnected,
- The top nut is completely unscrewed,
- The generator is held at the bottom thanks to a long bolt, which should be held with one key, and the nut should be tightened with the second,
- The generator is carefully removed,
- All broken elements are removed and replaced with new ones,
- Then everything is reassembled and installed. Moreover, the work is done in the opposite direction.
And the final touch is a mandatory check of the generator belt tension. To do this, you need to charge the battery and start it to understand that everything is working as it should again.
Generator repair for VAZ 2109
Repair of the generator on the VAZ 2109 is carried out only when faults have been discovered inside the device. In such a difficult situation, it is definitely worth doing a special diagnosis with a multimeter.
Thanks to the basic principles of operation, it is possible to very successfully replace or repair the device. But sometimes there is only one way out - installing a new one.
The main thing to remember is that timely detection and identification of breakdowns will help you avoid all of the above problems. Plus, you can extend the life of the generator itself for a long time.
Dismantling the electric generator
Before removing the generator, you will need to turn off the engine, turn the steering column all the way to the right and look under the hood. On the 2108, the device is located in the lower part, to the left of the engine, next to the cooling radiator. Once you have located the generator, be sure to free the battery terminals before starting work. If you suspect brush wear, you should first remove the charging relay, which is located on the back of the generator housing.
It is secured with two bolts. After unscrewing the hardware and disconnecting the contact plug, you need to inspect the condition of the brushes. If their resource is exhausted, you will need to purchase a new charging relay. This is determined by simply measuring the length of the brush; its size must be at least 4 cm. When the brushes are in working condition, it is enough to fasten the relay back. In case of other problems, you will need to completely dismantle the generator itself.
First of all, you need to disconnect the wiring, which is divided into 2 parts. The first one includes two red wires, they are connected to the back of the generator housing and secured with hardware. The second part consists of one red wire, it is connected to the generator terminal using a plug on the same side of the device. Having disconnected both wiring, you need to dismantle the generator in a certain sequence.
First, the hardware that is attached to the belt tensioner bar (on top of the generator) is untwisted. Then the nut securing the same bar to the motor block is unscrewed. After this, you need to unscrew the nut that secures the generator bracket to the engine block. Next, remove the device belt and unscrew the hardware securing the generator to the car body. After completing these steps, you can remove the generator with a slight movement and begin disassembling it.
Generator set price for VAZ 21099, VAZ 2109, VAZ 2108
| Catalog item | Serial number | Price | |
| A2110-80A (original) | BOSCH (9501.3801) (original) | From 3000 – 3200 | |
| 9501.3801 | FINWHALE 687-04 | 62022 / 180545 | From 3000 – 3200 |
| 9568.3749 | 922.3801 | SKL622RS | From 3000 – 3200 |
| 3701010 (HORT) | 3701024 | Contitech | From 3000 – 3200 |
| 3701971 | 3701953 | Electro 3701747 | From 3000 – 3200 |
| *prices are as of August 2021 |
Disassembling the device
For disassembly you will need the following tools:
- set of wrenches;
- bearing puller;
- vice.
With their help, the disassembly process will significantly speed up. When starting work, you need to unscrew the hardware securing the rotor shaft with a 19mm wrench. Usually they are secured very tightly, so you will have to put in a lot of effort. In the process of unscrewing the fastener elements, it is important to remember their location, so it is recommended to make a rough sketch on paper. This diagram will help you not get confused when assembling the device.
Place the generator with its back side up and unscrew the 4 fastening elements using an 8 key. This way you can open the front part of the generator housing. There is a bearing located there, which is secured using plates. Unscrew the hardware securing its plates and release the bearing from its seat.
If it does not give in, it is necessary to help it with a wooden strip, the size of which coincides with the dimensions of the bearing. The undisassembled part of the generator will need to be secured in a vice and the back of the housing will need to be pulled to release the element. All that remains is the rotor shaft and another bearing, which are removed using a puller. To do this, you need to place the tool on the bearing and release it from the shaft seat.
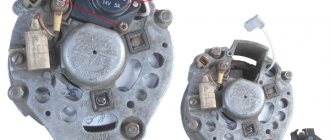
Generator parts: 1 – voltage regulator assembled with brush holder for generators produced since 1996; 2 – voltage regulator and brush holder for generators produced before 1996; 3 – terminal block for additional diodes; 4 – insulating bushings; 5 – rectifier block; 6 – contact bolt; 7 – stator; 8 – rotor; 9 – spacer sleeve; 10 – inner bearing mounting washer; 11 – drive side cover; 12 – pulley; 13 – outer bearing mounting washer; 14 – coupling bolt; 15 – front rotor ball bearing; 16 – bushing; 17 – cover from the side of the slip rings; 18 – buffer sleeve; 19 – clamping sleeve; 20 – capacitor
If you have diagnosed bearing wear, you need to write down their markings and purchase new ones. There is no need to go to the spare parts store, taking bearings with you. It is not recommended to listen to advice from sellers about similar bearings that will also work. Buy products that strictly comply with the markings of original parts.
Having dealt with the bearings, you will need to check the diode bridge, which is located inside the back of the device housing. If mechanical damage or oxidation is detected on the surface of the part, you need to dismantle the bridge by unscrewing the 4 fastening elements and replace it with a new one. The cost of all the above-mentioned parts does not exceed 800-1000 rubles. in total, so you can replace everything at once if possible.
Generator 37.3701
1 – clamping sleeve; 2 – bushing; 3 – buffer sleeve; 4 – back cover; 5 – screw for fastening the rectifier unit; 6 – rectifier block; 7 – rectifier block valve; 8 – capacitor; 9 – rear bearing of the rotor shaft; 10 – slip rings; 11 – rotor shaft; 12 – brush connected to terminal “B” of the voltage regulator; 13 – pin “30” for connecting consumers; 14 – output “61” of the generator; 15 – brush connected to terminal “Ш” of the voltage regulator; 16 – terminal “B” of the voltage regulator; 17 – voltage regulator; 18 – stud securing the generator to the tension bar; 19 – impeller; 20 – pulley; 21 – bearing mounting washers; 22 – thrust ring; 23 – front rotor shaft bearing; 24 – rotor winding; 25 – rotor pole piece; 26 – stator winding; 27 – stator; 28 – front cover.
Generator 9402.3701
1 – casing; 2 – output “B+” for connecting consumers; 3 – capacitor; 4 – common terminal of additional diodes (connected to the “D+” terminal of the voltage regulator); 5 – holder of positive diodes of the rectifier unit; 6 – holder of negative diodes of the rectifier unit; 7 – positive diode; 8 – negative diode; 9 – voltage regulator; 10 – back cover; 11 – tightening screw; 12 – front cover; 13 – stator winding; 14 – thrust ring; 15 – front rotor shaft bearing; 16 – pulley; 17 – nut; 18 – rotor shaft; 19 – conical washer; 20 – washer; 21 – rotor pole pieces; 22 – stator core; 23 – bushing; 24 – rotor winding; 25 – rear bearing of the rotor shaft; 26 – bearing sleeve; 27 – slip rings; 28 – brush holder; 29 – stator winding terminals; 30 – additional diode; 31 – pin “D” (common pin of additional diodes).
Technical characteristics of the generator 9402.3701
The stator and generator covers are secured with four screws. The rotor shaft rotates in bearings installed in the covers. The lubricant placed in the bearings at the factory is designed to last the entire service life of the generator. The rear bearing of the generator 9402.3701 is pressed onto the rotor shaft and is pressed by the rear cover through a plastic sleeve, the front bearing is pressed and rolled into the front cover and can only be replaced together with it. Its inner race, together with the thrust ring and washer, is clamped by a nut between the pulley and the step on the rotor shaft. The front bearing of the generator 37.3701 is secured with four screws between the inner and outer washers and can be replaced separately from the front cover. The rear part of the generator 9402.3701 is closed with a plastic casing with latches.
The generator stator contains a three-phase winding made in a star configuration (the terminals of the phase windings have a common point). The second ends of the phase windings are connected to a rectifier bridge consisting of six silicon diodes (valves) - three “positive” and three “negative”. The valves are pressed into two horseshoe-shaped aluminum holder plates in accordance with the polarity (positive and negative - on different plates); one of the plates also contains three additional diodes, through which the excitation winding of the generator is powered after starting the engine. The plates are combined into a rectifier unit mounted on the rear cover of the generator (under the plastic casing of the generator 9402.3701).
The excitation winding is located on the generator rotor, its leads are soldered to two copper slip rings on the rotor shaft.
Power is supplied to the field winding through two brushes. Alternator slip rings (9402.3701) have a reduced diameter to reduce peripheral speed and reduce brush wear. The brush holder is structurally combined with the voltage regulator and is mounted on the back cover of the generator. The voltage regulator is non-separable; if it fails, it is replaced.
Until 1996, for the 37.3701 generator, the brush holder and voltage regulator were separate units (voltage from terminal “30” of the generator was supplied to terminal “B” of the voltage regulator). Now voltage is supplied only to terminal “B” (terminal “B” is missing). According to their characteristics, the new and old voltage regulators are the same and, when assembled with a brush holder, are interchangeable.
To protect the on-board network from voltage surges during operation of the ignition system and reduce interference with radio reception, a capacitor with a capacity of 2.2 ±0.04 μF is connected between the terminals of the “positive” and “negative” valves (between the “+” and “ground” of the generator), located on generator rectifier block 9402.3701 and generator rear cover 37.3701.
When the ignition is turned on, voltage is supplied to the excitation winding of the generator (terminal “D” of generator 9402.3701 and “B” of generator 37.3701) through a control lamp in the instrument cluster (the lamp is lit) and resistors connected in parallel to it. After starting the engine, the excitation winding is powered by additional diodes of the rectifier unit (the control lamp goes out). If the lamp lights up after starting the engine, this indicates a malfunction of the generator or its circuits.
The “minus” of the battery should always be connected to the “ground” of the car, and the “plus” to the “B+” terminal of the generator 9402.3701 (“30” of the generator 37.3701). Switching back on will lead to breakdown of the generator valves.
The generator valves (and other devices in the vehicle’s on-board network when the generator is connected) should be checked at a voltage no higher than 15 V; a higher voltage (for example, when checking with a megger) can cause damage to the valves.
If it is necessary to check the insulation of windings with high voltage, the generator should be removed, and the winding terminals should be disconnected from the rectifier unit and voltage regulator
The VAZ 2108 generator is one of the main devices in the electrical circuit of the car. Without this device, starting the engine and normal operation of the car will be impossible, so if problems are detected, the unit must be checked and repaired as quickly as possible. You can learn more about the principle of operation, diagnostics and repair of the device from this material.
[Hide]
Car generator operation
But there is no magnet in the generator; its functions are performed by the excitation winding. The states can be briefly described as follows:
- When the engine is stopped and the ignition is turned off, all vehicle systems are de-energized and no voltage is supplied to the excitation winding.
- When you turn on the ignition, constant voltage is supplied to the regulator.
- The voltage regulator allows you to stabilize the value at the same level.
- Next, the current is transmitted through the brushes and slip rings to the rotor winding.
- A magnetic field appears, but it is stationary, so no voltage is generated at the power terminal. But it is there, since this terminal is electrically connected to the positive terminal of the battery.
- As soon as you start turning the crankshaft with the starter (or even by pushing the car), the alternator rotor rotates and current is produced.
After starting the engine, the generator takes on the main load of powering electricity consumers, while the battery is charged at this time.
Device Description
Before we tell you how to check the 2108 yourself, we suggest you familiarize yourself with basic information about the device. First, let's look at the principle of operation and device. A detailed diagram of the device is shown in the photo.
Principle of operation
The purpose of the unit is to provide electrical appliances and vehicle equipment with energy, and first of all we are talking about the battery. If the mechanism breaks down, the battery stops charging normally, and due to lack of voltage, the battery does not allow the operation of electrical equipment. When the device's charge runs out, the car will simply stall, and it will not be so easy to start it later.
The system is powered by the rotation of the pulley on which the belt is installed. The VAZ generator pulley receives mechanical force from the crankshaft through a belt. The latter can be either wedge or polywedge.
Device components
We will not fully list what components the generator on a VAZ 2108 car or the mechanism on a classic consists of, since the device of different generators is almost identical.
Let's look at the main elements:
- A diode rectifier used to convert alternating current to direct current.
- The generator belt, which transmits power.
- The pulley on which the belt is mounted.
- Brush unit.
- A voltage regulator relay, the purpose of which is to protect the battery from overvoltage.
- A light bulb that is displayed on the dashboard. It is used to notify the driver about malfunctions in the operation of the device (the author of the video is the Engine Repair channel! And interesting!).
Replacement and removal of the electric generator
The generator on a VAZ car is removed either for complete replacement in case of failure or to carry out repair work to replace faulty parts. To perform dismantling, prepare a standard set of tools; it is advisable to drive the car into the inspection hole.
Source
How to check the generator?
To check the functionality of the unit in your car, you need to follow these steps:
- Using a voltmeter, diagnose the voltage at the battery terminals. When the engine is running and the generator unit is operating normally, this parameter should be around 13.8-14.5 volts.
- Try placing your palm on the unit body with the engine running, you need to feel the vibration. If there is vibration, you will notice it immediately. Moreover, it may be due to wear of bearing parts.
- It is also necessary to diagnose the tension of the device strap, while the motor must be turned off. Press the strap with your finger - the deflection should be no more than 1.5 cm (video author - Vyacheslav Lyakhov).
Typical malfunctions and methods for their elimination
To prevent unit failure, it is necessary to ensure its high-quality and timely maintenance. As you can see from the photo of the diagram, the unit consists of many different components, so the likelihood of it breaking due to improper maintenance is quite high.
So, in what cases is a VAZ generator repaired:
- The indicator light on the dashboard does not turn on, although the unit and all equipment are working normally. Most likely, the problem is an open circuit or burnout of the indicator itself. In some cases, the reason is poor contact of the diode with the wiring; in this case, you only need to clean the contacts of the connection connector.
- The indicator on the tidy, as well as the instruments themselves on the control panel do not work. Apparently, the reason for this is the failure of the safety element, which will need to be replaced. Also, the reason may be a break or unsoldering of the wiring.
- The warning light comes on after the engine starts, but it disappears after the driver presses the gas. The essence of the problem lies in the fact that the generator unit is not excited at low engine speeds; in most cases, this is due to the desoldering of the resistor elements in the block. Conduct their diagnostics and, if necessary, solder them again.
- Another malfunction is that the indicator continues to light when the engine is turned on, while the voltmeter needle on the dashboard is in the red zone. In this case, there may be several reasons for the problem. First of all, it could be the strap slipping - you need to check it and, if necessary, tighten it. Also, the reason may be a short circuit or breakdown in the diode elements of the winding; much less often, a malfunction occurs when the voltage regulator fails.
- Another sign is that the indicator does not light up when the engine is running, but the voltmeter needle on the dashboard is in the red zone. In this case, you first need to diagnose the presence of contact between the regulator connector and the brushes. If the contact is normal, then check the brushes (they may freeze), as well as the slip rings; for the latter, the problem of oxidation is relevant. In addition, the cause of the problem may lie in the failure of the voltage regulator; usually we are talking about a break in the wiring between the contact and ground. The same symptoms appear in the event of a short circuit on the positive valves of the rectifier element.
- When the engine is running, the voltmeter needle is located in the red zone - this symptom indicates damage to the voltage regulator. In particular, we are talking about a short circuit that can occur between ground and also contact Ш. The problem can only be solved by replacing the regulator.
- If the unit is significantly louder than usual, there may be several reasons for this. First, you should check the functionality of the bearing elements, as well as the tightness of the pulley nut. In some cases, the loud operation of the unit is due to the creaking of the brushes. The brushes themselves may be of poor quality, but it is possible that the problem is dust getting on the slip rings.
Price issue
The price in this case depends on the manufacturer.
The generator of VAZ 2108, 2109, 21099 cars is a synchronous, three-phase electric machine, alternating current with electromagnetic excitation. It has a built-in rectifier (diode bridge) based on silicon diodes and an electronic voltage regulator. In addition, there is a rotor - the rotating part of the generator and a stator - the stationary part. The rotor is driven by a belt from a pulley on the engine crankshaft. On VAZ engines 2108, 21081, 21083 there is a V-belt, on 2111 there is a poly-V belt. A number of cars were equipped with generators made in Bulgaria, Slovenia, and Germany. Their characteristics are similar to domestic generators, but they may differ slightly in design.
On VAZ carburetor engines a generator 37.3701
, for engine 2111
generator 9402.3701
.
Both generators are similar in design and characteristics, the only differences are in the amount of current supplied (9402.3701 is more powerful). Technical characteristics of the generator 37.3701
- The value of the delivered current (at 6000 rpm -1 and a voltage of 13 V) - 55 A
- The voltage value - 13.6 - 14.6 V
- The direction of rotation of the rotor is right
- The maximum rotor speed is 13000 rpm -1
— Gear ratio engine/generator 1/2.04
Technical characteristics of the generator 9402.3701
— The value of the delivered current (at 6000 rpm -1 and a voltage of 13 V) – 80 A
— The voltage value – 13.2 – 14.7 V
— The direction of rotation of the rotor is right
A normally working, serviceable generator of VAZ 2108, 2109, 21099 cars and their modifications produces a voltage in the range of 13.6 V - 14.6 V
. This can be visually tracked using a voltmeter on the instrument panel, or it is better to measure the voltage with a voltmeter (multimeter, autotester...). Based on this, generator malfunctions come down to just two problems:
— the generator does not provide charging current at all
, or gives it in a small volume (the voltage is small - the voltmeter needle is in the red zone or close to it);
— the generator produces too much charging current
(the voltage is higher than normal, the voltmeter needle points too far to the right).
In the first case, the battery is undercharged and, after some time, starting the engine will be problematic. In the second case, the battery is overcharged and, as a result, its electrolyte boils away (the battery “boils”), the plates fall off, and then the final failure occurs.
It is advisable to have at least the simplest tester in order to diagnose generator malfunctions with a high degree of probability. In addition, based on the instrument readings, you can also draw certain conclusions about the performance of the generator set.
Several articles on our website provide the most suitable generators for VAZ 2108, 2109, 21099 cars with recommendations for diagnosing and eliminating them.
The car's generator is designed to generate electricity and recharge the battery. If the normal operation of the electric generator on a car is disrupted, its battery begins to gradually discharge. And your car won't go far. It all depends on how long the battery charge lasts. You can remove and repair the VAZ 2108 generator yourself. We begin repairs by identifying the cause of the malfunction in order to avoid many unnecessary and time-consuming operations. Our simple and understandable repair instructions will help you with this.
Generator Modifications
On newer VAZ-2109, 21099, 2110 cars, modifications of generators with the designation 94.3701 were installed. Their power is much higher than those used on eights. But the dimensions of the VAZ-2108 generator are the same as those of more modern ones installed on dozens. Therefore, they are interchangeable, but have different characteristics. Here are the differences:
- The current strength of 94.3701 is 80 A, which is 25 A higher than that of the figure-eight unit.
- The voltage adjustment range on the 94.3701 generator is larger.
- The gear ratio between the generator rotor and the engine crankshaft is higher.
Installing a new unit is advisable if a larger capacity battery is used, and in the system of electricity consumers there are a lot of those that have greater power. And if you use standard electric cars, the battery will be discharged and will not have enough current.
Common faults
The electric generator is located under the hood of the car and operates from a belt drive. The most common causes of generator breakdowns are as follows:
- The tension is loose or the alternator belt is stretched
- Charging relay faulty
- Generator brushes worn out
- The diode bridge has failed
- The bearing (or both bearings) of the rotor shaft is jammed
Troubleshooting check
Signs of malfunctions and their identification:
- Extraneous noises are heard that are clearly audible during operation
- this is a likely sign of wear on the shaft bearings - Low voltage received at the “output” from the generator
means worn brushes or weakened belt tension - An increase or decrease in voltage received at the “output”
may be caused by a malfunction of the diode bridge
Troubleshooting via the instrument panel warning lamp
What does a lit red light on the dashboard with a picture of a battery mean:
- In any case, this is a signal that the voltage at the output of the unit is lower than the battery voltage, or vice versa, the battery voltage is lower than the voltage supplied from the generator
- When the light goes out as the engine speed increases, the problem is most likely related to the generator
- If it starts to shine brighter, it’s time to change the battery
To perform initial diagnostics of faults, you just need to do the following procedures:
- Check the voltage at the battery terminals (contacts) using a voltmeter. With the engine running and the alternator working, the voltage on the battery should be between 13.8 - 14.5 volts
- With the engine running, touch the body of the device with your palm to detect vibration. When the wear of the shaft bearings is increased, their vibration transmitted through the generator housing is more than noticeable; it is very difficult to confuse it with something else
- Check the belt tension: with the engine stopped, you need to press the belt with your fingers - its deflection should not exceed 1 - 1.5 centimeters
Preliminary work
Due to the fact that our unit is located under the hood of the car, you will have to turn off the engine, turn the steering wheel to the right all the way, and open the hood. The electricity generator on the VAZ 2108 is installed in front of the engine. And it is located in the engine compartment in the lower left corner, between the engine and the radiator. So:
- Before removing the unit, it is necessary to disconnect the ground from the battery (negative contact or both terminals)
- To avoid unnecessary work, before removing the unit, remove the charging relay from it and at the same time check the production of the brushes
- The charging relay is located at the rear of the unit and is attached to its body with two screws
- To unscrew them you will need a Phillips screwdriver.
- When unscrewing the screws, be careful not to fall on the guard, otherwise you will have to remove them from there, which will be another huge task (and completely unnecessary)
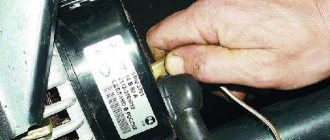
- To remove the relay, we need to release (disconnect) the wire that has a “female” contact
- After we removed the charging relay, visually inspected the brushes - we decide whether to purchase a new voltage relay or install the dismantled one back, it all depends on the degree of wear of the brushes
- For normal operation of brushes, a length of at least 4 centimeters is required.
Removing the generator on the “eight”
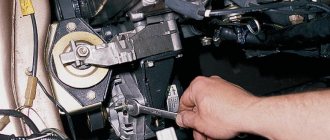
To dismantle the unit for replacement or repair, you will need “17” keys and a mounting blade. Before starting work, be sure to generously treat all threaded connections to facilitate dismantling. The procedure looks like this:
- Disconnect the negative terminal from the battery.
- Unscrew the top nut securing the generator housing to the bracket.
- Unscrew the nut on the lower mounting bolt.
- Slide the generator housing towards the engine block and remove the belt.
- Unscrew the nut from the power contact and move the wires to the side.
- Remove the lower mounting bolt.
After all these manipulations, you can completely dismantle the unit. This can be done either from below, if protection is not installed on the car, or from above.
We begin to remove the unit from the engine
Let's start removing the VAZ 2108 generator, repairs will be the next step:
- We disconnect the wires from the unit - they are usually red and come in two groups
- The first group of two wires is attached with a nut to a bolt located on the back cover
- The second group is made of one wire, connected to the unit terminal via “mother-father” contacts, on the same back cover of the generator.
To remove the generator from the engine, we need to unscrew a couple of nuts and one bolt in a certain sequence:
- First, unscrew the nut that is attached to the drive belt tensioner bar (located at the top of the power source)
- Then unscrew the bolt securing the tensioner bar to the motor housing and remove it
- The third step is to unscrew the nut from the bolt that secures the generator bracket to the engine block
Some nuances that will make it easier for beginners to remove the unit with their own hands:
- The bracket securing the generator is located at the bottom of the engine housing, under the generator. After unscrewing its nut, you must immediately remove the drive belt from the pulley of the unit itself.
- The bolt securing the generator should be pushed to the left from its bracket until it rests against the body or to protect the unit.
- It is necessary to unscrew the two screws located on the wheel side (right), which secure the mud protection to the body
- If the bolt holding the generator still rests on some body parts, you should press the engine with one hand and simultaneously pull out the bolt using the other hand.
Now that the generator has been completely removed from the engine, we can begin disassembly.
Let's move on to disassembly
To disassemble an electric generator, you just need to have two important tools:
- Bearing puller
- Vise
They will greatly facilitate and also speed up your work. In addition to these, it will be useful:
- Hammer
- Set of keys (or heads)
- Screwdriver Set
Now that we have stocked up on the necessary tools, let's start disassembling:
- Using a 19mm wrench, unscrew the nut that secures the impeller to the shaft
- To do this, you need to hold the impeller with one hand, and with the other hand remove the nut, rotating it counterclockwise
- It will take some effort, but this nut must be unscrewed
- The impeller is locked on the shaft with a pin, after removing the impeller from the shaft we need to remove this pin
Attention: You should remember and even write down the location of the spacer washers on the rotor shaft and the nuts when removing them. Since each type of generator device has its own unique characteristics in their immediate location, which does not depend on the instructions in the instructions or repair books. Remember right away, or better yet, sketch out the order of arrangement of such washers installed on your existing unit.
- Now we turn the unit upside down with the back cover, unscrew it using a wrench with 8 nuts (there are four of them)
- We take out the four pins that have become free and release the front part of the case
- In this part of the cover there is a “front” bearing, which is secured by plates (this bearing on the drive side fails more often; the cause of its failure may be overtightening of the drive belt)
- We remove the plates by unscrewing the nuts, then knock the bearing out of its seat using the adapter
- A wooden board, which is the same size as the diameter of the bearing to be knocked out, is ideal for this (you can use a soft metal attachment of a suitable size)
- Now we need a vice: screw the nut onto the rotor shaft, clamp the unit, or more precisely, what has not yet been disassembled in the vice
- We tear off its back cover with a sharp upward movement from its seat
- Now that we have removed the generator covers, we have the rotor shaft itself, on which the “rear” bearing is located in the upper part, clamped in a vice, as we see in the photo below.
- To remove the bearing from the shaft, we need a special puller
- We put the puller on the bearing and pull the bearing off the shaft
- Now we have two bearings in our hands: “front” (small) and “rear” (the larger one) - look carefully at their markings, buy the same ones exactly
Important: As practice shows, when purchasing new bearings, it is necessary to remove the old ones. And then buy new similar ones in the store. And such tips from sellers like: “they are all the same” or “if you have an old-style generator, definitely take these” - are often erroneous. Or rather, almost always. We recommend that, in order to save your time, money and nerves, it is easier to remove the bearings and select similar ones based on their factory markings.
- This advice applies to the rectifier unit (diode bridge), which is installed in the back cover
- If damage or metal oxide is visible on the block, we recommend that you remove it without further hesitation (it is secured with four nuts to the inside of the cover) and immediately purchase and install a new one
The practical part is removing the generator, disassembling it, repairing it and reinstalling it.
Due to the fact that the generator is located under the hood of the car, it is necessary to turn off the engine, turn the steering wheel to the right all the way and open the hood. The electric generator on VAZ 2108 - 15 cars is installed in front of the engine, in the lower left corner of the engine compartment, between the engine and the cooling radiator.
Before dismantling the generator, it is necessary to disconnect the ground from the battery, i.e. negative contact.
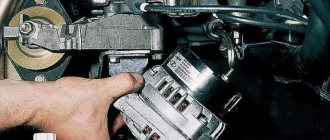
Replacing VAZ generator brushes
Before removing the generator itself, in order not to do unnecessary work, we remove the charging relay from the generator housing and check the production of the generator brushes. The charging relay is installed in the rear of the generator housing, and is attached to it with two bolts. To unscrew them you will need a Phillips screwdriver. When unscrewing the bolts, be careful not to drop them on the crankcase guard, otherwise getting them out of there will be one big problem.
To remove the relay, you need to disconnect the wire, the “female” contact. After removing the charging relay and visually inspecting the brushes, we decide to purchase a new generator voltage regulator relay or reinstall the dismantled one, depending on the wear of the brushes. For their normal operation, a brush length of at least 4 cm is required. Now we proceed directly to removing the electric generator from the engine.
- We disconnect the wires from the generator - as a rule, they are red and consist of two groups of wires, red. One group consists of two wires and is attached with a nut to a bolt on the rear wall of the generator. The other group consists of one wire and is connected to the generator terminal via a male-female contact, also on the rear wall of the generator.
- To remove the generator from the engine, you need to unscrew two nuts and one bolt in the following sequence: unscrew the nut attached to the generator belt tensioner bar (at the top of the generator), unscrew the bolt securing the tensioner bar to the engine block and remove it. The last step is to unscrew the nut from the bolt securing the generator bracket to the engine block.
- The generator mounting bracket is located at the bottom of the engine block, directly below the generator. After unscrewing this nut, you need to remove the generator belt from the generator pulley itself.
- The generator mounting bolt should be pushed to the left, out of the bracket, until it stops against the body shell or the generator’s mud protection.
- On the right wheel side, you need to unscrew the two screws that secure the dust protection of the generator to the car body.
- If the generator mounting bolt still rests against any body parts, you should press on the engine with one hand, and at the same time pull out the bolt with the other hand.
Now your generator is completely disconnected from the engine, and you can begin to disassemble and repair it.
Removing the generator pulley
To do this, we stop it from turning with a screwdriver and unscrew the nut securing it with a 19 mm spanner. The tightening torque is large, so it is better to use a wrench with a long handle.
Removing generator pulley 37.3701 for VAZ 2108, 2109, 21099 cars
Then we remove the following parts: nut, washer, pulley with impeller, segment key.
Separate the halves of the generator housing
First, we mark their relative positions (by placing marks on both parts). Using a 10 mm wrench (it’s more convenient to use a socket or socket wrench), unscrew the four nuts of the coupling bolts (there are engraving washers under the nuts).
Pull out the bolts. Remove the front part of the generator. Remove the rotor from the back of the generator. If it cannot be removed, you can tap it with a soft metal drift through the window under the voltage regulator, or by screwing a nut onto the thread of the shaft and holding it in a vice, with a sharp upward movement, pull the back cover into the shaft. The bearing remains on the rotor shaft. If necessary, we dismantle it with a puller and press on a new one (See “Replacing generator bearings”).
Disconnect the stator
Using an 8 mm wrench (it’s more convenient to use a socket or socket wrench), unscrew the three nuts securing the stator terminals to the diode bridge. We remove it from the back cover of the generator by prying it with a slotted screwdriver or hitting it with a hammer.
When is it time to repair a generator?
1. Any instrument cluster has a battery charge indicator (indicated by a red arrow, using the example of an instrument cluster from a high panel). When the generator stops supplying charge to the battery, this indicator lights up. When the ignition is turned on, it should light up, but when the car starts, it must go out. Otherwise, the generator does not produce current and needs to be inspected. It happens that the battery runs out quickly, and the indicator lamp does not light up at all. In fact, you can’t trust it 100%; sometimes the generator produces a very weak current, insufficient for a light bulb. This situation leads to the fact that literally in 1 week the battery is completely drained and you have to put it on charge. We recommend periodically checking a working battery.
2. You will need a multi-meter with the voltmeter function enabled. Measure the readings given by the generator to the battery (the procedure is demonstrated in detail in the video below). After you start the car, the voltage at the terminal will most likely be about 12-13 Volts and will gradually increase. Don't have a voltmeter? There is an alternative way to check, but it causes damage to the diode bridge (we do not recommend using this method on fuel-injected cars; it is better to stock up on a multi-meter):
- start the engine and let it run for approximately 2 minutes;
- apply gas and pull out the choke so that the engine reaches about 2 thousand revolutions;
- Disconnect the negative terminal from the battery.
If the car works, everything is fine with the generator, put the terminal back. The car stalled - the generator has become unusable and needs to be replaced or repaired. But! It happens that the generator gives a charge, but it is too weak (around 12 Volts), which is why the battery quickly runs out (the car will not stall after removing the terminal from the battery, so this method does not always work).
Assembling the unit
We are starting to assemble a generator for the VAZ 2108, the repair has reached its final stage:
- Assembly begins by pressing the rear bearing back onto the shaft. We perform this action using a small board and a hammer.
- Place the bearing on the shaft with two or three strong blows
- If you removed the rectifier unit, return it to the same four studs for securing the rectifier unit, located in the back cover
- Now we install the back cover itself back on the rotor so that the bearing completely “sits” into the intended seat located in the back cover
- To simplify the procedure, you can use a hammer and hit the cover with gentle blows through a wooden block to “plant” it completely on the shaft
- In our front cover we replace the small (front) bearing and secure it with plates
- We take the unit out of the vice and before putting on the front cover, put a spacer ring on the shaft, which should be located between the front ball bearing and the thrust recess located on the shaft
- We put the front cover on, tighten the nuts on the studs “crosswise” so that they are tightened evenly
- We install the key into the recess of the rotor shaft, then insert the impeller and tighten it with a nut
Now the generator is assembled, now it’s convenient to install the relay with brushes in place.
Returning the unit to its place
The installation procedure is the reverse process of removal:
- We insert it into the mounting bracket
- With one hand we press on the motor from above, and with the other hand, from the side of the front right wheel, we insert the bracket mounting bolt into place
- Screw on the bolt nut, but do not tighten it
- Then we secure the dust protection using self-tapping screws.
- Now we put the drive belt on the unit pulley and install the belt tensioner bar
- We tighten the drive belt to the desired deflection value (1 - 1.5 centimeters) and at the same time tighten the nut located on the tensioner plate
- Now we tighten the nut located on the mounting bracket of our generator.
That's it, the unit has been installed successfully. Completed for vases. Make sure once again that the minus terminal is removed from the battery and connect all the wires back to the generator. Remember that: paired wires are attached with a nut to a stud located on the back cover of the generator, and a single wire is connected using female-male connectors. Now you can connect the negative terminal to the battery and start the engine. If the work was done correctly, then the repair of electrical equipment (generator in particular) on the VAZ 2108 is completed and is no longer a problem for you. The power source began to produce the required voltage for the vehicle to operate. To be completely sure of proper operation, you can check the voltage it produces with a voltmeter. If not everything is clear about the design of the generator, then look for repairs of the VAZ 2108 in the electrical equipment section or use the training video.