Lada Largus Fully stock. Name is Laura › Logbook › TO 120000. Or replacing the timing belt on a K7M.
I would like to thank the Lada.online website for the fact that they have a clear answer to the question of what belt I need. According to their website
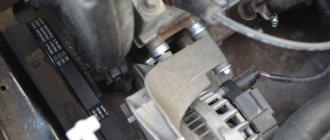
I need 4rk715... So I go to the store, call 4rk715 and am happy with the price of 150 rubles... My favorite 150 rubles... I arrive and start removing the timing belt. So. The first thing we do is put the car on the parking brake, put on the wheel chocks and remove the front right wheel.
Next, having unscrewed the “lamb”, remove the plastic protection and unscrew and fold back the rack connecting the subframe to the body.
Looking ahead, I’ll say that in this position it’s convenient to unscrew the crankshaft pulley (the car needs to be in gear and someone presses on the brake) and two bolts of the plastic timing belt protection, and not like I, a handyman, screwed up. Then we move up
And unscrew the two bolts securing the engine mount to the body. Then we move down and using the Archimedes lever (in my case, a pry bar), resting it on the subframe, lift the engine and insert a hammer between it and the subframe.
Then we move upstairs again and unscrew the cushion from the engine. And around here I unscrewed the crankshaft pulley and got “upset”
Fortunately, Vova is a good person and we went with him to get a new belt. Because the information on the Lada.online website turned out to be false (((Well, yes, so that they only have sex on holidays, and only with the bosses. So, they bought a belt, came to the garage... And... Parampamam!
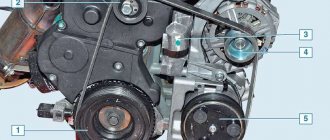
A message arrives that the belt has been delivered to the existential pickup point. OK. It will be useful for the future. Using sophistication, changing different keys (not everywhere you can get a ratchet with a head, we unscrew all the other bolts (3 with a 13 head, 1 we tear off with a ratchet, but unscrew it with an open-end wrench with a 13, 1 with a 10 wrench, 4 with a 8 head). Finally getting bored, we remove 2 timing covers
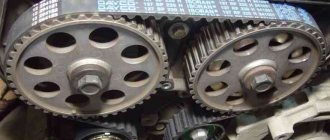
The first bad fear was confirmed. The oily debris shows that the crankshaft oil seal is leaking. We find the marks and set them in the correct position. The camshaft triangle should point up and the crankshaft point down.
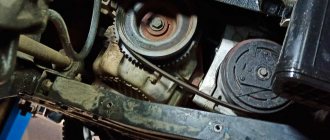
Then unscrew the nut on the tensioner pulley and remove it and the belt. Then we remove the crankshaft pulley and, trying to remove the oil seal, push it deeper and, estimating that we can now put the oil seal on top of this oil seal, install a second oil seal. I know that this is wrong, but from the photos of the engine there is enough space, but I don’t know how to extrude the oil seal (((And then in all the manuals it says “assemble in reverse order.” Um. But those who write like that are fighting Moses , the new belt won’t fit. I spent 3 hours. It won’t fit because of the phrase “put on a new belt.” As a result, I dropped the new roller and it broke when it hit the asphalt ((( Luckily the old one doesn’t play, so I had to install it. Next Then you will have to change it. As a result, in order to put the belt on, I had to turn the camshaft... Oh, how many bricks I put aside turning the camshaft... But then I turned it, every second turn the marks converge!
Nothing seems to be jamming, it rotates normally! So let's pull the roller
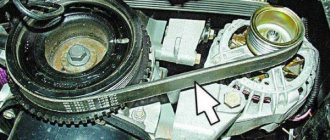
And this is done with a torx and a 13mm wrench, by pulling back the roller with a torx, we make sure the marks match and tighten the nut, that’s all the adjustment is. I pulled a little harder. When reinstalling the timing covers, do not forget to apply thread locker to two bolts that were difficult to unscrew; there is a legend that they come into contact with the oil channels
After securing the timing belt covers, we screw the cushion back to the engine, use the Archimedes lever, remove the hammer, and put a new belt on the generator and pulley. Having unscrewed the lower and loosened the upper mounts of the generator, pull it back with a pry bar and tighten the mounts of the generator. Then we fasten the subframe and body rods and assemble the plastic.
And let's start adjusting the valves.
Surprisingly, the “intake” is all normal, but the “exhaust” is all pinched (((but this is fixable and adjustable!
Oh yes. Somewhere between all these operations we change spark plugs, filters and oil. Finally, put the wheel back and you are good to go. And now go to Rezol (the company where I installed the LPG) because the cylinder is three years old and it’s time to do a hydrotest (((
Of the good. The pump is ok, the camshaft seal is ok. The brakes are fine. From the bad. The suspension began to knock. I spent 9 hours on this whole epic.
Motor line of the Largus model
Over the years, 8 and 16 valve French and domestic engines were installed on the Lada heel. Although today engineers prefer to use only Russian units, there are still many Largus with Renault engines driving on the country's roads. So, during the entire production period, four types of internal combustion engines were used in the model:
- 8-valve Renault-Nissan K7M with 84 hp. With. A heel with such a motor could be ordered in “standard” and “norm” versions.
- 16-valve Renault-Nissan K4M with a total power of 105 hp. With. Installed in the “Luxury” package.
- The 8-valve VAZ 11189 replaced the K7M in 2015.
- 16-valve VAZ 21129. For the first time, it began to be installed instead of the Renault K4M on models produced in 2021.
The process of replacing the timing belt on Lada Largus
Now let's move on to a description of the step-by-step replacement of the timing kit on an 8-valve engine.
- Remove the negative terminal from the battery.
- Remove the front right wheel. For convenience, it is recommended to carry out work on a pit or a lift.
Jack up the car and remove the front right wheel
New belt installed and ready to go
Replacing the timing belt and pulley on Lada Largus 8 valves was successful. If something doesn’t work out, then you need to do the assembly procedure again, after first removing the installed parts.
Timing belt selection
The choice of timing belt and pulley for Lada Largus depends a lot on the quality and longevity of the product. There are original parts that are quite expensive and substitutes that can be used instead.
Original
So, let's look at what kind of timing belt you can buy for an 8-valve Lada Largus, part numbers and catalog of replacements:
The catalog number of the original timing belt Lada Largus 8 valves looks like this - 8200939081 . The average cost in the Russian Federation is about 4,500 rubles (not too bad, right?)
8200939081 - original article, pay attention to the cost.
Analogs
Now let's look at the catalog of substitutes with articles and prices:
| Manufacturer's name | Catalog number | Average price in rubles in the Russian Federation |
| Gates | 5662 XS | 1000 |
| Dayco | 941059 | 1200 |
| Bosch | 1 987 949 675 | 1300 |
5662 XS Gates timing belt - recommended by Largus drivers from our portal
As you can see, there are not many analogues of the belt, but they have all proven themselves to be reliable and high-quality products that can be installed on the Lada Largus 8 valves.
Timing pulley selection
Now let’s look at which video can be mounted on Largus:
8200908180 – catalog number of the original timing pulley. Its cost in Russia is 4,000 rubles.
8200908180 — timing belt pulley in existential condition, the price of this spare part is amazing
Analogs
Consider a list of substitute products that may be suitable instead of the original part:
| Manufacturer's name | Catalog number | Average price in rubles in the Russian Federation |
| Dayco | ATB2572 | 2100 |
| Febi | 37605 | 2300 |
| Gates | 7784-21163 | 2500 |
| Ina | 531 0876 10 | 3000 |
| SWAG | 62 93 7605 | 3600 |
Consequences of untimely replacement of the timing belt kit
The consequences of untimely replacement can be catastrophic and fatal for the engine, and in particular the cylinder head. Therefore, it is recommended not to tighten and change the belt on time, or better yet 5 thousand km earlier.
Untimely replacement of the timing belt kit threatens the owner with bad consequences, namely:
- Bent valves.
- Increased wear of the camshaft.
- Increased wear on rocker arms.
- Damage to the camshaft seals.
All these consequences can have a bad effect on the operation of the Lada Largus engine with 8 valves.
Belt selection
Many car owners, in order to save money, are wondering how to do the replacement themselves and which belt to choose?
Choosing a timing belt for the 16-valve Lada Largus engine is quite simple, since you can buy a timing belt repair kit, which includes the belt itself and 2 rollers. This will cost the owner much less than buying separately.
Let's look at the kit and separately the parts.
Original repair kit (two rollers and a timing belt)
A repair kit for the Lada Largus gas distribution mechanism costs an average of 3,000 rubles. It includes two rollers and the belt itself. The catalog number looks like this - 130C17529R.
Original timing belt
8201069699
Now let's look at a belt made by Renault (cat. number - 8201069699). It is of excellent quality and lasts all 60 thousand kilometers.
Belt analogues
Also, there are analogues of the standard Lada Largus belt. Let's take a closer look:
| Manufacturer's name | vendor code | Average price in rubles in the Russian Federation |
| Dayco | 94997 | 1200 |
| Master-sport | 1126-SD-PCS-MS | 1200 |
| Contitech | CT 1179 | 1250 |
| Bosch | 1 987 949 686 | 1400 |
| LYNXauto | 132FL27 | 1500 |
| Gates | 5671 XS | 1650 |
| Febi | 19836 | 2000 |
All the manufacturers indicated in the table have proven themselves quite well and have high quality characteristics, and therefore are recommended for installation on the Lada Largus.
Original bypass roller
82 01 058 069 — deflection roller
Now, let’s look separately at the cost and article number of the Lada Largus timing tensioner pulley:
The original catalog number looks like this - 82 01 058 069. The average cost of a Lada Largus timing pulley for 16 valves is 6,000 rubles.
Analogues of the video
There are a number of substitutes that can be installed instead of the original part:
| Manufacturer's name | vendor code | Average price in rubles in the Russian Federation |
| Dello | 30770001070150 | 700 |
| Pilenga | PT-P 7150 | 800 |
| Optimal | 0-N262 | 1500 |
| Ruville | 55640 | 1500 |
| Ina | 532 0221 10 | 1500 |
| SNR | GE355.38 | 1800 |
| Gates | T41237 | 2200 |
Timing belt tensioner 8200061345
8200061345 - original number of the timing belt tensioner roller
Reasons for replacement
The main reasons for replacing the timing belt:
- Wear.
The most frequent and inexorable factor. The process of using a part wears it out and over time the spare part has to be replaced. Porepins can develop into a torn belt and engine “capital” - Cracks. Their formation depends, first of all, on the quality of the product.
- Belt stretch. It is formed during operation and is sometimes inevitable.
Replacing the timing belt on an 8-valve Lada Largus: K7M and 11189 engines
Relatively recently, everyone was able to see the new creation of AvtoVAZ Lada Largus, and it has already found its fans in many regions of the Russian Federation and is in high demand among them. The good interior space appeals to families who love traveling on wheels. The budget price was liked by many small companies that use the car as a company car.
The power units of the car use a belt to drive the valve mechanism, so let’s look at how to replace the timing belt of a Lada Largus 8 valve.
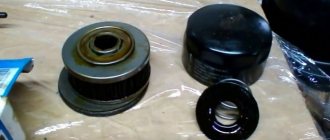
Fluid leaking from the drain hole or from under the seating surface
Replacing the timing belt for Lada Granta 16 valves. correct placement of marks
There are different signs of a malfunction of the VAZ-2109, 2107, 2114 and other car models. So, if the coolant was of poor quality, a leak may occur in the area of the drain hole. In this case, leakage occurs, the formation of drops after the vehicle is run in. This can be determined by examining the area of the drainage hole. It is worth noting that a small leak of liquid is normal for a new pump. This happens within the first 10 minutes. motor operation. This occurs due to the mechanical seal moving to the correct position.
If the new pump's break-in period is complete and fluid is still leaking from the drain hole, this is a sign that it is faulty. It is necessary to thoroughly flush the cooling system and install a new pump. Next you need to fill in the required amount of new antifreeze of acceptable quality.
If a leak is observed from under the seating surface, this also indicates a breakdown. In this case, a sign of a malfunction of the VAZ-2107, 2110, 2109 or other models is wetness, the appearance of drops, smudges on the body or around the specified area. The cause of such a breakdown is incorrect installation of the pump or incorrect use of sealant or seals.
If the pump is new, it needs to be removed and checked for correct installation.
It is especially important to pay attention to the tightening torques. If the pump is already old, it must be replaced
Engines
The designers have provided three power units for installation on this car, these are two eight-valve VAZ 11189 and K7M from Renault, as well as a 16-valve French engine K4M. The working volume of these engines is 1600 cm3, which is considered optimal for this class of cars. The power of the VAZ engine is 87 horses, the French engine can produce up to 90 hp. With. Both power units have an injection power system and comply with Euro-5 environmental standards.
This French engine began to be installed on domestic cars after Renault acquired shares in an automobile plant in Tolyatti.
This engine became the next in a series of modifications to the K7 series engines; its piston stroke was increased, rocker arms were added to the valve mechanism, and the diameter of the clutch and flywheel was increased. Average fuel consumption is approximately 7.2 liters per hundred kilometers.
Manufacturers declare a service life of 400 thousand km, but repairs often occur at 350 thousand km. The motor is combined with a manual gearbox having 5 stages.
VAZ 11189
This is a higher quality and modified VAZ 11186, which is installed on other VAZ passenger cars. It also has an injection power system and can deliver up to 87 hp. With. Its cost is lower than that of a French engine, which is why it is installed on most cars.
The average fuel consumption of the VAZ 11189 is slightly higher, it is equal to 8.2 l/100 km. As a disadvantage, experts note the shorter service life compared to the French engine, it is equal to 200 thousand km. Both engines bend the valves when the timing belt in the timing drive breaks.
Replace or repair?
If signs of pump malfunction appear, it must be replaced. Many drivers do not do this after every 60 thousand km. If the time has come for replacement, but there are no external signs of pump malfunction, you need to perform a thorough check. Often the first signs of failure are observed within the system. So, if the pump blades are made of metal, corrosion appears on them. Traces of mechanical damage will be visible on the plastic elements of the system. Such a device cannot be used in a cooling system. Even if it works now, it will fail very soon.
Some drivers decide to repair the pump. Theoretically, this procedure can be performed, but practically it is impractical. The cost of the pump is quite reasonable. That's why it's easier to buy.
Experts do not recommend repairing the pump, which is driven by the timing belt. Otherwise the pump will not be reliable. The likelihood of its breakdown increases many times over. Due to its breakdown in such a system, the motor may fail. Therefore, it is better not to save money, but to buy a new pump. It will be much more reliable than a refurbished pump.
It is very important to install it correctly in its original place
Particular attention is paid to seals and proper tightening of fasteners. In some cases, a special sealant is used for joints
It eliminates the possibility of leaks. However, the use of the presented material is not always possible. It will not allow you to subsequently loosen the motor for attaching the timing belt on some car models.
Replacement procedure
Usually this work is performed on a lift, which is not available in car owners’ garages, so an inspection pit is quite suitable. After installing the car, tighten the handbrake lever and place chocks under the rear wheels. In addition to a set of wrenches, you will need a car jack and a stand under the car body. Next, work continues in the engine compartment. Replacing the timing belt on Lada Largus 8 valves can be done approximately in the following sequence.
- Open the hood and disconnect the battery terminals. For K7M engines, it is additionally necessary to dismantle the inlet pipe and the inlet muffler.
Next, regardless of the type of motor, you should do:
- Remove the front wheel bolts on the right side of the car.
- Raise the body with a jack, install a stand, remove the wheel.
- The engine crankcase protective shield and the side mud protection shield are dismantled.
- Now remove the belt that operates the additional equipment of the machine.
For the K7M engine, it is necessary to additionally unscrew the TDC lock plug (its number is Mot. 1489).
- In an accessible way, brake the engine crankshaft from turning, unscrew the bolt on the crankshaft pulley, and remove it from the shaft.
- Now you can begin to dismantle the right support of the power unit; first, before doing this, place an automobile hydraulic or screw jack under the engine crankcase.
- If you lower the engine a little, you will have access to the plug that closes the slot for fixing the crankshaft in a stationary state; turn it out.
- Next, you need to remove the protective upper and lower covers of the timing mechanism drive and remove them from the engine compartment.
- Place the pulley bolt on the crankshaft in place with the spacer.
- After this, by rotating the crankshaft pulley bolt with the head, set the piston of the first cylinder to TDC. At the same time, they monitor compliance with the installation marks.
When the mark of the crankshaft pulley is a few millimeters from the mark on the cylinder block, screw in the crankshaft clamp and turn the shaft until it stops (for the K7M engine). It is necessary to rotate the crankshaft clockwise, while pressing the TDC lock, so that it is in the locking groove of the crankshaft.
- To remove the timing belt, you need to loosen its tension. To do this, loosen the mounting bolt on the tensioner, it turns to the side, and the belt is easily removed from the engine.
- The tension device roller is also dismantled along with the washer.
- Before installing a new timing belt, you should carefully inspect all timing drive parts for wear, paying special attention to the coolant pump.
In some cases, it may jam, which will result in cutting off the teeth of the timing belt. Once again check the alignment of the timing marks in the timing drive.
- The tension device together with the washer is installed in its place, the fastening screw is screwed in, but not fully tightened.
- Installation of the new part begins with the pulley on the engine crankshaft, followed by the pump and camshaft pulley. You need to monitor the tension of this branch of the belt to avoid deflection. It is necessary to remove the TDC clamp for the K7M engine.
- Tension the belt using a tensioning device by turning it with a special wrench until the marks match.
One is located on the stationary part of the roller, the other on the movable holder. After they coincide, the tensioner bolt is finally tightened.
- Next, everything is assembled in the reverse order of disassembly.
After completing the belt tension, you need to turn the engine crankshaft several revolutions, while checking that all installation marks match.
Tags
The correct position of the piston group relative to the valve mechanism is indicated by the coincidence of the installation marks in the timing drive. They are applied to the crankshaft and camshaft pulleys, and there are counters on the cylinder block and rear timing belt protective cover. On pulleys they can be in the form of a conical recess or in the form of a tide. The oil pump housing has a cast risk.
Only a complete match of the marks will guarantee a successful timing belt replacement.
Snapshotrlrlrlrl
In this case, it will be impossible to turn the crankshaft clockwise.
If, when screwing in the installation pin, you feel that it has rested, and the end of the nut on the pin does not come into contact with the end of the boss of the hole in the cylinder block (there will be a gap between the nut and the boss), then slightly turn the crankshaft counterclockwise by the pulley mounting bolt. Then we screw the installation pin into the hole of the block until the end (until the ends of the pin nut and the boss of the hole in the block touch) and turn the crankshaft clockwise until the shaft cheek pad stops against the pin.
How to replace the timing belt on a Lada Largus
For a Lada Largus car, the 16-valve timing belt needs to be replaced no more often than every 110-120 thousand kilometers.
If the belt is not replaced in time, it will break or the teeth will be cut off. In this case, the valves will be bent and the pistons will be deformed. Then expensive repairs will be required. Try to avoid this. The pump, which rotates using a belt, also needs to be replaced. The Lada Largus station wagon can have one of two engines under the hood:
- 8 valves, power 87 hp. pp., the same in Lada Kalina and Granta cars;
- 16 valves, power 102 hp. pp., VAZ has a license for this type of engine.
Cars with a 1.6 liter engine capacity have an injection power system. The design of the engines was made in such a way that if the belt breaks, the teeth damage the valve of the gas distribution system. The condition of the belt on Largus must be carefully monitored so that you do not have to resort to extreme measures in the form of expensive repairs.
You can replace the timing belt after 6 years only if you are confident in the quality of its material. Experienced drivers are sure that it is better to do this after 3 years. An unexpected breakdown may occur, then you will not be able to do without a tow truck. We conclude that it is necessary to change the belt every 60 thousand km.
We carry out the work according to the following instructions:
- Remove the right mud guard in the engine compartment. Before doing this, place the holding support.
- Unscrew the bolts, remove the upper and lower covers on the timing belt protection.
- Rotate the crankshaft until the mark on its surface is aligned with the mark on the block. Do the same work with the camshafts. Separately secure each shaft so that they do not rotate. The gas distribution system should not go astray.
- Unwind and loosen the tension roller.
- Take out the belt.
- Remove the roller bolt.
- Install the new roller without tension.
- Align it relative to the marks.
- Tension the belt using the roller.
- Remove the parts for fixing the shafts.
- We control the location of the marks.
- Assemble the mechanism and start the engine.
Purpose of the timing belt and design features
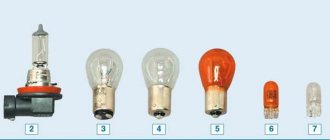
To supply the fuel mixture into the combustion chamber and exhaust gases, valves are used, which are part of the gas distribution mechanism. There can be 8 valves for engines with one camshaft, or 16 for engines with two camshafts, depending on the model.
Valves
An important element in the timing belt is the valves, which are divided into intake and exhaust. The diameter of the intake valve is made larger than the exhaust valve. This allows you to reduce the time it takes to fill the combustion chamber with the fuel mixture and increase the filling ratio. The inlet valve controls the flow of low-pressure mixture, hence providing a lower filling rate. The exhaust operates under high pressure conditions, which allows you to quickly empty the combustion chamber. Therefore, for optimal operation of the internal combustion engine, the intake valve should have a diameter of about 45% of the piston diameter, and the exhaust valve should have a diameter of about 38%.
In order to optimize the operation of the valve mechanism, a chamfer is made on the outer side of the valve at an angle of 45 degrees. There is a similar chamfer, or seat, at the hole that closes the valve on the head of the block. To ensure the tightness of the valve and seat, they are ground in using special abrasive powders.
There are special requirements for the materials from which valves are made. This especially applies to exhaust mechanisms that have a higher operating temperature. As a rule, these are alloys of chromium, nickel, manganese and nitrogen compounds.
Exhaust valve stems are often hollow and filled with sodium, which has high thermal conductivity and can effectively dissipate heat.
Camshaft and drive
The opening of the valves at the right time is carried out by the camshaft using a lever or rocker (rocker arm). The rocker rests on a ball joint or hydraulic compensator at one end, and on the valve stem at the other. The eccentric - the camshaft cam - presses on the rocker approximately in the middle of its length, transmitting force to the valve. The valve is returned to its original state by a spring located on the axis of its stem. Torque is transmitted to the camshaft through a chain or toothed belt drive.
The engines installed on the Lada Largus use two design solutions for the gas distribution mechanism: with one camshaft and with two. Twin camshaft engines are increasingly used due to their greater power output due to better mixing and combustion of the fuel mixture. Despite the advantages of dual-head motors, single-head motors are also widely used due to their simple design, reliability and low cost.
Drive unit
Torque is transmitted to the camshaft via a belt drive. It does not require lubrication, the belt is easily installed on the pulleys, has less inertia, and is quieter. The disadvantages include a limited resource: about 150 thousand km. However, such a mechanism is increasingly used due to its lower cost and ease of maintenance. Further we will consider only a timing drive with a belt drive.
Its elements should also include a tension roller used to tension the timing belt. The drive of the gas distribution mechanism is greatly influenced by its tension force. Excessive force leads to intense wear of timing parts, bearings, pulleys, water pump, generator, tensioner. Strong tension causes the belt to stretch, which also shortens its service life.
Weak tension can lead to the belt slipping along the timing pulleys of the camshafts, disruption of the valve timing and, as a result, deterioration of engine performance.
Timing belt tensioners, depending on the type and design, have a different service life and require replacement at the mileage specified in the vehicle’s operating manual. The most common, simple and, therefore, reliable tensioners are mechanical rollers, which are divided into eccentric and slider ones. On cars of the domestic automobile industry, eccentric tensioners are mainly installed. Their service life is comparable to the service life of the timing belt, so it is recommended to change them at the same time. Often timing belts and tensioner pulleys are sold as one repair kit. When replacing the timing belt, it is advisable to replace the water pump, regardless of its condition.
How to install a new belt on a car
Place a new part on the crankshaft pulley. Install the belt onto the pulley teeth by hand. In the same way, hang the belt on the pulley towards the camshaft. Place the remaining part of the timing belt behind the tension roller.
Now tighten the belt drive. Turn the roller counterclockwise and secure it with the bolt. Then secure this bolt. Rotate the crankshaft until the marks align.
Let's take a closer look at how to remove the belt on an 8-valve engine:
- place the Lada Largus car on the lift;
- remove the terminals from the battery, thereby stopping the operation of the on-board network;
- take a suitable wrench and turn the crankshaft so that the marks on the pulley and timing cover match;
- fix the shafts so that they do not rotate;
- take the 10th key and remove the protective cover;
- remove the pulley that is responsible for the belt drive;
- Using the 17th wrench, loosen the tension roller nut;
- remove the tension roller and timing belt.
Please note that if you notice damage on the old belt, it means that you need to replace not only the roller, but also the stud.
How to work with a 16-valve engine:
- Hang up the car, stop the final drive and remove the crankcase protection.
- Under the area where the Lada Largus engine is located, install something as a support.
- Use the 19th key to remove the right side of the support. Watch how the bolts are located in this place so as not to get confused later during assembly, since the bolts have different lengths.
- Remove the covers to protect the timing belt on the Largus car.
- Lock the crankshaft.
- Take the 18th key and remove the drive pulley.
- Set the piston to the normal TDC position, and then remove the belt drive, holding the bolt, and rotate the crankshaft.
This is how you remove the belt on a 16-valve engine.
Which timing belt is suitable for a Lada Largus car with any number of valves? In addition to the fact that you need to properly dismantle the belt, the quality of the materials from which it is made has a great influence on its service life.
The official manufacturer of materials for Largus is Gates. You can also choose Bosch, Dayco, Pilenga. There is no point in relying on reviews from owners about the quality of this or that manufacturer; follow the recommendations of official dealers. Trust your experience.
When changing the timing belt on Largus, also replace auxiliary spare parts. Replacing a belt is not a difficult task.
Don't skimp on the timing belt. Saving 200-300 rubles or postponing its installation until later, everything can turn into an expensive repair.
How to change it yourself?
A very simple replacement of the timing belt on a VAZ 2110 with an 8-valve engine.
You can replace the belt on an 8-valve VAZ 2114 with an injector engine yourself or by ordering the appropriate service at a service station. During the shift process, there are nuances that must be taken into account when performing the task. If you make mistakes and do not change the strap correctly, this can lead to rapid wear and breakage. Below are instructions for replacing the belt in a VAZ 2114 8 valve.
Tools
If you change the belt yourself, prepare the following:
- a set of open-end wrenches, you will need tools for 13 and 17;
- long flat blade screwdriver;
- 10mm ring wrench, you can use a ratchet head;
- key for installing the tension roller;
- wheel wrench;
- jack.
User Pro Remont shared a video that describes in detail the procedure for replacing the timing belt pulley and timing belt in a VAZ 2114 car.
Algorithm of actions
How to change a belt correctly:
- Drive the car into a garage with a pit. The surface on which work is performed must be level. Switch the gear selector to neutral position.
- Loosen the bolts on the front right wheel. Place this part of the car on a jack so that the wheel can be rotated.
- Open the hood of the car. Using a 10mm wrench, remove the three screws that secure the plastic strap protector.
- Using a 13mm wrench, you need to loosen the bolt that secures the tension roller. Remove the device.
- You can see a mark on the camshaft gear; it is made in the form of a rectangular protrusion on the edge. When performing work, it is necessary that this mark coincides with the protrusion located on the fastening of the strap casing. If these marks do not match, you need to turn the wheel until they match.
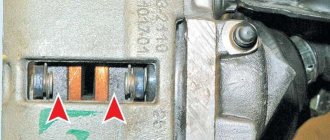
- Then find the rubberized plug installed on the top of the clutch housing; it is located to the right of the power unit’s BC. The part is carefully pryed off with a screwdriver and removed from the seat. Under the plug you can see the flywheel crown; there is a mark on this device. It should be opposite the triangular protrusion located on the left. If the marks do not match, then take a 17mm wrench and loosen the tensioner. Using a pulley removal wrench, turn the device counterclockwise to loosen the timing belt.
- When the upper part of the belt is removed from the gear assembly, take a 17mm wrench and turn the crankshaft until the flywheel marks are opposite each other. The flywheel itself must be secured in this position; to secure it, use a screwdriver and install it between the teeth. If you have an assistant, ask him to hold the tool to prevent it from turning.
- Now you can remove the right wheel. Unscrew the screws that secure the arch protection and dismantle it.
- Using a 17 mm wrench, unscrew the nut securing the generator set pulley. When unscrewing, make sure that the flywheel does not turn.
- Dismantle the generator pulley and remove it from its seat.
- Remove the timing belt from the crankshaft disc.
- Using a 17mm wrench, completely unscrew the tensioner pulley lock and remove it from its seat. If you loosen the fastening, the belt can be removed.
- Install the new product onto the crankshaft disc. When installing, make sure that the marks are not broken. Install the generator set drive pulley by first placing a strap on it.
- Place the product on the gear of the mechanism. Install the tension roller.
- The strap is being installed. During installation, the tension roller must be turned with a special tool purchased in advance at the store. If you don't have one, you can use two self-tapping screws and a screwdriver. Self-tapping screws are installed in the grooves, and a screwdriver secures them. Turning is done counterclockwise. Tension the belt using the tension roller and tighten the screw that secures the roller.
- It is necessary to set marks if they are lost during the work process. The installation procedure for all components is performed in reverse order.
Photo gallery
Photos of belt replacement are shown below.
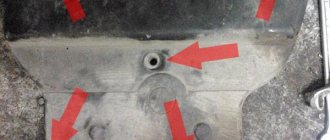
Remove the screws securing the timing belt guard.
The mark on the camshaft gear must coincide with the mark on the housing mount
Loosen the strap tension roller by turning it counterclockwise
Remove the belt from the pulleys and install a new product
Unscrew the nut securing the generator shaft
Put on the new belt and tighten the roller
Replacing the timing belt Lada Largus 8 valves
Consumables of the gas distribution mechanism must be changed on time. This is especially true for belt drives. If you do not check the condition of the belt, it may well break, and this threatens the pistons meeting the valves. This will definitely damage them, and costly repairs will be required to bring the car back to its previous condition. Here we will talk about the timing belt, which is installed on the eight-valve Lada Largus, or rather, we will talk about replacing this consumable on your own, without the involvement of specialists.
Preparatory stage
The initial stage of work is the same for both methods and boils down to providing access to the drive belt.
For this:
- We place the car on the inspection hole, immobilize and de-energize the on-board network by removing the “negative” terminal from the battery;
- For the convenience of work, remove the right front wheel from the car (in the direction of travel), dismantle the protective elements of the engine compartment - the lower one and the mudguard;
- Remove the accessory drive belt. To do this, using a spanner wrench, press the belt tension roller, remove the drive element, and then completely remove it from the equipment pulleys;
- We unscrew the spark plugs and cover their mounting holes with a rag;
- We remove the load from the upper right support of the power plant. To do this, install a pry bar between the subframe and the pan, squeeze the motor up a little and fix it in this position with a block;
- Let's move on to the engine compartment. There, first we pull out the fuel lines from the holders located on the support and take them to the side;
- We disconnect the support bracket from the top cover of the timing drive, for which we unscrew the three fastening bolts (these fasteners are different in length, so you should mark which one was located);
- We unscrew the two bolts that secure the support to the car body and remove it;
- We unscrew all the fasteners of the top drive cover (3 bolts and 2 nuts), after which we remove the cover. Please note that if you check the condition and tension of the belt, there is no need to disassemble anything further. After removing the cover, the belt will be clearly visible, so to assess its condition, all that remains is to turn the crankshaft a few turns and inspect the drive element. To adjust the tension, there is a special hatch on the bottom cover through which access to the tension roller is provided.
If the belt is replaced, then we continue to disassemble the power plant further; - We unscrew the bolt securing the auxiliary units pulley. To do this, ask an assistant to engage 5th gear in the gearbox and depress the brake pedal to block the crankshaft. If this is not enough to remove the bolt, then proceed as follows: remove the crankshaft position sensor from the flywheel housing.
We insert the pry bar into the resulting hole so that it fits between the teeth of the flywheel ring (starter ring).
The teeth that are used by the crankshaft position sensor (they are larger) must not be used as a stop; they must not be damaged under any circumstances. Thus, resting the pry bar against the flywheel housing, stop the crankshaft from turning and unscrew the bolt, and then remove the pulley; - We install the pulley bolt back, but first you should put a small bushing (a piece of pipe) or a pair of larger nuts on it;
- We dismantle the bottom cover of the drive by unscrewing its 4 fasteners.
When to change and why
The timing belt drive synchronizes the operation of the crankshaft and camshaft. The manufacturer recommends replacing it after 60,000 km. But it may well happen that the consumable will need to be replaced ahead of schedule. It is imperative to diagnose this unit so as not to miss the moment when the belt reaches a state of wear and there is a threat of its breakage. By the way, along with the belt drive, it is recommended to change the tension roller, which is also a consumable item and gradually wears out.
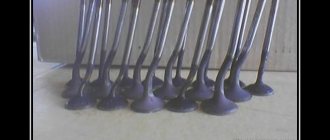
The photo below shows valves that were bent as a result of a broken timing belt:
The timing belt assembly should be inspected after 20,000 km. But what defects are critical, and if they occur, the belt needs to be changed:
- presence of cracks on the surface;
- obvious signs of wear (scuffs, etc.);
- the material began to delaminate;
- the teeth are worn out;
- the ends are frayed;
- oil stains are visible on the surface;
- The belt does not tighten because it is stretched.
During the inspection, pay attention to the condition of the tension roller and water pump. If it is unsatisfactory, they will also need to be replaced.
You can replace the belt drive yourself, but you must follow the instructions. Incorrect installation of the belt can cause engine damage. Of course, it will be better if you invite an assistant who has experience in car repair. Many car enthusiasts do just this and do not seek the help of specialists, which, by the way, is not cheap.
So, if you decide to replace the belt yourself, first prepare yourself properly and prepare everything you need, namely:
- jack;
- keys and heads of the required size;
- screwdriver;
- mandrel for fixing camshafts;
- new consumable.
Be sure to buy new consumables only from trusted retail outlets. A low-quality consumable will not last long, and very soon it will also have to be replaced. In addition, a low-quality drive may break, and such “savings” will result in expensive repairs.
Determining the pump malfunction
An important factor influencing the serviceability of the pump is the drive belt.
If it is installed or tensioned incorrectly, problems with the water pump may occur. A belt rupture leads to failure of the cooling system. There are a number of additional signs indicating a malfunctioning pump:
- A sharp whistle appears when the engine is running. There is no regular movement of fluid as a result of decreased pressure levels.
- Antifreeze leak detection. Associated with loss of elasticity of the omentum. Antifreeze begins to splash out of the expansion tank.
- Presence of grease odor. Appears when liquid leaks out of a damaged bearing.
- Presence of backlash. A characteristic howl appears, caused by the pump bearing.
- Cold condition of the radiator with a hot engine. The result is that circulation stops.
If the above symptoms appear, the pump should be replaced.
Sometimes, after replacing the radiator, a pump leak is discovered. The cause of this problem is incorrectly installed gaskets.
Stages of replacing a timing belt drive
When starting to make repairs, make sure that the car is securely fixed; it will be better if it is installed on an overpass. The first step is to open the hood and de-energize the car. To do this, disconnect the negative battery terminal.
Now the inlet pipe and the strap of auxiliary components are dismantled. Remove the auxiliary mechanism pulley. The motor support located on the right is dismantled. Now you can remove the upper and lower timing covers. After this, a view of the belt drive opens.
Now we do the following: tighten the crankshaft pulley fastening bolt and begin to rotate the crankshaft until the marks on the camshaft and crankshaft pulleys are at a distance of one tooth from the pulley axis. Now we fix the crankshaft by installing a special mandrel for this, and turn it to the right until it stops.
We remove the air collector, remove the plugs on the cylinder head holes. This is done in order to check the alignment of the marks located on the camshafts. To do this you will also have to remove the air collector. Scroll the crankshaft until the grooves on the camshafts are horizontal. To fix the camshafts, it is recommended to use a special mandrel.
Now we loosen the tensioner. Scroll the tension roller to the left. After this, the timing drive will weaken and you can begin to remove it. Remove the belt from all shafts and the pump pulley. We also remove the tension roller by unscrewing the bolt securing it. When installing the tensioner, you need to ensure that the groove on the engine aligns with the protrusion on the roller.
We install a new belt by pulling it onto the shafts and the water pump. Make sure that the arrows on the belt point in the direction of travel. If you install the belt in a different direction, it will cause premature wear of the teeth. Adjust the belt tension. We start the engine and check its operation. If unnatural noises are heard, the installation will have to be repeated.
Belt attachment in a 16-valve Largus unit
We carry out installation using the reverse algorithm.
- The roller paired with the tension mechanism, as noted, is replaced with new analogues.
- We hang the belt on all the pulleys. Note that the last step will be to attach this consumable to the tension roller.
- The tensioning component is installed on the stud of the LADA Largus cooling pump. To do this, insert the bent edge of the device bracket into the corresponding groove made on the pump body.
- Now it’s time to unscrew the control bolt from the previously marked hole and remove the locking bar with which we previously locked the camshafts.
- We rotate the crankshaft a couple of full revolutions until the grooves made on the end sections of the camshafts align.
- We check the correct position of the shaft again by screwing in the control screw. If everything is correct, then remove the bolt and close the hole opening with the indicated plug.
- We proceed to the installation of all previously removed components and parts.
The procedure for installing a belt on a 16-valve K4M engine can be viewed in this video:
"Folk" way
If the “folk” replacement method is chosen, then after the preparatory stage we do the following:
- We take two thin long rods and install them in the spark plug holes of cylinders 1 and 4 (an assistant must hold them strictly vertically);
- We turn the crankshaft, while looking at the (diamonds) marked on the camshaft pulleys. We rotate the crankshaft until these icons become a certain way, namely: the left pulley icon should be at the top, and the right one at the bottom;
- At the same time, the assistant should note that the pistons have become at TDC (the rods no longer rise and further rotation of the crankshaft leads to their lowering);
- To do everything correctly, you should put marks on the camshafts, marking their position, as well as on the flywheel and its crankcase;
- After applying the marks, you can remove the belt. This is done exactly as described above, but it is important to do everything carefully so as not to accidentally turn the crankshaft;
- After removing the belt, the camshafts will turn a little (due to the action of the valve springs), but this will not greatly affect the replacement process;
- After removing the belt and replacing the required elements, before installing a new drive, we check whether the crankshaft has moved. If necessary, we install it according to the applied marks;
- The belt should be put on starting from the crankshaft, then it goes over the pump. Before planting it on the camshaft pulleys, you need to install them according to the marks. To do this, an assistant, using two wrenches, turns the camshafts by the pulley bolts, overcoming the force of the springs, until the previously applied marks align. Next, the shafts are held in this position, and a belt is put on them;
- After that, the tension roller is put in place and the drive is tensioned.
After installing the drive element, turn the crankshaft 2 turns and check whether the applied marks match. If there is a displacement somewhere, we remove and reinstall the belt.
If everything is normal and the marks match, we install all the removed elements on the engine.
Note that both described methods can be somewhat combined, namely, when using the “folk” method, use a locking pin to block the crankshaft and prevent it from accidentally turning.