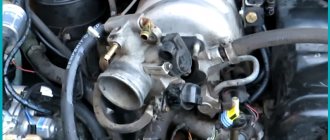
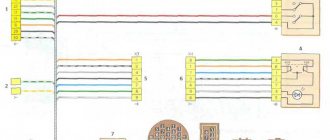
E-GAS or electronic gas pedal is installed on all Lada models (XRAY, Vesta, Largus, Granta, Kalina, Priora and Niva 4x4). Owner reviews about it are not reassuring; many complain that the e-gas pedal is “dumb” (less sensitive and informative than a conventional cable). Did you know that in some cases the electronic accelerator pedal can be adjusted to be more responsive and a little livelier?
We determine the model of the accelerator pedal; this can be done by the catalog number, which is glued to the side of the body. If you cannot access the sticker, you will have to remove the electronic gas pedal:
- Disconnect the block with wires next to the gas pedal;
- Unscrew three nuts using a 10mm wrench;
- Remove the housing and pedal assembly.
The manufacturer installs at least two types of electronic gas pedals on Lada cars (depending on the year of manufacture):
- Old model (catalog number: 11183-1108500);
- New sample (article: 11183-1108500-01).
Each block is modified differently. Attention! You do all further actions at your own peril and risk. In addition, you may lose your warranty.
Replacing and adjusting the throttle cable on a Priora
A delay in the car's response to pressing the gas is a symptom of incorrect adjustment of the throttle cable tension. It is quite possible that the cable simply stretched during operation. If, when pressing the gas pedal, a friction effect occurs, the softness and smoothness of pressing is lost, then the cable needs lubrication.
Today we will combine both operations - we will lubricate the throttle cable and adjust its tension.
Open the hood and remove the decorative engine cover. To remove the throttle cable from the plastic bracket, you need to pull the shell towards you and pull the rubber ring up.
Then you need to unhook the cable from the throttle valve drive. To do this, remove the U-shaped metal retaining bracket from the throttle valve drive by prying one of its sides sideways with a flat screwdriver.
- We try to release the barrel of the cable from the drive - overcoming the force of the drive spring, we twist it towards ourselves and disengage the cable by moving it to the side.
Let's move on to lubricating the cable. We remove the transparent cap from the central shell and pour liberally of WD40 or similar lubricant into it. Synthetic motor oil is fine - you will need a syringe for it.
We move the cable in the sheath and repeat the lubrication procedure. Then we put the protective cap back on and put the cable in place. Don't forget to install a retaining bracket on the throttle valve actuator.
To adjust the cable tension, a bracket is used that holds the cable housing at the attachment point with a rubber ring. We remove the pliers from the bracket and tighten the cable so that its sag near the damper drive is 1-2 mm. Then install the bracket into the corresponding slot on the casing.
No need to pull the throttle cable too hard! This can lead to the throttle opening when the gas pedal is released and, accordingly, increased idle speed. After adjusting the tension, press the gas pedal several times and check the tension again.
Correctly adjusting the cable will provide you with a clear response when you press the pedal - you will have a better feel for your car.
At the same time, make sure that there is no contact between the gas pedal and the rubber mat inside the cabin. This is one of the reasons why the speed freezes when the pedal is released. If the pedal rests on the mat and stops even briefly when fully pressed, be sure to trim the mat with scissors or a knife to eliminate its contact with the pedal.
Good luck on the roads!
How to replace the throttle cable on a VAZ 2114
In order to begin the process of replacing the cable, you first need to find it. If a car enthusiast does not know how to remove the throttle cable on a VAZ 2114, then he should act exactly according to the instructions below.
Usually the cable is located between the throttle sector and the gas pedal. Finding the sector will not be difficult, because if you look closely, you will notice that the tip of the cable is attached to it. The cable runs in the area of the car's engine compartment and front shield.
Additional Information. The front shield refers to the metal shield that separates the car's body and engine. It can be difficult to locate the cable, so in order to find it, you should be as careful as possible during your search.
Adjusting the throttle cable (gas cable) of Lada Priora
The so-called throttle cable or gas cable is a transition element between the throttle and the gas pedal. Pressing the latter transmits an impulse to the cable, which, in turn, slightly opens and closes the throttle valve again. The system is designed to regulate the fuel supply to the fuel system, and, as a result, the speed of the vehicle.
- If your car does not respond properly when you press the gas pedal, the problem is most likely in the throttle cable.
- The lack of reaction of the car to pressing the gas pedal, as a rule, indicates that the cable is faulty and requires immediate replacement.
- A delayed or weak response to pressing the gas pedal is most often the result of a weakened cable, either due to prolonged and intensive use, or due to weakening of the tension.
If the gas pedal has become “hard”, and when you press it you clearly feel increased resistance, most likely, to eliminate this difficulty, it is enough to lubricate the throttle cable. Of course, you should check for foreign objects under the pedal, such as a jammed mat or other object under the pedal, and only then conclude that there are problems with the cable.
The throttle cable of the Lada Priora, like most other VAZ models, can be done at home. For this, a minimum amount of tools and consumables is sufficient.
Tools required for work:
- pliers;
- flat screwdriver;
- syringe or bulb;
- WD-40 or motor oil (a few drops).
Work is carried out on a “cold” engine.
Work on adjusting the throttle cable of the Lada Priora takes place in several stages:
- First, we go to the engine compartment and remove the plastic cover covering the engine. The throttle cable itself is held in a special plastic bracket, and in order to remove it upward, you need to find the cable casing and use a rubber ring.
We remove the cable quite carefully; if you feel that it is caught on something, try to find the reason. As a rule, this stage of work does not require much effort and the cable can be easily removed.
- Next, we arm ourselves with a flat-head screwdriver and remove the special bracket from the throttle valve drive that holds the cable itself to the valve. To remove the cable, it is enough to pry the latch on the edge of this bracket (the bracket itself is U-shaped, so it is almost impossible to confuse it with other fasteners).
- The cable can now be completely removed. This will require some force as it is held in place by a spring, but the force is negligible. Subsequent actions depend on the task at hand. If you see that the problem is in the cable itself, you can either replace it completely or lubricate it. In the second case, we use motor oil or WD-40 fluid, without which almost no repair operation on VAZ cars can be done. First of all, lubricate the cable itself, then, if possible, the casing. By running the casing over the cable several times, you will ensure uniform lubrication along the entire length of the cable. Before you start lubricating the cable, you should remove the transparent cap, and upon completion of the operation, return it to its place.
If the problem is cable tension, look at the bracket that holds it to the throttle body. It will have to be removed and returned to its place after tensioning the throttle cable. In ideal condition, it sags by about one to two millimeters directly next to the throttle valve actuator. After the correction, we check the system: when the gas pedal is not pressed, the throttle valve should be tightly closed. Otherwise, you risk high idle speed and increased fuel consumption.
Other reasons for the heating system to malfunction
It happens that the VAZ-2115 stove has been adjusted, but it still does not heat well, the air flow coming out of it is a little warm. In this case, you need to perform another simple procedure to clean the hoses. For this:
- Unscrew the dashboard, on the passenger side, find two hoses extending from the stove.
- Touch them, if they are not hot, then most likely they are clogged and will have to be cleaned, after which everything should work properly and hot air will flow into the cabin.
The solutions presented in the article are very simple, but effective. After the procedures performed, your car will no longer be cold in winter, everything will work as it should. Moreover, you will not need any cash costs or special tools, and all adjustment actions will not take much time.
How to adjust the throttle valve and set the position angle?
An analogue of a modern car is a device made up of many components and assemblies. Deviations in the operation of the smallest component can lead to quite serious problems. The throttle position sensor (TPS) is one example of this type of component. And adjusting the throttle valve is an integral element of routine diagnostics of any car.
The throttle valve is presented in the form of an air valve, the functional task of which is to regulate the amount of air entering the engine. The fundamental features of the unit include a change in the cross-section of the air channel. When it is open, air flows smoothly through the intake manifold.
The throttle position sensor, located here, determines the opening angle. This function is carried out through its communication with the engine control unit. The signals coming from the sensor contribute to the issuance of a command from the control unit to increase the amount of injected combustible mixture.
Thus, the working mixture is enriched, and the engine operates closer to maximum speed.
Its sensor includes two types of resistors:
The sum of their resistance is approximately 8 kOhm. The reference voltage here is supplied to one of the outer terminals from the controller, and the second terminal is connected to ground. Thanks to this, a signal is sent to the controller, informing about the current position of the throttle valve. The value of the pulse voltage depends on the position level of the element, the standard interval of which is 0.7 to 4 W.
Important: the open state of the unit indicates the pressure level in the intake system of the vehicle is similar to atmospheric pressure; when closed, this value decreases to the vacuum state.
Type diversity
Everyone knows two types of TPS:
- Sample with a mechanical drive type.
- Unit with electric drive type.
Throttle position sensor
The first type is being introduced in economy class vehicles. The complete set of elements is combined in a separate block, which includes the following parts:
- frame;
- throttle valve;
- sensor;
- idle speed controller.
As an addition, there are also pipes located here, the functional task of which is to ensure the operation of gasoline vapor recovery and crankcase ventilation systems.
The damper housing is part of the cooling system. The functional task of the idle speed controller is to maintain the crankshaft speed in the closed position of the damper when starting or warming up the engine. The IAC is a stepper motor and valve. The functional tasks of these parts are to regulate the air supply entering the intake system bypass.
In modern conditions, most manufacturing plants equip machines with electric-type dampers. These elements are characterized by their own electronic control system.
Thus, the optimal amount of torque is ensured at all speed ranges and loads of the machine.
In addition to increased power and dynamics, owners receive a reduction in fuel consumption and exhaust emissions.
This element includes the following mechanisms:
- Frame.
- Throttle valve.
- Electric motor.
- Gearbox.
- Throttle position sensor.
- Return spring mechanism.
Differences between the electric damper type
Main functional differences:
- Lack of mechanical connection between the gas pedal and the throttle;
- Adjustment of XX by direct movement of the damper.
- The electronic system is able to independently influence the amount of torque of the internal combustion engine. This is possible due to the absence of a rigid connection between the gas pedal and the throttle valve. This condition persists even when the driver presses the accelerator.
Such functional changes are possible thanks to the operation of input-type sensors of the control unit and the actuator.
This electronic control system device is additionally characterized by an accelerator pedal position sensor and a brake and clutch position switch.
Thanks to all this, the engine control unit successfully responds to sensor signals, converting them to the damper module into control actions.
Alternative replacement
Sometimes there are cars with parallel installation of 2 TPS. In a functional sense, such installation will not add any power, but if one unit fails, the second one will operate uninterruptedly.
Therefore, the introduction of two TPS is carried out in order to increase the reliability of the module. These elements can be either non-contact type or sliding contact type.
As an addition, this module design includes an emergency damper position, which operates thanks to a return spring mechanism.
Nature of faults
Malfunctions or incorrect adjustment of the damper can be manifested in the following features:
- uncertain or difficult engine starting;
- increased fuel consumption;
- increased idle speed;
- failures when accelerating;
- Jerking when switching.
Adjustment work
It is the damper that accounts for the bulk of the work. Due to the fact that the damper is constantly involved in the moving operation of the motor, its position angle requires periodic adjustment.
Please note that this process is quite painstaking. You cannot avoid replacing the throttle valve if its adjustment leads to any deviations.
In order to avoid such incidents during replacement, we will consider in detail the details of correct throttle valve adjustment.
First, turn off the ignition to bring the throttle valve to the closed position. Secondly, disconnect the connector in the sensor, simultaneously checking for continuity between the terminals. Make sure there is no voltage.
Then you can begin to configure and adjust the sensor. After this, you need to resort to using a 0.4 mm thick probe.
It is used by placing it between the lever and the screw in parallel with the location of the throttle body gasket.
Using an ohmmeter (you can use another similar device), you need to make sure that there is no voltage here either. The presence of voltage indicates a malfunction of the sensor and its need for further replacement.
If the condition of no voltage is met, we proceed to direct adjustment of the sensor. The manipulations are as follows: turn the throttle valve actuator until the angle between the terminals reaches a value equal to the technical standards of the existing vehicle.
Upon completion of work, make sure that the screws on the sensor are securely tightened. During the adjustment process they could become loose.
Did you like the article? Was she helpful?
What is TPS in a VAZ-2110 car?
The throttle position sensor is abbreviated as TPS among motorists. This part is used in several types of engines:
- Gasoline injection type.
- Single injection type.
- Diesel engines.
TPS is also known as a throttle valve potentiometer. This is due to the fact that the sensor is designed to function as a variable resistor. The sensor itself is installed in the engine compartment - the place of fixation is the throttle pipe. The mechanism of operation of the sensor is as follows: depending on the position and degree of opening of the throttle valve, the resistance also changes. That is, the level of the value of such resistance depends on the pressing of the gas pedal. If the pedal is not pressed, the throttle valve will be closed and the resistance will be minimal. The opposite is true when the damper is open. Accordingly, the voltage across the TPS, which is directly proportional to the resistance, will also change.
The control of such changes is carried out by the electronic control system; it is the one that receives all signals from the TPS and supplies fuel using the fuel system.
So, at the maximum voltage of the signal contact of the throttle position sensor, the fuel system of the VAZ-2110 car will supply the largest portion of fuel.
Thus, the more accurate the TPS indicators, the better the VAZ-2110 electronic system adjusts the engine to the correct operating mode.
Health is life
There are malfunctions of the Lada Priora car that are not easy to immediately determine, because they are similar to many other malfunctions in the power supply and ignition systems, fuel supply and electronic adjustment of many sensors. Here, such difficult-to-detect malfunctions include a malfunctioning throttle valve and jamming of the throttle cable due to a break or lack of lubricant in the casing.
If the throttle valve does not open fully (engine does not develop full power) or closes (high idle speed), first try adjusting the throttle cable. If by adjusting the throttle valve drive it is impossible to achieve full opening or closing of the throttle valve or the drive sticks, replace the throttle valve drive cable on the Lada Priora engine:
For this you will need:
flat blade screwdriver, narrow jaw pliers, side cutters.
1. Remove the decorative casing 2. To replace the throttle valve drive cable, remove the safety bracket from the throttle assembly sector by prying it off with a screwdriver. 3. Remove the cable tip from the sector groove and disconnect the cable from the throttle assembly. 4. Remove the spring stopper and remove the cable from the slots in the holders. 5. Release the cable by using side cutters to cut through the plastic clamp securing the cable to the crankcase ventilation hose. 6. Slide the cable sheath forward and remove the cable sheath damper from the hole in the front panel. 7. Inside the car, under the instrument panel, remove the cable end from the pedal lever pin by sliding it with a screwdriver. 8. Remove the cable into the engine compartment and install a new cable.
ATTENTION. Before installing a new throttle cable, add a few drops of engine oil and run the cable through the sheath to coat the entire cable with oil. This procedure will easily and simply prolong your pleasant driving of the Lada Priora.
9. Install the cable in the reverse order of removal. Do not forget to secure the cable with a new plastic clamp on the crankcase ventilation hose. 10. Adjust the throttle valve drive (remove the spring stopper and, moving the cable sheath, adjust the free play of the cable; after adjustment, install the stopper close to the rubber bushing).
Replacing the throttle cable.
If the throttle valve does not open fully (engine does not develop full power) or closes (high idle speed), first try adjusting the throttle cable.
If by adjusting the throttle valve drive it is impossible to achieve full opening or closing of the throttle valve or the drive sticks, replace the drive cable; You will need: a flat-blade screwdriver, pliers with narrow jaws, side cutters.
1. Remove the decorative engine cover. 2. To replace the throttle drive cable, remove the safety bracket from the throttle assembly sector by prying it with a screwdriver. 3. Remove the cable tip from the sector groove and disconnect the cable from the throttle assembly. 4. Remove the spring stopper and remove the cable from the slots in the holders. 5. Release the cable by using side cutters to cut through the plastic clamp securing the cable to the crankcase ventilation hose. 6. Slide the cable sheath forward and remove the cable sheath damper from the hole in the front panel. 7. In the car interior, under the instrument panel, remove the cable end from the pedal lever pin by sliding it with a screwdriver. 8. Remove the cable into the engine compartment. 9. Install the cable in the reverse order of removal. Do not forget to secure the cable with a new plastic clamp on the crankcase ventilation hose. 10. Adjust the throttle valve drive.
This work does not require specific skills or great technical knowledge about the Lada Priora car, but you will remove one unpleasant malfunction that greatly affects the performance of the Lada Priora engine.
further Removing and installing the fuel frame.
TPS problems and their diagnosis
As you know, eternal parts for cars have not yet been invented. And the breakdown of the TPS can be foreseen; for this you need to inquire about the possible reasons for the failure of this part. Here are the main ones:
- Abrasion of the sprayed base layer, which serves to move the slider (the result is incorrect TPS readings).
- Failure of the movable type core (the result is deterioration of the contacts between the slider and the resistive layer).
How can you figure out problems with this sensor yourself? To do this, you can independently diagnose the operation of your diagnostics:
- Listen to the VAZ-2110 engine idling:
- the breakdown is obvious if you notice that its speed is in a “floating” state;
- Quickly release the gas pedal:
- a malfunction is present if the engine stops after this action.
- Pick up speed:
- There is a problem with the TPS if the car starts to move jerkily, which indicates an incorrect supply of fuel to the system.
Mechanical drive
The first models came with a cable drive. When you press the gas pedal, the force is transmitted mechanically.
The Priora throttle body additionally combines a position sensor for this element of the intake system and an idle speed regulator, which sets the crankshaft speed when the throttle is closed, as well as at the time of starting the engine and while connecting additional electrical equipment: headlights, air conditioning, electric heater motor salon It operates electrically. Which supplies air through the valve, bypassing the damper.
In addition, the housing is part of the crankcase cooling and ventilation system. The Priora throttle body with 16 valves differs from the throttle body of a car with 8 valves by an additional hole on the perimeter of the body on the side of the intake manifold.
Electric drive
Since 2011, cars produced by VAZ began to be equipped with an electronic gas pedal, which led to a change in the design of the Priora throttle valve.
Now the mechanism is driven by an electric motor connected through a gearbox. The idle speed regulator has been removed as unnecessary. The drive is controlled through an on-board computer, which, based on the readings of the damper position sensor, regulates the fuel mixture in the best possible way. The opening size began to depend not only on the accelerator, but also on the clutch and brake pedal. The damper returns to its original position using a return mechanism consisting of a spring.
The electronic drive allows you to maintain a constant engine speed when driving with varying loads, even without driver intervention.
Node location
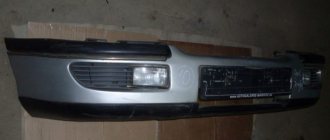
Opening the hood of the Priora, you won’t be able to see the throttle assembly. It is located under a plastic casing that covers the top of the engine. In addition to aesthetic value, it has the function of protecting against a heated valve cover.
After removing the casing, the air supply system will appear. It is a large rubber pipe connected on one side to the air filter box, and on the other to the intake manifold. A Priora throttle valve assembly is installed between them. It looks like an aluminum insert with a plastic black wing in the form of a sector, to which the control cable is connected (in the case of a mechanical drive).
Checking the operation of the throttle position sensor
To check the TPS yourself, it is not necessary to call an auto electrician for consultation. To do this you need a multimeter or voltmeter. Next, experts offer step-by-step instructions for checking the sensor.
The first step is to turn the key in the ignition switch, take the voltage readings between the sensor slider contact and the minus. In normal condition, the indicator will be up to 0.7 V.
The second step is to turn the plastic sector and open the damper, and then take measurements again. In the normal state of the sensor, the device will show a result of 4 V.
The third step is to turn on the ignition completely (as a result of this the connector will stretch out), measure the resistance between the slider and any terminal. When rotating the sector, you must monitor the measuring device:
- when the multimeter or voltmeter needle moves smoothly, the sensor is working;
- when the needle on the meter shows sudden changes, the DPPZ is faulty.
Once the sensor is faulty, it can be adjusted or replaced. The VAZ-2110 car repair service center will tell you how to do the right thing.
The days of carburetor engines for VAZ cars are irrevocably gone; the manufacturer is trying to introduce more and more electronics into engine control systems. On the one hand, this greatly simplifies maintenance and operation. On the other hand, this does not eliminate the need for timely maintenance and especially diagnostics. This fully applies to a rather simple, but extremely important unit - the throttle valve of the VAZ 2110. Its timely diagnosis and care do not take much time, but can save a lot of nerves and money.
Maintenance frequency
Practice shows that the throttle needs to be cleaned at intervals of 40-60 thousand kilometers. The time when such a need arises can be determined by the following signs:
- Unstable speed.
- Long return to idle speed when releasing the accelerator pedal.
- Difficulty starting the engine after a long period of inactivity. Even in warm weather.
- The exhaust gases contain the smell of gasoline, indicating that the mixture is over-rich.
The manufacturer recommends cleaning every 50 thousand km. Owners of the Priora car name different numbers on thematic forums. Some people do not resort to this procedure throughout the entire use of the machine. Much depends on operating conditions: region, timeliness of replacing the air filter.
Let's sum it up
Taking into account the above information, it becomes clear that the throttle valve is an important element of a fuel injection engine. At the same time, it is a mistake to believe that the throttle assembly does not require regular maintenance.
Moreover, although the manual recommends cleaning the damper every 35 thousand kilometers, it is important to make allowances for the operating conditions of the vehicle. As a rule, even in cities, roads in the CIS countries are not clean, and the air is quite heavily polluted. If a car drives on dirt roads, air pollution increases significantly.
It should also be noted that VAZ 2110 car owners often do not install the best air filters. The result is active and rapid contamination of not only the filters themselves, but also the throttle assembly. For these reasons, it is optimal to change the air filter every 15 thousand km, and also clean the throttle valve (at least superficially) every time it is replaced.
It is also necessary every 30-40 thousand km. completely remove the throttle assembly, deep clean it, at the same time clean the sensors and electrical connectors, check the condition of the corrugations, pipes, etc.
Finally, we note that you need to constantly monitor the condition of the throttle and regardless of whether there are any problems with the engine. This approach will allow not only to achieve stable operation of the internal combustion engine, not to lose engine power and not to consume excess fuel, but also to increase the service life of the power unit. “Turn the Engine” is dedicated to one of the greatest blessings of civilization - the piston internal combustion engine. Everything about the operation, service and preventative maintenance of gasoline and diesel internal combustion engines. Useful information on engine and attachment repairs, methods and techniques for carrying out diagnostic procedures. Tuning, engine tuning and competent selection of technical fluids.
How to clean the throttle body yourself
Cleaning the damper is one of the procedures that is easy to do yourself. It takes no more than an hour.
Work is carried out on a cooled engine. Before you begin, you need to prepare wrenches, Phillips and flat head screwdrivers, and carburetor cleaner. To clean the Lada Priora throttle valve, you need to do the following:
- Put the car on the parking brake.
- Disconnect the negative terminal of the battery.
- Remove the plastic protective cover from the engine. To do this, unscrew the oil filler cap. Remove the 4 rubber plugs around the perimeter of the casing. Then unfasten the adsorber valve with a screwdriver and move the wires to the side. After removing the casing, the oil filler cap must be replaced to prevent dirt from entering the engine.
- Disconnect the connectors from the Priora throttle sensor and the idle air control.
- Disconnect the cooling system hoses that heat the damper while the engine is running. Before loosening the clamps, you need to partially drain the coolant. Not completely, but only below the level of the throttle assembly. To do this, you need to open the cap of the expansion tank and, placing a flat container under the radiator, unscrew the radiator cap.
- Disconnect the crankcase ventilation system pipes.
- Loosen the clamp and remove the air pipe.
Before cleaning the part, you must additionally remove the sensors from the housing. This should only be done for a power driven unit. As for the electronic gas damper, a control unit is attached to its body, which does not need to be removed. Moreover, when flushing the carburetor with cleaner, you need to make sure that the cleaning agent does not get on the control unit.
Debugg
If you notice that the throttle has begun to perform its direct duties poorly, do not rush to go to a service station and hand over your money.
The problem with the damper can often be solved with your own hands.
Most often, a problem with the throttle occurs due to contamination, which leads to impaired functionality. To correct the situation, simply clean the element.
When Cleaning Is Required
The practice of "tens" car owners shows that on these cars the throttle becomes clogged literally just a few years after the start of active use of the car.
The biggest “pests” for the damper are particles of oil, dust and gases coming from the engine crankcase.
When the engine is running, dust mixes with air and oil, forming a kind of mixture that enters the throttle valve. Over time, this substance sticks to surfaces and accumulates on the idle rod.
Soon the thermal gap becomes covered with dirt, and access through the idle air regulator channel is significantly deteriorated. If you do nothing, the engine will begin to work incorrectly, the dynamics will drop, and the engine will respond late to pressing the gas pedal.
According to the recommendations in the operating manual for the domestic ten, the damper should be cleaned after every 50 thousand kilometers traveled. If you clean it in a timely manner, the throttle will last much longer and there will be no problems with the operation of the power unit.
Signs of contamination
Problems with the throttle valve can be identified by characteristic symptoms.
| Signs | Explanation |
| Engine has difficulty returning from high to low speeds | This happens when you take your foot off the gas pedal. Instead of a smooth return to the required parameters, the speed literally drops to the 400 rpm mark. The engine may stall and begin to shake. The speed can return to the desired level, but with difficulty |
| The engine is difficult to start when cold and even when operating temperature is reached | To start the engine normally, you need to turn the starter for a long time. You can identify the problem by smell. The characteristic aroma of unburned fuel will come from the exhaust pipe. Try pressing the pedal all the way down several times. This will open the throttle fully, air will flow in, and the engine will start. But in the first few minutes the engine will still stall |
Troubling the motor is a rather indirect sign, since this is how the engine can behave in various types of failure. But don't rule out problems with the throttle.
Cleaning procedure
In most cases, surface cleaning will help if the contamination is not significant. The spray is used to clean carburetors and injectors.
The process for cleaning the VAZ-2110 throttle valve (injector) is as follows:
- Remove the corrugation from the air filter and throttle valve.
- Apply the solution from a spray can to the valve.
- After 5-10 minutes, remove dirt with a brush or clean rag.
- Repeat cleaning if the dirt is not completely removed.
To completely clean the throttle valve of the VAZ-2110, you will need to dismantle it. When carrying out repairs, it is advisable to install a new O-ring and gasket. Cleaning procedure:
- Disconnect the negative terminal from the battery.
- Dismantle all pipes going to the throttle assembly.
- Unscrew the two bolts securing the damper. Remove it for further cleaning. Pay attention to whether the gaskets and o-rings are damaged and what condition they are in.
- Do not damage the sensors during dismantling. Remove them carefully, being careful not to destroy the housing and power wires.
- Spray all surfaces of the assembly, grooves and holes with an aerosol. Wait until the product gets into all hard-to-reach places.
- Wipe the body with a brush or rag. If necessary, repeat the procedure several times. This will allow you to clean the body and internal surfaces as efficiently as possible.
The platinum thread in the air flow sensor often becomes clogged, dust settles on it and interferes with normal operation. It is possible to clean the thread and grill using an aerosol. But you should not touch it with your hands or foreign objects - this will lead to disruption of the sensor. To prevent contamination of the fuel system, change the fuel and air filters promptly. The less dust gets into the mixture, the longer the fuel system elements will last - the VAZ-2110 throttle valve, injectors, air flow sensors, pressure sensors, idle air control.
Preparation
Let's start with the preparatory activities that will ultimately allow you to get to the throttle body and more and clean it properly.
- Remove the casing that is installed on the power unit.
- Unscrew the cap on the expansion tank. This will allow you to relieve excess pressure from the cooling system.
- Slightly loosen the tension on the mounting clamps, then remove the forced ventilation tube.
- Examine the current condition of the air pipe, which should also be removed and, if necessary, replaced.
- If there are significant traces of oil in the pipe, then you can be 100% sure that the throttle is definitely clogged.
- The problem is most likely in the forced ventilation duct. This is explained by the fact that contaminants in the form of gas from the crankcase and oil particles have no other way than through the ventilation branch.
- Next you need to remove the damper heating tubes. To do this, just loosen the clamps with a screwdriver.
- For a while, come up with plugs for them from improvised means - old spark plugs, some kind of non-hollow rubber bands. In short, anything that fits the diameter of the hole.
- Remove the fuel tank ventilation system hose. To do this, you must first unscrew the clamp, remove the cable and unscrew the throttle mounting nuts.
- Be sure to remove the connectors from two sensors - idle speed and throttle position. They are located on the unit being repaired, so there will be no problems with the search.
What you need for cleaning
To remove and clean the assembly you will need:
- Screwdriver Set
- Head "13" with ratchet
- Old toothbrush with stiff bristles
- Cleaner
- Cotton swabs
- Latex gloves
Removing the throttle on a VAZ 2110
So that you do not constantly run for the necessary tool, it is better to say in advance that to perform this procedure you will need the following:
- screwdriver with Phillips and flat blade
- 13mm wrench, or rather a socket head with a ratchet handle
- pliers if necessary
First of all, we open the hood of the car and unscrew the clamping screw of the inlet pipe - this is the same thick corrugated “hose” that goes from the air filter housing to the throttle assembly.
And also the second one - from a thinner hose that comes from the pipe:
Now you can slightly move the pipe to the side so that later, when removing it, it does not interfere with us:
Next, unscrew the three screws that are marked in the photo below:
And the fourth one, which is located below:
If for some reason the upper hoses are difficult to remove, you can use pliers, being very careful not to damage the hose.
Then you need to disconnect the plugs with power wires from the throttle position sensor and the idle speed control. This is clearly shown in the photograph below; more precisely, the result is already visible:
And all that remains is to unscrew only two nuts securing the throttle assembly to the receiver, as shown in the photo below:
We move it to the side and the assembly is removed without any problems:
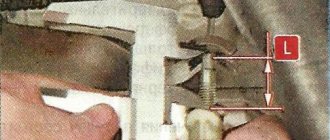
And there are a couple more points - this is disconnecting and removing the throttle control cable. Everything is quite simple here:
- We remove the cable fixing bracket by prying it with a flat screwdriver
- We remove the cable from its engagement with the damper, turning it to the required torque
Cleaning Rules
Before removing and cleaning the throttle valve, you need to buy a special cleaner for it. There are many manufacturers, there is enough choice. Among the inexpensive ones, Abro is effective.
- You need to remove the engine cover (decorative plastic);
- Reduce the pressure in the cooling system by unscrewing the expansion tank cap;
- Loosen the clamps and remove the hose from the forced ventilation air pipe;
- Use a screwdriver to remove the heating hoses for the remote control (it is advisable to plug them for now);
- Disconnect the cable and unscrew the fastening nuts. Now removal of the throttle assembly is possible;
- Use a cleaner to wash everything very thoroughly. Most often, it is necessary to use a needle to check whether the forced ventilation channel is coked, and also to clean it;
- Cleaning is necessary for the idle air regulator, for which it must be removed and inspected. If you find that it is jamming and adjustment is impossible, then it needs replacement;
- After washing, reassemble everything as it was. Please make sure that the gasket is intact and in good condition, then you can leave it. If this is not the case, then only replacement.
Assembly
Installation of the remote control is strictly in the disassembly sequence, only in reverse. A cleaned remote control unit makes engine operation stable at idle, and the engine speed no longer fluctuates. There is a clear response when the gas pedal is operated. Additionally, the throttle assembly may need to be modified, but first study the video on such modifications.
Correction of a factory miscalculation
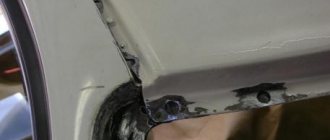
It is quite common for a throttle assembly to come out of the factory with something that cannot even be called a defect, but can still be attributed to design errors. In theory, air should flow into the space behind the throttle, for which a channel of approximately 2.5 mm is specially made.
But the whole problem is that this channel was pressed against the wall of the receiver, thus blocking the possibility of air flow. A slight modification of the throttle assembly can help in this case.
Bored channel for air flow in the throttle
To do this, just take a file and use it to make a small groove in the indicated place. 2 - 3 mm will be enough. But before doing this, it is necessary to remove the throttle.
On a VAZ 2110, the throttle assembly is removed in the following sequence:
- Disconnect the connectors of the sensor that regulates the position of the throttle valve, its drive cable and the XX regulator;
- We partially drain the coolant;
- Next is the removal of the air hose located on the body of the mass air flow sensor. Why do you just need to loosen the clamp;
- We also loosen the clamps: where the throttle pipe is attached to the air hose; where the hose of the 2nd crankcase exhaust circuit is attached to the cylinder head cover pipe. We remove the connected hoses - the air and 2nd crankcase ventilation circuits;
- Having loosened the clamp, remove the hose of the 1st crankcase gas exhaust circuit from the throttle assembly fitting;
- Having loosened the clamps, we remove the hoses supplying and discharging coolant;
- You will need a wrench with a 13mm head, with which you need to unscrew the nuts securing the throttle assembly to the receiver on a VAZ 2110;
- It is now possible to remove the throttle assembly from the studs;
- It remains to remove the sealing gasket and, if your VAZ 2110 has a system that traps gasoline vapors, disconnect the hose for purging the adsorber.
Even if the purpose of removing the throttle was to modify it, still do not forget that for stable operation it also needs periodic cleaning. To be honest, there is nothing complicated in this procedure, but it will help the engine run better, which is quite important.
For cleaning you will need:
- short and long screwdrivers;
- toothbrush (soft, or just old);
- cotton buds;
- cleaning agent;
- rubber or cotton gloves.
For cleaning to give the desired result, it must be carried out very carefully. First, you can go through all the cavities with a toothbrush, at the same time cleaning the idle speed control (it must also be removed). Further, more delicate, cleaning is done with cotton swabs. Pay special attention to the area where the throttle valve is located and the place where the XX regulator fits.
Please note that cleaning the crankcase ventilation duct with conventional means is not possible, but it can be easily done using the foot pump available in each trunk. The diameter of the fitting is similar to the wheel one, you just need to add cleaning agent and pump your foot several times.
If you have problems mentioned at the beginning that started recently, cleaning should fix them. If there were problems from the beginning, do not forget about improvements. Sometimes only replacing the throttle assembly helps.
Important addition
When cleaning the internal cavity, it is not recommended to change the position of the Priora throttle valve with electronic gas, since the drive gears can be damaged. The mechanical damper, on the contrary, can be rotated by the drive, completely opening access to the inside. You can also disconnect the damper from the rotation axis. It is secured with two bolts. However, you need to know how hard to tighten it back. If self-loosening occurs after assembly, the bolts will fall into the combustion chambers of the engine. To prevent this from happening, after finishing the work you need to drive 500 km, disassemble the unit again and tighten the damper fasteners.
After assembly, do not forget to add coolant to the operating level.
Source