Heating system for a Niva Chevrolet car
The automotive heating system of a Chevrolet Niva SUV consists of the main structural elements and components that are responsible not only for heating the interior, but also for cooling it in the summer. The heating system consists of the following elements:
- Heater radiator;
- Control block;
- Heater pipes;
- Coolant pump;
- Compressor;
- Evaporator.
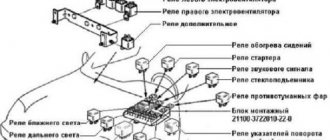
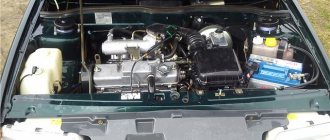
These are the main elements, but there are also small ones such as a resistor and fuse, which are also responsible for the functioning of the stove as a whole. So, we will not consider how the heating system works, but will only analyze the main points that may be the causes of stove malfunctions. The car's heating system is shown in the photo below.
Causes of malfunction
Often, a breakdown of the stove in the interior of a Chevrolet Niva car is not particularly difficult, so to eliminate it, you should know the main reasons, or, more precisely, the components that fail.
So, the following factors can be the causes of stove malfunction:
- Additional resistor malfunction. This resistor is used to control an electric fan that blows hot air directly into the car interior.
- Malfunction of heater pipes.
- Leak at the connections of the pipe and the heater radiator.
- The stove control unit is faulty.
- Heater malfunction.
Let's look at how to eliminate the main causes of stove failure, how repairs are carried out and what you need to know to carry them out.
Resistor - how to fix it?
Initially, you need to make sure that it is the Niva Chevrolet fan resistor that has failed. This can be found out as follows: if, when the ignition is turned on, none of the first three speed positions work, then the problem lies precisely in this small part. The fourth speed will function in this case, since the resistor does not affect its operation.
Checking the resistor for functionality
So, the resistor is responsible for the operation of the fan, or rather for its rotation frequency. By switching the regulator, the resistance changes, directly affecting the speed of the stove fan.
To replace the fan resistor, follow these steps:
- Disconnect the negative terminal from the battery.
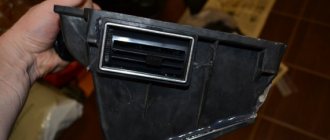
- Inside, you need to loosen the glove compartment clamps and slightly pull it towards you.
- Behind the glove compartment there is a resistor, which is removed by removing the terminal block and unscrewing the screw.
Replacing the resistor is not particularly difficult and will take no more than 5 minutes. After installation, we check for functionality.
Condition of the pipes
Another common malfunction is wear of the pipes (which occurs in rare cases and requires their replacement) or damage to the clamps on them. Coolant (antifreeze) passes through this connection and its leakage is observed over time during operation. You can determine this leak by feeling the carpet in the car interior. If there are traces of coolant or an odor, the products need to be replaced.
You also need to pay attention to the condition of the clamps securing the pipes; perhaps one of them is not tightened, or has been damaged, and because of this, a leak has formed into the interior.
If a product such as a radiator is being replaced, it is recommended to install new pipes together. During operation, they lose their elasticity, and liquid may leak.
Control block
If the heater control unit fails, then it will need to be replaced. The stove control unit is a front panel on which the stove operating mode switches are located.
In the event of a malfunction, this product will require repair, which involves removing the unit and further replacement. Product repair can be entrusted to an experienced electrician, who can determine the exact location of the fault in a matter of minutes and carry out repairs. If you are sure that it is impossible to operate the control unit in the future, then you can replace it with a new one. The process of removing the control unit is simple, but it will take about an hour if you remove it yourself.
Fan
If the stove fan does not work, then you need to check the serviceability of the electric motor. The fan acts as an air blower that enters the car interior. The fan can be repaired, but first it needs to be removed. The extraction process is described in the relevant materials. After removal, the fan is checked from the battery. If the engine is faulty, then it is replaced. You can replace the fan as a whole by first purchasing a new one.
Heater (radiator)
The last element that requires attention if the heater in the cabin does not work is the heater. If the heater radiator becomes clogged, then heater repair is required. To avoid this, it is necessary to fill the radiator not with ordinary water, but with distilled water or antifreeze. The use of powder-based sealants is also not allowed, as they lead to clogging of the radiator honeycomb. In this case, no repair will help and the radiator and heater will need to be replaced.
Thus, starting from the simplest and getting to the most complex moments of stove malfunction, you can notice that small devices (fuse, resistor) often fail. Good luck troubleshooting the stove in your Niva Chevrolet.
The stove Niva 2121 does not work
This modification migrated from the previous Niva
, where I have worked without complaints since 2012, I’m not adding anything new here, even the hoses and clamps are all old.
I got the idea after looking at and testing a similar solution from a person on the Niva forum
with the nickname Captain, who implemented such a system for himself and his friends.
With such a stove, there is no need for a fashionable electric pump from a gazelle
. When I looked, I was simply stunned by what I saw - I arrived on the street -30, while driving in my Niva I was frozen until I was blue in the face, we went up to his friend’s cooled car (2131 crocodile), started it, stood on the street, climbed under the hood, chatted while the engine was warming up, Alexander got into The car turned on the heater, and I went to the passenger door, opened it and the pancake began to warm up from the emanating heat from the passenger compartment. I was simply shocked. I got into the car, closed the door and was even more stunned - I couldn’t hear the stove motor at all. Extremely impressed, almost shouting at the boarding party, I rushed to the store for spare parts, and then to the garage
In preparation for the “white flies” season, I installed a modified stove, and its modification consisted of the following: 1) a significant reduction in noise; 2) increase in fan performance; 3) increased heat transfer from the radiator.
And now first things first. Reducing noise and increasing fan performance is achieved by installing a heater fan from a VAZ2108 in the boot. An increase in heat transfer is achieved by installing a heater radiator from Shniva (it has a larger number of fins because it is designed for a much larger interior volume) and it is free of blunt flange connections and a heater valve from a VAZ 2108 (its flow area is much larger than that of a classic one). For one thing, I decided to install a thermostat from Shniva in order to get rid of the tube that I don’t like that goes from the stove along the block, but this is not all the charms of the Shniva-thermostat, its highlight is that the stove with it heats much better due to the fact that the cooled return The stove entering the thermostat cools its thermoelement, thereby closing it and hotter coolant flows into the stove.
How the heater and cooling fan works in Niva Chevrolet
The movement of air through the heater radiator is carried out by a DC motor . The impeller is installed directly on the rotor shaft, which minimizes power losses. The fan electric motor is securely mounted in a sealed casing, which is located under the windshield of the car, so to repair it, you will need to remove some interior elements.
Attention! The maximum impeller speed can reach 3000 rpm, but only if the original electric motor model is installed.
The operation of the electric heater motor is controlled from inside the car using a special switch.
Additional resistor
To ensure a comfortable temperature inside the car, it is not always necessary to operate the fan motor at full power. To reduce the speed, additional resistance is installed in series in the electrical circuit . This simple but effective method can significantly reduce the intensity of the air flow.
For more precise adjustment, the resistor has 3 resistance values , and given the possibility of direct connection, the rotation of the motor rotor can be set in 4 different speed modes.
The standard product provides the following current indicators , which is directed to the electric motor after passing through the internal spiral of the limiter:
- 5.1 A – first speed.
- 9.0 A – second.
- 14.0 A – third.
Attention! Depending on the type of motor installed, the maximum current at fourth speed can range from 18 to 25 Amps.
The device of the stove of the Niva Chevrolet car
The Chevrolet Niva is equipped with a liquid-type heater. It supplies warm air to the cabin and cools the engine, overheating of which can lead to disastrous consequences and costly repairs.
Without air conditioning
The Chevrolet Niva heating system consists of the following elements:
- ventilation duct;
- windshield heating duct;
- intermediate body;
- air intake filter;
- fan;
- interior heating duct;
- foot heating duct;
- heater radiator.
The intensity of the hot air supply is regulated using dampers. The air duct system distributes the heat flow to various areas of the cabin: windshield, side windows, legs, doors, etc. In addition, there is a four-speed air supply switch.
Heating system for the interior of a Chevrolet Niva car, where 1 is the side deflector air duct; 2 — windshield air duct; 3 - intermediate body; 4 - intermediate air duct; 5 — outside air filter housing; 6 — fan housing of the heating and ventilation system; 7 — central deflector; 8 — air duct for blowing the front passenger’s feet; 9 — facing of control units; 10 — front air duct for blowing the legs of rear seat passengers; 11 — rear air duct for blowing the legs of rear seat passengers; 12 — heater assembly; 13 — air duct for blowing the driver’s feet; 14 - side deflector
With air conditioning
The air conditioning system allows you to regulate the temperature and humidity in the cabin. Before turning on the air conditioner, the heater fan is turned on, and the temperature control knob is set to minimum. Almost the entire air conditioning system is located in the engine compartment. Only the evaporator is brought into the cabin between the heater and the electric motor, providing heat exchange between the incoming air and the refrigerant.
Heater and air conditioner diagram, where 1 - heater housing; 2 — inlet pipe of the heater radiator; 3 — heater radiator outlet pipe; 4 — air conditioner evaporator housing; 5 — evaporator outlet pipe; 6 — evaporator inlet pipe; 7 — fan housing; 8 — control cable for the external air supply damper
As the refrigerant moves through the evaporator tubes, it absorbs heat and turns into a gaseous state. The evaporator fins are cooled, and the fan directs cold air into the cabin and reduces the temperature. Gaseous refrigerant from the compressor under pressure enters the condenser, cools and turns into a liquid state. After this, the liquid is supplied to the receiver, and from it to the evaporator reducer, where it again turns into a gaseous state. A new cycle begins.
Heating and ventilation system components
The heater fan (ME-255) supplies air to the passenger compartment through air ducts. Its rotation speed is controlled by a three-position switch on the panel.
An additional resistor is designed to reduce the fan rotation speed (intermediate rotation speeds).
The heater radiator is installed in the passenger compartment under the panel in a plastic case and serves to transfer heat to the interior.
The heater valve is installed at the inlet of the heater radiator and serves to regulate the flow of antifreeze that passes through it.
The damper control levers serve to distribute air flows that are directed into the cabin, as well as to control the heater tap.
The design of the heater has a number of disadvantages, for example, strong fan noise, as well as its low performance. We'll talk about this and other problems in the improvements section.
Keywords: Niva stove | Niva air ducts
Many people are interested in improvements to the stove on Niva 21213. This interest is associated with the simply disgusting performance of this structural element. If there is a slight frost and there are cotton pants, the problem is practically not felt. Now, at -10°, the windows freeze so much that you begin to feel like a tanker looking at the world through the viewing slit. That’s why drivers are trying to correct the manufacturers’ mistakes and improve the overall good heater. Strictly speaking, nothing special is required for this; almost anyone can cope with this task.
Modifications to the stove on Niva 21213 can be quite different. The simplest option would be to finish up the air ducts. But many go even further and almost completely remodel the stove. It's up to you to decide what to do. Much depends on your love for comfort. Below we will consider the most popular options for converting the heater.
Location of the heater fan on the Niva Chevrolet car
On a Chevrolet Niva car, the heater fan is located in the engine compartment under the cabin filter, slightly below the windshield. A motor is installed under the impeller, which is connected through the fuse box to the on-board network of the machine.
The stove fan occupies a central place in the interior heating system of the Niva Chevrolet car.
If necessary, dismantling the motor can be done in two ways:
- through the hole for the cabin filter, having previously removed the filter itself;
- through the interior, partially dismantling the dashboard.
More often they resort to the first option, since it is less labor-intensive.
On the Chevrolet Niva, the heater fan is located in the car interior under the cabin filter
Replacing the stove radiator
The heating system is quite reliable, but like everything reliable, it comes to its end. Most often it goes to the pipes and taps ; the heater radiator may be the last to leave the distance. Niva VAZ 2121 and its modifications 21213 and 21214 are no exception and problems with the radiator may await them too. Therefore, it is better to prevent a problem than to encounter it in a field on a frosty night.
A sudden cold snap in the Niva’s interior does not mean that something urgently needs to be changed or repaired. For diagnostics, it is not necessary to go to a service station; you can find out everything yourself with a simple set of tools and a head on your shoulders. Actually, the lack of warm air in the air ducts can be the result of several malfunctions:
- air lock in the heating system; clogged air ducts; inoperative or malfunctioning heater motor; clogged heater radiator.
A clogged air intake may come as a complete surprise to the driver. This is especially true for the Niva, which is off-road friendly. Dust, leaves, branches, and other gifts from the forests that are absolutely not needed there can get into the air intake. A faulty heater motor will make itself known immediately, but the radiator will warm up properly, and if it is clogged or leaking, then a replacement is in order.
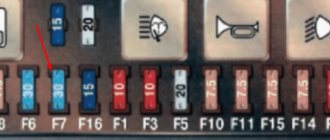
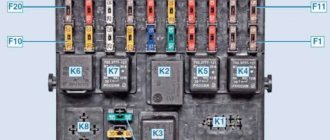
Main block with fuses and relays
This block is located to the left of the steering column and is closed from below with a lid. To get to it, you need to tighten 2 screws, then press the top edge of the cover and gradually free it from all fasteners.
The block that appears will be held on a special bracket. The fuse diagram itself and the number of elements on it may vary depending on the configuration and year of manufacture.
Also interesting: Tuning Niva: 145 photos of ideas on how to improve the VAZ 2121 with your own hands "
photo of the fuse box in a Chevrolet Niva
LADA 4×4 URBAN Niva air conditioner and heater with cabin filter.
You will need: flathead and Phillips screwdrivers.
Also interesting: Installing an alternator belt and air conditioner on a Chevrolet Niva
1. Remove the window handle: remove the latch by prying it with a screwdriver between the latch and the washer.
2. Remove the door handle: take out the plug, prying it off with a screwdriver, and then unscrew the three fastening screws.
3. Remove the inner handle trim: pry it off with a screwdriver.
4. Remove the door trim (depending on the configuration and year of manufacture):
- Unclip the 8 plastic clips around the perimeter (two on each side and four on the bottom).
- Unscrew the door trim fastening screws around the perimeter (phillips screwdriver).
There are slight differences in the process of dismantling the door trim of the new model (different door handle and location of fastening screws).
Procedure:
- Remove the door handle: take out the plug, prying it off with a screwdriver, and then unscrew the two fastening screws.
- Remove the inner handle trim: pry it off with a screwdriver.
- (For rear door trim) Remove the window handle: remove the latch by prying it with a screwdriver between the latch and the washer.
- Unscrew the door lock.
- Unscrew the screws securing the casing (4 on top under the plugs and 3 on the bottom).
- Remove the door trim by unclipping the rivets around the perimeter.
Read news about the new Niva
- Air conditioning Niva Chevrolet - design and repair
- Sound insulation of Lada 4x4 Niva according to the “Premium” option
- Niva tuning: 145 photos of ideas on how to improve the VAZ 2121 with your own hands
- Tuning for VAZ 2131 4×4 (LADA five-door) buy with delivery throughout the Russian Federation
- New Lada Niva 4x4 2021: photo of the interior in a new body, prices and when the updated model will be released
- Do-it-yourself Niva 4x4 tuning: updating the interior of the Lada VAZ-2121
- Tuning the Niva 2121 interior with your own hands: video instructions
- Tuning the VAZ 2121 interior - improving the Niva with your own hands Video
DIY troubleshooting
If the Chevy Niva cooling fan does not turn on, then if you have at least a little experience, you can try to fix the problem yourself. The main advantage of repairs without the involvement of third-party specialists is saving money and time . Also, during the work, other elements and devices that are located at the location of the stove can be checked.
The disadvantages of self-repair may include making serious mistakes , which will lead to failure of not only the products being repaired, but also related parts. In some cases, replacing parts may result in a short circuit and fire in the vehicle.
If, despite all the possible disadvantages, you decide to repair the Chevrolet Niva yourself, then the recommendations below will help minimize the risks and possible damage from unprofessional intervention in the electrical system of the car.
Step-by-step instruction
If the stove fan does not turn on, then first you should check the fuse , which is responsible for the safety of the wiring circuit of this electricity consumer. The Chevrolet Niva relay and fuse mounting block is located under the steering column. To get to it, you will need to unscrew the screws and remove the cover by pulling it towards you.
The location of the fuses inside the block may vary significantly depending on the car model, but in both old and restyled models, the protective device located in cell F18 is responsible for the heater heater. Such a product must operate at a current strength of more than 25 Amperes. You can check the functionality of the fuse with a tester or multimeter.
Attention! When installing a high-power fan motor (25A), the standard fuse is replaced with a product with a response current of 30 Amps.
If the fuse is in good condition, it is possible that the heater fan malfunction is caused by a failed electric motor. To make sure that this part has actually burned out, you will need to dismantle it.
This work is performed in the following sequence:
- Remove the glove compartment. To perform this operation, you will need to unscrew several screws, remove the cover stops and the side casing.
- Unscrew the screws securing the electric motor.
- Disconnect the wires.
- Open the hood and remove the windshield wipers and the panel underneath them.
- Remove the cabin filter.
- Unscrew the four nuts holding the air duct box in place.
- Remove the engine from the engine compartment side.
You can check the electric motor using a multimeter, or by directly connecting it to a 12 V current source. If the motor is faulty, it must be replaced with a new original product or its complete analogue. Otherwise, it is recommended to lubricate the bearing and reassemble the interior heating system in the reverse order of removal.
Attention! If the cabin filter is significantly dirty, it also needs to be changed.
If the heater fan motor constantly runs at maximum speed, then most likely the additional resistor is faulty. As a rule, this part cannot be repaired and you will need to use a new product in order to select the operating mode of the stove. To replace this part, you will also need to dismantle the glove compartment as described above.
Once this part is removed, the work of replacing the resistor is performed in the following sequence :
- Remove the wire terminal block.
- Unscrew the screw securing the resistor.
- Remove additional resistance.
- Install and connect a new product.
- Connect the wires.
- Install the glove compartment.
Attention! Before replacing the additional resistor, it is recommended to check its functionality using a multimeter.
Sometimes the cause of a fan malfunction is a broken motor operating mode switch. The work to resolve this issue is similar to the steps above. If no broken wires are detected, this part is removed and then checked with a multimeter. Even if there is no closed circuit in one of the modes, it is recommended to replace the part.
The duration of operation of the electric motor or other components will depend on the quality of the spare parts used , so it is advisable to use only trusted retail outlets or order parts directly from the manufacturer.
Removing the radiator of the VAZ-2121 stove
The procedure for removing the heater radiator on a VAZ Niva does not require any special skills or abilities. It is important to prepare the necessary materials and tools in advance. Most instructions for repairing car heaters contain a recommendation to drain the coolant before starting work. In practice, many car enthusiasts limit themselves to draining only that part of the antifreeze that is located in the radiator itself and the nearby pipes of the cooling system.
Preparing tools
To replace the radiator, you will need the following tools:
- pliers;
- slotted screwdriver;
- Phillips screwdriver;
- a set of markers for identifying wires;
- spanner set to “7”;
- socket wrench set to “10”;
- socket wrench set to “7”;
- socket wrench set to "10".
Procedure for dismantling the radiator
All operations must be performed in the following sequence:
- Unscrew the left self-tapping screw securing the storage shelf.
The self-tapping screw is unscrewed with a Phillips screwdriver
The right side of the shelf is attached to the upholstery
The central part of the shelf is unscrewed from the front panel
The right edge of the shelf moves down freely
There is a special spike on the left side of the shelf
The lower part of the panel is also fixed with a self-tapping screw
The process is shown on the right side, the left side is similar
The panel is moved to the side
The wire blocks are detached to remove the entire radio panel
After disconnecting the wires, the panel can be easily removed
Loosening the clamp is shown using the example of the lower pipe; a similar operation is performed with the upper
The screws are unscrewed with a socket wrench with a “7” head
The removed seal allows you to remove the radiator pipes from the engine compartment
The fastening nut is unscrewed with a “7” key
The rod is removed from the crane lever
The rod is disconnected from the fan casing
The staples are pryed off with a slotted screwdriver
The casing with the fan is moved to the side
After removing the fan, the radiator is carefully removed from its compartment
The tap and pipes are turned off with a key to “10”
The removed tap is checked for leaks
The bottom nut often falls out and gets lost
Disconnect the outgoing pipe.
The two fastening nuts are unscrewed with a “10” wrench
After dismantling, you should carefully inspect the radiator for blockages in the grille and leaks from the tubes. Based on the results of the inspection, a decision is made on the possibility of repair or installation of a new radiator.
Video: installing a radiator
The process of replacing the heater radiator on a classic Niva has been studied far and wide by many car owners. In fact, the procedure is similar to the entire family of AvtoVAZ classics. However, caution and safety precautions should be observed when working. After completing the repair, before driving on public roads, you must make sure that all components and mechanisms of the vehicle are operating normally. Only then should you begin daily use of the machine.
Furnace Fan Failure Determination
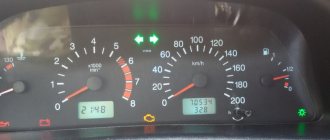
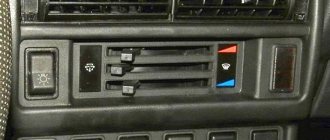
The stove in Niva Chevrolet is switched on from the passenger compartment. The regulator is located on the dashboard. It has four positions . Three of them are designed to switch the heater in different power modes. The fourth is used to turn on the electric motor.
The heater fan turns on the fourth position.
When you put the control in position “1”, then the engine sounds. In addition, its operation must be verified in all other provisions. If this doesn't work, it will need to be replaced.
The main causes of the problem are:
- No battery power.
- The fan power cable is damaged.
- Fuse failure.
- The pre-resistance is faulty. In this case, the fan will not work
only in certain positions. - The ignition does not turn on.
- The fan has reached the end of its service life. This requires a complete replacement.
Due to problems with the connection and winding of the furnace fan.
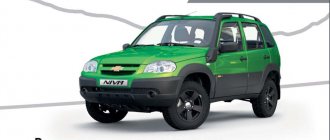
What to do if the Chevrolet Niva stove does not heat well
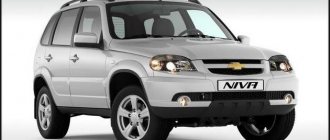
Chevrolet Niva is a spectacular, powerful SUV with a good rear suspension. Very well suited for our constantly repaired roads, trips to the country, to the sea and just for travel. The machine is quite easy to use and is inexpensive to repair. It is indispensable if you live outside the city, it justifies itself as a car for the whole family and is very stable. With the arrival of the autumn-winter period, good and high-quality operation of the heater will be relevant. If the stove does not heat well, the Chevrolet Niva will become a very uncomfortable car, and you will have to forget about its advantages. Moreover, if the car was parked in the garage overnight, it is problematic to be in it and feel the cold comparable to that of a basement. Let's consider the main components of this technological unit of the car:
- radiator;
- fan;
- dampers;
- pipes;
- air duct;
- unit for regulating fluid movement.
The process of improving the operation of the stove on a Niva Chevrolet car
If you are one of those who purchased a car like a Chevrolet Niva, then you may have already encountered the problem of heating the interior. Good operation of the heater is important to maintain an optimal level of comfort for passengers and the driver, as well as to create safe conditions for movement in the vehicle. Unfortunately, sometimes drivers notice that the heat in their Niva Chevrolet is rather weak, so it is not able to provide the conditions expected by the car owner. In this case, it is quite important for you to show increased participation, understand the causes of the malfunction, and also, armed with the necessary information, eliminate all problems.
There is a category of car owners who prefer to redirect all difficulties to the service station specialists. Indeed, by qualified craftsmen, the problem will not only be identified, but also eliminated quickly. However, it is still useful to learn to personally “hear” your car and troubleshoot all problems yourself. This will allow you to get even closer to your “iron friend” and also save money.